Centos7+Mysql8 dual-system hot backup (master-master replication HA) instructions
Centos7+Mysql8 dual-system hot backup (master-master replication HA) instructions
Pang Guoming, 2018-09-13
1.1 Preparation before operation
- Two servers, and the newly installed version of Centos 7.3 at the same time (the same version must be installed);
- If there is an external network link, configure Centos7 to connect to the Internet and install the wget tool. If there is no external network link, skip to "1.2 Centos7 to install mysql";
Configure Centos7 networking
The default networking of newly installed Centos7 is turned off, you can set up the startup networking through the following steps
The first step: [root@localhost ~]# cd /etc/sysconfig/network-scripts/
Step 2: [root@localhost ~]# ls

At this time, you will find that there is no ifcfg-eth0 file mentioned in the tutorial, just open the first one.
It is definitely wrong to create a new tutorial if you can't find it.
The third step: [root@localhost ~]# vi ifcfg-eno167777736
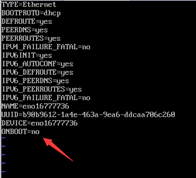
Step 4: Modify ONBOOT to yes, save and exit (refer to how to use vi)
Step 5: [root@localhost ~]# service network restart
Install wget under Centos7
This operation uses Centos's yum source installation, you need to download the rpm package first, so we need to install the wget download tool first
[ root@localhost ~]# yum install wget
A confirmation prompt will be prompted during the installation. Enter y to confirm the installation.
1.2 Install MySQL 8 under Centos7
Note: The same version of mysql must be installed on both servers
Step 1: Check if there is an old version, if there is, delete it
Check old version, command
rpm -qa|grep mariadb
rpm -qa|grep mysql
List all installed rpm package, command
rpm -qa | grep mariadb
Uninstall, command
rpm -e mariadb-libs-5.5.52-1.el7.x86_64
If an error occurs: Dependency check failed:
libmysqlclient.so.18()(64bit) is required by (installed) postfix-2:2.10.1-6.el7.x86_64
libmysqlclient.so.18(libmysqlclient_18)(64bit) is required by (installed) postfix-2:2.10.1-6.el7.x86_64
The solution is to force uninstall, because there is no --nodeps
rpm -e --nodeps mariadb-libs-5.5.52-1.el7.x86_64
Step 2: Download and install MySQL
**Install MySQL8 when there is an external network connection: **
Download and install the official Yum Repository of MySQL
[ root@localhost ~]# wget -i -c https://repo.mysql.com//mysql80-community-release-el7-1.noarch.rpm
Use the above command to directly download the Yum Repository for installation, and then you can directly install it with Yum.
[ root@localhost ~]# yum -y install mysql80-community-release-el7-1.noarch.rpm
After that, install the MySQL server.
[ root@localhost ~]# yum -y install mysql-community-server
Until the prompt install complete mysql installation is complete
Install MySQL8 through the installation package without external network connection
Create the directory before starting, otherwise an error will be reported and the startup will fail
mkdir -p /usr/local/mysql/var
Unzip the installation package
tar -xvf mysql-8.0.12-1.el7.x86_64.rpm-bundle.tar
rpm -ivh net-tools-2.0-0.22.20131004git.el7.x86_64.rpm
Install msyql
rpm -ivh mysql-community-common-8.0.12-1.el7.x86_64.rpm
rpm -ivh mysql-community-libs-8.0.12-1.el7.x86_64.rpm
rpm -ivh mysql-community-client-8.0.12-1.el7.x86_64.rpm
rpm -ivh mysql-community-server-8.0.12-1.el7.x86_64.rpm
Uninstall sequence
rpm -e mysql-community-server-8.0.12-1.el7.x86_64
rpm -e mysql-community-client-8.0.12-1.el7.x86_64
rpm -e mysql-community-libs-8.0.12-1.el7.x86_64
rpm -e mysql-community-common-8.0.12-1.el7.x86_64
Copy the my.cnf file to /etc/
rm -rf /etc/my.cnf
cp my.cnf /etc/
Initialize the system
mysqld --initialize-insecure --user=mysql
Step 3: Start MySQL
[ root@localhost ~]# systemctl start mysqld.service
Check the running status of MySQL, as shown in the figure:
[ root@localhost ~]# systemctl status mysqld.service
The fourth step: Mysql initial configuration
Get the initial password to log in to mysql
mysql will create a root@locahost account after installation, and put the initial password in the /var/log/mysqld.log file;
[ root@localhost ~]# cat /var/log/mysqld.log | grep password

Use the initial password to log in to mysql
mysql -u root -p
Modify the initial password:
ALTER USER 'root'@'localhost' IDENTIFIED BY 'MyNewPass4!';
If you want to set a simple password (such as abc, 123), according to the mysql8 default password policy is not allowed, you can modify the default password policy to achieve this purpose
set global validate_password.policy=0;
set global validate_password.length=4;
1.3 Firewall, iptable settings
Because mysql dual-system hot backup requires mutual remote access to the mysql server, both servers need to open port 3306, or close the firewall directly.
Turn off the firewall: systemctl stop firwalld
Prohibit the firewall from booting up: systemctl disable firealld
The firewall opens port 3306: firewall-cmd --zone=public --add-port=3306/tcp --permanent
Firewall reload setting: firewall-cmd --reload
1.4 Dual-system hot backup (master-master replication HA cluster) configuration
First of all, ensure that the mysql versions of the two servers are the same, and the firewall is open to 3306
Current environment:
A server ip: 172.20.201.23 ready to be the master server master
B server ip: 172.20.201.24 server slave for backup
1.4.1 Build master-slave replication of A—>B
1.4.1.1 Steps
Operate on server A
The first step: Create a user dedicated to backup (execute after logging in to mysql)
CREATE USER 'cp_user'@'172.20.201.24' IDENTIFIED WITH mysql_native_password BY 'master2018!';
GRANT REPLICATION SLAVE ON . TO 'cp_user'@'172.20.201.24';
(Note: the cp_user and master2018! here are the username and password of the master server that need to be used for the backup server configuration for a while, and need to be written down)
**Step 2: Modify the MySQL configuration file: /etc/my.cnf, add the following content:
log-bin=mysql-bin
binlog_format=mixed
server-id=1 //server unique identifier, each server configuration must be saved differently
read-only=0
binlog-do-db=test_db//The name of the database that needs to be backed up is "test_db" (optional)
auto-increment-increment=2 //Set here to use a server for backup, according to personal circumstances
auto-increment-offset=1 //Indicates the serial number of this server, starting from 1, not exceeding auto-increment-increment
//After configuring the database, insert the first data id=1, and the second data id=3 instead of 2, to avoid id conflicts in the database cluster
The third step: After the modification is completed and saved, restart mysql
[ root@localhost ~]# service mysqld restart
The fourth step: execute mysql>show master status\G (see the following information)
The two values of mysql-bin.000002 and 154 need to be remembered to be useful later (the database just installed may be mysql-bin.000001
Now that the master has been configured, the backup service is configured below.
**B server operation: **
The first step: Modify the MySQL /etc/my.cnf file and add the following content:
log-bin=mysql-bin
binlog_format=mixed
server-id=2 //server unique identifier, each server configuration must be saved differently
replicate-do-db=test_db //The name of the database to be synchronized
relay-log=mysql.relay.bin
log-slave-updates=ON
Step 2: After configuration, save the changes and restart the mysql service.
The third step: log in to the mysql server of server B: execute the following command (configure the synchronized primary server)
CHANGE MASTER TO
MASTER_HOST='172.20.201.23',
MASTER_USER='cp_user',
MASTER_PASSWORD='master2018!',
MASTER_LOG_FILE='mysql-bin.000020',
MASTER_LOG_POS=155;
Step 4: Restart the MySQL service of server B: service mysql restart
Step 5: Use the command to view the running status of the mysql slave on the B server. After logging in to mysql, run:
Show slave status\G
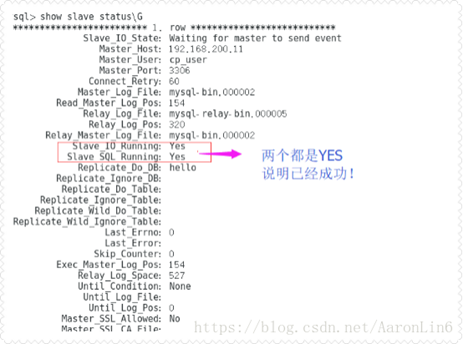
If the Last Error is 0, the configuration is considered correct.
If a connection error occurs, consider turning off the firewall of server A or emptying iptables (iptables -F)
1.4.1.2 test:
Log in to MySQL on the A and B servers and run the following script to create the database test_db;
CREATE DATABASE IF NOT EXISTS test_db default charset utf8 COLLATE utf8_general_ci;
Create a table on server A separately and insert data
USE test_db;
CREATE TABLE user(
id int not null auto_increment,
user_name VARCHAR(50),
password VARCHAR(10) ,
name VARCHAR(50),
status VARCHAR(10) ,
constraint pk__person primary key(id)
);
INSERT INTO user (user_name,password,name,status) VALUES('admin','admin','admin','1');
Go to test_db on server B to see if the same tables and data are synchronized
Synchronized, the master-slave replication of configuration A—>B is complete
1.4.1.3 summary
At this point, the master-slave replication of A—>B is completed
1.4.2 Build master-slave replication of B—>A
1.4.2.1 Steps
It is actually the reverse operation of step 1. Set B (192.168.62.129) as the master server and A (192.168.62.130) as the slave server. The steps are basically the same as above. Among them, the \etc\my.cnf configuration files of the A and B servers can continue to add the master-slave configuration content.
1、 Create a backup user in B
CREATE USER 'cp_user'@'172.20.201.23' IDENTIFIED WITH mysql_native_password BY 'master2018!';
GRANT REPLICATION SLAVE ON . TO 'cp_user'@'172.20.201.23';
2、 Open /etc/my.cnf, open B's binarylog:
The new configuration is as follows:

3、 There is no need to export the initial state of B to synchronize to A, because the initial state of A and B are the same (implemented in step 1), check the master log status.
show master status\G
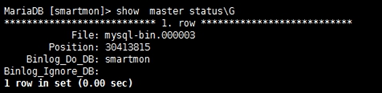
4、 Log in to server A to enable relay relay_log
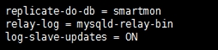
5、 Start synchronization on server A:
CHANGE MASTER TO
MASTER_HOST='172.20.201.24',
MASTER_USER='cp_user',
MASTER_PASSWORD='master2018!',
MASTER_LOG_FILE='mysql-bin.000017',
MASTER_LOG_POS=155;
host is the IP address of B, user and password are backup users created on B, and log_file and log_pos are the master status information seen on B.
6、 Check the slave status on A.
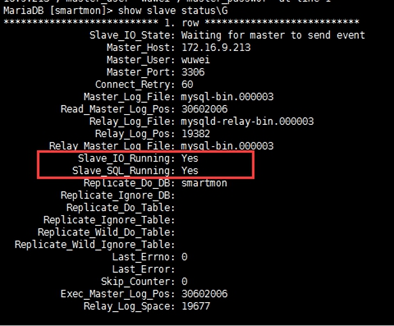
If both the IO process and the SQL process are YES, the synchronization from B to A is successful.
1.4.2.2 test
Add data to the MySQL test_db of either server A or B and the other one is automatically synchronized.
1.4.2.3 summary
At this point, the MySQL dual-system hot mutual backup configuration is complete.