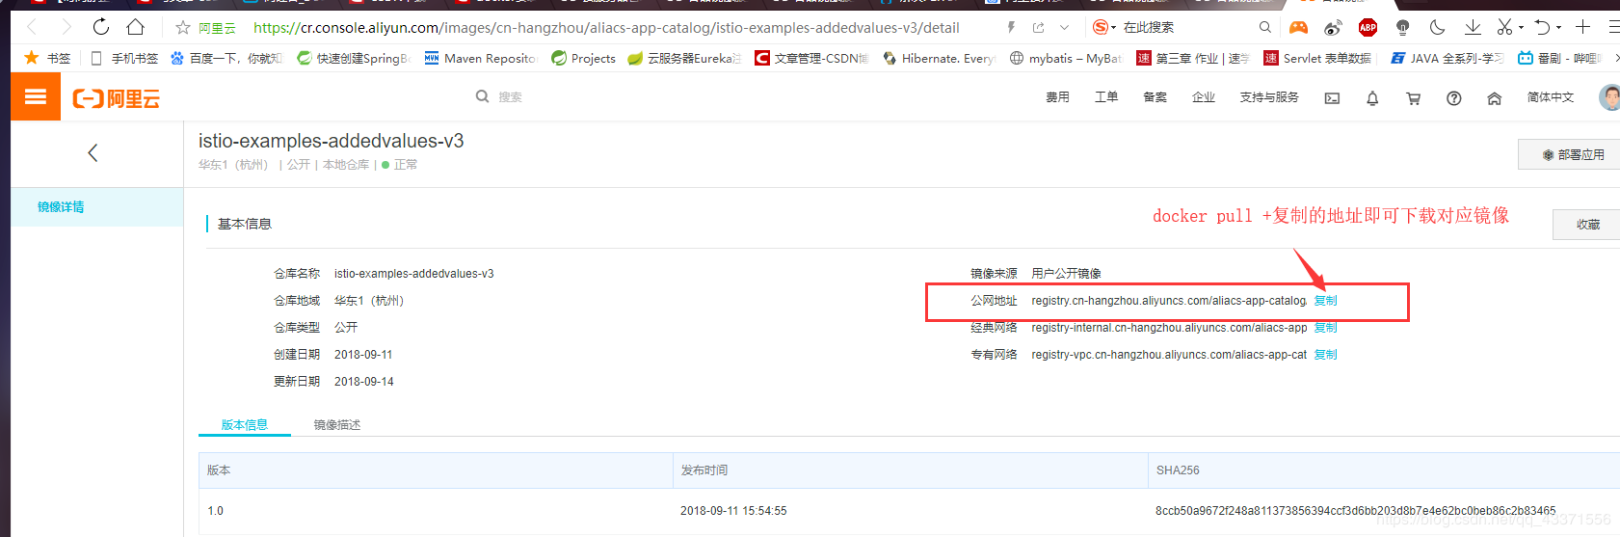
Docker technology (container virtualization technology)
Docker——Container Virtualization Technology###
-
Virtual machine technology and container virtualization technology
-
[ Mirroring command)(https://cloud.tencent.com/developer/audit/support-plan/10575518?from=10680#_159)
-
Usually the CentOS we install into the virtual machine are several G, why docker is only 220M here
-
[1. Direct command addition)(https://cloud.tencent.com/developer/audit/support-plan/10575518?from=10680#1_426)
-
[ Format)(https://cloud.tencent.com/developer/audit/support-plan/10575518?from=10680#_549)
-
[ Step)(https://cloud.tencent.com/developer/audit/support-plan/10575518?from=10680#_866)
Chapter 1 Introduction to Docker#
Birth background##
A product goes from development to launch, from operating system, to operating environment, and to application configuration.
As the collaboration between development + operation and maintenance, we need to care about many things, which is also a problem that many Internet companies have to face.
Especially after the iteration of various versions, the compatibility of different version environments is a test for operation and maintenance personnel.
**The reason why Docker has developed so rapidly is also because it provides a standardized solution. **
The environment configuration is so troublesome, and if you change a machine, you have to do it again, which is laborious and time-consuming.
Many people think, can the problem be solved fundamentally, and the software can be installed with the environment?
In other words, when installing, copy the original environment exactly.
**Developers can use Docker to eliminate the problem of "works on my machine" during collaborative coding. **
Development needs to clearly inform the operation and maintenance deployment team of all configuration files + all software environments used.
However, even so, deployment failures still often occur.
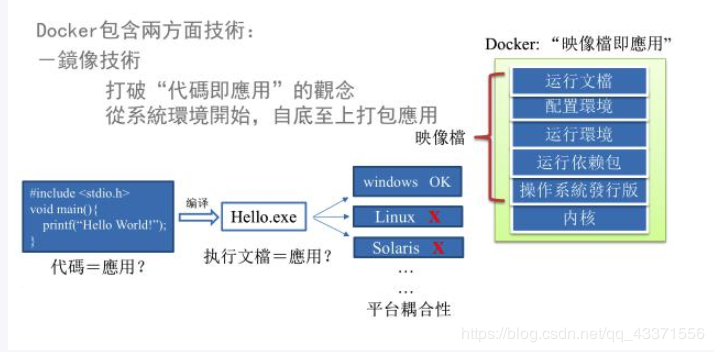
**The design of Docker image allows Docker to break the concept of "program is application" in the past. **** Excluding the core of the operating system through images (images), the system environment needed to run the application **** is packaged from the bottom up to achieve seamless cross-platform operation of the application. **
Docker introduction##
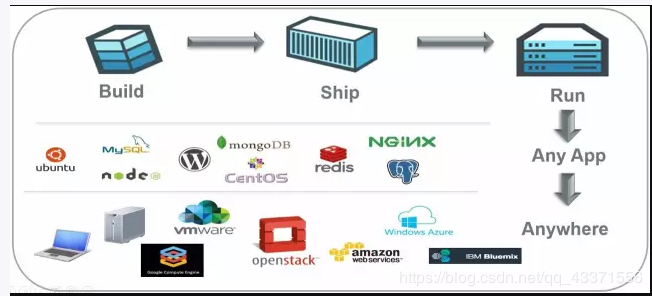
The main goal of Docker is "Build, Ship and Run Any App, Anywhere",
That is, through the life cycle management of application components such as packaging, distribution, deployment, and operation,
**Enable the user's APP (which can be a WEB application or database application, etc.) and its operating environment to be "packaged once, run everywhere". **
The emergence of Linux container technology solves such a problem, and Docker is developed on its basis.
Run the application on the Docker container, and the Docker container is consistent on any operating system,
This achieves cross-platform, cross-server. You only need to configure the environment once, and you can deploy it on another machine with one click. It greatly simplifies the operation
to sum up:
Docker is a software container that solves operating environment and configuration problems, which facilitates continuous concentration and contributes to the overall release of container virtualization technology
Virtual machine technology and container virtualization technology##
Virtual Machine Technology###
Virtual machine (virtual machine) is a solution with environment installation.
It can run one operating system in another operating system**, such as running Linux system in Windows system.
The application has no sense of this because the virtual machine looks exactly like the real system
Disadvantages: 1 more resource usage 2 more redundant steps 3 slow startup
Container Virtualization Technology###
Linux Containers (Linux Containers, abbreviated as LXC).
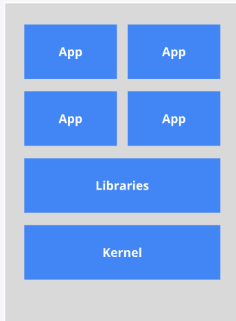
Linux container does not simulate a complete operating system, but isolates processes.
With a container, all the resources required for software operation can be packaged into an isolated container.
Unlike a virtual machine, a container does not need to be bundled with a complete set of operating systems, only the library resources and settings required for software work.
As a result, the system becomes efficient and lightweight and ensures that the software deployed in any environment can run consistently.
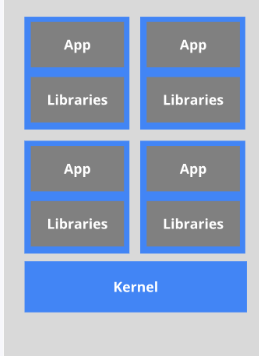
The difference between the two
- Traditional virtual machine technology is to virtualize a set of hardware, run a complete operating system on it, and then run the required application processes on the system;
- The application process in the container runs directly on the kernel of the host (ie: the host, hereinafter collectively referred to as the host). The container does not have its own kernel, and there is no hardware virtualization. Therefore, containers are more portable than traditional virtual machines.
- Each container is isolated from each other, each container has its own file system, processes between containers will not affect each other, and computing resources can be distinguished.
official website###
Official website: https://www.docker.com
Docker community official: https://hub.docker.com/
Chapter 2 Docker Installation#
Docker supports the following CentOS versions: CentOS 7 (64-bit), CentOS 6.5 (64-bit) or higher
Prerequisites##
Currently, only the kernel in the release version of CentOS supports Docker.
Docker runs on CentOS 7 and requires a 64-bit system and system kernel version 3.10 or higher.
Docker runs on CentOS-6.5 or higher, and requires a 64-bit system and a system kernel version of 2.6.32-431 or higher.
# View kernel version
uname -r
Install Docker
Docker installation tutorial (CentOS 7) I installed it successfully
Docker installation tutorial (CentOS 6)
Docker management commands###
# Reload the background startup process
systemctl daemon-reload

# Start the docker container,Shut down the virtual machine every time/Need to start when running the server(important!!!)
sudo service docker start

# View Docker container status
sudo service docker status(should see active(running))

# Run hello-world mirror/Test if Docker can be used
sudo docker run hello-world
Docker underlying principle##
Docker structure diagram##
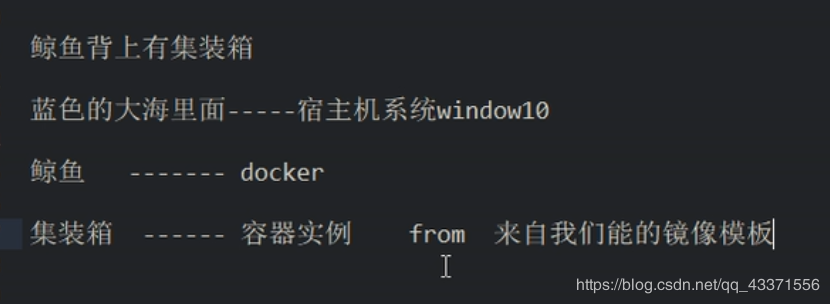
working principle###
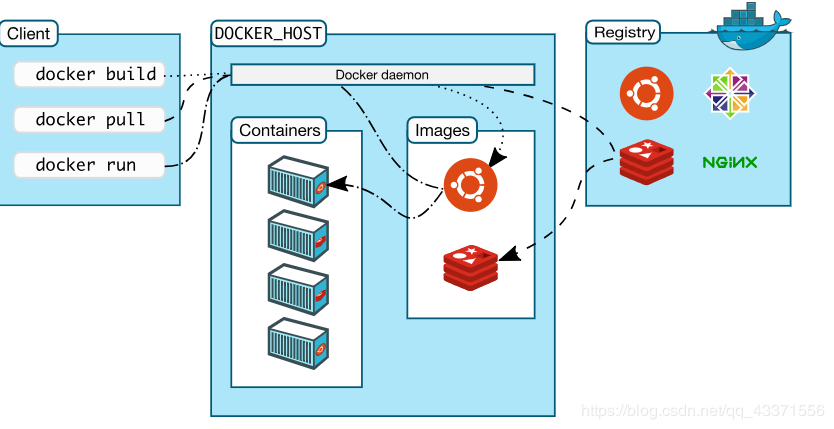
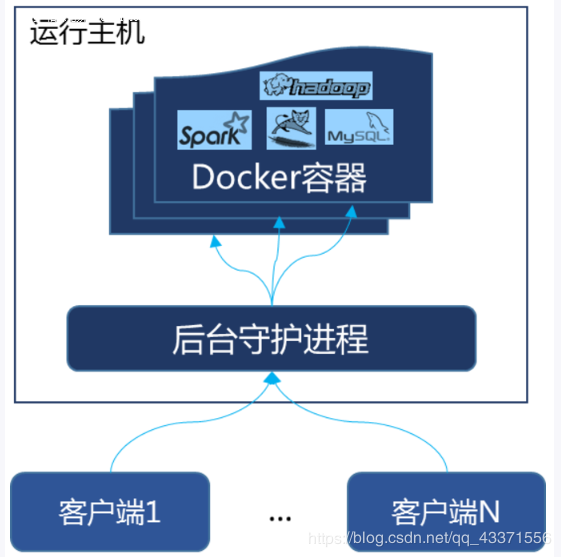
Docker is a Client-Server structure system, the Docker daemon runs on the host,
Then access from the client through the Socket connection, the daemon accepts commands from the client and manages the container running on the host.
A container is a runtime environment, which is the container we mentioned earlier.
Why is Docker faster than VM###
(1) **Docker has fewer abstraction layers than virtual machines. **
Since docker does not require Hypervisor to implement hardware resource virtualization,
The programs running on the docker container directly use the hardware resources of the actual physical machine.
Therefore, docker will have obvious advantages in efficiency in terms of CPU and memory utilization.
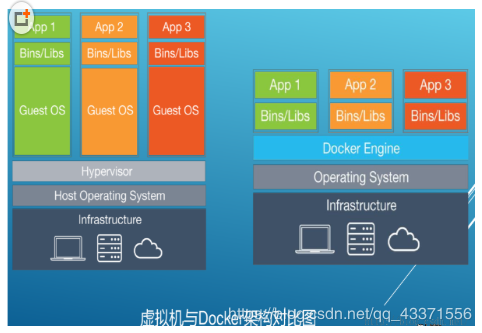
(2) **Docker uses the kernel of the host machine and does not require Guest OS. **
Therefore, when creating a new container, docker does not need to reload an operating system kernel like a virtual machine.
Therefore, avoid the time-consuming and resource-intensive process of searching and loading the operating system kernel.
When creating a new virtual machine, the virtual machine software needs to load the Guest OS. This new creation process takes minutes.
Since docker directly uses the operating system of the host machine, this process is omitted, so it only takes a few seconds to create a new docker container.
Focus on the comparison between the two through the following figure (the figure is very important!!!)
Chapter 3 Docker Common Commands#
Help command##
# View docker version information
docker version

# View all docker installation information
docker info

# View docker help(Most important,Learn to use the help file to learn,This is the only way to become a master!!!)
docker --help
Mirror command##
# 1. List local mirrors(figure 1)
docker images

# option description
 - a :List all mirrors
 - q:Only list the mirror id
 - digests :Display summary information of the mirror
- - no-trunc :Show belief information

# 2. Search for a mirror name(Will search for related mirrors in the docker community,And the Alibaba source we configured just helped us synchronize the mirroring of the docker community,figure 2)
docker search

# option description
	-sDisplay the mirror images whose favorite number is not less than the specified value
 - - no-trunc :Show belief information
 - automated :Only list images of the automated type

# 3. Download mirror(image 3)
docker pull image name:[TAG](If not written, the default is lasted)

# 4. Delete mirror
docker rmi  -f Mirror name/Mirror id
docker rmi -f $(docker images -qa )
Description of each option:
REPOSITORY: indicates the source of the mirrored warehouse
TAG: Mirrored tag
IMAGE ID: Image ID
CREATED: Mirror creation time
SIZE: mirror size
The same warehouse source can have multiple TAGs, representing different versions of the warehouse source. We use REPOSITORY:TAG to define different mirrors.
figure 1

figure 2
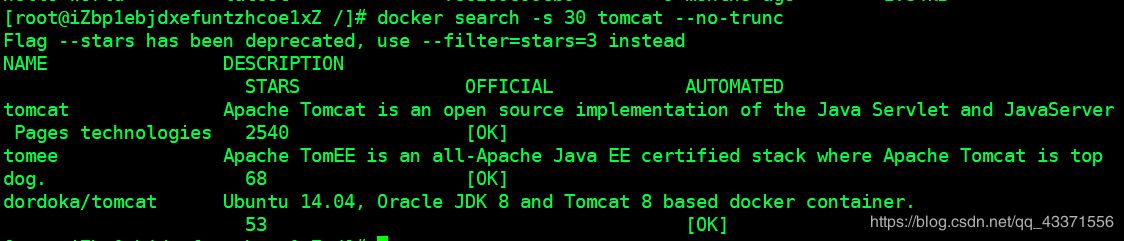
image 3
Container Command##
Basic commands###
# 1. Create and start the container
docker run [OPTIONS] IMAGE [COMMOND][ARGS...]

# OPTIONS description
	--name="Container new name":Specify a name for the container;
	-d:Run the container in the background and return the container ID, that is, start the guardian container;
	-i: Run the container in interactive mode, usually with-t Simultaneous use;
	-t: reassign a pseudo input terminal for the container, usually with-i used simultaneously;
	-P:Random port mapping;
	-p:Specify port mapping, there are the following four formats
	      ip:hostPort:containerPort
	      ip::containerPort
	      hostPort:containerPort
	      containerPort

# eg:Use mirror centos:latest starts a container in interactive mode,Execute in the container/bin/bash command.
docker run -it centos /bin/bash


# 2. Query the currently running container(Viewing process in analogy virtual)
docker ps [OPTIONS]

# OPTIONS description (commonly used):
	-a :List all currently running containers+Ran in history
	-l :Display the recently created container.
	-n: Display the last n created containers.
	-q :Silent mode, only the container number is displayed.
	--no-trunc :The output is not truncated.

# 3. Exit the container
exit Exit after the container stops
ctrl+p+q The container does not stop exiting

# 4. Start the container
docker start container ID/Container name

# 5. Restart container
docker restart

# 6. Stop container
docker stop container ID/Container name

# 7. Forcibly stop the container
docker kill container ID/Container name

# 8. Delete the stopped container(If it doesn't stop,Delete regret stop)
docker rm container ID
Delete multiple containers(Especially the second,Query all running processes first,Then pass it through the pipeline to the subsequent delete operation)
docker rm -f $(docker ps -a -q)
docker ps -a -q | xargs docker rm
Important commands###
# 1. Start the daemon container(Background process)
docker -d container name

# Use mirror centos:latest starts a container in background mode
docker run -d centos

Question: Then docker ps-a to view,You will find that the container has exited
Very important point:Docker container running in the background,There must be a foreground process.
If the commands run by the container are not those that have been suspended (such as running top, tail), they will automatically exit.

This is the mechanism of docker,Such as your web container,Let’s take nginx as an example, under normal circumstances,We configure to start the service only to start the responding service. For example, service nginx start
but,this way,nginx runs in background process mode,It leads to applications that are not running in the docker foreground,
After such a container is started in the background,Will commit suicide immediately because he thinks he has nothing to do.
So, the best solution is,Run the program you want to run as a foreground process
# 2. View container logs
docker logs -f -t --tail container ID

eg :(figure 1)
docker run -d centos /bin/sh -c "while true;do echo hello testLogs;sleep 2;done"
docker logs -tf --tail 10 02c81778b0e0

- t is the time stamp
- f Follow the latest log print
- - tail number shows the last number

# 3. View the processes running in the container(figure 2)
docker top container ID

# 4. View the internal details of the container(image 3)
docker inspect container ID

# 5. Enter the running container and interact(Figure 4)
docker exec -it container ID bashShell

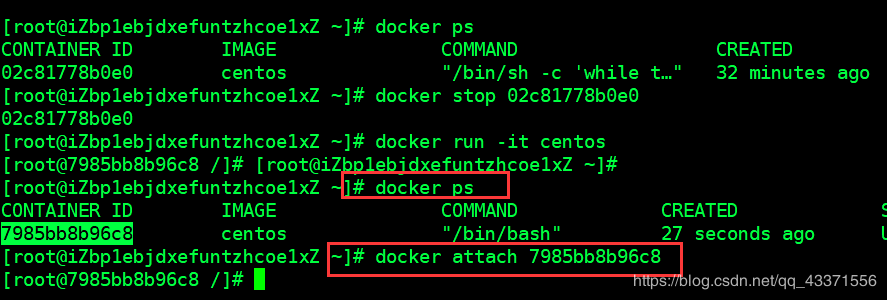
# 6. Re-enter the container(Figure 5)
docker attach container ID bashShell(Default if not written/bin/under bash)

# Compare the difference between 5 and 6
attach directly into the container startup command terminal,Will not start a new thread
exec is to open a new terminal in the container,And can start a new thread
figure 1
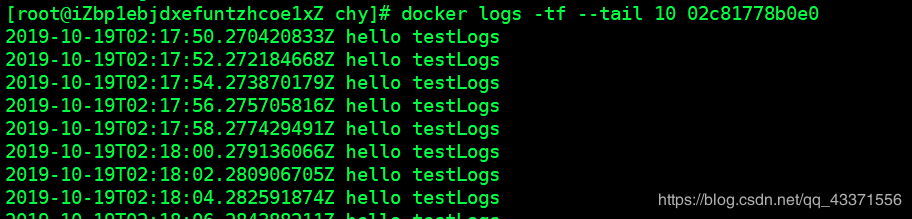
figure 2

image 3
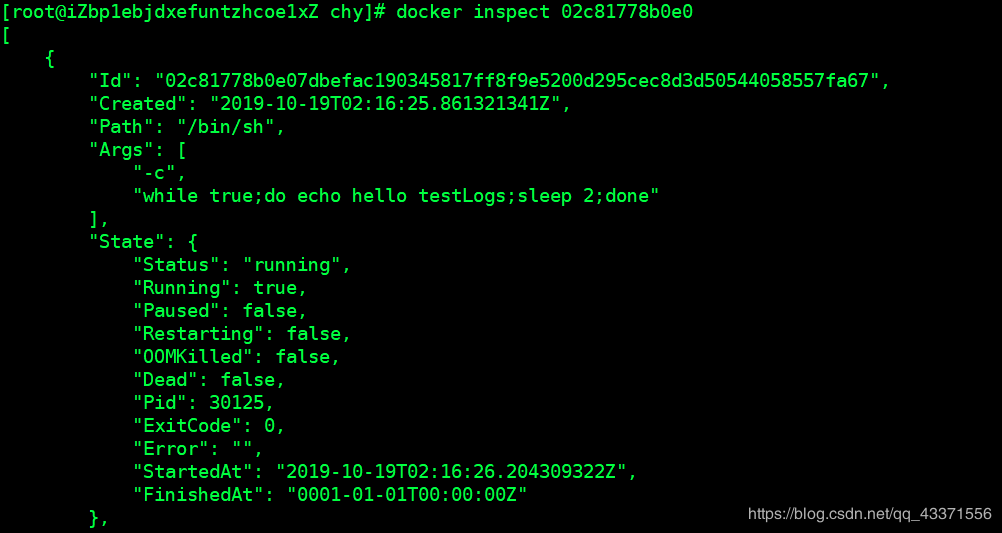
Figure 4
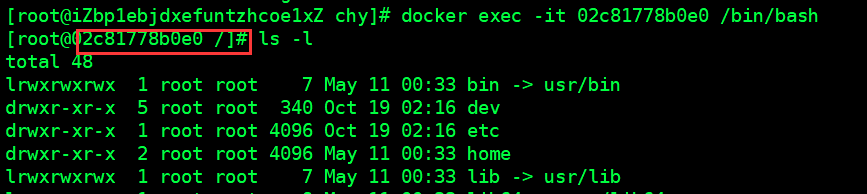
Figure 5
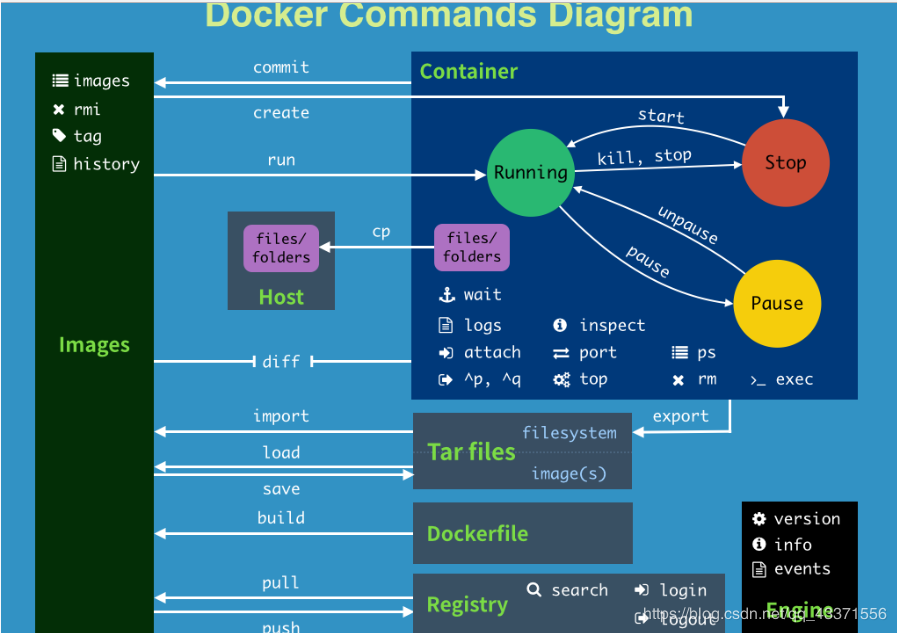
Docker commonly used command diagram##
Chapter 4 Docker Mirror#
Mirror / UnionFS (Union File System)
Union File System (UnionFS) is a layered, lightweight and high-performance file system,
It supports changes to the file system as a submission to overlay layer by layer,
At the same time, different directories can be mounted under the same virtual file system. **Union file system is the basis of Docker image. **
Mirroring can be inherited by layering. Based on the basic mirroring (no parent mirroring), various specific application mirroring can be made.
characteristic
Load multiple file systems at the same time, but from the outside, only one file system can be seen.
Joint loading will superimpose each layer of file system, so that the final file system will contain all the underlying files and directories
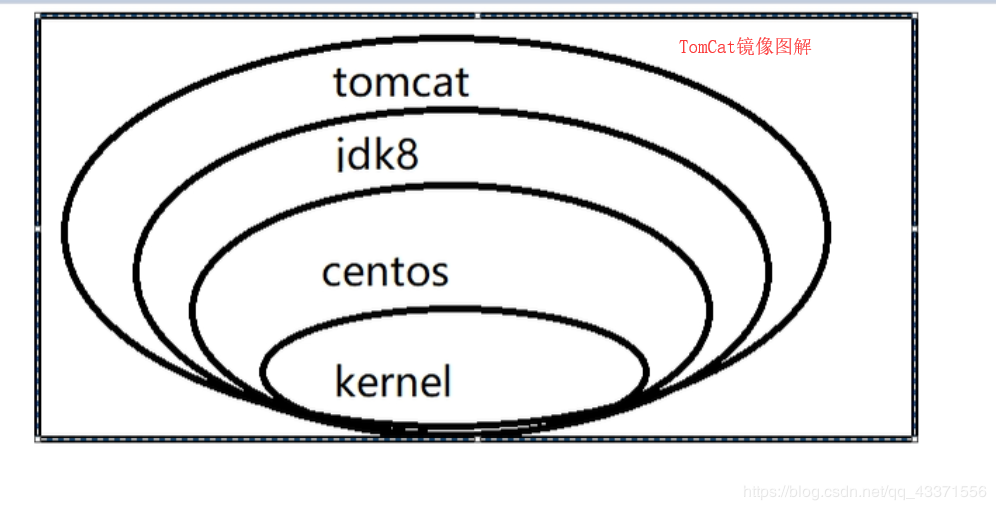
to sum up:
The mirror image is like an onion ring, like a lotus roll, layered on top of one another, only showing one file system to the outside.
Moreover, this layered mirror can also be reused
Features##
Dcoker images are read-only. When the container is started, a new writable layer is loaded on top of the image. This layer is called the "container layer", and the execution of the "container layer" is called " Mirror layer"
Docker image loading principle:
The docker image is actually composed of a layered file system, and this layer of files constitutes the file system UnionFS.
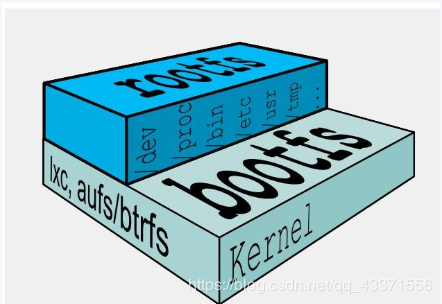
bootfs (boot file system) mainly includes bootloader and kernel. The main function of bootloader is to boot and load the kernel. When Linux starts, it will load the bootfs file system. *The bottom layer of the Docker image is bootfs *.
This layer is the same as a typical Linux/Unix system, including a boot loader and a kernel.
When the boot load is complete, the entire kernel is in the memory. At this time, the right to use the memory has been transferred from the bootfs to the kernel, and the system will also unload the bootfs at this time.
rootfs (root file system), on top of bootfs.
Included are standard directories and files such as /dev, /proc, /bin, /etc in a typical Linux system.
Usually the CentOS we install into the virtual machine are several G, why is docker only 220M here

For a streamlined OS, rootfs can be very small, and it only needs to include the most basic commands, tools, and libraries.
**Because the bottom layer directly uses the Host's kernel, you only need to provide rootfs. **
It can be seen that for different linux distributions, the bootfs are basically the same, and the rootfs will be different, so the bootfs can be shared by different distributions. **
Docker image Commit operation##
# Submitting a copy of the container essentially becomes a new image
docker commit -m="Descriptive information submitted"-a="Author"Container ID The name of the target image to be created:[Label name]

eg:At the same time docker runs tomcat case
# 1. Create an interactive interface(Equivalent to the foreground start)
docker run -it -p 8888:8080 tomcat   #Port mapping uses 8888 as the entrance of docker,8080 mapped to tomcat mirror(figure 1,figure 2)
docker run -it -P  tomcat  #Automatic port mapping(View port through docker ps,image 3)
# Background start(Will not occupy the current page)
docker run -d -p 8888:8080 tomcat

# 2. Enter tomcat(If pre-start,Open another window,Directly enter after starting)
# View running container ID
docker ps
# Enter the root directory
docker exec -it container ID/bin/bash
/usr/local/tomcat# rm -rf webapps/docs/
# Access tomcat after deletion,You can see a 404 appears when accessing the document under the homepage(Figure 4)

# 3. Submit a copy of the container to make it a new image
# View running container ID
docker ps
# Submit container
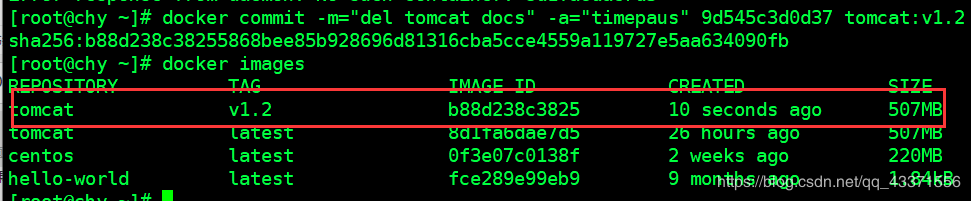
docker commit -m="del tomcat docs"-a="timepaus"Container ID tomcat:v1.2
# View mirror(Figure 5)
docker images

# 4. Start the new image at the same time and compare with the original
You can see that the new image submitted by ourselves has no documentation()
But the tomcat we downloaded again is there
figure 1
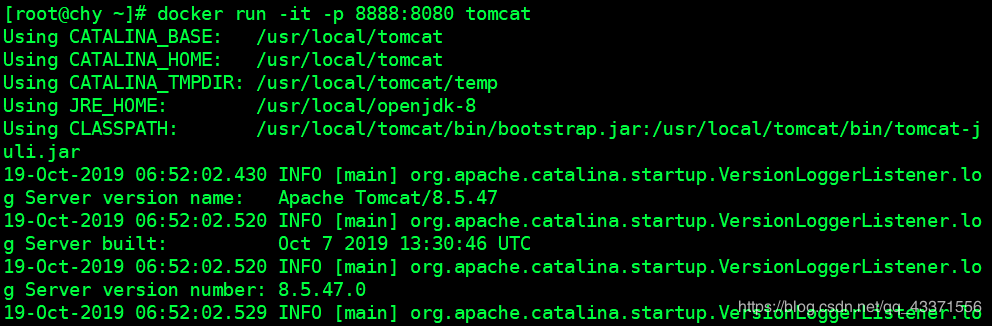
figure 2
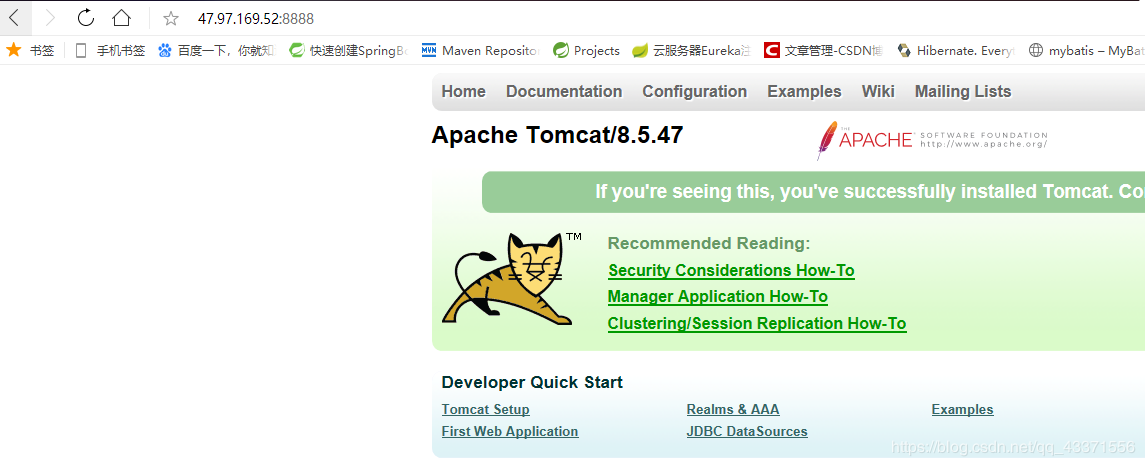
image 3

Figure 4
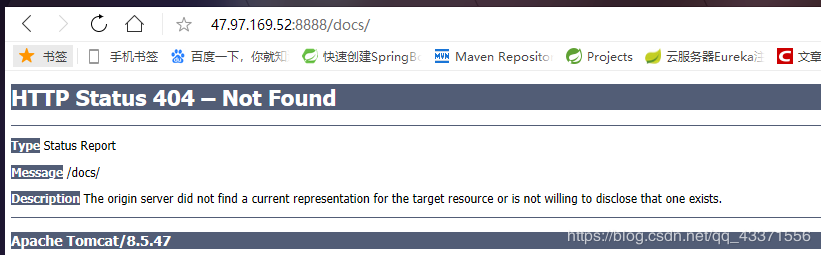
Figure 5
Chapter 5 Docker Container Data Volume#
Introduction##
Similar to the rdb file and aof file in Redis
Used for container persistence and inheritance and sharing data during glory
Add data volume in container##
1. Direct command add
# by-v command directly added(Need to create containerData in the root directory)
# Modifying the containerData in the container after creation will be synchronized to hostData,Vice versa
docker run -it -v /hostData:/containerData image name/ID

# Create read-only file,Only this file can be read in the container,But cannot be modified. ro: readonly
docker run -it -v /Directory of the dead path of the host:/Directory in the container:ro mirror name
2. Docker add
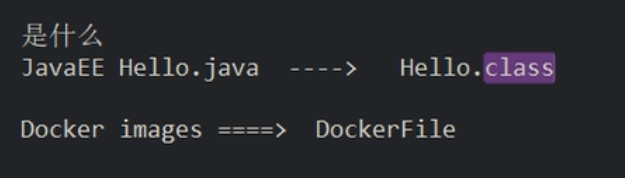
Simple understanding of DockerFile
# 1. Create a mydocker folder in the root directory of the host and enter

# 2. In the mydocker file, I want to create a DockerFile file and edit it,The content is as follows(figure 1)

# volume test
FROM centos
VOLUME ["/dataVolumeContainer1","/dataVolumeContainer2"]
CMD echo "finished,--------success1"
CMD /bin/bash

Description:
For portability and sharing considerations, use-v Host directory:The container directory method cannot be implemented directly in the Dockerfile.
Since the host directory is dependent on a specific host, there is no guarantee that such a specific directory will exist on all hosts.

3. Use the docker build command to create a mirror,And mount the specified file on the specified host
docker build -f /mydocker/DockerFile -t the new image name defined

4. View mirror
docker images

5. Run a new image
docker run -the new image ID defined by it/bin/bash

6. View through the container ID generated after the image is run(figure 2),Data volume address mapped by the corresponding host
docker ps
docker inspect container ID

7. Test whether the added volume and the host are interoperable
Create a file in the container,See if the corresponding file is created in the host

note:Docker mount host directory(Step 3)Docker access appears cannot open directory.: Permission denied
Solution: add one more after the mounted directory--privileged=true parameter
figure 1
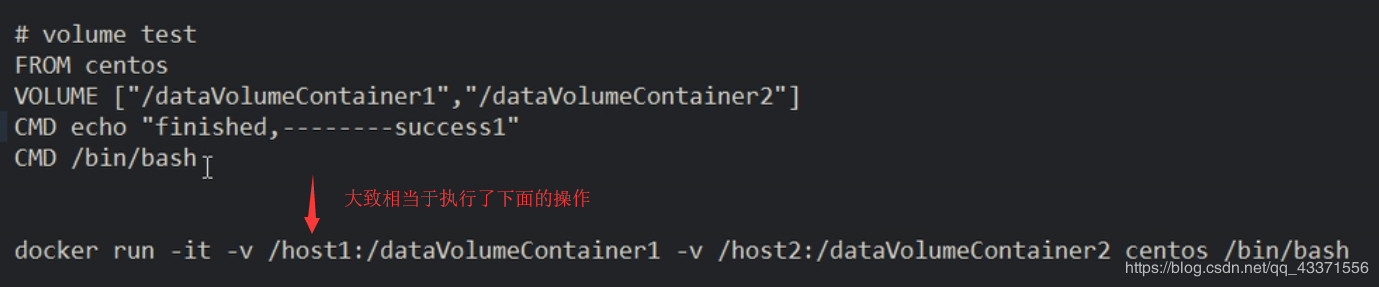
Figure 2, View information about the running container id docker inspect container ID

Comparison and summary
Data Volume Container##
The named container mounts the data volume, and other containers realize data sharing by mounting this (parent container),
The container where the data volume is mounted is called the data volume container
Implementation steps
# 1. The image built in the previous step is a template,First start a parent container dc01,Create a file in the data volume folder where the container is created(figure 1)
docker run -it --name 	dc01 zzyy/centos
touch dc01_add.txt

# 2. Create sub-container dc02,dc03 inherited from dc01,Create a file in the data volume folder where the container is created(figure 2)
docker run -it --name dc02 --volumes-from dc01 zzyy/centos
touch dc02_add.txt
docker run -it --name dc03 --volumes-from dc01 zzyy/centos
touch dc01=3_add.txt

# 3. Go back to dc01 and you can see that all the data is shared(image 3)
# 4. Delete dc01,Is dc03 accessible after dc02 modification,can(Figure 4)
# 5. Delete whether dc02dc03 is accessible,can(Figure 5)
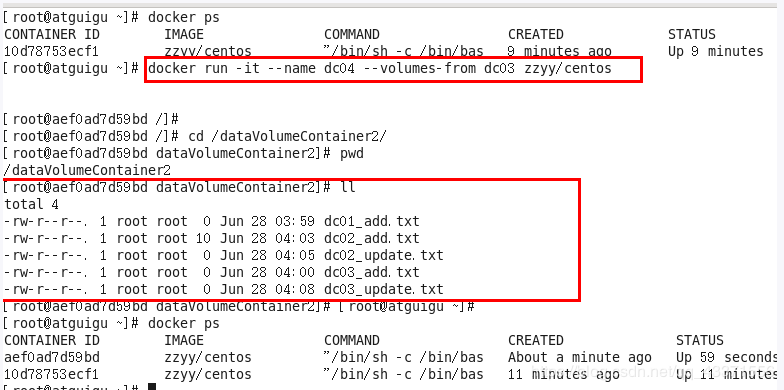
# 6. Whether the new dc04 inherits dc03 can be accessed,can(Figure 6)

in conclusion
Transfer of configuration information between containers,The life cycle of the data volume lasts until no container uses it
figure 1
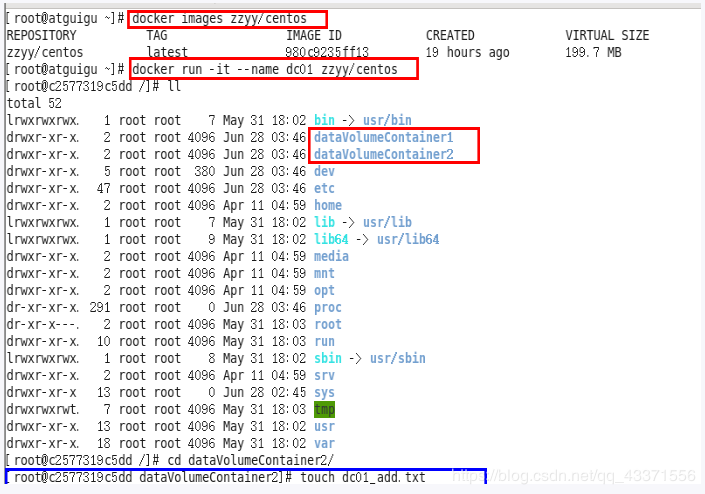
figure 2
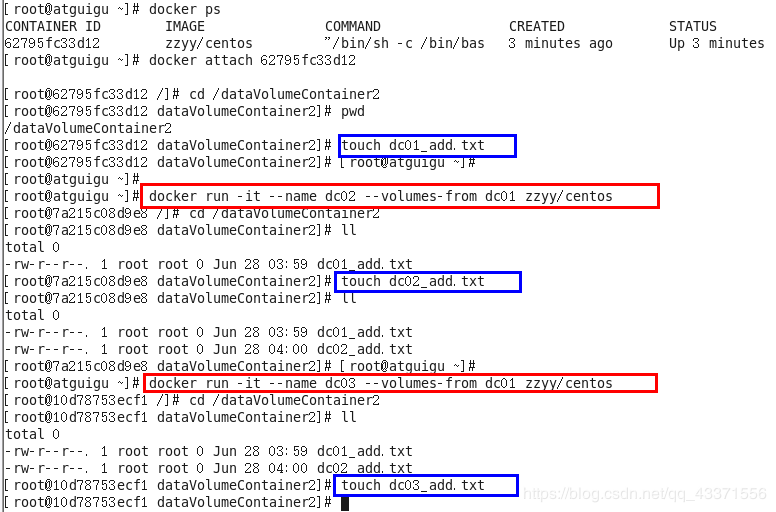
image 3
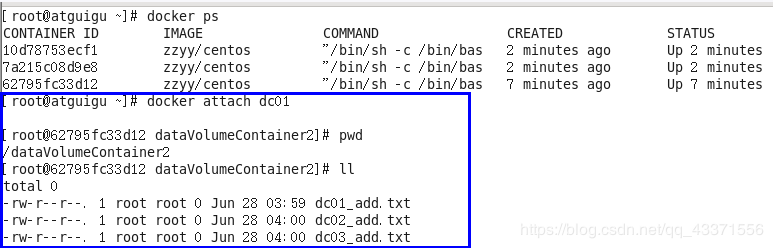
Figure 4
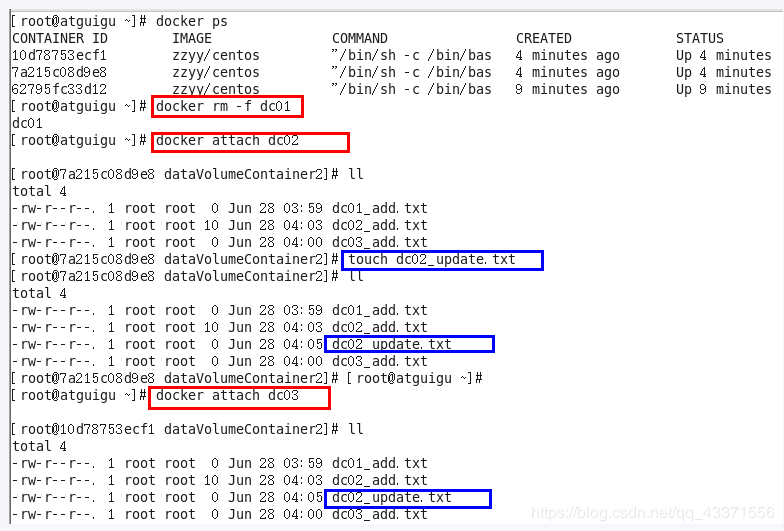
Figure 5
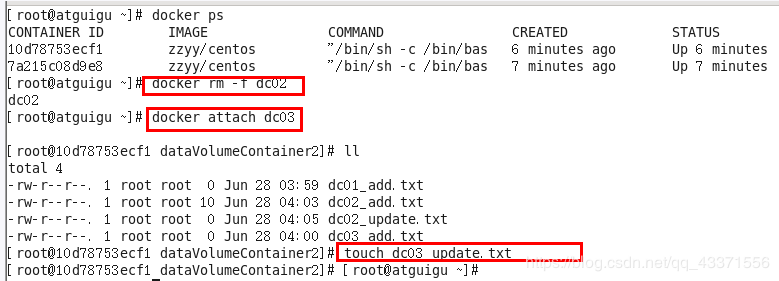
Figure 6
Chapter 6 DockerFile Analysis#
Introduction##
Dockerfile is used to build a Docker image file, a script composed of a series of commands and parameters
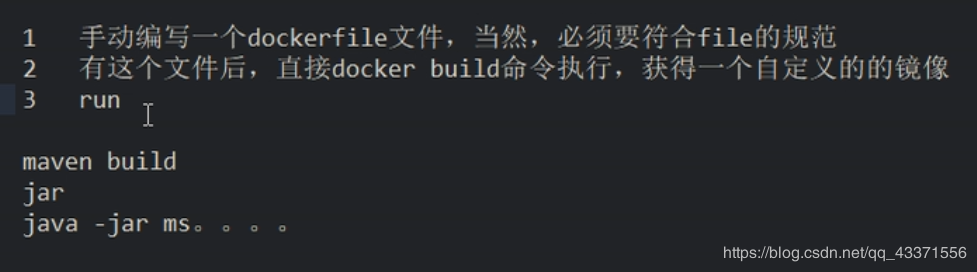
Build steps##
- Write Dockerfile
- docker build
- docker run
format###
Take the centos file as an example
FROM scratch
ADD centos-8-container.tar.xz /

LABEL org.label-schema.schema-version="1.0" \
 org.label-schema.name="CentOS Base Image" \
 org.label-schema.vendor="CentOS" \
 org.label-schema.license="GPLv2" \
 org.label-schema.build-date="20190927"

CMD ["/bin/bash"]
grammar###
- Each reserved word command must be a thank you letter and be followed by at least one parameter
- Instructions are executed in order from top to bottom
-
Indicates a comment
- Each instruction will create a new mirror layer and submit it
The general process of Docker executing DockerFile###
- docker runs a container from the base image
- Execute an instruction and make changes to the container
- Perform an operation similar to docker commit to submit a new mirror layer
- docker runs a new container based on the image just submitted
- Execute the next execution in the dockerfile until all instructions are completed
From the perspective of application software, Dockerfile, Docker image and Docker container represent three different stages of software.
- Dockerfile is the raw material of software
- Docker image is a software deliverable
- Docker container can be considered as the running state of software.
Dockerfile is for development, and Docker image becomes the delivery standard.
Docker containers involve deployment and operation and maintenance. The three are indispensable, and they work together to serve as the cornerstone of the Docker system.
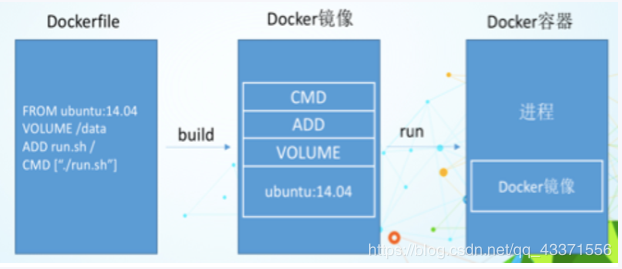
1 Dockerfile, you need to define a Dockerfile, Dockerfile defines everything the process needs. The content of Dockerfile includes executable code or files, environment variables, dependent packages, runtime environment, dynamic link library, operating system release, service process and kernel process (when the application process needs to deal with system service and kernel process, this Need to consider how to design namespace access control) and so on;
2 Docker image, after defining a file with Dockerfile, a Docker image will be generated during docker build. When the Docker image is run, it will really start to provide services;
3 Docker container, the container provides services directly
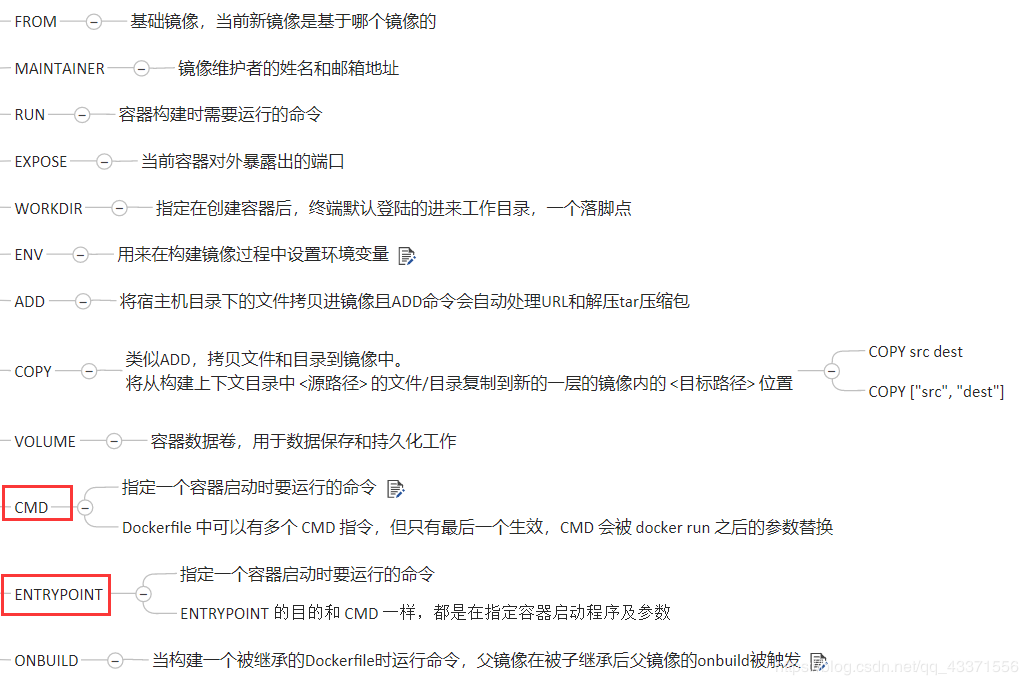
DockerFile reserved word instructions##
View tomcat's DockerFile file to better understand reserved words
Case of reserved words integration###
Custom Mirror####
The lite version of centos we installed is not supported by vim and ifconfig commands
We can support these functions by writing Dockerfile
# 1. Search centos mirror and download
docker search centos
docker pull centos

# 2. Write to create a file(/mydoker/dockerfile_centos ),Write Dockerfile,The content is as follows
--------------------------------------------------------------------
FROM centos
MAINTAINER timepause<[email protected]>

ENV MYPATH /usr/local
WORKDIR $MYPATH

RUN yum -y install vim
RUN yum -y install net-tools

EXPOSE 80

CMD echo $MYPATH
CMD echo "install vim and ifconfig commond plug-in components success"
CMD /bin/bash
-----------------------------------------------------------------------

# 3. Compile and run centos(Pay attention to the final space and dot,figure 1)
docker build -f /mydoker/dockerfile_centos -t mycentos:1.3.

# 4. Test function(figure 2)
# Check whether to add a mirror
docker ps
# Run a new image
docker run -it mycentos:1.3
# Use vim and if config commands in the container
figure 1
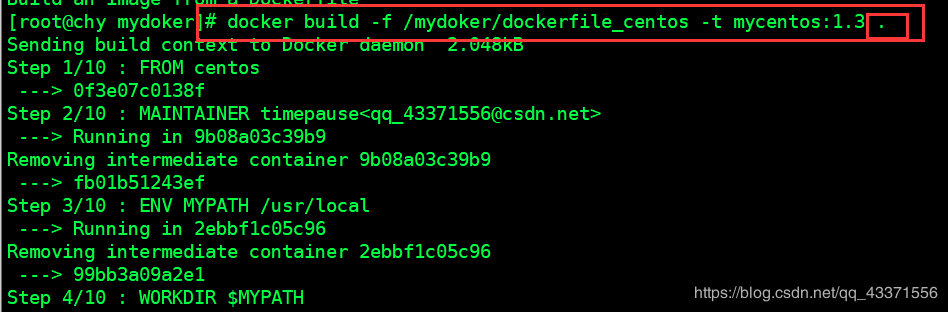
figure 2
Custom tomcat9
# 1. Create a directory to store the generated image files
mkdir -p /myuse/mydocker/tomcat9
# 2. Create related files(c.txt for testing)
touch c.txt
# 3. Upload tomcat and jdk(Be sure to pay attention to the version,Modify the Dockerfile file according to the version,figure 1)
#.4. Create and edit Dockerfile(Need to download centos in advance)
vim Dockerfile
- - - - - - - - - - - - - - - - - - - - - Dockerfile-------------------------------
FROM centos
MAINTAINER chy<[email protected]>
# Put the host's current context c.txt copied to the container/usr/local/Under path
COPY c.txt /usr/local/cincontainer.txt
# Add java and tomcat to the container
ADD jdk-8u11-linux-x64.tar.gz /usr/local/
ADD apache-tomcat-9.0.27.tar.gz /usr/local/
# Install vim editor
RUN yum -y install vim
# Set the WORKDIR path for work visits, and log in the foothold
ENV MYPATH /usr/local
WORKDIR $MYPATH
# Configure java and tomcat environment variables
ENV JAVA_HOME /usr/local/jdk1.8.0_11
ENV CLASSPATH $JAVA_HOME/lib/dt.jar:$JAVA_HOME/lib/tools.jar
ENV CATALINA_HOME /usr/local/apache-tomcat-9.0.27
ENV CATALINA_BASE /usr/local/apache-tomcat-9.0.27
ENV PATH $PATH:$JAVA_HOME/bin:$CATALINA_HOME/lib:$CATALINA_HOME/bin
# The port that the container is listening on when it is running
EXPOSE 8080
# Run tomcat at startup
# ENTRYPOINT ["/usr/local/apache-tomcat-9.0.8/bin/startup.sh"]
# CMD ["/usr/local/apache-tomcat-9.0.8/bin/catalina.sh","run"]
CMD /usr/local/apache-tomcat-9.0.27/bin/startup.sh && tail -F /usr/local/apache-tomcat-9.0.27/bin/logs/catalina.out
- - - - - - - - - - - - - - - - - - - - - Dockerfile-------------------------------
# 5. Build image(In the directory where these files are stored,figure 2)
# If the Dockerfile file name is Dockerfile,Parameters can be omitted-f /Writing where Dockerfile is located
docker build -t mytomcat9 .
# 6. View the image and run the image(image 3)
docker images
# Run mirror(Background start,Figure 4 after success)
docker run -d -p 8080:8080--name myt9 -v /myuse/mydocker/tomcat9/test:/usr/local/apache-tomcat-9.0.27/webapps/test -v /myuse/mydocker/tomcat9/tomcat9logs/:/usr/local/apache-tomcat-9.0.27/logs --privileged=true mytomcat9
# Note that the mapping of the container volume is configured here,The test folder of the host machine is mapped to the test file in the tomcat webapps directory,And the two can communicate with each other.
docker exec -it container ID/bin/bash #Enter the container root directory,Can visit related pages
# 7. After successful visit,Add jsp file and web.xml file( a.jsp is used to access the test,web.xml is used to make jsp pages compile)
vim a.jsp
mkidr WEB-INF
vim /WEB-INF/web.xml
- - - - - - - - - - - - - - - - - - - - - - - - - - - - - - - - - - - - - - - - - - a.jsp---------------------------<%@ page language="java" contentType="text/html; charset=UTF-8" pageEncoding="UTF-8"%><!DOCTYPE html PUBLIC "-//W3C//DTD HTML 4.01 Transitional//EN""http://www.w3.org/TR/html4/loose.dtd"><html><head><meta http-equiv="Content-Type" content="text/html; charset=UTF-8"><title>Insert title here</title></head><body>-----------welcome------------<="i am in docker tomcat self "%><br><br><% System.out.println("=============docker tomcat self");%></body></html>------------------------------------------a.jsp---------------------------------------------------------------------web.xml-----------------------------------<?xml version="1.0" encoding="UTF-8"?><web-app xmlns="http://xmlns.jcp.org/xml/ns/javaee"
xmlns:xsi="http://www.w3.org/2001/XMLSchema-instance"
xsi:schemaLocation="http://xmlns.jcp.org/xml/ns/javaee
http://xmlns.jcp.org/xml/ns/javaee/web-app_4_0.xsd"
version="4.0"
metadata-complete="true"></web-app>------------------------------------------web.xml-----------------------------------
# 8. Restart service,Visit a.jsp(Figure 5)
# View the current container id
docker ps(View the current container ID)
docker ps -a(View all container IDs that have been run)
# Restart service
docker restart container ID
# Visit a.jsp page
figure 1

figure 2
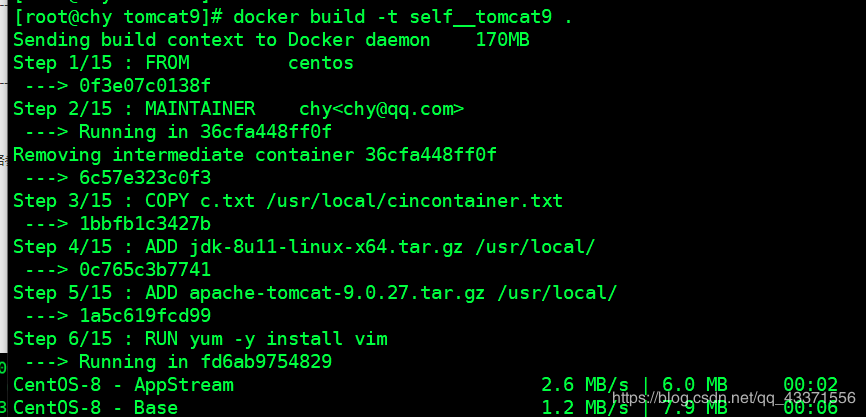
image 3
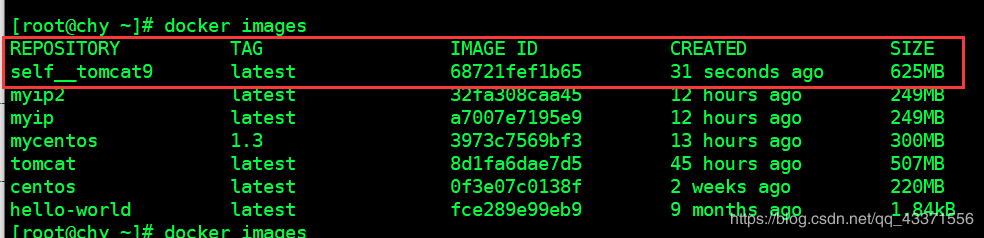
Figure 4
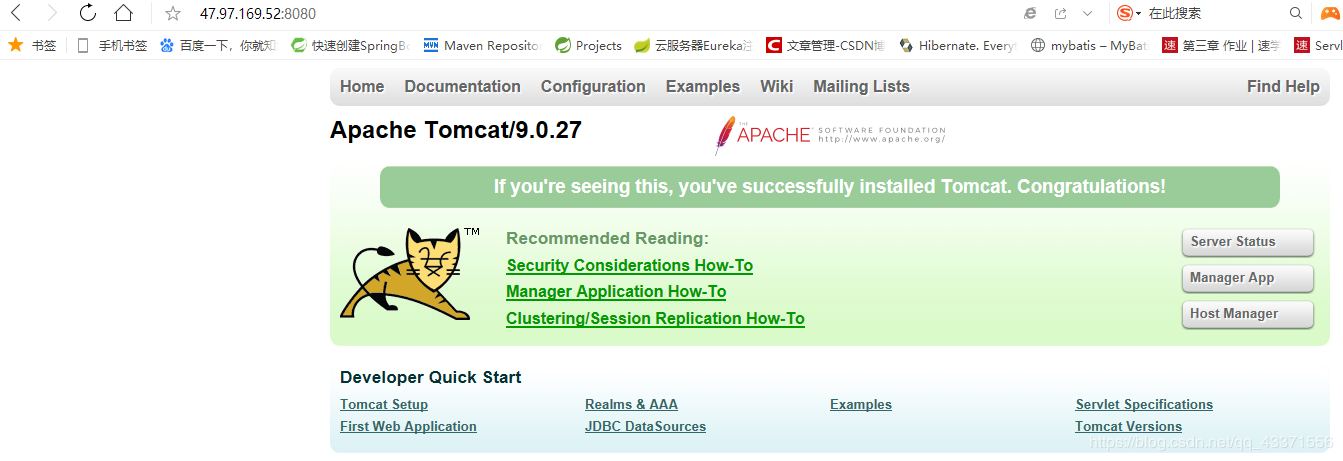
Figure 5
Chapter 7 Install Software via Docker#
MySQL
# 1. To install mysql5.6 as an example(Don't know why 5.7 won't come)
docker pull mysql:5.6

# 2. Run mirror,Start the container(Port 3306,root user password:root,Run mirror:mysql5.6)
docker run -p 3306:3306--name mysql -v /datebase/mysql/conf:/etc/mysql/conf.d -v /datebase/mysql/logs:/logs -v /datebase/mysql/data:/var/lib/mysql -e MYSQL_ROOT_PASSWORD=root -d mysql:5.6

# 3. Enter msql internal test login
docker ps
## Enter the current directory of mysql
docker exec -it MySQL container ID after running successfully/name     /bin/bash
## Enter account password
mysql -u account-p(Then enter the password as prompted)

# 4. Graphical interface to connect to the database

# 5. Backup database data,Then we can restore the data by directly reading this sql file
docker exec myql service container ID sh-c ' exec mysqldump --all-databases -uroot -p"root" '>/datebase/all-databases.sql
Redis
# 1. Download the latest version of redis mirror
docker pull redis

# 2. Run mirror(redis port 2333,-Redis after d does not add parameters and defaults to redis:latest)
# Note the correspondence between the local data volume and the data volume directory in the container
docker run -p 2333:6379-v /myuse/myredis/data:/data -v /myuse/myredis/conf/redis.conf:/usr/local/etc/redis/redis.conf  -d redis redis-server /usr/local/etc/redis/redis.conf --appendonly yes

# 3. Upload redis.conf to the directory where the local data volume is located
The local data volume sits in the directory:/myuse/myredis/conf
File address(too big,Can't put it here): https://download.csdn.net/download/qq_43371556/11889084

# 4. Cil running redis----shell command line
docker exec -it is the container ID redis running the Rediis service-cli
# Connect to docker redis remotely
docker exec -it redis_s redis-cli -h 192.168.1.100-p 6379-a your_password //Use if there is a password-a parameter
RabbitMQ
# 1. Download mirror
docker pull rabbitmq:3.7.7-management

# 2. Run mirror
docker run -d --name rabbitmq3.7.7-p 5672:5672-p 15672:15672-v `pwd`/data:/var/lib/rabbitmq --hostname myRabbit -e RABBITMQ_DEFAULT_VHOST=/-e RABBITMQ_DEFAULT_USER=admin -e RABBITMQ_DEFAULT_PASS=admin df80af9ca0c9

- d Run the container in the background;
- - name specifies the container name;
- p Specify the port on which the service runs (5672: application access port; 15672: console web port number);
- v Map directories or files;
- - hostname host name (an important note of RabbitMQ is that it stores data according to the so-called "node name", which is the host name by default);
- e Specify environment variables; (RABBITMQ_DEFAULT_VHOST: Default virtual machine name; RABBITMQ_DEFAULT_USER: the default user name; RABBITMQ_DEFAULT_PASS: the password of the default user name)

# 3. access(As shown below)
http://ip:15672
account number:admin
password: admin
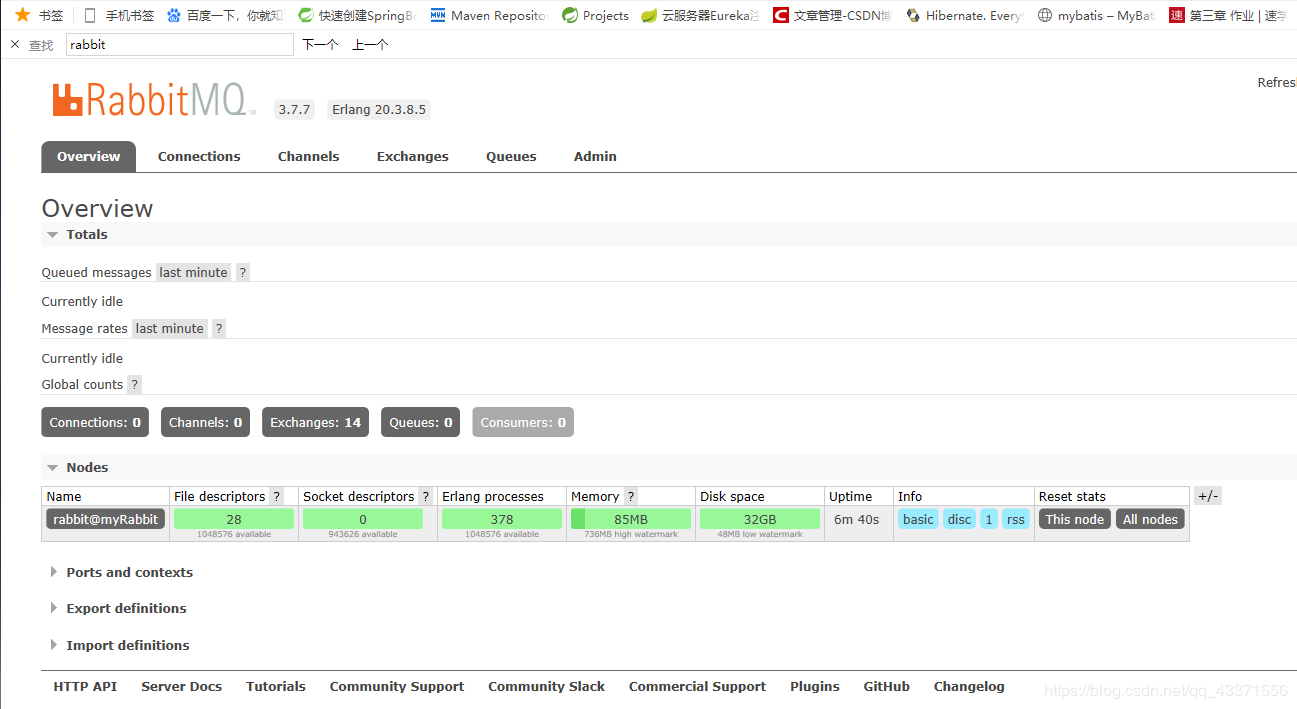
MongoDB
# 1. View docker+MongoDB version(figure 1)
docker search

# 2. Download the latest MongoDB
docker pull MongoDB

# 3. Run the image into a container
docker run -itd --name mongo -p 27017:27017 mongo --auth
## Parameter Description:
- p 27017:27017: Map the 27017 port of the container service to the 27017 port of the host. The external can directly pass the host ip:27017 Access to mongo services.
- - auth: A password is required to access the container service.

# 4. Use the following commands to add users and set passwords, and try to connect.
$ docker exec -it mongo mongo admin
# Create a user named admin with a password of 123456.
> db.createUser({ user:'admin',pwd:'123456',roles:[{ role:'userAdminAnyDatabase', db:'admin'}]});
# Try to connect using the user information created above.
> db.auth('admin','123456')
figure 1
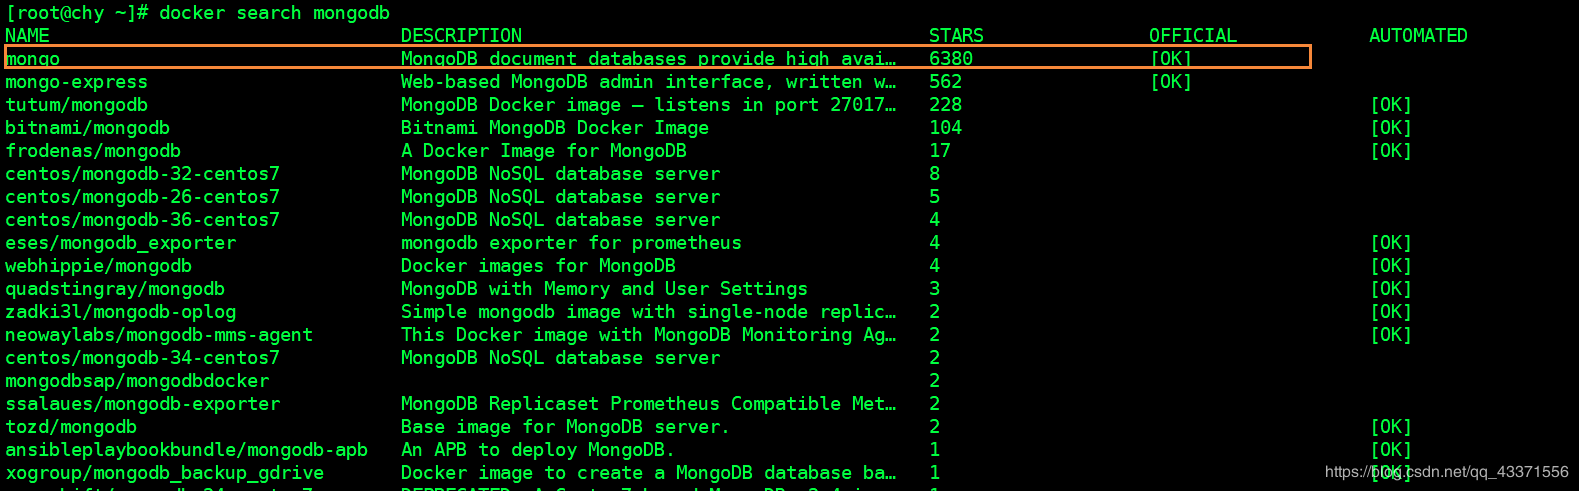
figure 2
Chapter 8 Publish Mirror to Alibaba Cloud#
step##
# 1. Log in to Alibaba Cloud,Enter the container image service(You can jump to the container mirroring service by registering and logging in at the address below)
https://cr.console.aliyun.com/cn-hangzhou/instances/repositories

# 2. Create mirror warehouse(figure 1)
# 3. Log in in docker,According to Figure 2,Operation guide in Figure 3

# 5. Create a running container as an image(Figure 4)
docker commit

OPTIONS description:
- a :Submitted mirror author;
- m :The explanatory text when submitting;

# 4. Push the image to Alibaba Cloud's image warehouse(It is best to follow the operation guide on Alibaba Cloud)
docker tag [ImageId] registry.cn-hangzhou.aliyuncs.com/timepause/mydocker:[Mirror version number]
sudo docker push registry.cn-hangzhou.aliyuncs.com/timepause/mydocker:[Mirror version number]

# 5. Search mirror,Download mirror(Figure 5,Figure 6)
Mirror address copied by docker pull
figure 1
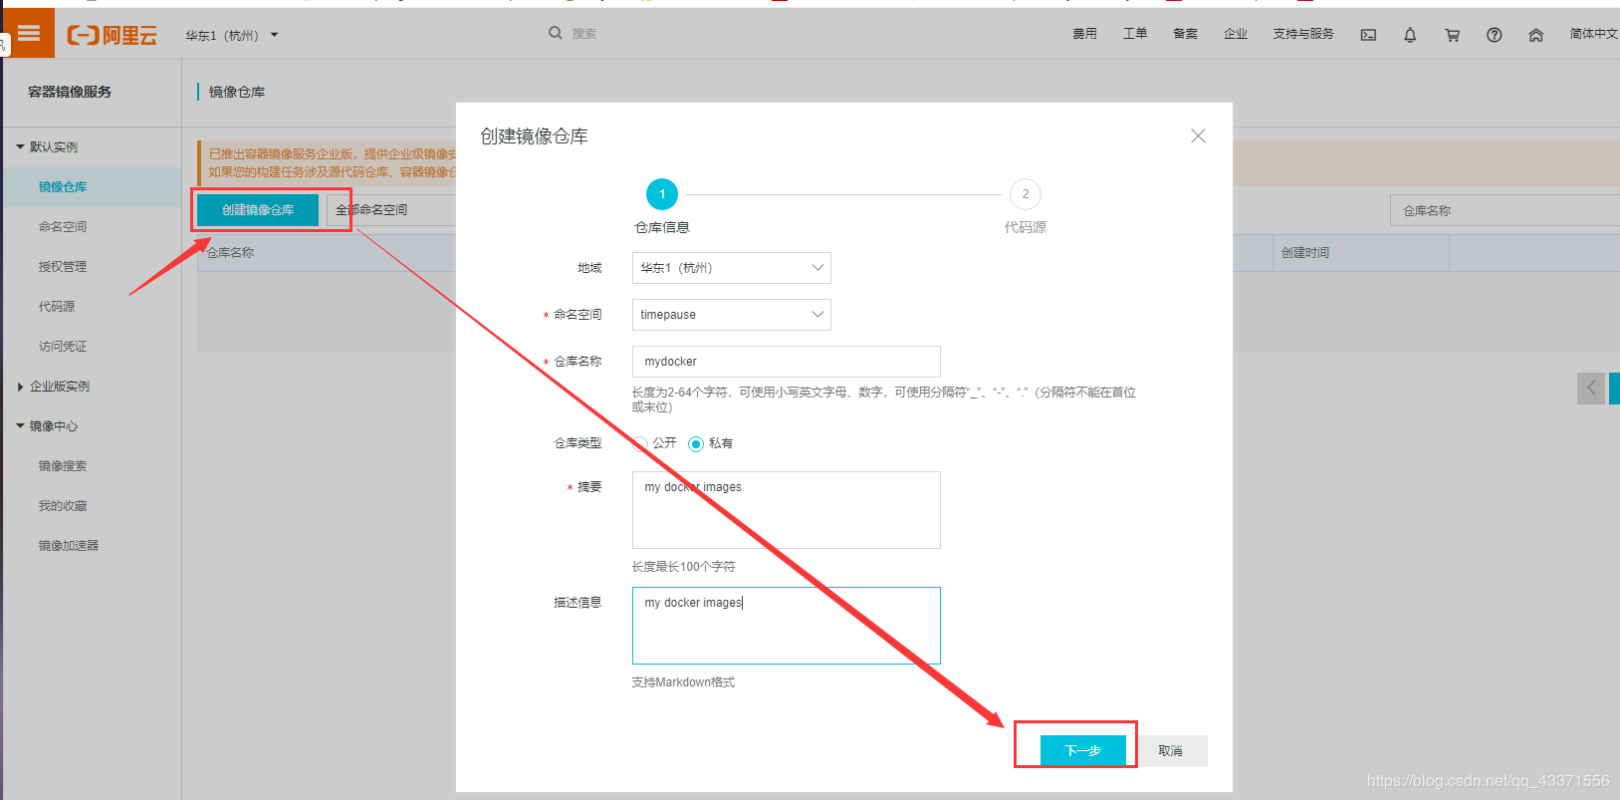
figure 2

image 3
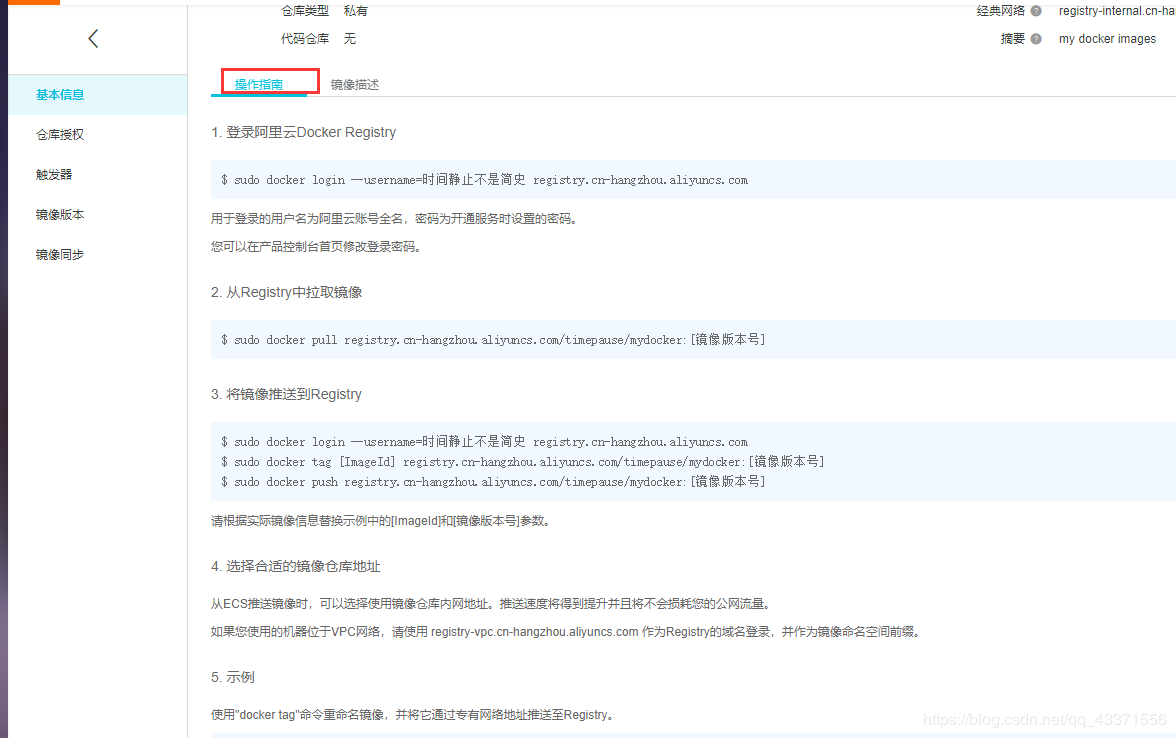
Figure 4
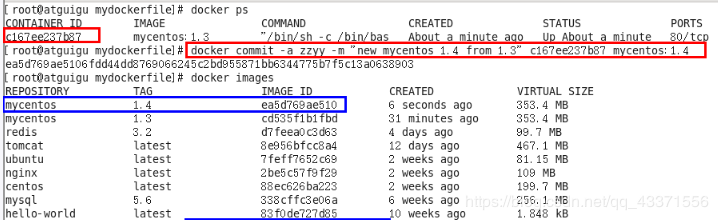
Figure 5
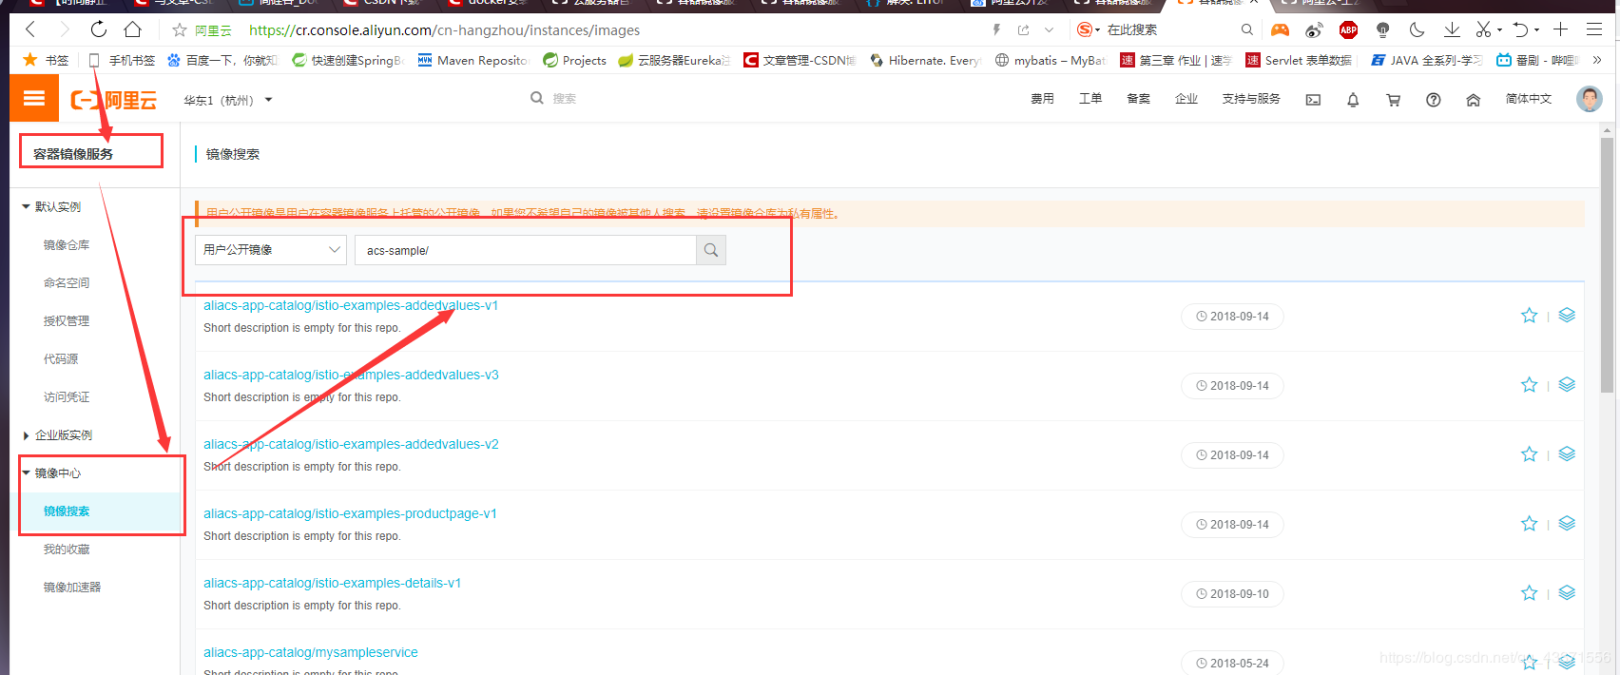
Figure 6