Technical Corner | Using Elastic Stack on CentOS 8: Elasticsearch/Kibana 7.8 Deployment and Authentication Configuration
**Author's note: **Huixiang technology corner "source production control" topic, will focus on the three directions of open source, localization, independent and controllable technology, with operating system, middleware, database, program application, etc. as the rough classification, update related The development trend of technology, the in-depth use of the core technology, and the systematic summary of the overall structure of the technology provide considerable information for learners of related technologies, and also provide personal synchronized learning and summary notes for readers.
This article briefly summarizes the use of Elasticsearch and Kibana in the Elastic Stack suite on CentOS 8. It also summarizes the deployment and authentication settings of Elasticsearch 7.8.0 and the supporting deployment of Kibana 7.8.0 in detail. In the future, regarding the use of Elastic Stack related packages on CentOS 8, series of articles on its usage summary and performance tuning will be updated successively, so stay tuned.
Introduction to Elastic Stack
When you mention Elastic Stack, you have to mention ELK. ELK is the abbreviation of three open source software, namely: Elasticsearch, Logstash and Kibana, they are all open source software. But now there is also a new Beats, which is a lightweight log collection and processing tool (Agent). Beats occupies less resources and is suitable for collecting logs on various servers and transmitting them to Logstash. The official also recommends this tool. The original ELK Stack members added the Beats tool, so it has been renamed Elastic Stack.
Elastic Stack includes:
- Elasticsearch is an open source distributed search engine that provides three functions: collecting, analyzing, and storing data. Its features are: distributed, zero configuration, automatic discovery, automatic index sharding, index copy mechanism, RESTful style interface, multiple data sources, automatic search load, etc. For details, please refer to the Elasticsearch Authoritative Guide.
- Logstash is mainly a tool for collecting, analyzing, and filtering logs, and supports a large number of data acquisition methods. The general working method is C/S architecture. The client side is installed on the host that needs to collect logs, and the server side is responsible for filtering and modifying the received node logs and sending them to Elasticsearch at the same time.
- Kibana is also an open source and free tool. Kibana can provide Logstash and Elasticsearch with a friendly web interface for log analysis, which can help aggregate, analyze, and search important data logs.
- Beats here is a lightweight log collector. In fact, the Beats family has 6 members. In the early ELK architecture, Logstash was used to collect and parse logs, but Logstash consumes relatively high resources such as memory, CPU, and I/O. Compared to Logstash, Beats accounts for almost negligible system CPU and memory.
Deployment of Elasticsearch 7.8
Method 1: YUM method to install
Enter the following command to download and install the public signature certificate:
rpm --import https://artifacts.elastic.co/GPG-KEY-elasticsearch
Create a new file elasticsearch.repo under the directory /etc/yum.repos.d/, and fill in the file content as follows:
[ elasticsearch]
name=Elasticsearch repository for7.x packages
baseurl=https://artifacts.elastic.co/packages/7.x/yum
gpgcheck=1
gpgkey=https://artifacts.elastic.co/GPG-KEY-elasticsearch
enabled=0
autorefresh=1
type=rpm-md
After adding it, directly execute yum -y install --enablerepo=elasticsearch elasticsearch to install it.
Method 2: Download the RPM package and install manually
Execute the following command to install:
wget https://artifacts.elastic.co/downloads/elasticsearch/elasticsearch-7.8.0-x86_64.rpm;
wget https://artifacts.elastic.co/downloads/elasticsearch/elasticsearch-7.8.0-x86_64.rpm.sha512;
shasum -a 512-c elasticsearch-7.8.0-x86_64.rpm.sha512;
rpm --install elasticsearch-7.8.0-x86_64.rpm;
**Note: **If
shasumprompts that the command cannot be found, please enteryum -y install perl-Digest-SHAto install dependencies.**Tip: **Since the Elastic website is a foreign country, the download speed is extremely slow. You can choose a domestic mirror address, such as the mirror of Huawei Cloud. The download address: https://mirrors.huaweicloud.com/elasticsearch/7.8.0/
The installation is complete, the system prompts as follows:
### NOT starting on installation, please execute the following statements to configure elasticsearch service to start automatically using systemd
 sudo systemctl daemon-reload
 sudo systemctl enable elasticsearch.service
### You can start elasticsearch service by executing
 sudo systemctl start elasticsearch.service
Created elasticsearch keystore in/etc/elasticsearch/elasticsearch.keystore
[ /usr/lib/tmpfiles.d/elasticsearch.conf:1] Line references path below legacy directory /var/run/, updating /var/run/elasticsearch → /run/elasticsearch; please update the tmpfiles.d/ drop-in file accordingly.
Method 3: Source code installation
If you have more flexible requirements, you can download the Elasticsearch source code package from the official website for deployment. First, you need to create a user group:
groupadd -g 888 elasticsearch;
useradd -g elasticsearch -m -u 888 elasticsearch;
Then download it from the official website or mirror download address, and unzip it to the folder to be deployed:
wget https://artifacts.elastic.co/downloads/elasticsearch/elasticsearch-7.8.0-linux-x86_64.tar.gz;
tar -zxvf elasticsearch-7.8.0-linux-x86_64.tar.gz -C /usr/share/;
mv /usr/share/elasticsearch-7.8.0//usr/share/elasticsearch;
chown -R elasticsearch:elasticsearch /usr/share/elasticsearch;
Elasticsearch 7.8 configuration
After the deployment is complete, we enter the configuration link. Before configuration, we need to know the location of the process file and the configuration file. Install through the above methods one and two, the process file path is in /usr/share/elasticsearch, and the configuration file path is in /etc/elasticsearch. Through the above method three installation, the process file path is in the decompressed file path, such as /usr/share/elasticsearch given in the example, and the configuration file is in the config folder under the process file path.
There is a file called jvm.options under the configuration file path. Modify the two lines of parameters -Xms and -Xmx to adjust the initial heap size and maximum heap size of the jvm. The recommended value is 40%~50% of the operating system memory. Note: -Xms is the same as -Xmx. Example: If the virtual machine memory is 8G, you can set the following parameters:
- Xms4g
- Xmx4g
or
- Xms4096m
- Xmx4096m
There is a file called elasticsearch.yml under the configuration file path. Configure this file to start the cluster:
# Cluster name, uniform for all nodes in the cluster
cluster.name: Elasticsearch-Cluster
# Current node name, customized but not allowed to be repeated in the cluster
node.name: node-1
node.attr.rack: r1
# The data and log storage path below, please modify the path according to the actual situation
# Install through method one and two, the default path already exists, install through method three, please specify the existing path
path.data:/var/lib/elasticsearch
path.logs:/var/logs/elasticsearch
bootstrap.memory_lock:true
# The current node's intranet IP address, although it can also be set to 0.0.0.0 but it is recommended to follow this setting
network.host:10.66.66.1
http.port:9200
# Addresses of all nodes in the cluster
discovery.seed_hosts:["10.66.66.1","10.66.66.2","10.66.66.3"]
# The name of all nodes in the cluster should be the same as the node.consistent name
cluster.initial_master_nodes:["node-1","node-2","node-3"]
In addition, you need to do some preparatory work before starting Elasticsearch 7.8. First edit the file /etc/security/limits.conf and add the following configuration at the end:
elasticsearch      soft    nofile  100000
elasticsearch      hard    nofile  100000
elasticsearch      soft    memlock unlimited
elasticsearch      hard    memlock unlimited
elasticsearch      soft    nproc   4096
elasticsearch      hard    nproc   4096
Edit the file /etc/sysctl.conf, adjust or add the following configuration according to the existing content in the file:
vm.swappiness=10
vm.max_map_count=262144
After adding, execute sysctl -p.
Finally, modify the /etc/hosts file to add the Elasticsearch cluster host name, for example:
10.66.66.1 node-110.66.66.2 node-210.66.66.3 node-3
Elasticsearch has built-in Java, so there is no need to deploy Java again at the system layer.
It can be started after the configuration is completed. Method one and two can be started and stopped by the systemctl command:
systemctl start elasticsearch;
systemctl stop elasticsearch;
systemctl restart elasticsearch;
If you need to turn on self-start at boot, you can turn it on with the following command:
systemctl daemon-reload;
systemctl enable elasticsearch;
Method 3 can be started and stopped by the following command:
# start up
/usr/share/elasticsearch/bin/elasticsearch -d -p /usr/share/elasticsearch/pid;
# stop
esid=$(cat /usr/share/elasticsearch/pid && echo);
kill -SIGTERM $esid;
After startup, you can execute the following commands to check whether the startup log, cluster node discovery, and master node election are normal:
# Please note the path: 1.Search according to the log storage path set by the configuration file; 2.Enter the log file name according to the actual cluster name
tail -f /var/logs/elasticsearch/Elasticsearch-Cluster.log;
# After installing according to methods one and two, you can also view the Elasticsearch process through the following commands
systemctl status elasticsearch;
You can also directly obtain the cluster health check information returned by Elasticsearch through the following URL browser or curl command access:
curl -XGET http://node-1:9200/_cluster/health?pretty
You can also directly access the 9200 port of the machine in the browser, and the following page can be displayed:
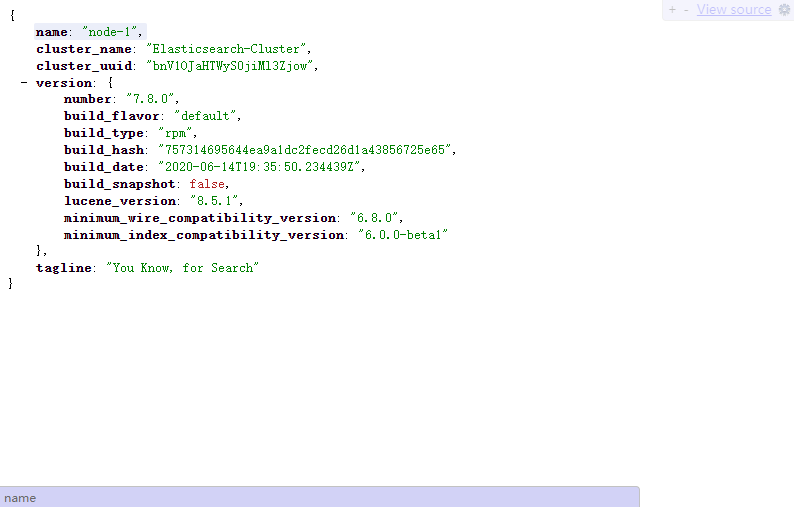
The default access page of port 9200 after Elasticsearch is successfully started
Elasticsearch 7.8 authentication function configuration
After Elasticsearch is started by default, the 9200 port can be accessed at will through the set Host IP, which is very insecure. In order to ensure a certain degree of security, we can modify the http.port field in the elasticsearch.yml file, modify the default port, and increase access to which account and secret authentication is required.
Since Elasticsearch 6.8, Elastic has made some X-Pack paid functions free and open for use, including basic authentication functions. Therefore, after Elasticsearch 6.8, you can directly use Elasticsearch's own authentication functions. In the previous version, an open source plug-in called elasticsearch-http-basic was required, and the author’s warehouse address: https://github.com/Asquera/elasticsearch-http-basic. However, the version of this warehouse is now closed and no longer updated, so it is recommended that if you need to use Elasticsearch, do not use Elasticsearch versions before 6.8.
Next, we configure the authentication function of Elasticsearch 7.8. First, in a cluster node, enter the process file path and execute the following command to create a certificate authority:
bin/elasticsearch-certutil ca;
Just press Enter all the way, there is a password for setting CA in the middle, no need to set. After completion, the file elastic-stack-ca.p12 will be generated in the process file path directory. Then continue to execute the following commands on the cluster node where the certificate authority has been generated to create a certificate and private key:
bin/elasticsearch-certutil cert --ca elastic-stack-ca.p12;
Just press Enter all the way, there is a password for setting the certificate, no need to set. After completion, the file elastic-certificates.p12 will be generated in the process file path directory. After the generation is complete, copy the file to the same path of other machines, and all machines in the cluster modify the group of the two files:
chown -R elasticsearch:elasticsearch *.p12;
All machines in the cluster establish soft connections to the configuration file path. The example is as follows. Please modify the specific path to the actual path:
ln -s /usr/share/elasticsearch/elastic-certificates.p12 /etc/elasticsearch/elastic-certificates.p12;
ln -s /usr/share/elasticsearch/elastic-stack-ca.p12 /etc/elasticsearch/elastic-stack-ca.p12;
Configure elasticsearch.yml:
# Set the cluster mutual trust communication port 9300
transport.port:9300
http.cors.enabled:true
http.cors.allow-origin:"*"
http.cors.allow-headers: Authorization
# Open X-Pack's safety certification
xpack.security.enabled:true
# Open X-Pack's mutual trust security certification in the cluster must be opened in synchronization with the above security certification switch
xpack.security.transport.ssl.enabled:true
# Authentication mode is certificate mode
xpack.security.transport.ssl.verification_mode: certificate
# Configure certification path
xpack.security.transport.ssl.keystore.path: elastic-certificates.p12
xpack.security.transport.ssl.truststore.path: elastic-certificates.p12
# If you need to enable SSL/TLS access ES cluster through HTTPS, and then add the following configuration
xpack.security.http.ssl.enabled:true
xpack.security.http.ssl.keystore.path: elastic-certificates.p12
xpack.security.http.ssl.truststore.path: elastic-certificates.p12
xpack.security.http.ssl.client_authentication: none
Modify the configuration of the discovery.seed_hosts field to add the cluster mutual trust communication port 9300, for example:
discovery.seed_hosts:["10.66.66.1:9300","10.66.66.2:9300","10.66.66.3:9300"]
After completing the configuration, restart the Elasticsearch process. Then set the built-in user authentication password. In a cluster node, enter the process file path and execute the following command:
bin/elasticsearch-setup-passwords interactive;
Here to create a password for the built-in users in Elasticsearch, the built-in users are:
- elastic: Has the superuser role and is a built-in super user, which can do anything.
- kibana: Has the role of kibana_system, which is used by Kibana to connect to and communicate with Elasticsearch. The Kibana server submits a request as the user to access the cluster monitoring API and the .kibana index cannot access the index.
- logstash_system: Has the role of logstash_system. It is used when Logstash stores monitoring information in Elasticsearch.
- beats_system: Has the role of beats_system. It is used when Beats stores monitoring information in Elasticsearch.
- apm_system: The user used by the APM server to store monitoring information in Elasticsearch.
- remote_monitoring_user: Used by Metricbeat users when collecting and storing monitoring information in Elasticsearch. It has built-in roles of remote_monitoring_agent and remote_monitoring_collector.
After completing this step, you need to use the HTTP/HTTPS protocol to access through the port 9200. Enter the account password to access. curl is also available, the command test example is as follows, for example, the user name is elastic and the password is ESabc+2333:
curl -uelastic:ESabc+2333-XGET http://node-1:9200/_cluster/health?pretty
Kibana deployment and configuration
The deployment configuration of Kibana is relatively simple. The installation method is similar to Elasticsearch. You can choose the specific method. This section will not go into details. Use method two, execute the following command to install:
wget https://artifacts.elastic.co/downloads/kibana/kibana-7.8.0-x86_64.rpm;
shasum -a 512 kibana-7.8.0-x86_64.rpm;
rpm --install kibana-7.8.0-x86_64.rpm;
**Note: **If
shasumprompts that the command cannot be found, please enteryum -y install perl-Digest-SHAto install dependencies.**Tip: **Since the Elastic website is a foreign country and the download speed is extremely slow, you can choose a domestic mirror address, such as the mirror of Huawei Cloud. Download address: https://mirrors.huaweicloud.com/kibana/7.8.0/
After installing in the above way, the process file path is in /usr/share/kibana, and the configuration file path is in /etc/kibana.
Modify the /etc/kibana/kibana.yml file to the following configuration:
server.port:5601
server.host:"0.0.0.0"
# Set the Elasticsearch cluster address to facilitate Kibana for disaster recovery management
elasticsearch.hosts:["https://node-1:9200","https://node-2:9200","https://node-3:9200"]
kibana.index:".kibana"
# Internationalization settings, set to Chinese
i18n.locale:"zh-CN"
# Open X-Pack's safety certification
xpack.security.enabled:true
# Elasticsearch built-in account password
elasticsearch.username:"kibana"
elasticsearch.password:"ESabc+2333" #Password of the kibana account when setting the built-in account password
# Kibana SSL/TLS access is enabled, if SSL is not required/TLS, can be ignored
server.ssl.enabled:true
server.ssl.key:/etc/kibana/kibana-certificates.key
server.ssl.certificate:/etc/kibana/kibana-certificates.cer
server.ssl.certificateAuthorities:/etc/kibana/kibana-certificates-ca.cer
server.ssl.clientAuthentication: none
# Elasticsearch such as turning on SSL/TLS access, you need to configure the following two rules
elasticsearch.ssl.verificationMode: certificate
elasticsearch.ssl.certificateAuthorities:/etc/kibana/kibana-certificates-ca.cer
The SSL/TLS authentication in the above Kibana configuration is a bit of an episode that needs to be explained. Since Kibana does not currently support the encryption authentication method of .p12 files, if there is currently no SSL/TLS security agency approved issuance certificate, SSL/TLS still needs to be enabled , We need to use the configuration after converting the .p12 file. The specific operations are as follows:
openssl pkcs12 -in elastic-certificates.p12 -nocerts -nodes > kibana-certificates.key
openssl pkcs12 -in elastic-certificates.p12 -clcerts -nokeys > kibana-certificates.cer
openssl pkcs12 -in elastic-certificates.p12 -cacerts -nokeys -chain > kibana-certificates-ca.cer
Place the generated files in a suitable path. For example, the above configuration places these files in the /etc/kibana/ path, and then you can call them.
**Note: **It is still recommended to configure Kibana's SSL/TLS option after applying for a recognized issuance certificate from a security agency using a domain name, because self-signed certificate browsers are not considered secure and still have security risks. Please pay attention.
It can be started after the configuration is completed, and can be started and stopped by the systemctl command:
systemctl start kibana;
systemctl stop kibana;
systemctl restart kibana;
If you need to turn on self-start at boot, you can turn it on with the following command:
systemctl daemon-reload;
systemctl enable kibana;
You can access Kibana by entering the built-in user after startup, for example, the user name is elastic and the password is ESabc+2333:
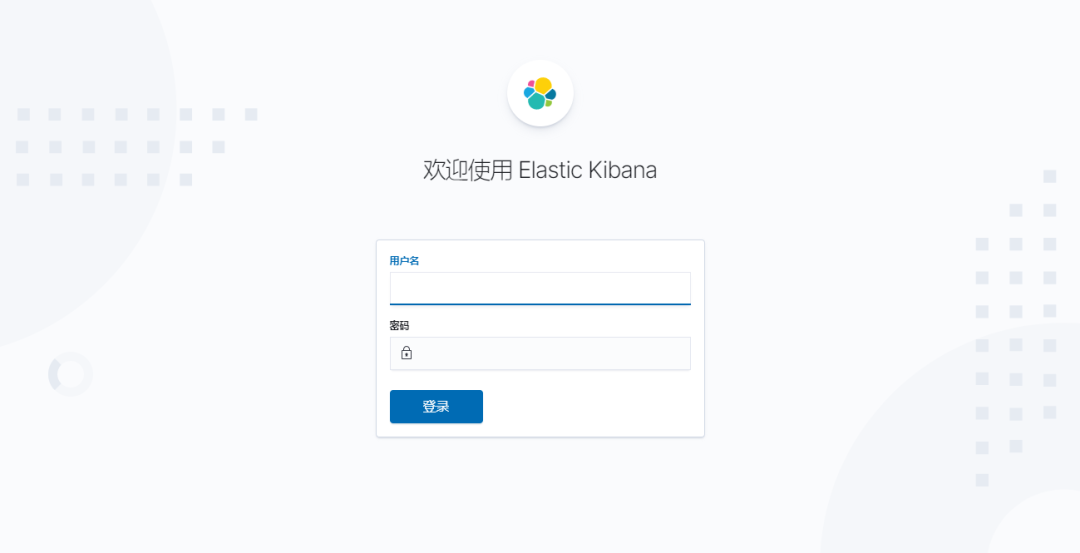
Kibana login interface
Kibana login interface
Recommended Posts