[Oracle] Manually install and uninstall Oracle, this is the most comprehensive one! !
The author personally developed a simple, stable, and scalable delay [message queue] (https://cloud.tencent.com/product/cmq?from=10680) framework under high concurrency scenarios, with precise timing tasks and delay queue processing functions. Since open source for more than half a year, it has successfully provided more than a dozen small and medium-sized enterprises with precise timing scheduling solutions, and has withstood the test of the production environment. In order to benefit more children's shoes, the open source framework address is now given:
https://github.com/sunshinelyz/mykit-delay
PS: Welcome to Star source code, you can also pr your awesome code.
Write in front
I wrote an article about installing Oracle on CentOS 7/8. According to the article I wrote, the installation was successful, but there was a problem when uninstalling Oracle. Today, I will put together an article on manually installing and uninstalling Oracle. The full text is actual combat content, dry goods throughout.
If the article is helpful to you, please don't hesitate to like, watch, leave a message and forward it. Your support is the biggest motivation for my continuous creation!
Environmental preparation
-
CentOS7 / CentOS8 64-bit minimally installed virtual machine environment (I will omit the installation steps here, and you will install the virtual machine environment yourself)
-
Oracle 11gR2 64-bit Linux version installation package (follow [Glacier Technology] WeChat public account, reply to the "oracle" keyword to get the Oracle database installation package download link).
linux.x64_11gR2_database_1of2.zip
linux.x64_11gR2_database_2of2.zip
Installation process
1. Turn off the firewall
Operating user: root
systemctl stop firewalld.service
systemctl disable firewalld.service
2. Install dependency package
The operating user is root.
Execute the following command to install dependent packages.
yum install -y automake autotools-dev binutils bzip2 elfutils expat \
gawk gcc gcc-multilib g++-multilib lib32ncurses5 lib32z1 \
ksh less lib32z1 libaio1 libaio-dev libc6-dev libc6-dev-i386 \
libc6-i386 libelf-dev libltdl-dev libodbcinstq4-1 libodbcinstq4-1:i386 \
libpth-dev libpthread-stubs0-dev libstdc++5 make openssh-server rlwrap \
rpm sysstat unixodbc unixodbc-dev unzip x11-utils zlibc unzip cifs-utils \
libXext.x86_64  glibc.i686
3. Create oracle user
The operating user is: root
groupadd -g 502 oinstall
groupadd -g 503 dba
groupadd -g 504 oper
groupadd -g 505 asmadmin
useradd -u 502-g oinstall -G oinstall,dba,asmadmin,oper -s /bin/bash -m oracle
passwd oracle
After the above command is executed, set a password for the oracle user, for example, the password I set here is oracle
4. Unzip the Oracle database installation package
Operating user: oracle
Operating directory: /home/oracle
Upload the Oracle 11gR2 installation file (you can use sftp to upload) to the operation directory, and then sequentially unzip the installation file to this directory.
unzip linux.x64_11gR2_database_1of2.zip
unzip linux.x64_11gR2_database_2of2.zip
5. Modify operating system configuration
Operating user: root
Operating file: /etc/security/limits.conf
vim /etc/security/limits.conf
Add the following configuration items at the end of the file.
oracle          soft      nproc   2047
oracle          hard      nproc   16384
oracle          soft      nofile  1024
oracle          hard      nofile  65536
oracle          soft      stack   10240
6. Create Oracle installation directory
Operating user: oracle
mkdir ~/tools/oracle11g
7. Modify environment variables
Operating user: oracle
Operating directory: /home/oracle
vim ~/.bash_profile
Add the following configuration items at the end of the file
export ORACLE_BASE=/home/oracle/tools/oracle11g
export ORACLE_HOME=$ORACLE_BASE/product/11.2.0/dbhome_1
export ORACLE_SID=orcl
export ORACLE_UNQNAME=orcl
export NLS_LANG=.AL32UTF8
export PATH=${PATH}:${ORACLE_HOME}/bin/:$ORACLE_HOME/lib64
Make environment variables take effect.
source ~/.bash_profile
8. Modify Oracle configuration file
Operating user: oracle
Operating directory: /home/oracle
Copy file template
cp /home/oracle/database/response/db_install.rsp .
**Note: The last one of the copy command cannot be omitted, which means that the db_install.rsp file will be copied from the /home/oracle/database/response directory to the current directory. **
Edit the db_install.rsp file.
vim db_install.rsp
The configuration items that need to be modified are as follows. Here, I will list the modified configuration items.
oracle.install.option=INSTALL_DB_AND_CONFIG
ORACLE_HOSTNAME=localhost #It can actually be modified to your own hostname or domain name(IP)
UNIX_GROUP_NAME=oinstall
INVENTORY_LOCATION=/home/oracle/tools/oraInventory
SELECTED_LANGUAGES=en,zh_CN
ORACLE_HOME=/home/oracle/tools/oracle11g/product/11.2.0/dbhome_1
ORACLE_BASE=/home/oracle/tools/oracle11g
oracle.install.db.InstallEdition=EE
oracle.install.db.DBA_GROUP=dba
oracle.install.db.OPER_GROUP=oper
oracle.install.db.config.starterdb.type=GENERAL_PURPOSE
oracle.install.db.config.starterdb.globalDBName=orcl
oracle.install.db.config.starterdb.SID=orcl
oracle.install.db.config.starterdb.characterSet=AL32UTF8
oracle.install.db.config.starterdb.memoryOption=true
oracle.install.db.config.starterdb.memoryLimit=1024
oracle.install.db.config.starterdb.installExampleSchemas=false
oracle.install.db.config.starterdb.password.ALL=Oracle#123456
oracle.install.db.config.starterdb.control=DB_CONTROL
oracle.install.db.config.starterdb.dbcontrol.enableEmailNotification=false
oracle.install.db.config.starterdb.dbcontrol.emailAddress=test@qq.com #You can fill in your own email address
oracle.install.db.config.starterdb.automatedBackup.enable=false
oracle.install.db.config.starterdb.storageType=FILE_SYSTEM_STORAGE
oracle.install.db.config.starterdb.fileSystemStorage.dataLocation=/home/oracle/tools/oracle11g/oradata
oracle.install.db.config.starterdb.fileSystemStorage.recoveryLocation=/home/oracle/tools/oracle11g/fast_recovery_area
oracle.install.db.config.starterdb.automatedBackup.enable=false
DECLINE_SECURITY_UPDATES=true
9. Silently install Oracle 11gR2
Operating user: oracle
Operating directory: /home/oracle/database
. /runInstaller -silent -ignoreSysPrereqs -responseFile /home/oracle/db_install.rsp
Next, it is silently waiting for Oracle to install itself. After waiting for a period of time, if the following information is output, it indicates that the Oracle database has been installed successfully.
The following configuration scripts need to be executed as the "root" user.
#! /bin/sh
# Root scripts to run

/home/oracle/tools/oraInventory/orainstRoot.sh
/home/oracle/tools/oracle11g/product/11.2.0/dbhome_1/root.sh
To execute the configuration scripts:1. Open a terminal window
   2. Log inas"root"3. Run the scripts
   4. Return to this window and hit "Enter" key to continue

Successfully Setup Software.
10. The installation is complete
Operating user: root
According to the information prompt in the previous step, execute the following two lines of commands, the specific location needs to be determined according to your installation location:
/home/oracle/tools/oraInventory/orainstRoot.sh
/home/oracle/tools/oracle11g/product/11.2.0/dbhome_1/root.sh
11. Create a connected user
Operating user: oracle
sqlplus /nolog
conn /as sysdba
startup
Next, execute the following command.
alter user system identified by system;
alter user sys identified by sys;
Create a connected user.
create user SYNC identified by SYNC;
grant connect,resource,dba to SYNC;
Verify installation result
1. Start the database
Start the installed database orcl.
Operation user oracle
sqlplus /nolog
Use dba permission to connect to Oralce
connect /as sysdba
Start the database
startup
Confirm the start result:
ORACLE instance started.

Total System Global Area  534462464 bytes
Fixed Size                  2215064 bytes
Variable Size            373293928 bytes
Database Buffers          150994944 bytes
Redo Buffers                7958528 bytes
Database mounted.
Database opened.
2. Verify database
Here, we use Navicat to connect to the Oracle database as shown below.
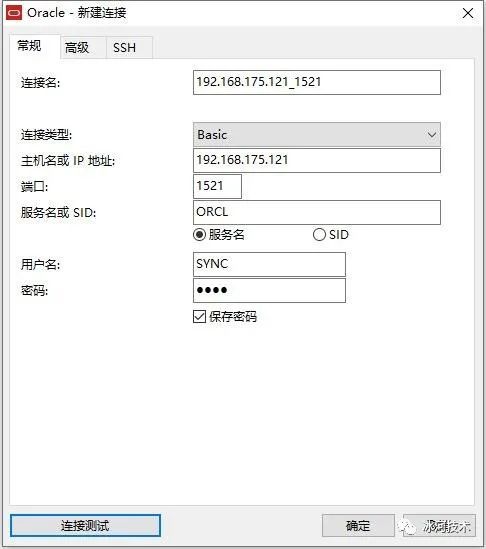
Here, the username entered is SYNC and the password is SYNC.
Next, click "Connection Test" as shown below.
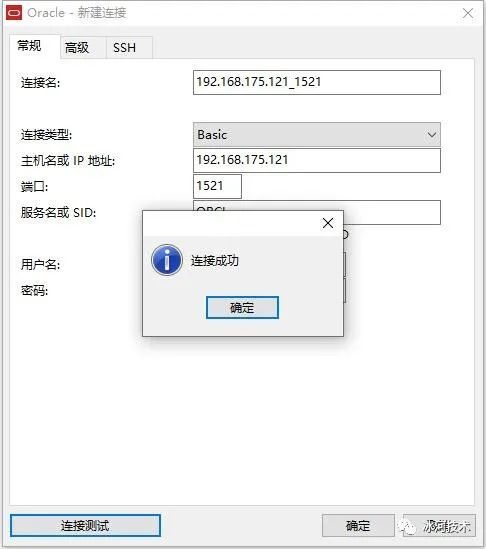
You can see that the Oracle database connection is successful.
Manually uninstall Oracle
1. Stop listening
[ oracle@binghe101 ~]$ lsnrctl stop
[ oracle@binghe101 ~]$ lsnrctl status
2. Stop the database
[ oracle@binghe101 ~]$ sqlplus /as sysdba
SQL> shutdown immediate
3. Delete oracle inventory directory
[ root@binghe101 app]# rm -rf /home/oracle/tools/oraInventory/
4. Delete all directories under Oracle's base directory
[ root@binghe101 oracle]# rm -rf /home/oracle/tools/oracle11g/*
5. Delete the temporary directory /tmp
[ root@binghe101 tmp]# rm -rf /tmp/*
6. Delete Oracle configuration file
[ root@binghe101 tmp]# rm -f /etc/ora*
7. Delete oracle generated command
[ root@binghe101 tmp]# rm -f /usr/local/bin/*
8. Other files
[ root@binghe101 .oracle]# rm -rf /usr/tmp/.oracle/
9. Delete users and groups
[ root@binghe101 tmp]# userdel -r oracle
[ root@binghe101 tmp]# groupdel oper
[ root@binghe101 tmp]# groupdel dba
[ root@binghe101 tmp]# groupdel oinstall
[ root@binghe101 tmp]# groupdel asmadmin
10. Revoke oracle's resource restriction file
[ root@binghe101 tmp]# vi /etc/security/limits.conf
11. Kernel parameters
[ root@binghe101 tmp]# vi /etc/sysctl.conf
[ root@binghe101 tmp]# sysctl -p
12. Delete oracle base
[ root@binghe101 ~]# rm -rf /home/oracle/tools/oracle11g
Recommended Posts