OpenstackGバージョンUbuntu13.043ノード実験記録
OpenstackGバージョンUbuntu13.043ノード実験記録
- 準備段階
特別なリマインダー:
このドキュメントは、公式Webサイトドキュメント([http://docs.openstack.org/](http://docs.openstack.org/))、github([https://github.com/mseknibilel/OpenStack-Grizzly-Install-Guide/blob/OVS_MultiNode/OpenStack_Grizzly_Install_Guide.rst](https://github.com/mseknibilel/OpenStack-Grizzly-Install-Guide/blob/OVS_MultiNode/OpenStack_Grizzly_Install_Guide.rst))、longgeek構成ドキュメント([http://longgeek.com/2013/03/31/openstack-grizzly-multinode-deployment-in-ubuntu-12-04/](http://longgeek.com/2013/03/31/openstack-grizzly-multinode-deployment-in-ubuntu-12-04/))を参照し、オープンスタックの多くのヒーローにも相談しました。これを一つずつありがとう!
必要な機器:
8Gメモリ、windows2003sp2オペレーティングシステム、workstation9、ubuntu13.04(64ビット)ミラーを備えた物理マシン
ネットワーク設定:
Control node:eth0(10.10.10.51),eth1(172.16.10.200)
Network node:eth0(10.10.10.52),eth1(10.20.20.52),eth2(172.16.10.201)
Computenode:eth0(10.10.10.55),eth1(10.10.20.55)
外部ネットワーク:172.16.10.0/24(openstackのインターネットビジネステクノロジー外部ログ)
管理ネットワーク:10.10.10.0/24(キーストーンなどの3つのノード間の通信)認証、rabbitmq [メッセージキュー](https://cloud.tencent.com/product/cmq?from=10680)
ビジネスネットワーク:10.20.20.0 / 24(dpcp、l2、l3などのネットワークノードとコンピューティングノード間の仮想マシンデータ通信)
トポロジー:
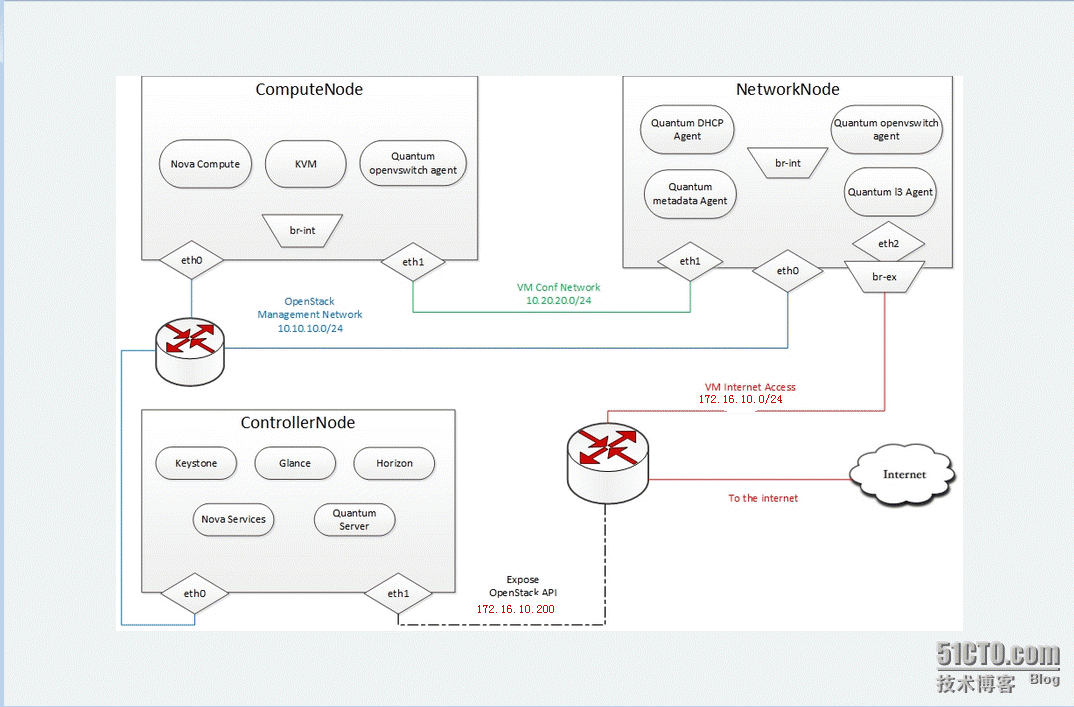
注:仮想マシンのテストにより、各仮想マシンには2Gメモリがあり、外部ネットワークはブリッジネットワークセグメントを使用し、管理ネットワークとビジネスネットワークはそれぞれvmnet2とvmnet3を使用します。さらに、コンピューティングノードには外部アドレスがないため、ソフトウェアパッケージをダウンロードできません。natを追加できます。インストールが完了したら、ネットワークを削除できます。公式ウェブサイトのドキュメントでコンピューティングノードのゲートウェイをネットワークノードのIPに設定する方法や、インターネットをサーフィンするネットワークノードnatエージェントコンピューティングノードなど、他の方法もありますが、実験結果には影響しません。
インストール手順:
2 .Control node
2.1 ubuntuを準備する
グリズリーソースを追加
apt-get install -y ubuntu-cloud-keyring
echo debhttp://ubuntu-cloud.archive.canonical.com/ubuntu precise-updates/grizzly main>> /etc/apt/sources.list.d/grizzly.list
更新システム
apt-get update -y
apt-get upgrade -y
apt-get dist-upgrade –y
2.2 ネットワーク設定
cat /etc/network/interfaces
auto eth0
iface eth0 inet static
address 10.10.10.51
netmask 255.255.255.0
Restart the networking service:
auto eth1
iface eth1 inet static
address 172.16.10.200
netmask 255.255.255.0
gateway 172.16.10.254
dns-nameservers 172.16.10.5
ネットワークサービスを再起動します
service networking restart
2.3 [MySQL](https://cloud.tencent.com/product/cdb?from=10680)をインストールします
MySQLをインストールします。
apt-get install -y mysql-serverpython-mysqldb
すべてのリクエストを受け入れるようにmyaslを構成します
sed -i 's/127.0.0.1/0.0.0.0/g'/etc/mysql/my.cnf
service mysql restart
データベースを作成する
mysql -u root -p
Keystone
CREATE DATABASE keystone;
GRANT ALL ON keystone.* TO 'keystone'@'%'IDENTIFIED BY 'keystone';
Glance
CREATE DATABASE glance;
GRANT ALL ON glance.* TO 'glance'@'%'IDENTIFIED BY 'glance';
Quantum
CREATE DATABASE quantum;
GRANT ALL ON quantum.* TO 'quantum'@'%'IDENTIFIED BY 'quantum';
Nova
CREATE DATABASE nova;
GRANT ALL ON nova.* TO 'nova'@'%'IDENTIFIED BY 'nova';
Cinder
CREATE DATABASE cinder;
GRANT ALL ON cinder.* TO 'cinder'@'%'IDENTIFIED BY 'cinder';
quit;
2.4 RabbitMQ
Install RabbitMQ:
apt-get install -y rabbitmq-server
Install NTP service:
apt-get install -y ntp
2.5. Others
Install other services:
apt-get install -y vlan bridge-utils
Enable IP_Forwarding:
sed -i's/#net.ipv4.ip_forward=1/net.ipv4.ip_forward=1/' /etc/sysctl.conf
To save you from rebooting, perform thefollowing
sysctl net.ipv4.ip_forward=1
sysct l -pは、すぐに有効になります
2.6 Keystone
キーストーンをインストールする
apt-get install –y keystone
/etc/keystone/keystone.confデータベース構成を変更します
connection =mysql://keystoneUser:[email protected]/keystone
キーストーンサーバーを再起動し、データベースを同期します
service keystone restart
keystone-manage db_sync
スクリプトを使用してデータベースに入力します。インターネットからダウンロードできます。状況に応じてIPアドレスパスワードを変更する必要があります。スクリプトの機能は、新しいテナント、ユーザー、サービスリスニングポートなどを作成することです。ダウンロードアドレスは次のとおりです。
スクリプトの内容は次のとおりです。
root@control:~# catkeystone_endpoints_basic.sh
#! /bin/sh
Keystone basic Endpoints
Mainly inspired byhttps://github.com/openstack/keystone/blob/master/tools/sample_data.sh
Modified by Bilel Msekni / InstitutTelecom
Support: [email protected]
License: Apache Software License (ASL)2.0
Host address
HOST_IP=10.10.10.51
EXT_HOST_IP=172.16.10.200
MySQL definitions
MYSQL_USER=keystone
MYSQL_DATABASE=keystone
MYSQL_HOST=$HOST_IP
MYSQL_PASSWORD=keystone
Keystone definitions
KEYSTONE_REGION=RegionOne
export SERVICE_TOKEN=ADMIN
export SERVICE_ENDPOINT="http://${HOST_IP}:35357/v2.0"
while getopts"u:D:p:m:K:R:E:T:vh" opt; do
case $opt in
u)
MYSQL_USER=$OPTARG
;;
D)
MYSQL_DATABASE=$OPTARG
;;
p)
MYSQL_PASSWORD=$OPTARG
;;
m)
MYSQL_HOST=$OPTARG
;;
K)
MASTER=$OPTARG
;;
R)
KEYSTONE_REGION=$OPTARG
;;
E)
export SERVICE_ENDPOINT=$OPTARG
;;
T)
export SERVICE_TOKEN=$OPTARG
;;
v)
set -x
;;
h)
cat <<EOF
Usage: $0 [-m mysql_hostname] [-umysql_username] [-D mysql_database] [-p mysql_password]
[- K keystone_master ] [ -R keystone_region ] [ -E keystone_endpoint_url]
[ - T keystone_token ]
Add -v for verbose mode, -h to display thismessage.
EOF
exit 0
;;
?)
echo "Unknown option -$OPTARG" >&2
exit 1
;;
:)
echo "Option -$OPTARG requires an argument" >&2
exit 1
;;
esac
done
if [ -z "$KEYSTONE_REGION" ];then
echo "Keystone region not set. Please set with -R option or setKEYSTONE_REGION variable." >&2
missing_args="true"
fi
if [ -z "$SERVICE_TOKEN" ]; then
echo "Keystone service token not set. Please set with -T option orset SERVICE_TOKEN variable." >&2
missing_args="true"
fi
if [ -z "$SERVICE_ENDPOINT" ];then
echo "Keystone service endpoint not set. Please set with -E optionor set SERVICE_ENDPOINT variable." >&2
missing_args="true"
fi
if [ -z "$MYSQL_PASSWORD" ]; then
echo "MySQL password not set. Please set with -p option or setMYSQL_PASSWORD variable." >&2
missing_args="true"
fi
if [ -n "$missing_args" ]; then
exit 1
fi
keystone service-create --name nova --typecompute --description 'OpenStack Compute Service'
keystone service-create --name cinder--type volume --description 'OpenStack Volume Service'
keystone service-create --name glance--type image --description 'OpenStack Image Service'
keystone service-create --name keystone--type identity --description 'OpenStack Identity'
keystone service-create --name ec2 --typeec2 --description 'OpenStack EC2 service'
keystone service-create --name quantum--type network --description 'OpenStack Networking service'
create_endpoint () {
case $1 in
compute)
keystone endpoint-create --region$KEYSTONE_REGION --service-id
;;
volume)
keystone endpoint-create --region $KEYSTONE_REGION --service-id
;;
image)
keystone endpoint-create --region $KEYSTONE_REGION --service-id
;;
identity)
keystone endpoint-create --region $KEYSTONE_REGION --service-id
;;
ec2)
keystone endpoint-create --region $KEYSTONE_REGION --service-id
;;
network)
keystone endpoint-create --region $KEYSTONE_REGION --service-id
;;
esac
}
for i in compute volume image object-storeidentity ec2 network; do
id=mysql -h "$MYSQL_HOST" -u "$MYSQL_USER"-p"$MYSQL_PASSWORD" "$MYSQL_DATABASE" -ss -e "SELECTid FROM service WHERE type='"$i"';" || exit 1
create_endpoint $i $id
done
環境変数を設定します。そうしないと、keystonコマンドラインを使用して多くのパラメータでクエリを実行するのが不便です。
root@control:~# cat creds
Paste the following:
export OS_TENANT_NAME=admin
export OS_USERNAME=admin
export OS_PASSWORD=123456
exportOS_AUTH_URL="http://172.16.10.200:5000/v2.0/"
root@control:~# source creds
キーストーンの結果を確認する
root@control:~# keystone user-list
+----------------------------------+---------+---------+--------------------+
| id | name | enabled | email |
+----------------------------------+---------+---------+--------------------+
| 546 b18d85b9a4bf8b548bd08e8ecfe87 | admin | True | [email protected] |
| a0dbcb1c75814ab285ea0ddc4a156dd6 | cinder | True | [email protected] |
| 1 a860d4cd8244bb3bc19e9cfe8259e60 | demo | True | [email protected] |
| 08725 b7243854901bb0835be1e3a8c5e | glance | True | [email protected] |
| 1 dcb939697e04229ae14abe02fce6d6f | nova | True | [email protected] |
| 5 e447437acc148d88e386989d62da44d |quantum | True | [email protected] |
+----------------------------------+---------+---------+--------------------+
root@control:~# keystone endpoint-list
+----------------------------------+-----------+--------------------------------------------+------------------------------------------+------------------------------------------+----------------------------------+
| id | region | publicurl | internalurl | adminurl | service_id |
+----------------------------------+-----------+--------------------------------------------+------------------------------------------+------------------------------------------+----------------------------------+
| 12 eac4b2ed91404f93f2235cbaa446f3 |RegionOne | http://172.16.10.200:9292/ | http://10.10.10.51:9292/ | http://10.10.10.51:9292/ | 1372321775df4b6c9d894d299412acc5 |
| 37 c6d6ce5e954f449cac46194ea077d0 |RegionOne | http://172.16.10.200:8776/v1/
| 3 e9f2ce578e248b5945a099f69141312 |RegionOne | http://172.16.10.200:8773/services/Cloud | http://10.10.10.51:8773/services/Cloud | http://10.10.10.51:8773/services/Admin | 46be108df1084f5e9a2702ecfd517aa3 |
| 5240 aec5803b4d7094b66dfa4ecd6c55 |RegionOne | http://172.16.10.200:9696/ | http://10.10.10.51:9696/ | http://10.10.10.51:9696/ | 6e4dacf1c7984a7baa216aeec2e5831d |
| 8128 afab6f034d03820704fe8d7fc817 |RegionOne | http://172.16.10.200:5000/v2.0 | http://10.10.10.51:5000/v2.0 | http://10.10.10.51:35357/v2.0 | a68ed6a40998477abc0990bd56dcbd86 |
| 960 af7efa1b84a778fb6c40a6015a497 |RegionOne | http://172.16.10.200:8774/v2/
+----------------------------------+-----------+--------------------------------------------+------------------------------------------+------------------------------------------+----------------------------------+
2.7 Glance
一目でインストール
apt-get install -y glance
/etc/glance/glance-api-paste.iniを更新します
[ filter:authtoken]
paste.filter_factory =keystoneclient.middleware.auth_token:filter_factory
delay_auth_decision = true
auth_host = 10.10.10.51
auth_port = 35357
auth_protocol = http
admin_tenant_name = service
admin_user = glance
admin_password = 123456
/etc/glance/glance-registry-paste.iniを更新します
[ filter:authtoken]
paste.filter_factory =keystoneclient.middleware.auth_token:filter_factory
auth_host = 10.10.10.51
auth_port = 35357
auth_protocol = http
admin_tenant_name = service
admin_user = glance
admin_password = 123456
/etc/glance/glance-api.confを更新します
sql_connection =mysql://glance:[email protected]/glance
[ paste_deploy]
flavor = keystone
/etc/glance/glance-registry.confを更新します
sql_connection =mysql://glance:[email protected]/glance
[ paste_deploy]
flavor = keystone
glance-apiおよびglance-registryサービスを再起動します
service glance-api restart; serviceglance-registry restart
glanceデータベースを初期化します
glance-manage db_sync
ダウンロードミラーアップロードミラー
wgethttps://launchpad.net/cirros/trunk/0.3.0/+download/cirros-0.3.0-x86_64-disk.img
glance image-create --name="CirrOS0.3.1" --disk-format=qcow2 \
-
- container-format=bare --is-public=true <cirros-0.3.1-x86_64-disk.img
root@control:~# filecirros-0.3.1-i386-disk.img
cirros-0.3.1-i386-disk.img: QEMU QCOW Image(v2), 41126400 bytes
ビューミラー
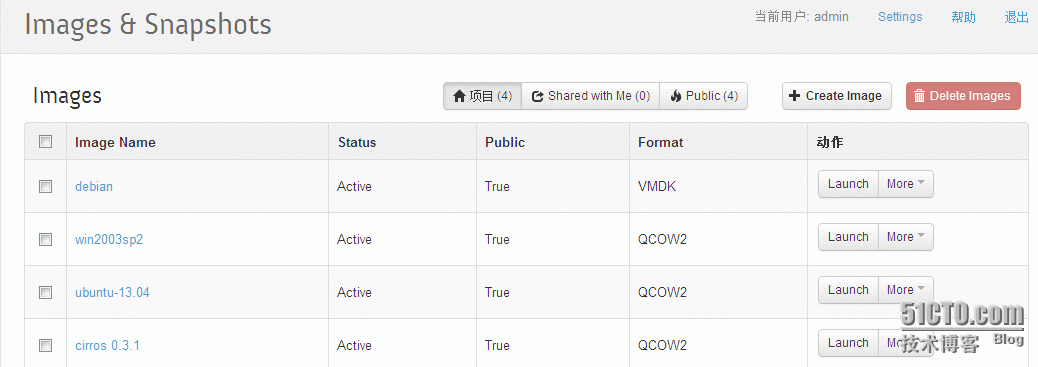
root@control:~# glance image-list
+--------------------------------------+--------------+-------------+------------------+------------+--------+
| ID | Name | Disk Format | Container Format |Size | Status |
+--------------------------------------+--------------+-------------+------------------+------------+--------+
| fe4210d1-783c-4b7b-9cfd-10f02f7d3c20 |cirros 0.3.1 | qcow2 | bare | 12251136 | active |
| 918 dd333-2e9d-4ad2-bcce-9c6be9aec81b |debian | vmdk |bare | 464421376 | active |
| 4 dd939cc-54ce-4af0-a170-3d6b778e651f |ubuntu-13.04 | qcow2 | bare | 233504768 | active |
| 43 c2bb24-2c4f-4b53-a2da-6ac5fa525dbd |win2003sp2 | qcow2 | bare | 1822621696 | active |
+--------------------------------------+--------------+-------------+------------------+------------+--------+
注:イメージについては、オンラインでダウンロードするか、自分で作成するか、vSphereのovfテンプレートなどの他の仮想化プラットフォームからインポートできます。添付ファイルには、Windowsイメージファイルの作成とvmwareovfテンプレートファイルのインポートが含まれます。
2.8. Quantum
量子サーバーをインストールする
apt-get install -y quantum-server
OVSプラグイン構成ファイル/etc/quantum/plugins/openvswitch/ovs_quantum_plugin.iniを編集します
Under the database section
[ DATABASE]
sql_connection =mysql://quantum:[email protected]/quantum
Under the OVS section
[ OVS]
tenant_network_type = gre
tunnel_id_ranges = 1:1000
enable_tunneling = True
Firewall driver for realizing quantumsecurity group function
[ SECURITYGROUP]
firewall_driver =quantum.agent.linux.iptables_firewall.OVSHybridIptablesFirewallDriver
/etc/quantum/api-paste.iniを編集します
[ filter:authtoken]
paste.filter_factory =keystoneclient.middleware.auth_token:filter_factory
auth_host = 10.10.10.51
auth_port = 35357
auth_protocol = http
admin_tenant_name = service
admin_user = quantum
admin_password = 123456
/etc/quantum/quantum.confを更新します。
[ keystone_authtoken]
auth_host = 10.10.10.51
auth_port = 35357
auth_protocol = http
admin_tenant_name = service
admin_user = quantum
admin_password = 123456
signing_dir =/var/lib/quantum/keystone-signing
量子サービスを再起動します
service quantum-server restart
2.9. Nova
nova関連パッケージをインストールする
apt-get install -y nova-api nova-cert novncnova-consoleauth nova-scheduler nova-novncproxy nova-doc nova-conductor
/etc/nova/api-paste.iniを変更します
[ filter:authtoken]
paste.filter_factory = keystoneclient.middleware.auth_token:filter_factory
auth_host = 10.10.10.51
auth_port = 35357
auth_protocol = http
admin_tenant_name = service
admin_user = nova
admin_password = 123456
signing_dirname =/tmp/keystone-signing-nova
Workaround for https://bugs.launchpad.net/nova/+bug/1154809
auth_version = v2.0
/etc/nova/nova.confを変更します
root@control:~# cat /etc/nova/nova.conf
[ DEFAULT]
logdir=/var/log/nova
state_path=/var/lib/nova
lock_path=/run/lock/nova
verbose=True
api_paste_config=/etc/nova/api-paste.ini
compute_scheduler_driver=nova.scheduler.simple.SimpleScheduler
rabbit_host=10.10.10.51
nova_url=http://10.10.10.51:8774/v1.1/
sql_connection=mysql://nova:[email protected]/nova
root_helper=sudo nova-rootwrap/etc/nova/rootwrap.conf
Auth
use_deprecated_auth=false
auth_strategy=keystone
Imaging service
glance_api_servers=10.10.10.51:9292
image_service=nova.image.glance.GlanceImageService
Vnc configuration
novnc_enabled=true
novncproxy_base_url=http://172.16.10.200:6080/vnc_auto.html
novncproxy_port=6080
vncserver_proxyclient_address=10.10.10.51
vncserver_listen=0.0.0.0
Network settings
network_api_class=nova.network.quantumv2.api.API
quantum_url=http://10.10.10.51:9696
quantum_auth_strategy=keystone
quantum_admin_tenant_name=service
quantum_admin_username=quantum
quantum_admin_password=123456
quantum_admin_auth_url=http://10.10.10.51:35357/v2.0
libvirt_vif_driver=nova.virt.libvirt.vif.LibvirtHybridOVSBridgeDriver
linuxnet_interface_driver=nova.network.linux_net.LinuxOVSInterfaceDriver
If you want Quantum + Nova Security groups
firewall_driver=nova.virt.firewall.NoopFirewallDriver
security_group_api=quantum
If you want Nova Security groups only,comment the two lines above and uncomment line -1-.
#- 1- firewall_driver=nova.virt.libvirt.firewall.IptablesFirewallDriver
Metadata
service_quantum_metadata_proxy = True
quantum_metadata_proxy_shared_secret =helloOpenStack
Compute
compute_driver=libvirt.LibvirtDriver
Cinder
volume_api_class=nova.volume.cinder.API
volume_driver=nova.volume.driver.ISCSIDriver
enabled_apis=ec2,osapi_compute,metadata
osapi_volume_listen_port=5900
volume_group = cinder-volumes
volume_name_template = volume-%s
iscsi_helper=tgtadm
add or volum can not attach
iscsi_ip_address=10.10.10.51
novaデータベースを初期化します
nova-manage db sync
Nova関連サービスを再起動します
cd /etc/init.d/; for i in $( ls nova-* );do sudo service $i restart; done
Nova関連サービスの起動を確認してください
root@control:~# nova-manage service list
Binary Host Zone Status State Updated_At
nova-cert control internal enabled :-) 2013-10-28 09:56:13
nova-conductor control internal enabled :-) 2013-10-28 09:56:11
nova-consoleauth control internal enabled :-) 2013-10-28 09:56:11
nova-scheduler control internal enabled :-) 2013-10-28 09:56:13
nova-console control internal enabled :-) 2013-10-28 09:56:11
2.10. Cinder
燃えがら関連のパッケージをインストールする
apt-get install -y cinder-apicinder-scheduler cinder-volume iscsitarget open-iscsi iscsitarget-dkms
iscsiサービスを構成する
sed -i 's/false/true/g'/etc/default/iscsitarget
サービスを再開します
service iscsitarget start
service open-iscsi start
/etc/cinder/api-paste.iniを構成します
[ filter:authtoken]
paste.filter_factory =keystoneclient.middleware.auth_token:filter_factory
service_protocol = http
service_host = 10.10.10.51
service_port = 5000
auth_host = 10.10.10.51
auth_port = 35357
auth_protocol = http
admin_tenant_name = service
admin_user = cinder
admin_password = 123456
signing_dir = /var/lib/cinder
/etc/cinder/cinder.confを編集します
root@control:~# cat /etc/cinder/cinder.conf
[ DEFAULT]
rootwrap_config = /etc/cinder/rootwrap.conf
api_paste_confg = /etc/cinder/api-paste.ini
iscsi_helper = ietadmここではデフォルトのtgtサービスを使用しています
iscis_helper = tgtadm
volume_name_template = volume-%s
volume_group = cinder-volumes
verbose = True
auth_strategy = keystone
state_path = /var/lib/cinder
lock_path = /var/lock/cinder
volumes_dir = /var/lib/cinder/volumes
sql_connection =mysql://cinder:[email protected]/cinder
RPC
rabbit_host = 10.10.10.51
rabbit_password = guest
issci_ip_prefix = 10.10.10
rpc_backend = cinder.openstack.common.rpc.impl_kombu
iscsi_ip_address = 10.10.10.51
API
osapi_volume_extension =cinder.api.contrib.standard_extensions
燃えがらデータベースを初期化する
cinder-manage db sync
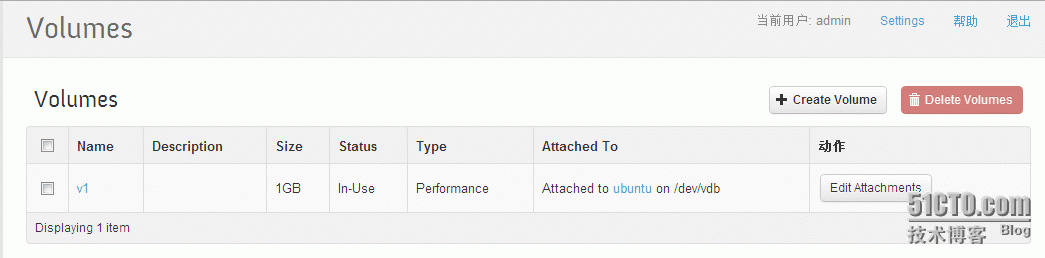
cinder-volumesという名前のボリュームグループを作成すると、仮想マシンにはデフォルトで2つのハードディスクが追加されます
pvcreate /dev/sdb
vgcreate cinder-volumes /dev/sdb
燃えがらサービスを再開する
cd /etc/init.d/; for i in $( ls cinder-* );do sudo service $i restart; done
燃えがらサービスが実行されていることを確認します
cd /etc/init.d/; for i in $( ls cinder-* );do sudo service $i status; done
2.11. Horizon
地平線をインストールします
apt-get install -y openstack-dashboardmemcached
必要に応じて、ubuntuテーマを削除できます
dpkg --purgeopenstack-dashboard-ubuntu-theme
Apacheとmemcachedを再起動します
service apache2 restart; service memcachedrestart
OpenStackダッシュボードにログインします
http://172.16.10.200/horizonログインユーザー名とパスワードはadmin、123456です。
- Network node
3.1. 準備オーケー
[ インストールソース](インストールソース)
apt-getinstall -y ubuntu-cloud-keyring
echodeb http://ubuntu-cloud.archive.canonical.com/ubuntu precise-updates/grizzlymain >> /etc/apt/sources.list.d/grizzly.list
更新システム
apt-getupdate -y
apt-getupgrade -y
apt-getdist-upgrade -y
ntpサービスをインストールします
apt-getinstall -y ntp
制御ノードの時間を同期するようにntpを構成します
Commentthe ubuntu NTP servers
sed -i's/server 0.ubuntu.pool.ntp.org/#server 0.ubuntu.pool.ntp.org/g' /etc/ntp.conf
sed -i's/server 1.ubuntu.pool.ntp.org/#server 1.ubuntu.pool.ntp.org/g' /etc/ntp.conf
sed -i's/server 2.ubuntu.pool.ntp.org/#server 2.ubuntu.pool.ntp.org/g' /etc/ntp.conf
sed -i's/server 3.ubuntu.pool.ntp.org/#server 3.ubuntu.pool.ntp.org/g' /etc/ntp.conf
Setthe network node to follow up your conroller node
sed -i's/server ntp.ubuntu.com/server 10.10.10.51/g' /etc/ntp.conf
ntpサービスを再起動します
servicentp restart
他のソフトウェアをインストールする
apt-getinstall -y vlan bridge-utils
IP転送をオンにする
sed -i's/#net.ipv4.ip_forward=1/net.ipv4.ip_forward=1/' /etc/sysctl.conf
sysctl-pはそれをすぐに有効にします
3.2. インターネット
3 初期構成
OpenStack management
auto eth0
iface eth0 inet static
address 10.10.10.52
netmask 255.255.255.0
VM Configuration
auto eth1
iface eth1 inet static
address 10.20.20.52
netmask 255.255.255.0
VM internet Access
auto eth2
iface eth2 inet static
address 172.16.10.201
netmask 255.255.255.0
3.4. OpenVSwitchは、主にインターネットをセットアップしなかったため、githubによると2つのステップを別々に実行しませんでした。2番目の部分を実行する前に、クォンタムソフトウェアパッケージをインストールする必要があります。ここでeth2とbr-ex ipを設定して、インターネットにアクセスできるようにします。一緒に行うことができます。
[ openVSwitchのインストール:](openVSwitchのインストール:)ここでは3つのソフトウェアすべてをインストールする必要があることに注意してください。ovsの使用に加えて、openstackはシステムのbrcompatも使用します
apt-get install openvswitch-switchopenvswitch-brcompat openvswitch-datapath-dkms
ovs-brcompatdを開始するように設定します。
sed -i 's/# BRCOMPAT=no/BRCOMPAT=yes/g'/etc/default/openvswitch-switch
openvswitch-switchを開始します。
root@network:~# service openvswitch-switch restart
-
Killingovs-brcompatd (1327)
-
Killingovs-vswitchd (1195)
-
Killingovsdb-server (1185)
-
Startingovsdb-server
-
Configuring Open vSwitch system IDs
-
Startingovs-vswitchd
2013- 10- 29 T02:45:50Z|00001|brcompatd|WARN|Bridgecompatibility is deprecated and may be removed no earlier than February 2013
- Startingovs-brcompatd
ovs-brcompatd、ovs-vswitchd、ovsdb-serverおよびその他のサービスが開始されるまで
そして、brcompatモジュールを確認してください
lsmod | grep brcompat
brcompat 13512 0
openvswitch 84038 7 brcompat
それでもbrcompatを起動できない場合は、次のコマンドを実行します。
/etc/init.d/openvswitch-switch force-reload-kmod
サーバーを再起動できなくなった場合、ubuntu13.04(64ビット)は通常、上記の3つのソフトウェアをインストールし、他の追加操作なしで正常に起動できます。
橋を作る
ovs-vsctl add-br br-int#br-intはvm統合に使用されます
ovs-vsctl add-br br-ex#br-exは、インターネットからvmにアクセスするために使用されます
ovs-vsctl add-port br-ex eth2#br-exブリッジからeth2
上記の操作を行った後、eth2ネットワークカードが機能しないため、ネットワークカード構成ファイルを変更する必要があります
ネットワークカードの最終構成:
root@network:~# cat /etc/network/interfaces
This file describes the networkinterfaces available on your system
and how to activate them. For moreinformation, see interfaces(5).
The loopback network interface
auto lo
iface lo inet loopback
The primary network interface
auto eth0
iface eth0 inet dhcp
OpenStack management
auto eth0
iface eth0 inet static
address 10.10.10.52
netmask 255.255.255.0
VM Configuration
auto eth1
iface eth1 inet static
address 10.20.20.52
netmask 255.255.255.0
VM internet Access
auto eth2
iface eth2 inet manual
up ifconfig $IFACE 0.0.0.0 up
down ifconfig $IFACE down
auto br-ex
iface br-ex inet static
address 172.16.10.201
netmask 255.255.255.0
gateway 172.16.10.254
dns-nameservers 8.8.8.8
次に、サーバーまたはネットワークを再起動します。次の手順に進む前に、インターネットとイントラネットの接続に問題はありません。
ブリッジネットワークを表示する
ovs-vsctl list-br
ovs-vsctl show
3.5. Quantum
Quantum openvswitchエージェント(レイヤー2スイッチング)、l3エージェント(レイヤー3ルーティング)およびdhcpagentをインストールします
apt-get -y installquantum-plugin-openvswitch-agent quantum-dhcp-agent quantum-l3-agentquantum-metadata-agent
/etc/quantum/api-paste.iniを編集します
[ filter:authtoken]
paste.filter_factory =keystoneclient.middleware.auth_token:filter_factory
auth_host = 10.10.10.51
auth_port = 35357
auth_protocol = http
admin_tenant_name = service
admin_user = quantum
admin_password = 123456
OVSプラグイン構成を編集します/etc/quantum/plugins/openvswitch/ovs_quantum_plugin.ini
Under the database section
[ DATABASE]
sql_connection =mysql://quantum:[email protected]/quantum
Under the OVS section
[ OVS]
tenant_network_type = gre
tunnel_id_ranges = 1:1000
integration_bridge = br-int
tunnel_bridge = br-tun
local_ip = 10.20.20.52
enable_tunneling = True
Firewall driver for realizing quantumsecurity group function
[ SECURITYGROUP]
firewall_driver =quantum.agent.linux.iptables_firewall.OVSHybridIptablesFirewallDriver
/etc/quantum/quantum.confを設定します
root@network:~# cat/etc/quantum/quantum.conf |grep -v ^#|grep -v ^$
[ DEFAULT]
lock_path = $state_path/lock
bind_host = 0.0.0.0
bind_port = 9696
core_plugin =quantum.plugins.openvswitch.ovs_quantum_plugin.OVSQuantumPluginV2
api_paste_config =/etc/quantum/api-paste.ini
control_exchange = quantum
fake_rabbit = False
rabbit_host = 10.10.10.51
rabbit_password = guest
rabbit_port = 5672
rabbit_userid = guest
notification_driver =quantum.openstack.common.notifier.rpc_notifier
default_notification_level = INFO
notification_topics = notifications
[ QUOTAS]
[ DEFAULT_SERVICETYPE]
[ AGENT]
root_helper = sudo quantum-rootwrap/etc/quantum/rootwrap.conf
[ keystone_authtoken]
auth_host = 10.10.10.51
auth_port = 35357
auth_protocol = http
admin_tenant_name = service
admin_user = quantum
admin_password = 123456
signing_dir =/var/lib/quantum/keystone-signing
/etc/quantum/metadata_agent.iniを更新します(制御ノードとの通信)
root@network:~# cat/etc/quantum/metadata_agent.ini |grep -v^# |grep -v ^$
[ DEFAULT]
auth_url = http://10.10.10.51:35357/v2.0
auth_region = RegionOne
admin_tenant_name = service
admin_user = quantum
admin_password = 123456
nova_metadata_ip = 10.10.10.51
nova_metadata_port = 8775
metadata_proxy_shared_secret =helloOpenStack
/etc/quantum/l3_agent.iniおよび/etc/quantum/dhcp_agent.ini構成ファイルは変更されません
sudo権限を設定する
root@network:~# cat/etc/sudoers.d/quantum_sudoers
Defaults:quantum !requiretty
quantum ALL=NOPASSWD: ALL
quantum ALL = (root) NOPASSWD:/usr/bin/quantum-rootwrap
すべての量子サービスを再起動します
cd /etc/init.d/; for i in $( ls quantum-*); do sudo service $i restart; done
すべてのサービスのステータスを確認し、quantumの下のログを確認します
cd /etc/init.d/; for i in $( ls quantum-*); do sudo service $i status; done
- Compute Node
4.1. ノードを準備します
インストールソース
apt-get install -y ubuntu-cloud-keyring
apt-get install -y gplhost-archive-keyring
root@c03:/var/log/nova# cat/etc/apt/sources.list.d/cloud-archive.list
debhttp://ubuntu-cloud.archive.canonical.com/ubuntu precise-updates/grizzly main
root@c03:/var/log/nova# cat/etc/apt/sources.list.d/grizzly.list
deb http://archive.gplhost.com/debiangrizzly main
deb http://archive.gplhost.com/debiangrizzly-backports main
更新システム
apt-get update -y
apt-get upgrade -y
apt-get dist-upgrade -y
ntpサービスをインストールします
apt-get install -y ntp
制御ノードの時間を同期するようにntpを構成します
Comment the ubuntu NTP servers
sed -i 's/server0.ubuntu.pool.ntp.org/#server 0.ubuntu.pool.ntp.org/g' /etc/ntp.conf
sed -i 's/server1.ubuntu.pool.ntp.org/#server 1.ubuntu.pool.ntp.org/g' /etc/ntp.conf
sed -i 's/server2.ubuntu.pool.ntp.org/#server 2.ubuntu.pool.ntp.org/g' /etc/ntp.conf
sed -i 's/server3.ubuntu.pool.ntp.org/#server 3.ubuntu.pool.ntp.org/g' /etc/ntp.conf
Set the network node to follow up yourconroller node
sed -i 's/server ntp.ubuntu.com/server10.10.10.51/g' /etc/ntp.conf
ntpサービスを再起動します
service ntp restart
他のソフトウェアをインストールする
apt-get install -y vlan bridge-utils
IP転送をオンにする
sed -i's/#net.ipv4.ip_forward=1/net.ipv4.ip_forward=1/' /etc/sysctl.conf
sysctl-pはすぐに有効になります
4.2. ネットワーク設定
その中で、eth2はソフトウェアパッケージのダウンロードに使用され、使用後に削除できます
root@c03:~# cat /etc/network/interfaces
This file describes the networkinterfaces available on your system
and how to activate them. For moreinformation, see interfaces(5).
The loopback network interface
auto lo
iface lo inet loopback
The primary network interface
auto eth2
iface eth2 inet dhcp
auto eth0
iface eth0 inet static
address 10.10.10.55
netmask 255.255.255.0
auto eth1
iface eth1 inet static
address 10.20.20.55
netmask 255.255.255.0
4.3 novaコンピューティングパッケージをインストールする
apt-get install nova-compute-qemu(ここでは仮想マシンにインストールしましたが、kvmはサポートしていません)
注意:
nova-compute-kvm requires that your CPU supportshardware-assisted
virtualization (HVM) such as Intel VT-x orAMD-V. If your CPU does not
support this, or if you are already runningin a virtualized environment, you
can instead use the nova-compute-qemupackage. This package provides
software-based virtualization.
/etc/nova/api-paste.iniの自動トークン検証セクションを変更します
[ filter:authtoken]
paste.filter_factory =keystoneclient.middleware.auth_token:filter_factory
auth_host = 10.10.10.51
auth_port = 35357
auth_protocol = http
admin_tenant_name = service
admin_user = nova
admin_password = 123456
signing_dir = /tmp/keystone-signing-nova
auth_version = v2.0
/etc/nova/nova.confを変更します
root@c03:~# cat /etc/nova/nova.conf
[ DEFAULT]
dhcpbridge_flagfile=/etc/nova/nova.conf
dhcpbridge=/usr/bin/nova-dhcpbridge
logdir=/var/log/nova
state_path=/var/lib/nova
lock_path=/var/lock/nova
force_dhcp_release=True
iscsi_helper=tgtadm
iscsi_ip_address=10.10.10.51
libvirt_use_virtio_for_bridges=True
connection_type=libvirt
root_helper=sudo nova-rootwrap/etc/nova/rootwrap.conf
verbose=True
ec2_private_dns_show_ip=True
api_paste_config=/etc/nova/api-paste.ini
volumes_path=/var/lib/nova/volumes
enabled_apis=ec2,osapi_compute,metadata
General
verbose=True
my_ip=10.10.10.55
rabbit_host = 10.10.10.51
rabbit_password = guest
auth_strategy=keystone
ec2_host=10.10.10.51
ec2_url=http://10.10.10.51:8773/services/Cloud
Networking
libvirt_use_virtio_for_bridges=True
network_api_class=nova.network.quantumv2.api.API
quantum_url=http://10.10.10.51:9696
quantum_auth_strategy=keystone
quantum_admin_tenant_name=service
quantum_admin_username=quantum
quantum_admin_password=123456
quantum_admin_auth_url=http://10.10.10.51:35357/v2.0
Security Groups
firewall_driver=nova.virt.firewall.NoopFirewallDriver
security_group_api=quantum
Compute
compute_driver=libvirt.LibvirtDriver
connection_type=libvirt
Cinder
volume_api_class=nova.volume.cinder.API
volume_driver=nova.volume.driver.ISCSIDriver
enabled_apis=ec2,osapi_compute,metadata
osapi_volume_listen_port=5900
cinder_catalog_info=volume:cinder:internalURL
iscsi_helper=tgtadm
volume_name_template = volume-%s
volume_group = cinder-volumes
Glance
glance_api_servers=10.10.10.51:9292
image_service=nova.image.glance.GlanceImageService
novnc
novnc_enabled=true
novncproxy_base_url=http://172.16.10.200:6080/vnc_auto.html
novncproxy_port=6080
vncserver_proxyclient_address=10.10.10.55
vncserver_listen=0.0.0.0
libvirタイプを表示
root@c03:~# cat /etc/nova/nova-compute.conf
[ DEFAULT]
libvirt_type=qemu
compute_driver=libvirt.LibvirtDriver
デフォルトの仮想ブリッジを削除します。削除しなくても影響はありません。
virsh net-destroy default
virsh net-undefine default
nova-computeサービスを開始します
service nova-compute restart
nova関連サービススマイリーをチェック
root@control:~# nova-manage service list|grep -v c01 |grep -v c02
Binary Host Zone Status State Updated_At
nova-cert control internal enabled :-) 2013-10-29 04:29:43
nova-conductor control internal enabled :-) 2013-10-29 04:29:38
nova-consoleauth control internal enabled :-) 2013-10-29 04:29:42
nova-scheduler control internal enabled :-) 2013-10-29 04:29:43
nova-compute c03 nova enabled :-) 2013-10-29 04:29:36
nova-console control internal enabled :-) 2013-10-29 04:29:43
4.4. OpenVSwitch
openVSwitchのインストール:ここにある3つのソフトウェアをインストールする必要があることに注意してください。ovsの使用に加えて、openstackはシステムのbrcompatも使用します。
apt-get install openvswitch-switchopenvswitch-brcompat openvswitch-datapath-dkms
ovs-brcompatdを開始するように設定します。
sed -i 's/# BRCOMPAT=no/BRCOMPAT=yes/g'/etc/default/openvswitch-switch
openvswitch-switchを開始します。
service openvswitch-switch restart
-
Killing ovs-brcompatd (1327)
-
Killing ovs-vswitchd (1195)
-
Killing ovsdb-server (1185)
-
Starting ovsdb-server
-
Configuring Open vSwitch system IDs
-
Starting ovs-vswitchd
2013- 10- 29 T02:45:50Z|00001|brcompatd|WARN|Bridgecompatibility is deprecated and may be removed no earlier than February 2013
- Starting ovs-brcompatd
ovs-brcompatd、ovs-vswitchd、ovsdb-serverおよびその他のサービスが開始されるまで
そして、brcompatモジュールを確認してください
lsmod | grep brcompat
brcompat 13512 0
openvswitch 84038 7 brcompat
それでもbrcompatを起動できない場合は、次のコマンドを実行します。
/etc/init.d/openvswitch-switchforce-reload-kmod
サーバーを再起動できなくなった場合、ubuntu13.04(64ビット)は通常、上記の3つのソフトウェアをインストールし、他の追加操作なしで正常に起動できます。
br-intブリッジを作成する
ovs-vsctl add-br br-int
4.5. Quantum
Quantumopenvswitchエージェントをインストールします。
apt-get install quantum-plugin-openvswitch-agent
OVSプラグイン構成ファイル/etc/quantum/plugins/openvswitch/ovs_quantum_plugin.iniを編集します。
root@c03:~# cat/etc/quantum/plugins/openvswitch/ovs_quantum_plugin.ini |grep -v ^# |grep -v ^$
[ DATABASE]
sql_connection =mysql://quantum:[email protected]/quantum
reconnect_interval = 2
[ OVS]
tenant_network_type = gre
tunnel_id_ranges = 1:1000
local_ip = 10.20.20.55
enable_tunneling = True
[ AGENT]
polling_interval = 2
[ SECURITYGROUP]
firewall_driver = quantum.agent.linux.iptables_firewall.OVSHybridIptablesFirewallDriver
/etc/quantum/quantum.confを編集します。
root@c03:~# cat/etc/quantum/quantum.conf|grep -v ^# |grep -v ^$
[ DEFAULT]
verbose = True
lock_path = $state_path/lock
bind_host = 0.0.0.0
bind_port = 9696
core_plugin =quantum.plugins.openvswitch.ovs_quantum_plugin.OVSQuantumPluginV2
api_paste_config =/etc/quantum/api-paste.ini
control_exchange = quantum
fake_rabbit = False
rabbit_host = 10.10.10.51
rabbit_password = guest
notification_driver = quantum.openstack.common.notifier.rpc_notifier
default_notification_level = INFO
notification_topics = notifications
[ QUOTAS]
[ DEFAULT_SERVICETYPE]
[ AGENT]
root_helper = sudo quantum-rootwrap/etc/quantum/rootwrap.conf
[ keystone_authtoken]
auth_host = 10.10.10.51
auth_port = 35357
auth_protocol = http
admin_tenant_name = service
admin_user = quantum
admin_password = 123456
signing_dir =/var/lib/quantum/keystone-signing
サービスを開始します。
service quantum-plugin-openvswitch-agentrestart
他のソフトウェアをインストールします。
インスタンスが燃えがらによって作成されたボリュームを正常に接続したい場合は、ショップアシスタントソフトウェアをインストールする必要があります。これは公式ウェブサイトのトラブルシューティングに記載されていますが、通常は見つかりません(システムが最小限にインストールされているため、mysql-cientにはありませんインストール)
libsysfs2_2.1.0+repack-2_amd64.deb multipath-tools_0.4.9-3ubuntu7_amd64.deb sg3-utils_1.33-1build1_amd64.deb
mysql-client-core-5.5_5.5.32-0ubuntu0.13.04.1_amd64.deb sysfsutils_2.1.0+repack-2_amd64.deb
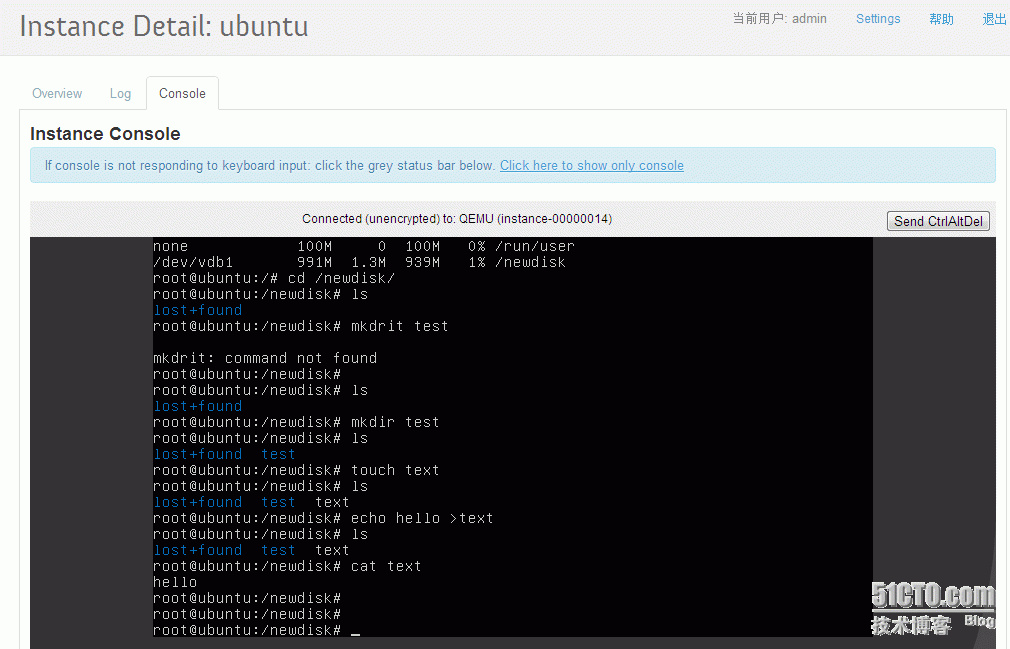
5 。 vmの作成を開始します
これらの2つのポイントについては、公式Webサイトのドキュメントを直接参照できますが、どちらもコマンドラインモードであり、賢いように見えますが、ダッシュボードコンソールにログインしていないことは簡単です。
5.1 量子ネットワークを作成する
基本的な手順は次のように要約されます。
テナントを構築します(各テナントは独自のネットワークと仮想マシンを持つことができますが、外部マイニングネットワークを共有します)
エクストラネット名を作成する
外部ネットワークサブネットを構築します(floatingip範囲が設定され、外部が仮想マシンにアクセスできるように、内部仮想マシンの内部ネットワークIPとのマッピングに使用されます)
組み込みのネットワーク名
イントラネットサブネットを構築する(仮想マシンインスタンスに割り当てられる)
ルーターを構築する
ルーターのゲートウェイ(外部ネットワーク)を設定し、ネットワークセグメント(内部ネットワーク)を追加して、外部ネットワークと内部ネットワークをルーター経由で接続できるようにします。
ネットワーク環境が損なわれていないかどうかを確認するコマンドがあることに注意してください。
root@control:~# quantum agent-list
+--------------------------------------+--------------------+---------+-------+----------------+
| id | agent_type | host | alive | admin_state_up |
+--------------------------------------+--------------------+---------+-------+----------------+
| 03 d00de0-d78e-47ae-8b64-10971e140b45 |Open vSwitch agent | network | :-) |True |
| a7c840b3-de73-4ee4-8e1f-acb4ff9b2046 | L3agent | network | :-) | True |
| b6b66ba7-e733-42a4-bdf0-796787d48955 |DHCP agent | network | :-) | True |
| c3ce6c66-8a9a-4786-8d92-5325df54e0f0 |Open vSwitch agent | c03 | :-) | True |
+--------------------------------------+--------------------+---------+-------+----------------+
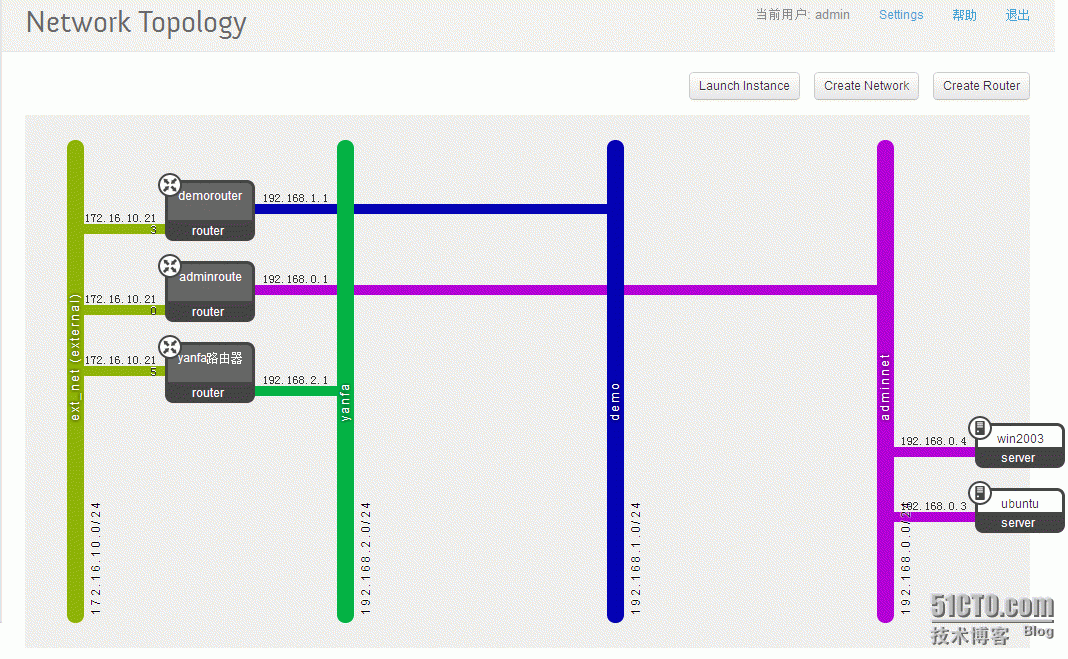
構築されたネットワークトポロジは次のとおりです。
管理テナント
管理テナントには、すべてのネットワークトポロジを表示するためのより多くの権限がありますが、他のテナントの仮想マシンは表示できません
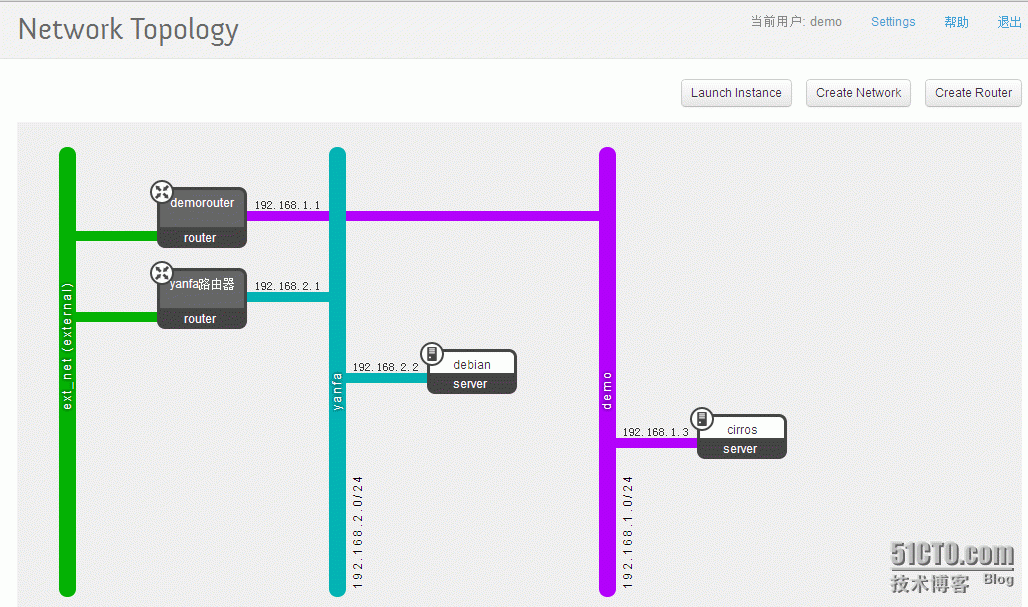
デモテナント
テナントには、192.168.1.0 / 24と192.168.2.0/24の2つのネットワークセグメントがあります。
図のネットワーク図からわかるように、2つのネットワークセグメントは外部IP接続を介して通信でき、同じ内部ネットワークセグメントは対応するルーティングなしで相互に通信できます。
5.2 仮想マシン
インスタンス名を起動し、ミラーを選択し、ネットワークを選択して、起動します
VNCアクセス、公式Webサイトからダウンロードした画像はキーを使用してsshでログインすることに注意してください。ユーザー名とパスワードがログインできないようにsshd_configで構成されています。キーをダウンロードしてsshでログインするか、vncでsshd構成を変更できます。鏡を作る。
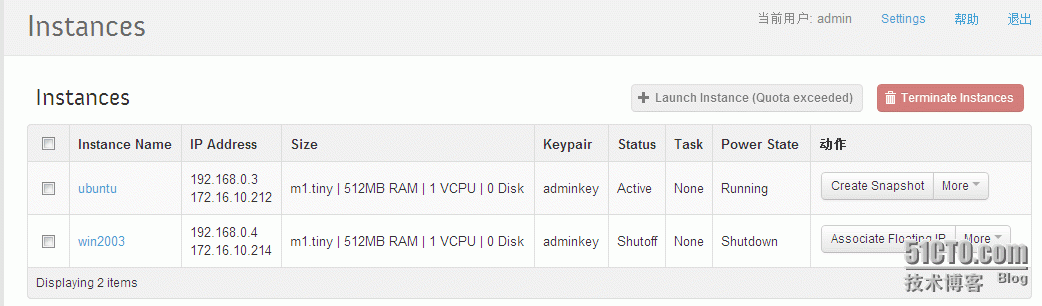
上記の他のソフトウェアをインストールした後、最終的に添付
ここでの画像debianは、esxi5によって生成されたovfテンプレートからインポートされ、windows2003はkvm仮想マシンを使用して独自に作成され、その他のものはインターネットからダウンロードされます。
インポートミラーでサポートされている形式は次のとおりです
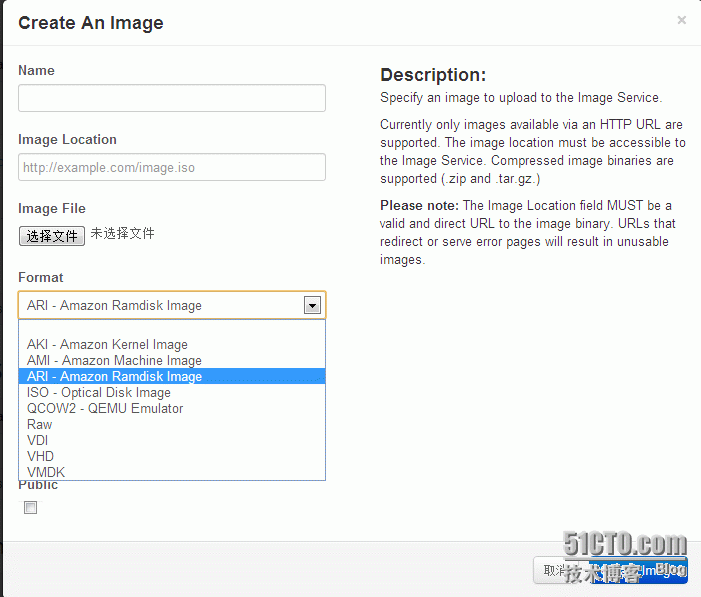
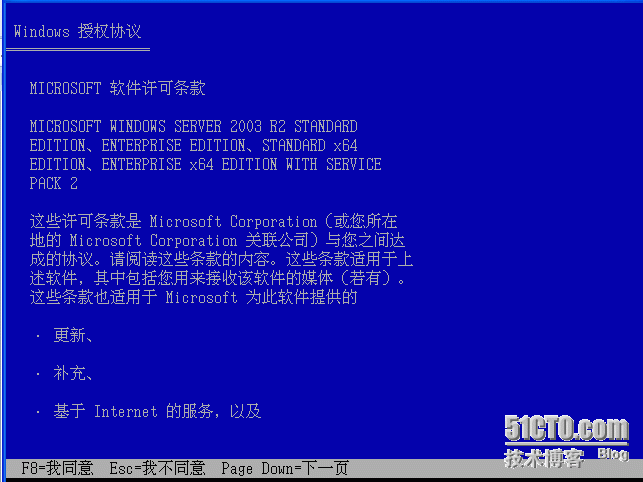
添付ファイル:ウィンドウズミラープロダクション
Openstackはwindows2003をミラー化します
準備ができました
virtio-win-1.1.16.vfdをダウンロード
virtio-win-0.1-65.iso
windows_sp2.iso
開始
qemu-img create -f raw windows2003.img 8G
sudo qemu-kvm -m 512-no-reboot -boot order=d -drive file=windows2003.img,if=virtio,boot=off -drive file=WIN2003_SP2.iso,media=cdrom,boot=on -fda virtio-win-1.1.16.vfd -bootorder=d,menu=on -usbdevice tablet -nographic -vnc :1
次に、vncviewer 127.0.0.1:5901をすばやく使用してアクセスして表示し、F12を押してメニューオプションにジャンプします。そうしないと、自動的にハードディスクブートモードになります。誤って入力した場合は、kvmプロセスを強制終了し、kvmを再起動して、すばやくF12を押してみてください。
デフォルトのCDブート
F8を押してパーティションに入り、フォーマット後に再起動すると、プロセスが再起動します。
sudoqemu-kvm -m 512 -no-reboot -boot order=d -drivefile=windows2003.img,if=virtio,boot=off -drivefile=WIN2003_SP2.iso,media=cdrom,boot=on -fda virtio-win-1.1.16.vfd -bootorder=d,menu=on -usbdevice tablet -nographic -vnc :1
F12を押して、開始するハードディスクを選択します
インストールを再開します。
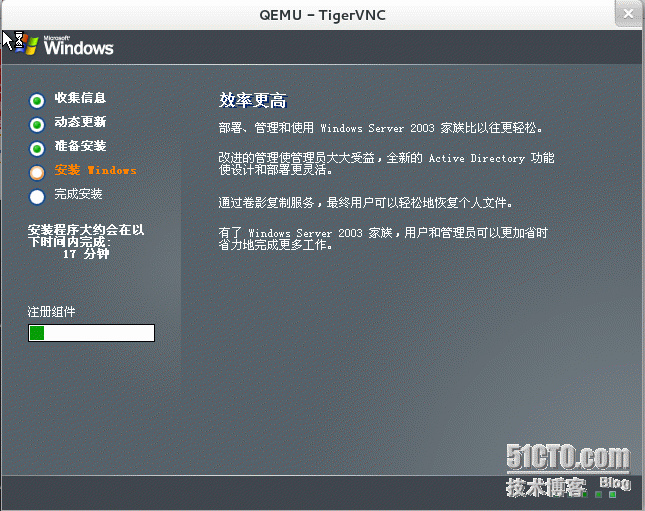
インストールが完了したら、仮想マシンをシャットダウンします
仮想マシンイメージを再起動し、virtioドライバーをロードします
sudo qemu-kvm -m512 -drive file=windows2003.img -cdromvirtio-win-0.1-65.iso -net nic,model=virtio -net user -boot order=c -usbdevicetablet -nographic -vnc :1
virtioドライバーをインストールした後、シャットダウンして管理ツールをインストールします
sudo qemu-kvm -m512 -drive file=windows2003r.img -cdromWIN2003_SP2.iso -net nic,model=virtio -net user -boot order=c -usbdevice tablet-nographic -vnc :1
アップロード
glance addname="win2003X64" is_public=true container_format=ovf disk_format=raw < windows2003.img