Introduce Mycat for PXC cluster and build a complete high-availability cluster architecture
MySQL cluster middleware comparison##
Building a PXC cluster under CentOS8 article demonstrates how to build a three-node PXC cluster from scratch. But building a PXC cluster is not enough, because in actual enterprise applications, there may be multiple PXC clusters, and each cluster exists as a data slice. Therefore, under the complete architecture, we also need to introduce database middleware for the cluster to achieve data sharding and [load balancing] (https://cloud.tencent.com/product/clb?from=10680) and other functions.
There are many database middleware on the market. These middleware are mainly divided into two types, load balancing type and data segmentation type (usually data segmentation type will have load balancing function):
-
**Load balancing type: **
-
Haproxy
-
MySQL - Proxy
-
**Data segmentation type: **
-
MyCat
-
Atlas
-
OneProxy
-
ProxySQL
The role of load balancing middleware:
- Load balancing provides request forwarding, which can evenly forward requests to each node in the cluster, reducing the load of a single node
- Allows us to make full use of the resources of each node in the cluster to give full play to the performance of the cluster
The role of data segmentation middleware:
- Distribute SQL statements according to different routing algorithms, so that different shards can store different data, thus forming data segmentation
- Let the data be stored evenly on different shards to prevent the data volume of a certain shard from exceeding the storage limit of the database. Sharding here refers to a cluster or a database node
The following is a comparison of common middleware:
| Name | Is it open source and free | Load capacity | Development language | Function | Document | Population rate |
|---|---|---|---|---|---|---|
| MyCat | Open source and free | Reconstructed based on Alibaba's Corba middleware, with high-traffic inspection | Java | Comprehensive functions, rich sharding algorithm and functions such as read-write separation, global primary key and distributed transaction | Document Rich, not only the official "Mycat Authoritative Guide", but also many community-contributed documents | There are applications in the fields of telecommunications and e-commerce, and it is the MySQL middleware with the highest penetration rate in China |
| Atlas | Open source and free | Based on MySQL Proxy, it is mainly used for 360 products. It has a visit volume inspection that carries billions of requests every day. | C language | The function is limited, which realizes the separation of reading and writing. It has a small amount of data segmentation algorithm and does not support Global primary keys and distributed transactions | Less documents, only open source project documents, no technical communities and publications | Low penetration rate, except Qihoo 360, only used in some small and medium-sized projects, there are not many cases for reference |
| OneProxy | Divided into free version and enterprise version | C-based kernel with good performance | C language | Limited functions, realized read-write separation, has a small amount of data segmentation algorithm, does not support global primary keys and distributed transactions | documents Few, the official website does not provide documentation, no technical communities and publications | Low penetration rate, only used in the internal systems of some small and medium-sized enterprises |
| ProxySQL | open source and free | excellent performance, recommended by Percona | C++ | relatively rich in functions, support for read-write separation, data segmentation, failover and query caching, etc. | rich documents, official documents and technical communities | penetration rate compared to Mycat Low, but many companies have tried to use it |
Configure Mycat data segmentation##
After the introduction and comparison in the previous section, it can be seen that MyCat and ProxySQL are ideal database middleware. Compared with ProxySQL, MyCat has more comprehensive functions and higher penetration rate, so Mycat is used as the middleware of PXC cluster. For the introduction and installation of Mycat, please refer to my other article Mycat Quick Start, which will not be repeated here.
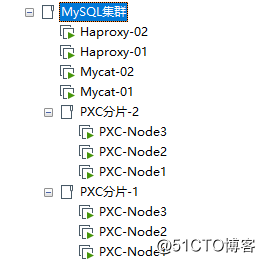
This section mainly introduces how to configure Mycat's data segmentation function so that Mycat acts as the front-end data segmentation middleware to forward SQL requests to the back-end PXC cluster shards. Therefore, here I set up two PXC clusters, each cluster is a shard, and set up two Mycat nodes and two Haproxy nodes to form dual-system hot standby later. As shown:
The information of each node is as follows:
| Role | Host | IP |
|---|---|---|
| Haproxy-Master | Haproxy-Master | 192.168.190.140 |
| Haproxy-Backup | Haproxy-Backup | 192.168.190.141 |
| Mycat:Node1 | mycat-01 | 192.168.190.136 |
| Mycat:Node2 | mycat-02 | 192.168.190.135 |
| PXC fragment-1: Node1 | PXC-Node1 | 192.168.190.132 |
| PXC fragment-1: Node2 | PXC-Node2 | 192.168.190.133 |
| PXC fragment-1: Node3 | PXC-Node3 | 192.168.190.134 |
| PXC fragment-2: Node1 | PXC-Node1 | 192.168.190.137 |
| PXC Fragment-2: Node2 | PXC-Node2 | 192.168.190.138 |
| PXC Fragment-2: Node3 | PXC-Node3 | 192.168.190.139 |
Create a test library in each shard, and create a t_user table in the library for testing. The specific table creation SQL is as follows:
CREATE TABLE `t_user`(`id`int(11) NOT NULL,`username`varchar(20) NOT NULL,`password`char(36) NOT NULL,`tel`char(11) NOT NULL,`locked`char(10) NOT NULL,
 PRIMARY KEY(`id`),
 UNIQUE KEY `idx_username`(`username`)) ENGINE=InnoDB DEFAULT CHARSET=utf8mb4;
After completing the above preparations, we then start to configure Mycat. If you don't understand the configuration file of Mycat, you can refer to another article of mine: [Mycat core configuration details] (https://blog.51cto.com/zero01/2465837), this article will not repeat it.
1、 Edit the server.xml file and configure the access user of Mycat:
< user name="admin" defaultAccount="true"><property name="password">Abc_123456</property><property name="schemas">test</property><property name="defaultSchema">test</property></user>
2、 Edit the schema.xml file to configure the Mycat logic library, logic table, and connection information of the cluster nodes:
<? xml version="1.0"?><!DOCTYPE mycat:schema SYSTEM "schema.dtd"><mycat:schema xmlns:mycat="http://io.mycat/"><!--Configure logic library--><schema name="test" checkSQLschema="true" sqlMaxLimit="100" randomDataNode="dn1"><!--Configuration logic table--><table name="t_user" dataNode="dn1,dn2" rule="mod-long"/></schema><!--Configure data fragmentation. Each fragment will have an index value, starting from 0. For example, the index value of dn1 is 0, the index value of dn2 is 1, and so on--><!--The index of the fragment is related to the fragment algorithm, and the value calculated by the fragment algorithm is the fragment index--><dataNode name="dn1" dataHost="pxc-cluster1" database="test"/><dataNode name="dn2" dataHost="pxc-cluster2" database="test"/><!--Configure connection information for cluster nodes--><dataHost name="pxc-cluster1" maxCon="1000" minCon="10" balance="2"
    writeType="1" dbType="mysql" dbDriver="native" switchType="1" slaveThreshold="100"><heartbeat>select user()</heartbeat><writeHost host="W1" url="192.168.190.132:3306" user="admin"
   password="Abc_123456"><readHost host="W1-R1" url="192.168.190.133:3306" user="admin" password="Abc_123456"/><readHost host="W1-R2" url="192.168.190.134:3306" user="admin" password="Abc_123456"/></writeHost><writeHost host="W2" url="192.168.190.133:3306" user="admin"
         password="Abc_123456"><readHost host="W2-R1" url="192.168.190.132:3306" user="admin" password="Abc_123456"/><readHost host="W2-R2" url="192.168.190.134:3306" user="admin" password="Abc_123456"/></writeHost></dataHost><dataHost name="pxc-cluster2" maxCon="1000" minCon="10" balance="2"
    writeType="1" dbType="mysql" dbDriver="native" switchType="1" slaveThreshold="100"><heartbeat>select user()</heartbeat><writeHost host="W1" url="192.168.190.137:3306" user="admin" password="Abc_123456"><readHost host="W1-R1" url="192.168.190.138:3306" user="admin" password="Abc_123456"/><readHost host="W1-R2" url="192.168.190.139:3306" user="admin" password="Abc_123456"/></writeHost><writeHost host="W2" url="192.168.190.138:3306" user="admin" password="Abc_123456"><readHost host="W2-R1" url="192.168.190.137:3306" user="admin" password="Abc_123456"/><readHost host="W2-R2" url="192.168.190.138:3306" user="admin" password="Abc_123456"/></writeHost></dataHost></mycat:schema>
3、 Edit the rule.xml file and modify the modulus base of the mod-long fragmentation algorithm. Since there are only two clusters as fragments, the base number needs to be changed to 2:
< tableRule name="mod-long"><rule><columns>id</columns><algorithm>mod-long</algorithm></rule></tableRule><function name="mod-long"class="io.mycat.route.function.PartitionByMod"><!-- how many data nodes --><property name="count">2</property></function>
- **Tips: **This fragmentation algorithm uses the value of the
idcolumn in the table to modulate the modulus base to obtain the index of the data fragment
After completing the configuration of the above three files, start Mycat:
[ root@mycat-01~]# mycat start
Starting Mycat-server...[root@mycat-01~]# more /usr/local/mycat/logs/wrapper.log |grep successfully
# The log output successfully indicates that the startup is successful
INFO   | jvm 1|2020/01/1915:09:02| MyCAT Server startup successfully. see logs in logs/mycat.log
test###
After the startup is complete, enter Mycat to execute an insert statement to test whether the SQL can be forwarded to the correct cluster shard. Specific steps are as follows:
[ root@mycat-01~]# mysql -uadmin -P8066 -h127.0.0.1-p
mysql> use test;
mysql> insert into t_user(id, username, password, tel, locked)->values(1,'Jack',hex(AES_ENCRYPT('123456','Test')),'13333333333','N');
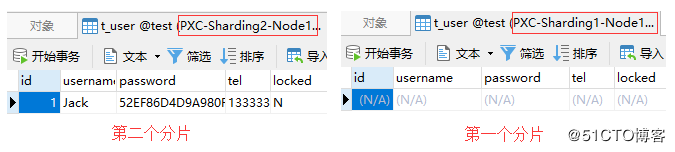
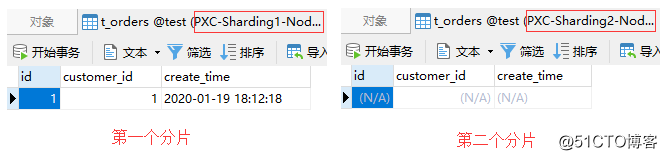
The above insert statement inserts a record with id as 1, and we use a fragmentation algorithm that modulates the id column, and the configured modulus base is 2. Therefore, the result of the modulo calculation based on the value of id and modulo base is: 1% 2 = 1. The resulting 1 is the index of the shard, so under normal circumstances Mycat will forward the insert statement to the cluster with the shard index of 1.
According to the configuration in the schema.xml file, the cluster corresponding to the shard with index 1 is pxc-cluster2, which is the second PXC cluster shard. Next, we can compare the data in the two clusters to verify whether Mycat correctly forwarded the SQL as expected.
As you can see from the figure below, Mycat correctly forwarded the insert statement to the second shard. At this time, the first shard has no data:
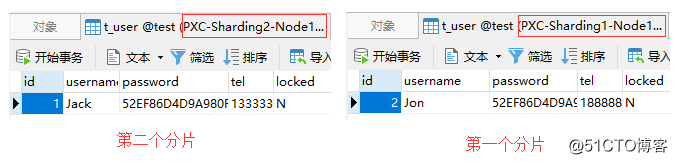
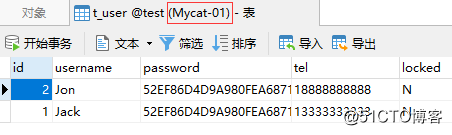
Then we test whether Mycat can forward the SQL to the first shard when the id is 2. The specific SQL is as follows:
insert into t_user(id, username, password, tel, locked)values(2,'Jon',hex(AES_ENCRYPT('123456','Test')),'18888888888','N');
The test results are shown in the figure:
After completing the above test, the data in all shards can be queried on Mycat at this time:
Four commonly used data segmentation algorithms##
Primary key modulus segmentation###
In the example in the previous section, the primary key modular segmentation is used, and its characteristics are as follows:
- Primary key modulo segmentation is suitable for scenarios where the initial data is large but the data is not growing fast. For example, map products, administrative data, corporate data, etc.
- The disadvantage of primary key modular segmentation is that it is difficult to extend new segments and too much data is migrated
- If you need to expand the number of fragments, it is recommended that the number of expanded fragments be 2n times the original fragments. For example, it was originally two shards, but after expansion it will be four shards
Primary key range segmentation###
- Primary key range segmentation is suitable for scenarios where data is growing rapidly
- It is easy to increase the sharding, and need to have a clear primary key column
Date segmentation###
- Date segmentation is suitable for scenarios where data is growing rapidly
- Easy to add shards, need a clear date column
Enumeration value segmentation###
- Enumeration value segmentation is suitable for scenarios where data is classified and stored, and is suitable for most businesses
- Enumeration value segmentation splits the data according to the mapping relationship between the value (number) of a field and the
mapFileconfiguration - The disadvantage of enumerated value segmentation is that the data stored in the shards is not uniform enough
In the article [Mycat core configuration details] (https://blog.51cto.com/zero01/2465837), the enumeration value segmentation algorithm is also introduced. Compared with other algorithms, this algorithm uses an additional mapping file (mapFile), so here is a simple demonstration of the use of this algorithm.
**Requirements: ** There is a column in the user table that stores the area code where the user is located. This column is required to be used as a shard column, so that user data under different area codes can be stored in different shards.
1、 First, add the following configuration in the rule.xml file of Mycat:
<!- - Define sharding rules--><tableRule name="sharding-by-areafile"><rule><!--Define which column to use as the shard column--><columns>area_id</columns><algorithm>area-int</algorithm></rule></tableRule><!--Define the sharding algorithm--><function name="area-int"class="io.mycat.route.function.PartitionByFileMap"><!--Define the file name of mapFile, located in the conf directory--><property name="mapFile">area-hash-int.txt</property></function>
2、 Create the area-hash-int.txt file in the conf directory to define the correspondence between the area code and the fragment index:
[ root@mycat-01/usr/local/mycat]# vim conf/area-hash-int.txt
020=00755=00757=00763=10768=10751=1
3、 Configure schema.xml, add a logical table, and set its sharding rule to sharding-by-areafile:
< schema name="test" checkSQLschema="true" sqlMaxLimit="100" randomDataNode="dn1"><table name="t_user" dataNode="dn1,dn2" rule="mod-long"/><table name="t_customer" dataNode="dn1,dn2" rule="sharding-by-areafile"/></schema>
4、 Enter Mycat to execute the hot reload statement, which can make Mycat apply the new configuration without restarting:
[ root@mycat-01~]# mysql -uadmin -P9066 -h127.0.0.1-p
mysql> reload @@config_all;
test####
After completing the above configuration, let's build a table to test it and create the t_customer table in all clusters. The specific table SQL is as follows:
create table t_customer(
 id int primary key,
 username varchar(20) not null,
 area_id int not null);
Insert a record with area_id as 020 into Mycat:
[ root@mycat-01~]# mysql -uadmin -P8066 -h127.0.0.1-p
mysql> use test;
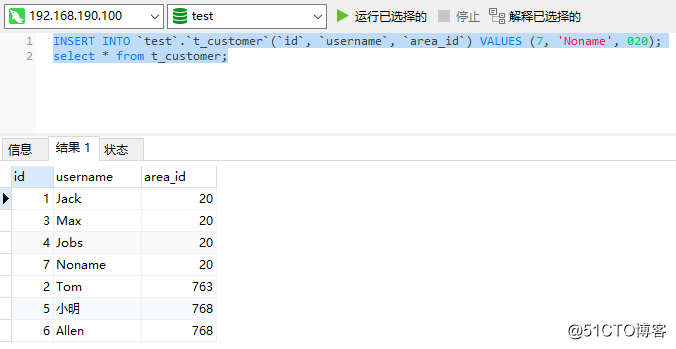
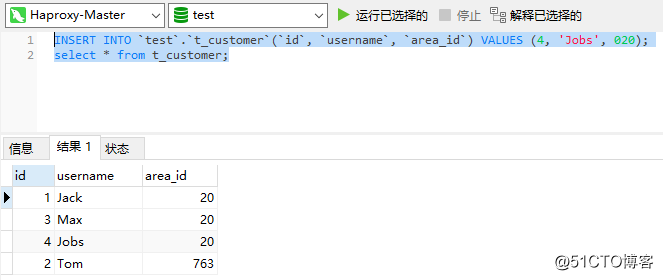
mysql> insert into t_customer(id, username, area_id)->values(1,'Jack',020);
According to the configuration in the mapping file, the data with area_id as 020 will be stored in the first shard, as shown below:
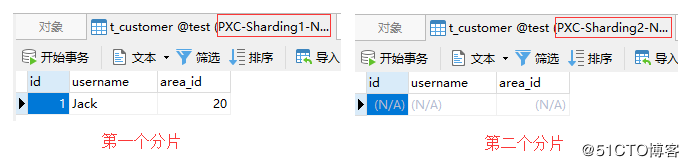
- **Tips: **Here, because
area_idis of typeint, the preceding0will be removed
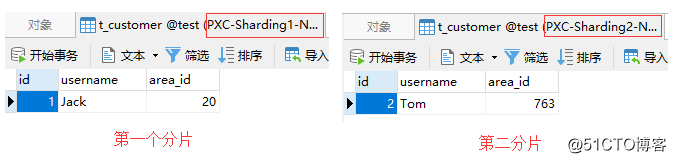
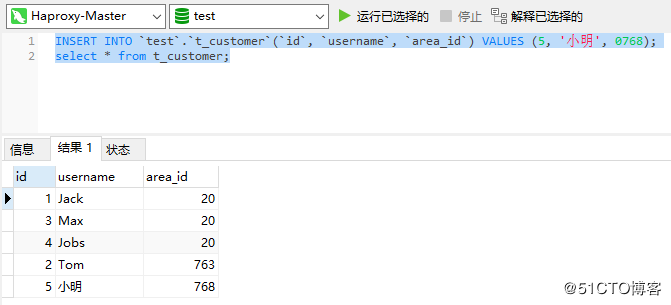
Then insert a record with area_id as 0763:
insert into t_customer(id, username, area_id)values(2,'Tom',0763);
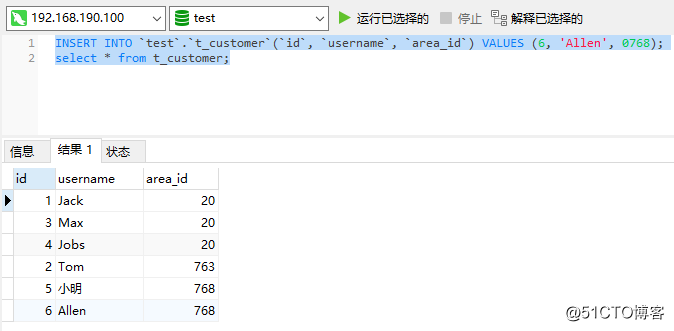
According to the configuration in the mapping file, the data with area_id as 0763 will be stored in the second shard, as shown below:
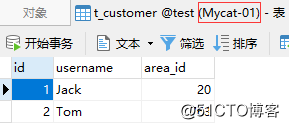
After completing the above test, the data in all shards should be queried in Mycat at this time:
Father and son table##
When related data is stored in different shards, you will encounter table join problems. In Mycat, it is not allowed to do table join queries across shards. In order to solve the problem of cross-sharding table connection, Mycat proposed a solution of parent-child table.
The parent-child table stipulates that the parent table can have any segmentation algorithm, but the child table associated with it is not allowed to have a segmentation algorithm, that is, the data of the child table is always stored in the same slice with the data of the parent table. No matter what segmentation algorithm is used for the parent table, the child table always follows the parent table for storage.
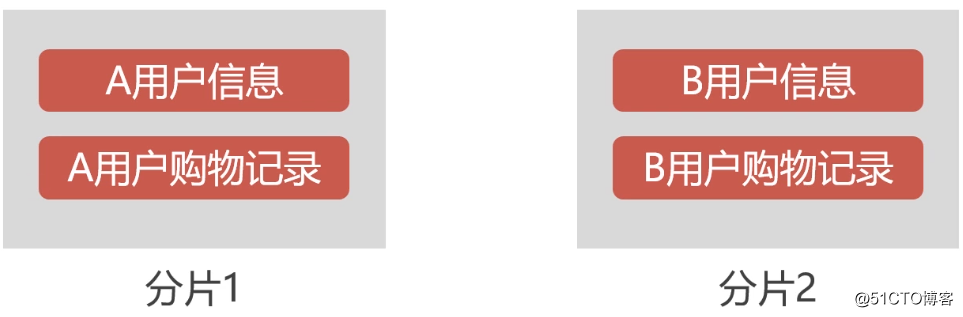
For example, the user table and the order table are related. We can use the user table as the parent table and the order table as the child table. When user A is stored in shard 1, the order data generated by user A will also be stored in shard 1, so that there is no need to cross shards when querying the order data of user A. As shown below:
practice###
After understanding the concept of the parent-child table, let's take a look at how to configure the parent-child table in Mycat. First, configure the parent-child table relationship in the schema.xml file:
< schema name="test" checkSQLschema="true" sqlMaxLimit="100" randomDataNode="dn1"><table name="t_customer" dataNode="dn1,dn2" rule="sharding-by-areafile"><!--Configuration sub-table--><childTable name="t_orders" joinKey="customer_id" parentKey="id"/></table></schema>
childTable label description:
joinKeyattribute: define the column used to associate the parent table in the child tableparentKeyattribute: defines the associated column in the parent tableYou can continue to add thechildTabletag in the childTabletag
After completing the above configuration, let Mycat reload the configuration file:
reload @@config_all;
test###
Then create the t_orders table in all shards. The specific table creation SQL is as follows:
create table t_orders(
 id int primary key,
 customer_id int not null,
 create_time datetime default current_timestamp
);
Now there are two users in the shard, the user with id of 1 is stored in the first shard, and the user with id of 2 is stored in the second shard. At this point, insert an order record through Mycat:
insert into t_orders(id, customer_id)values(1,1);
Since the order record is associated with the user whose id is 1, it will be stored in the first shard according to the provisions of the parent-child table. As shown below:
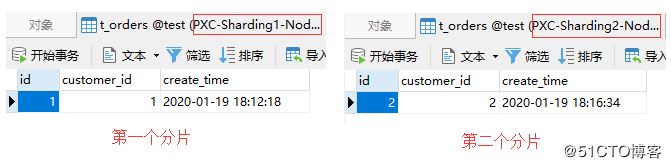
Similarly, if the order record is associated with a user whose id is 2, it will be stored in the second shard:
insert into t_orders(id, customer_id)values(2,2);
The test results are as follows:
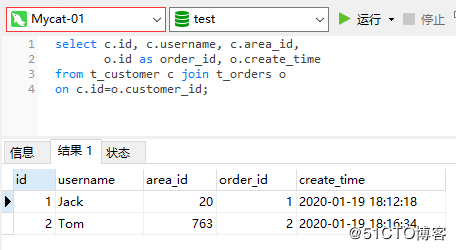
Since the data of the parent and child tables are stored in the same shard, there is no problem with the associated query on Mycat:
Establish a high-availability Mycat cluster with dual-system hot backup##
Foreword###
In the example in the above section, we can see that the read and write operations on the back-end database cluster are all performed on Mycat. As a middleware responsible for receiving client requests and forwarding the requests to the back-end database cluster, Mycat inevitably requires high availability. Otherwise, if Mycat has a single point of failure, the entire database cluster will be unavailable, which will have a huge impact on the entire system.
So this section will demonstrate how to build a highly available Mycat cluster. In order to build a Mycat highly available cluster, in addition to having more than two Mycat nodes, it is necessary to introduce Haproxy and Keepalived components.
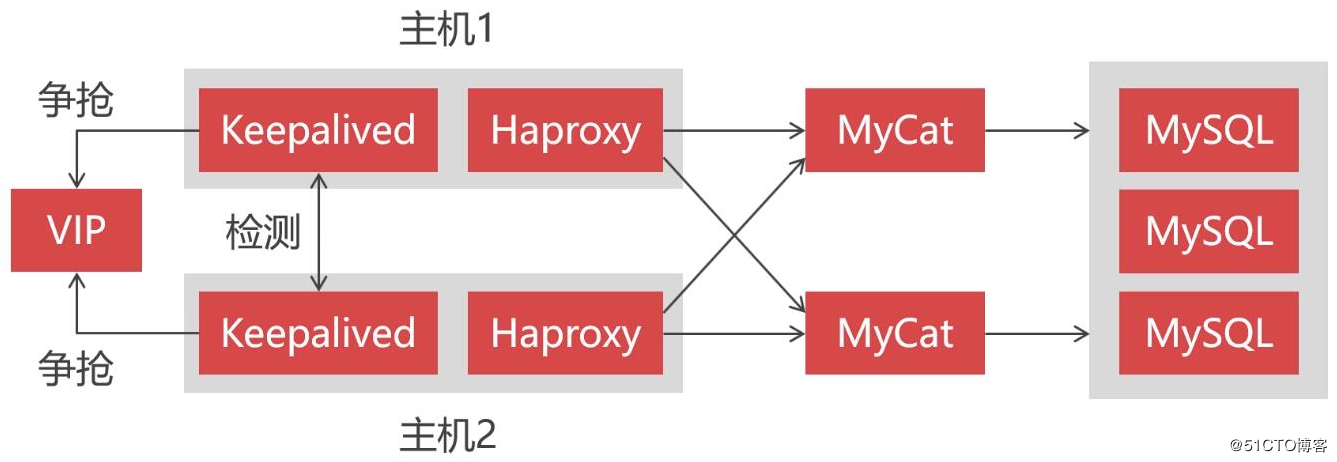
Among them, Haproxy, as a load balancing component, is located at the forefront to receive client requests and distribute the requests to each Mycat node to ensure the high availability of Mycat. Keepalived is used to implement dual-system hot backup, because Haproxy also needs to be highly available. When one Haproxy goes down, another standby Haproxy can immediately take over. In other words, only one Haproxy is running at the same time, and the other Haproxy is waiting as a backup. When the running Haproxy goes down unexpectedly, Keepalived can immediately switch the standby Haproxy to the running state.
Keepalived allows hosts to compete for the same virtual IP (VIP) to achieve high availability. These hosts are divided into two roles: Master and Backup, and there is only one Master, while Backup can have multiple. At the beginning, the Master first obtains that the VIP is running. When the Master goes down, Backup will automatically obtain the VIP if it cannot detect the Master. At this time, the request sent to the VIP will be received by the Backup. In this way, Backup can seamlessly take over the work of the Master to achieve high availability.
After introducing these components, our cluster architecture will eventually evolve into this:
Install Haproxy
Since Haproxy is an old-brand load balancing component, the installation package of this component is included in the yum repository of CentOS, and the installation is very simple. The installation command is as follows:
[ root@Haproxy-Master ~]# yum install -y haproxy
Configure Haproxy:
[ root@Haproxy-Master ~]# vim /etc/haproxy/haproxy.cfg
# Add the following configuration items at the end of the file
# Monitoring interface configuration
listen admin_stats
 # Bound ip and listening port
 bind 0.0.0.0:4001
 # Access agreement
 mode http
 # URI relative address
 stats uri /dbs
 # Statistical report format
 stats realm Global\ statistics
 # Account password used to log in to the monitoring interface
 stats auth admin:abc123456

# Database load balancing configuration
listen proxy-mysql
 # Bound ip and listening port
 bind 0.0.0.0:3306
 # Access agreement
 mode tcp
 # Load balancing algorithm
 # roundrobin: poll
 # static-rr: weight
 # leastconn: least connection
 # source: request source ip
 balance roundrobin
 # Log format
 option tcplog
 # Hosts that need to be load balanced
 server mycat_01 192.168.190.136:8066 check port 8066 weight 1 maxconn 2000
 server mycat_02 192.168.190.135:8066 check port 8066 weight 1 maxconn 2000
 # Use keepalive to detect dead links
 option tcpka
Because the 3306 port is configured for TCP forwarding and 4001 as the access port of the Haproxy monitoring interface, these two ports need to be opened on the firewall:
[ root@Haproxy-Master ~]# firewall-cmd --zone=public--add-port=3306/tcp --permanent
[ root@Haproxy-Master ~]# firewall-cmd --zone=public--add-port=4001/tcp --permanent
[ root@Haproxy-Master ~]# firewall-cmd --reload
After completing the above steps, start the Haproxy service:
[ root@Haproxy-Master ~]# systemctl start haproxy
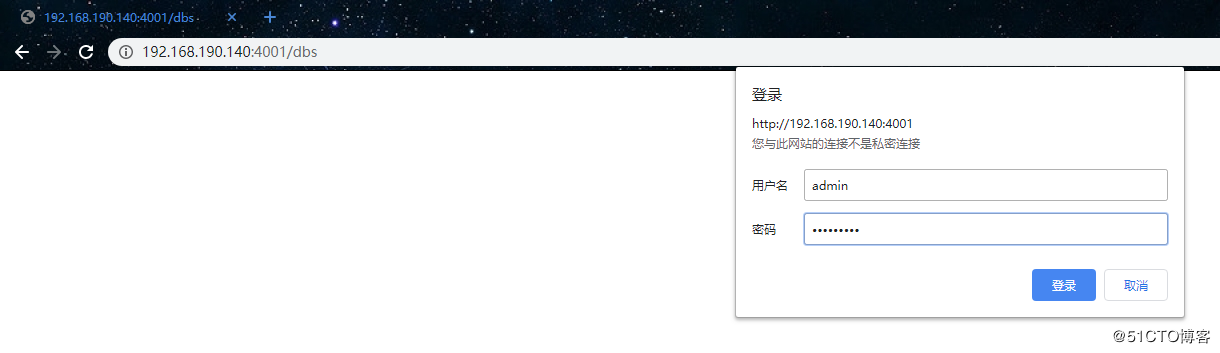
Then use the browser to access the Haproxy monitoring interface. The first time you visit, you will be asked to enter the username and password, where the username and password are configured in the configuration file:
After successful login, you will see the following page:
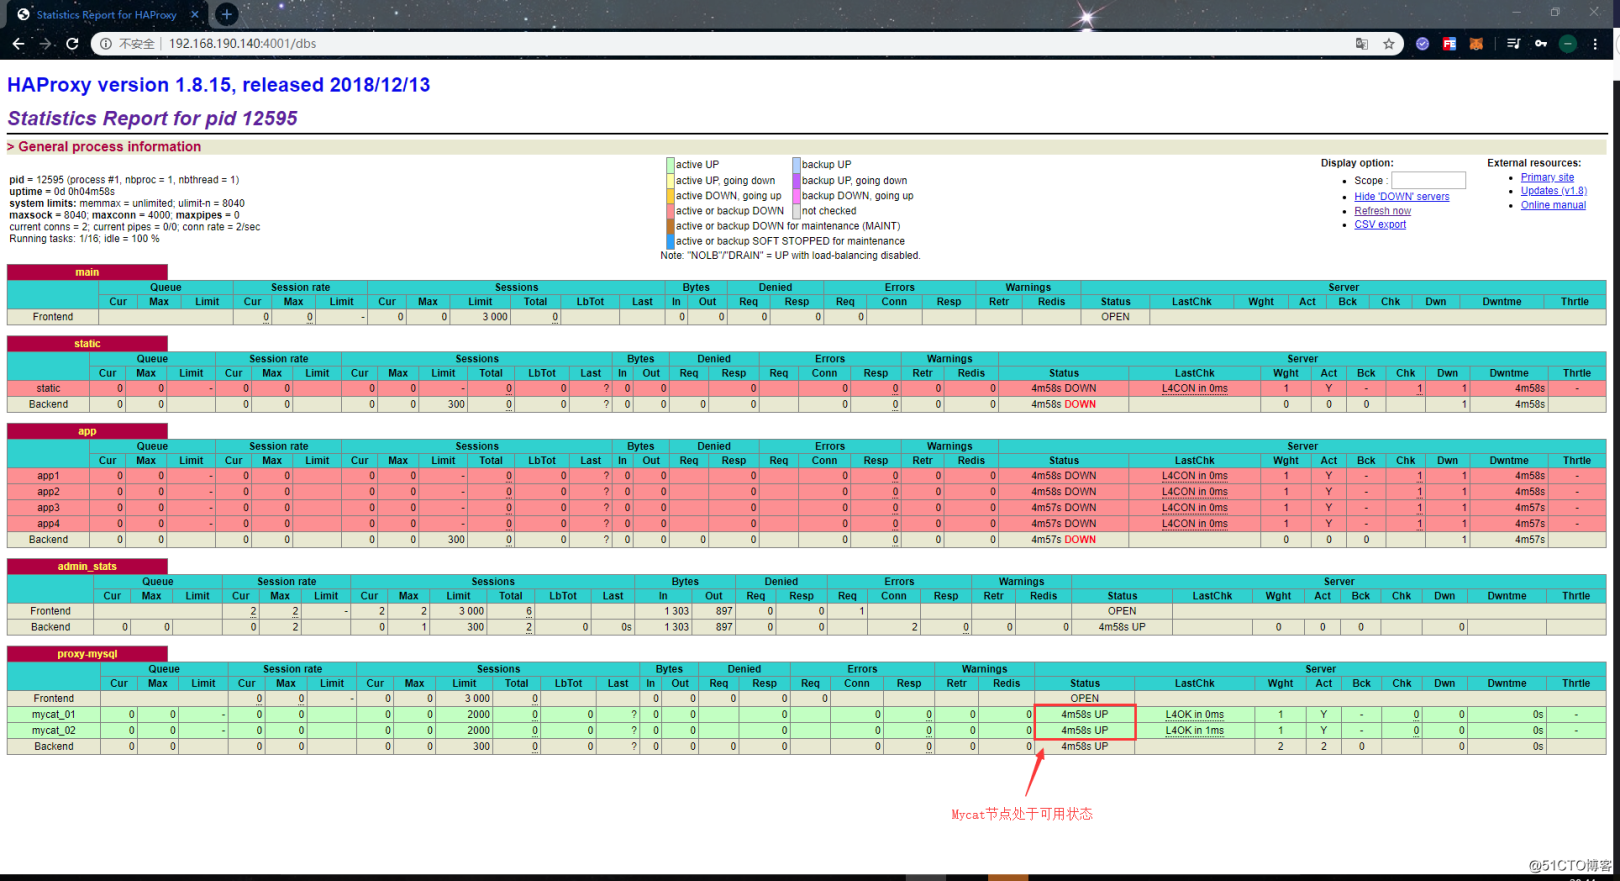
The monitoring information provided by Haproxy's monitoring interface is also relatively comprehensive. Under this interface, we can see the connection information of each host and its own status. When the host cannot be connected, the column of Status will display DOWN, and the background color will also change to red. The value in the normal state is UP, and the background color is green.
Another Haproxy node also uses the above steps to install and configure, so I won’t repeat it here.
Test Haproxy
After the Haproxy service is set up, let's use the remote tool to test whether we can connect to Mycat normally through Haproxy. as follows:
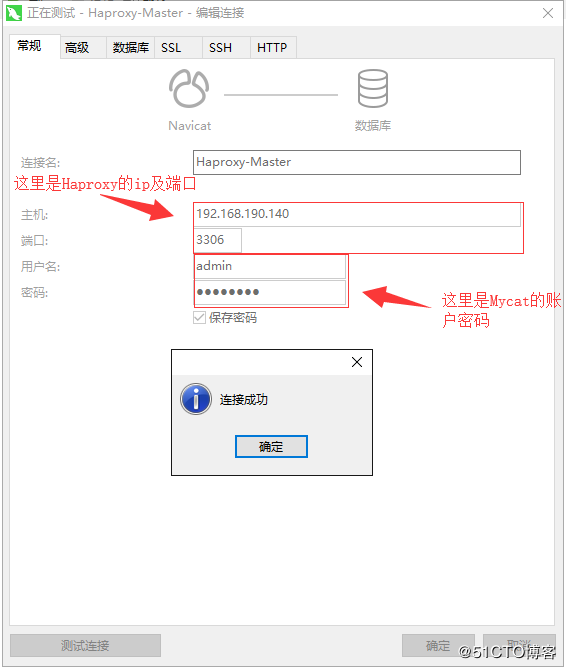
After the connection is successful, execute some SQL statements on Haproxy to see if you can insert data and query data normally:
We built Haproxy to make Mycat highly available, so finally test whether Mycat has high availability, first stop a Mycat node:
[ root@mycat-01~]# mycat stop
Stopping Mycat-server...
Stopped Mycat-server.[root@mycat-01~]#
At this point, from the monitoring interface of Haproxy, you can see that the node mycat_01 is already offline:

Now there is one Mycat node left in the cluster, and then we execute some SQL statements on Haproxy to see if we can still insert data and query data normally:
As can be seen from the test results, insert and query statements can still be executed normally. In other words, even if one Mycat node is turned off at this time, the entire database cluster can still be used normally, indicating that the Mycat cluster is now highly available.
Use Keepalived to achieve high availability of Haproxy###
After achieving the high availability of the Mycat cluster, we have to achieve the high availability of Haproxy, because the current architecture has changed from the initial Mycat client-oriented to the Haproxy client-oriented.
At the same time, only one Haproxy needs to be available, otherwise the client will not know which Haproxy to connect to. This is also the reason why VIP is used. This mechanism allows multiple nodes to still use the same IP when they take over from each other, and the client only needs to connect to this VIP from beginning to end. Therefore, to achieve the high availability of Haproxy, it is Keepalived's turn to come out. Before installing Keepalived, you need to enable the VRRP protocol of the firewall:
[ root@Haproxy-Master ~]# firewall-cmd --direct --permanent --add-rule ipv4 filter INPUT 0--protocol vrrp -j ACCEPT
[ root@Haproxy-Master ~]# firewall-cmd --reload
Then you can use the yum command to install Keepalived. Note that Keepalived is installed on the Haproxy node:
[ root@Haproxy-Master ~]# yum install -y keepalived
After the installation is complete, edit the keepalived configuration file:
[ root@Haproxy-Master ~]# mv /etc/keepalived/keepalived.conf /etc/keepalived/keepalived.conf.bak  #Do not use the built-in configuration file
[ root@Haproxy-Master ~]# vim /etc/keepalived/keepalived.conf
vrrp_instance VI_1 {
 state MASTER
 interfaceens32
 virtual_router_id 51
 priority 100
 advert_int 1
 authentication {
  auth_type PASS
  auth_pass 123456}

 virtual_ipaddress {192.168.190.100}}
Configuration instructions:
-
state MASTER: Define the role of the node as master. When the role is master, the node can obtain VIP without vying for it. Multiple masters are allowed in the cluster. When there are multiple masters, the masters need to compete for VIP. For other roles, the VIP can only be obtained when the master is offline -
interface ens32: define the name of the network card that can be used for external communication, the name of the network card can be viewed through theip addrcommand -
virtual_router_id 51: Define the id of the virtual route, the value is 0-255, the value of each node needs to be unique, that is, it cannot be configured to be the same -
priority 100: define the weight, the higher the weight, the more priority to get VIP -
advert_int 1: Define the detection interval as 1 second -
authentication: define the authentication information used in the heartbeat check -
auth_type PASS: Define the authentication type as password -
auth_pass 123456: define a specific password -
virtual_ipaddress: Define virtual IP (VIP), which needs to be an IP under the same network segment, and each node needs to be consistent
After completing the above configuration, start the keepalived service:
[ root@Haproxy-Master ~]# systemctl start keepalived
When the keepalived service starts successfully, use the ip addr command to view the virtual IP bound to the network card:
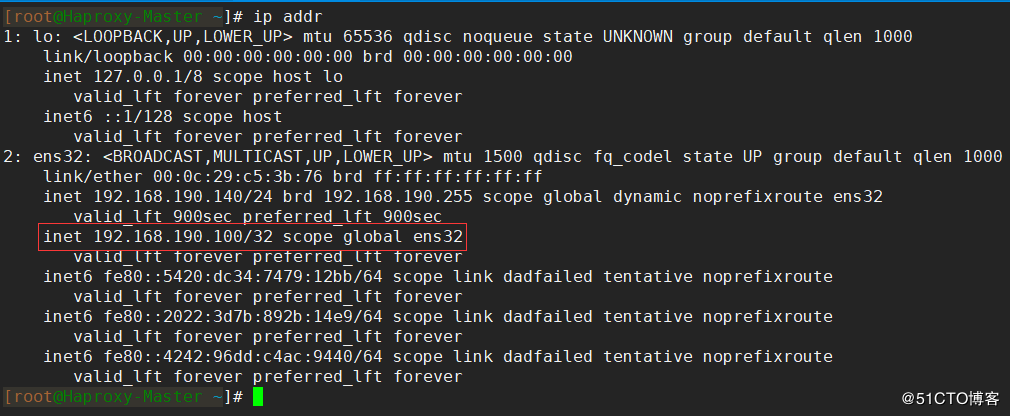
The other node is also installed and configured using the above steps, so I won't repeat it here.
Test Keepalived
Above we have completed the installation and configuration of Keepalived. Finally, we will test whether the Keepalived service is available and whether Haproxy has high availability.
First, test whether the virtual IP can be pinged normally on other nodes. If it cannot be pinged, you need to check the configuration. As shown in the figure, I can normally ping here:

Common virtual IP ping failure:
- The firewall configuration is incorrect, and the VRRP protocol is not opened correctly
- The configured virtual IP is not in the same network segment as the IP of other nodes
- Keepalived is configured incorrectly, or Keepalived did not start successfully at all
After confirming that Keepalived's virtual IP can be communicated from the external ping, use Navicat to test whether to connect to Mycat through the virtual IP:
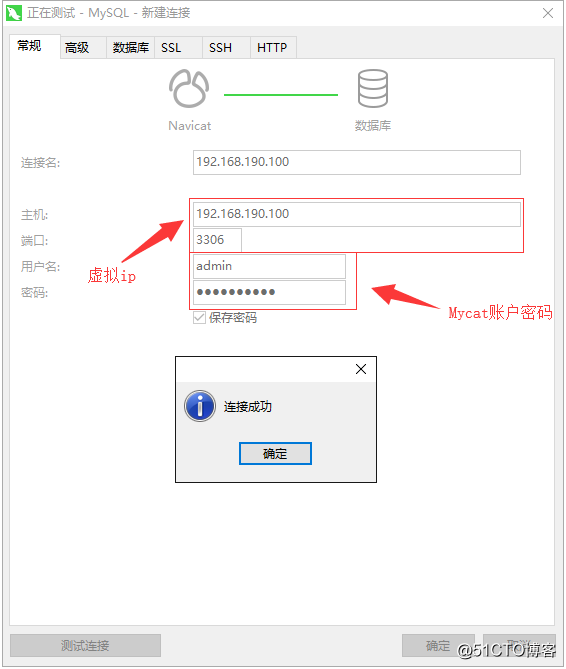
After the connection is successful, execute some statements to test whether the data can be inserted and queried normally:
At this point, there is basically no problem. Finally, test the high availability of Haproxy, and turn off the keepalived service on one of the Haproxy nodes:
[ root@Haproxy-Master ~]# systemctl stop keepalived
Then execute some statements again to test whether the data can be inserted and query normally. The following can be executed normally, which means that the Haproxy node has high availability: