Build a PXC cluster under CentOS8
Introduction to PXC##
PXC is the abbreviation of [Percona XtraDB Cluster] (https://www.percona.com/doc/percona-xtradb-cluster/LATEST/index.html), and is a free [MySQL] (https://cloud.tencent.com/product/cdb?from=10680) cluster product produced by Percona. The function of PXC is to connect different mysql instances through the Galera cluster technology that comes with mysql to realize a multi-master cluster. In the PXC cluster, each mysql node is readable and writable, which is the master node in the master-slave concept. There is no read-only node.
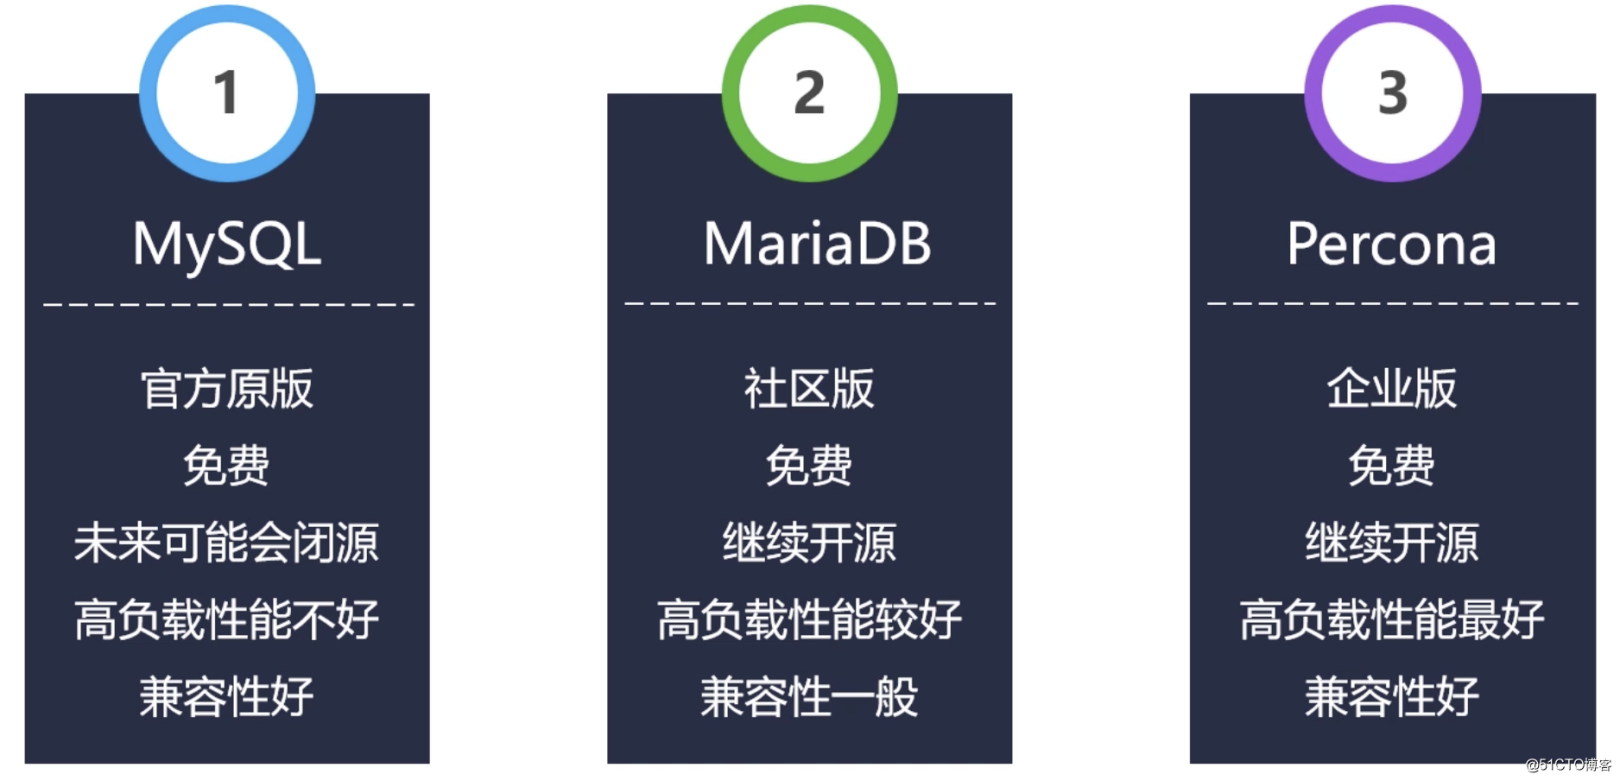
PXC is actually a multi-master synchronous replication plug-in for OLTP based on Galera. PXC is mainly used to solve the problem of strong data synchronization in MySQL cluster. PXC can cluster any derivative version of mysql, such as MariaDB and Percona Server. Since the performance of Percona Server is closest to the mysql enterprise version, its performance is significantly improved compared to the standard version of mysql, and it is basically compatible with mysql. Therefore, when building a PXC cluster, it is usually recommended to build based on Percona Server.
For the selection of database cluster solutions, please refer to:
Features of PXC###
- Synchronous replication, transactions are either submitted to completion or all fail on all cluster nodes
- Multi-master replication, there is no division of master-slave roles, read/write operations can be performed on any node
- Strong consistency of data synchronization, the data of all nodes are consistent in real time
- The more PXC cluster nodes, the slower the data synchronization speed, so the PXC cluster cannot be too large
- The speed of PXC cluster data synchronization depends on the node with the lowest configuration, so the hardware configuration of all nodes in the PXC cluster should be as consistent as possible
- PXC cluster only supports InnoDB engine, so only the data of InnoDB engine will be synchronized
Install PXC and form a cluster##
Environmental preparation###
Environmental version description:
- VMware Workstation Pro 15.5
- Percona XtraDB Cluster 5.7
- CentOS 8
There are several common derivative versions of MySQL, and Percona Server is one of them. Percona Server is chosen here because it is the closest to the enterprise version of MySQL. The comparison chart of each derivative version is as follows:
The PXC cluster design of this article is shown in the figure:
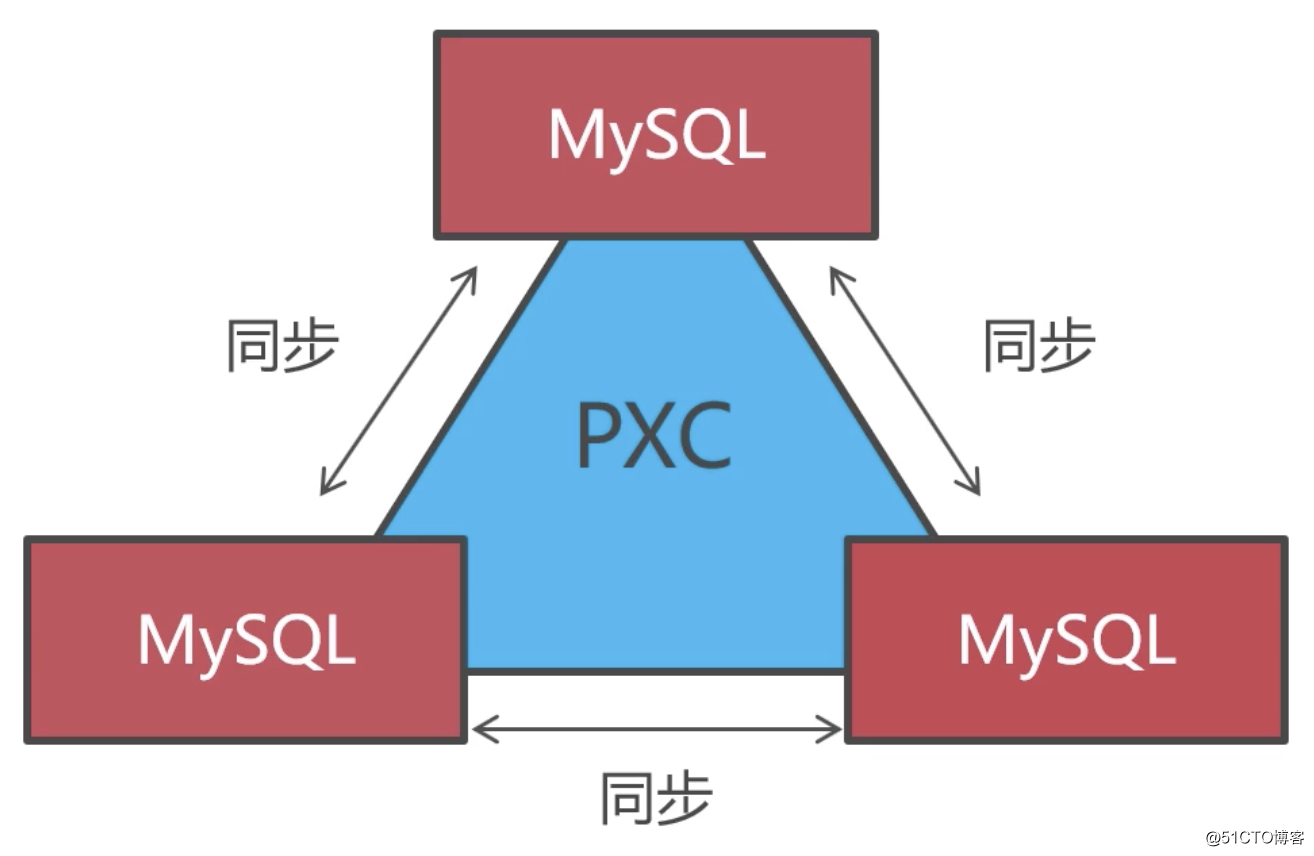
- **Tips: **Actually, the smallest PXC cluster has two nodes, but the course is designed with three nodes. This is because in order to prevent split-brain, the PXC cluster will automatically stop running when more than half of the nodes are inaccessible due to unexpected downtime. So if it is designed as two nodes, one of the nodes is down and more than half of the nodes are inaccessible, then the cluster will stop running and the other node will be unavailable. Such disaster tolerance is too poor, so at least three nodes are designed here to improve the availability of the PXC cluster.
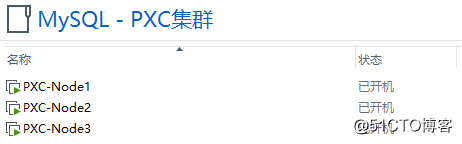
According to the figure, we need to create three virtual machines to build a three-node PXC cluster:
Node description:
| Node | Host | IP |
|---|---|---|
| Node1 | PXC-Node1 | 192.168.190.132 |
| Node2 | PXC-Node2 | 192.168.190.133 |
| Node3 | PXC-Node3 | 192.168.190.134 |
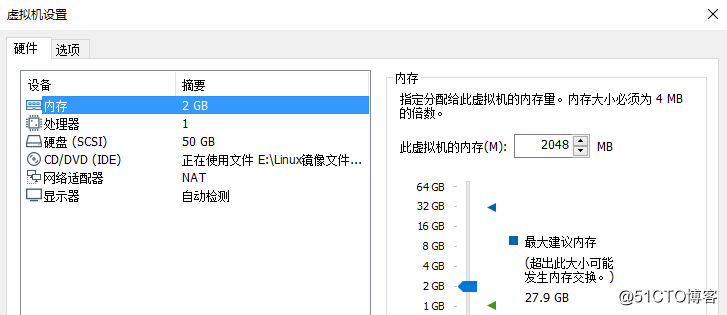
The configuration of each virtual machine is as follows:
Regarding PXC clusters, performance is sacrificed to ensure strong data consistency. The more nodes in the PXC cluster, the longer the data synchronization time. So how many database servers should be used to do the cluster is the most suitable. Relatively speaking, can it achieve the best results in performance?
Generally speaking, no more than 15 nodes form a PXC cluster, and the performance is very good. Then this PXC cluster is used as a shard, and a few more shards are set on MyCat to deal with data segmentation and concurrent access.
System preparation
Some CentOS versions are bundled with mariadb-libs by default, you need to uninstall it before installing PXC:
[ root@PXC-Node1 ~]# yum -y remove mari*
PXC cluster uses four ports:
| Port | Description |
|---|---|
| 3306 | MySQL service port |
| 4444 | Request full synchronization (SST) port |
| 4567 | Communication port between database nodes |
| 4568 | Request incremental synchronization (IST) port |
So if the system has a firewall enabled, these ports need to be opened:
[ root@PXC-Node1 ~]# firewall-cmd --zone=public--add-port=3306/tcp --permanent
[ root@PXC-Node1 ~]# firewall-cmd --zone=public--add-port=4444/tcp --permanent
[ root@PXC-Node1 ~]# firewall-cmd --zone=public--add-port=4567/tcp --permanent
[ root@PXC-Node1 ~]# firewall-cmd --zone=public--add-port=4568/tcp --permanent
[ root@PXC-Node1 ~]# firewall-cmd --reload
Install PXC
First go to the official document:
There are two simpler installation methods for PXC. One is to download the rpm package from the official website and install it locally on the system, and the other is to use the official yum repository for online installation. This article demonstrates this method of local installation, first open the following URL:
After selecting the appropriate version, copy the download link:
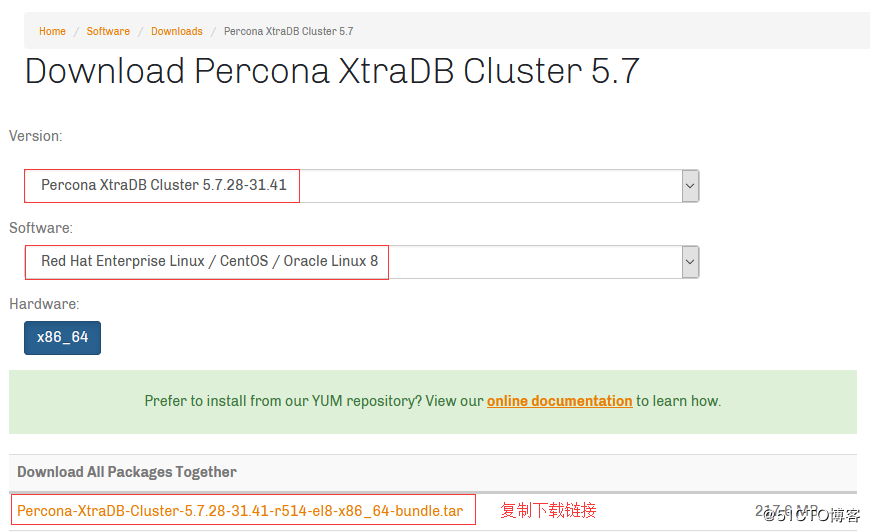
Then use the wget command to download on CentOS, as shown in the following example:
[ root@PXC-Node1 ~]# cd /usr/local/src
[ root@PXC-Node1 /usr/local/src]# wget https://www.percona.com/downloads/Percona-XtraDB-Cluster-LATEST/Percona-XtraDB-Cluster-5.7.28-31.41/binary/redhat/8/x86_64/Percona-XtraDB-Cluster-5.7.28-31.41-r514-el8-x86_64-bundle.tar
Create a directory to store the rpm file, and extract the downloaded PXC installation package to the newly created directory:
[ root@PXC-Node1 /usr/local/src]# mkdir pxc-rpms
[ root@PXC-Node1 /usr/local/src]# tar -xvf Percona-XtraDB-Cluster-5.7.28-31.41-r514-el8-x86_64-bundle.tar -C pxc-rpms
[ root@PXC-Node1 /usr/local/src]# ls pxc-rpms
Percona-XtraDB-Cluster-57-5.7.28-31.41.1.el8.x86_64.rpm
Percona-XtraDB-Cluster-57-debuginfo-5.7.28-31.41.1.el8.x86_64.rpm
Percona-XtraDB-Cluster-57-debugsource-5.7.28-31.41.1.el8.x86_64.rpm
Percona-XtraDB-Cluster-client-57-5.7.28-31.41.1.el8.x86_64.rpm
Percona-XtraDB-Cluster-client-57-debuginfo-5.7.28-31.41.1.el8.x86_64.rpm
Percona-XtraDB-Cluster-devel-57-5.7.28-31.41.1.el8.x86_64.rpm
Percona-XtraDB-Cluster-full-57-5.7.28-31.41.1.el8.x86_64.rpm
Percona-XtraDB-Cluster-garbd-57-5.7.28-31.41.1.el8.x86_64.rpm
Percona-XtraDB-Cluster-garbd-57-debuginfo-5.7.28-31.41.1.el8.x86_64.rpm
Percona-XtraDB-Cluster-server-57-5.7.28-31.41.1.el8.x86_64.rpm
Percona-XtraDB-Cluster-server-57-debuginfo-5.7.28-31.41.1.el8.x86_64.rpm
Percona-XtraDB-Cluster-shared-57-5.7.28-31.41.1.el8.x86_64.rpm
Percona-XtraDB-Cluster-shared-57-debuginfo-5.7.28-31.41.1.el8.x86_64.rpm
Percona-XtraDB-Cluster-test-57-5.7.28-31.41.1.el8.x86_64.rpm
Percona-XtraDB-Cluster-test-57-debuginfo-5.7.28-31.41.1.el8.x86_64.rpm
In addition, the installation of PXC needs to depend on qpress and percona-xtrabackup-24, you can get the corresponding rpm package download link in percona-provided warehouse. Then enter the pxc-rpms directory to download the rpm packages of these two components, as follows:
[ root@PXC-Node1 /usr/local/src]# cd pxc-rpms
[ root@PXC-Node1 /usr/local/src/pxc-rpms]# wget https://repo.percona.com/release/8/RPMS/x86_64/qpress-11-1.el8.x86_64.rpm
[ root@PXC-Node1 /usr/local/src/pxc-rpms]# wget https://repo.percona.com/release/8/RPMS/x86_64/percona-xtrabackup-24-2.4.18-1.el8.x86_64.rpm
After completing the above steps, you can now install PXC locally via the yum command:
[ root@PXC-Node1 /usr/local/src/pxc-rpms]# yum localinstall -y *.rpm
After successful installation, there will be related commands of mysql in the system. As follows, if you can view the version information normally, the installation is successful:
[ root@PXC-Node1 /usr/local/src/pxc-rpms]# mysql --version
mysql  Ver 14.14 Distrib 5.7.28-31,forLinux(x86_64) using  7.0[root@PXC-Node1 /usr/local/src/pxc-rpms]#
Configure PXC cluster###
After installation, some configuration is required to start the cluster. The PXC configuration file is located in the /etc/percona-xtradb-cluster.conf.d/ directory by default, and the /etc/my.cnf file is just a reference to it:
[ root@PXC-Node1 ~]# cd /etc/percona-xtradb-cluster.conf.d/[root@PXC-Node1 /etc/percona-xtradb-cluster.conf.d]# ll
Total amount 12-rw-r--r--1 root root 381 12 1317:19 mysqld.cnf  #mysql related configuration
- rw-r--r--1 root root 44012 December 1317:19 mysqld_safe.cnf  # mysqld_safe related configuration
- rw-r--r--1 root root 106612 May 1317:19 wsrep.cnf  #PXC cluster related configuration
Add some basic configurations such as character sets to the mysqld.cnf file:
[ root@PXC-Node1 /etc/percona-xtradb-cluster.conf.d]# vim mysqld.cnf
[ mysqld]...

# Set character set
character_set_server=utf8
# Set the listening ip
bind-address=0.0.0.0
# Skip DNS resolution
skip-name-resolve
Then configure the PXC cluster, modify the following configuration items in the wsrep.cnf file:
[ root@PXC-Node1 /etc/percona-xtradb-cluster.conf.d]# vim wsrep.cnf
[ mysqld]
# The unique ID of the MySQL instance in the PXC cluster. It cannot be repeated and must be a number
server-id=1
# Path to Galera library file
wsrep_provider=/usr/lib64/galera3/libgalera_smm.so
# The name of the PXC cluster
wsrep_cluster_name=pxc-cluster
# IP of all nodes in the cluster
wsrep_cluster_address=gcomm://192.168.190.132,192.168.190.133,192.168.190.134
# The name of the current node
wsrep_node_name=pxc-node-01
# IP of the current node
wsrep_node_address=192.168.190.132
# Synchronization method(mysqldump、 rsync、 xtrabackup)
wsrep_sst_method=xtrabackup-v2
# Account password used during synchronization
wsrep_sst_auth=admin:Abc_123456
# Adopt strict synchronization mode
pxc_strict_mode=ENFORCING
# Copy based on ROW(Safe and reliable)
binlog_format=ROW
# Default engine
default_storage_engine=InnoDB
# Primary key self-growth does not lock the table
innodb_autoinc_lock_mode=2
Start PXC cluster###
So far, we have completed the installation and configuration of PXC on the virtual machine PXC-Node1. Then complete the same steps on the other two nodes, so I won’t repeat them here.
When all nodes are ready, use the following command to start the PXC cluster. Note that this command is used to start the first node. The first node can be any of the three nodes when the cluster is first started. Here I use PXC-Node1 as the first node. So execute this command under the virtual machine:
[ root@PXC-Node1 ~]# systemctl start [email protected]
The other nodes only need to start the MySQL service normally. After startup, they will automatically join the cluster according to the configuration in the wsrep.cnf file:
[ root@PXC-Node2 ~]# systemctl start mysqld
Disable the automatic startup of Percona Server:
[ root@localhost ~]# systemctl disable mysqld
Removed /etc/systemd/system/multi-user.target.wants/mysqld.service.
Removed /etc/systemd/system/mysql.service.[root@localhost ~]#
- **Tips: **The reason for disabling self-startup is because in a PXC cluster, when a node is down and restarted, it will randomly synchronize data with a PXC node. If the node is down for too long, the amount of data that needs to be synchronized will be relatively large. When a large amount of data synchronization occurs, the PXC cluster will restrict other write operations until all the data is successfully synchronized. Therefore, after a long period of downtime, the correct approach is not to start the node immediately, but to copy data files from other nodes to the node, and then start it. In this way, the data that needs to be synchronized will be much less and will not cause long-term speed limits.
Create a database account###
Then modify the default password of the root account. We can find the initial default password in the mysql log file. The red box in the figure below shows the default password:

- **Tips: **The default password will only be generated after the MySQL service is started for the first time
Copy the default password, and then use the mysql_secure_installation command to change the password of the root account:
[ root@localhost ~]# mysql_secure_installation
For security reasons, the root account generally does not allow remote login, so we need to create a separate database account for remote access. This account is also used to synchronize data in the PXC cluster, and corresponds to the configuration item wsrep_sst_auth in the wsrep.cnf file:
[ root@localhost ~]# mysql -uroot -p
mysql> create user 'admin'@'%' identified by 'Abc_123456';
mysql> grant all privileges on *.* to 'admin'@'%';
mysql> flush privileges;
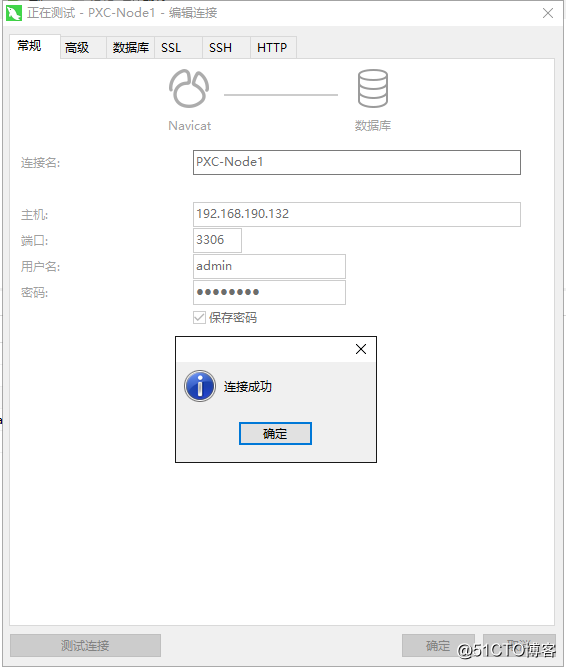
After creating the account, use the client tool to perform a remote connection test to see if the connection is successful:
So far, we have completed the construction of the PXC cluster. You should be able to see the synchronization effect of the PXC cluster now, because the operations of modifying the root password and creating a new account above will be synchronized to the other two nodes. In other words, at this time, the root account passwords of the other two nodes are already modified, and there will also be an admin account. You can verify this yourself.
In addition, we can also use the following statement to confirm the status of the cluster:
show status like 'wsrep_cluster%';
Results of the:
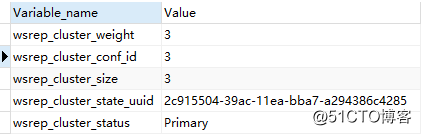
Variable description:
wsrep_cluster_weight: the weight value of the node in the clusterwsrep_cluster_conf_id: The number of times the relationship between cluster nodes has changed (+1 for each addition/deletion)wsrep_cluster_size: the number of nodes in the clusterwsrep_cluster_state_uuid: UUID of the current state of the cluster, which is a unique identifier for the current state of the cluster and the sequence of changes it has undergone. It is also used to compare whether two or more nodes are in the same cluster. If the value of the variable of the two nodes is the same, it means they are in the same cluster. If the value is inconsistent, it means they are not in the same clusterwsrep_cluster_status: the current status of the cluster
Verify cluster data synchronization##
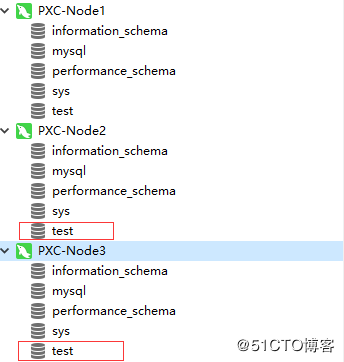
1、 Verify that the created database can be synchronized
Create a test library in node 1:
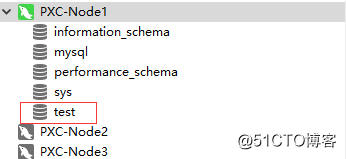
After the creation is complete, clicking on other nodes should also see the library test:
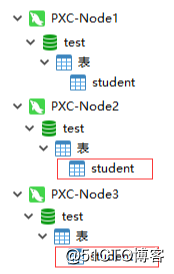
2、 Verify that the created data table can be synchronized
Create a student table in the test library in node 1:
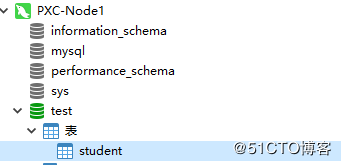
After creation, you should be able to see this student table in other nodes:
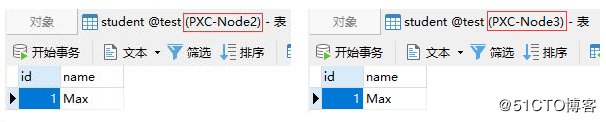
3、 Verify that the table data can be synchronized
Insert a piece of data into the student table in node 1:
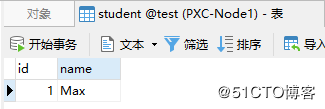
At this time, other nodes should also be able to see this data:
Description of cluster status parameters##
The status parameters of the cluster can be queried through SQL statements, as follows:
show status like '%wsrep%';
Since there are so many state parameter variables that can be queried, some commonly used ones are explained here. PXC cluster parameters can be divided into the following categories:
-
Queue related
-
wsrep_local_send_queue: the length of the send queue -
wsrep_local_send_queue_max: the maximum length of the send queue -
wsrep_local_send_queue_min: the minimum length of the send queue -
wsrep_local_send_queue_avg: the average length of the send queue -
wsrep_local_recv_queue: the length of the receiving queue -
wsrep_local_recv_queue_max: the maximum length of the receiving queue -
wsrep_local_recv_queue_min: the minimum length of the receiving queue -
wsrep_local_recv_queue_avg: the average length of the receiving queue -
Copy related
-
wsrep_replicated: the number of times to synchronize data to other nodes -
wsrep_replicated_bytes: the total amount of data synchronized to other nodes, in bytes -
wsrep_received: the number of times that synchronization requests from other nodes have been received -
wsrep_received_bytes: the total amount of synchronized data received from other nodes, in bytes -
wsrep_last_applied: number of simultaneous applications -
wsrep_last_committed: the number of transaction commits -
Flow control related
-
wsrep_flow_control_paused_ns: the total time spent in the flow control pause state (nanoseconds) -
wsrep_flow_control_paused: the proportion of flow control pause time (0 ~ 1) -
wsrep_flow_control_sent: The number of flow control pause events sent, that is, the number of times the current node triggers flow control -
wsrep_flow_control_recv: the number of flow control pause events received -
wsrep_flow_control_interval: the lower limit and upper limit of flow control. The upper limit is the maximum number of requests allowed in the queue. If the queue reaches the upper limit, the new request is rejected, that is, flow control is triggered. When processing existing requests, the queue will be reduced, once the lower limit is reached, new requests will be allowed again, that is, the flow control will be lifted -
wsrep_flow_control_status: flow control switch status (open: ON, close: OFF) -
Affairs related
-
wsrep_cert_deps_distance: the number of concurrent transactions executed -
wsrep_apply_oooe: the proportion of transactions in the receive queue -
wsrep_apply_oool: the frequency of out-of-order execution of transactions in the receive queue -
wsrep_apply_window: the average number of transactions in the receive queue -
wsrep_commit_oooe: the proportion of transactions in the sending queue -
wsrep_commit_oool: no meaning (no local out-of-order commit) -
wsrep_commit_window: the average number of transactions in the send queue -
Status related
-
wsrep_local_state_comment: the current state of the node -
wsrep_cluster_status: the current status of the cluster -
wsrep_connected: Whether the node is connected to the cluster -
wsrep_readywhether the cluster is working properly -
wsrep_cluster_size: the number of nodes in the cluster -
wsrep_desync_count: the number of delay nodes -
wsrep_incoming_addresses: IP addresses of all nodes in the cluster
**PXC node state diagram: **

OPEN: The node started successfullyPRIMARY: The node successfully joined the clusterJOINER: synchronize data with other nodesJOINED: Successfully synchronize data with other nodesSYNCED: complete synchronization with the cluster, and can provide services to the outside worldDONER: Receive full data synchronization from other nodes, which is not available
**PXC cluster state diagram: **
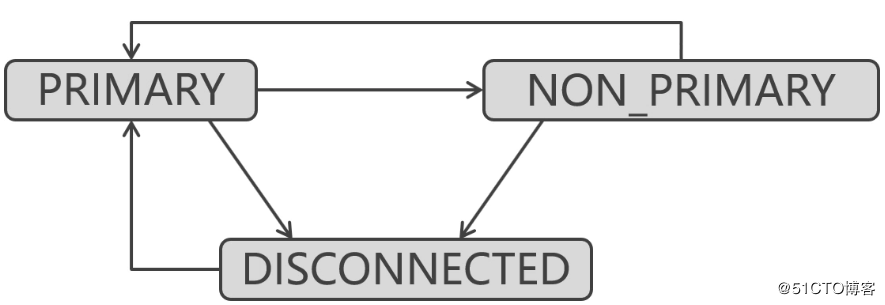
PRIMARY: normal stateNON_PRIMARY: split brain in clusterDISCONNECTED: The cluster is in an unconnectable state
Official documents:
About the online and offline of PXC nodes##
1、 Safe offline posture of PXC node
How to start the node, just use the corresponding command to shut down
-
Example of the first node:
-
The command to start the first node is:
systemctl start [email protected] -
Then the corresponding shutdown command is:
systemctl stop [email protected] -
Examples of other nodes:
-
The command to start other nodes is:
systemctl start mysqld -
Then the corresponding shutdown command is:
systemctl stop mysqld
2、 If all PXC nodes are safely offline, then when starting the cluster, you need to start the last offline node first
When starting the cluster for the first time, any node can be started as the first node. But if it is a cluster that has already been started, when the cluster goes offline and then goes online, the last offline node needs to be started as the first node. In fact, about whether a node can be started as the first node, you can find out by looking at the grastate.dat file:
[ root@PXC-Node1 ~]# cat /var/lib/mysql/grastate.dat
# GALERA saved state
version:2.1
uuid:    2c915504-39ac-11ea-bba7-a294386c4285
seqno:-1
safe_to_bootstrap:0[root@PXC-Node1 ~]#
- **Note: **
safe_to_bootstrapmeans it cannot be started as the first node when the value is0, and when it is1, it means it can be started as the first node. The last offline node in the PXC cluster will change the value ofsafe_to_bootstrapto1, and this node needs to be started as the first node the next time the cluster is started. This is because the data of the last offline node is the latest. Start it as the first node, and then let other nodes synchronize data with this node, so as to ensure that the data in the cluster is up to date. Otherwise, the data in the cluster may be old data before a certain point in time.
**3、 If the PXC nodes are all exited accidentally, and not at the same time **
As mentioned at the beginning of this article, when more than half of the nodes in the PXC cluster are inaccessible due to unexpected downtime, the PXC cluster will stop running. However, if these PXC nodes exit in a safe offline manner, it will not cause the cluster to automatically stop running, but will only reduce the size of the cluster. The cluster will stop automatically only when more than half of the nodes go offline unexpectedly. Unexpected offline situations include:
- Downtime, suspend, shutdown, restart, power failure, network disconnection, etc. Anyway, nodes that are safely offline without using the corresponding stop command are all accidental offline
As long as the nodes in the PXC cluster do not exit unexpectedly at the same time, when there is one node left in the cluster, the node will automatically change the value of safe_to_bootstrap in the grastate.dat file to 1. Therefore, when restarting the cluster, the last node that exits is also started first.
4、 If all PXC nodes exit unexpectedly at the same time, you need to modify the grastate.dat file
When all nodes in the cluster exit due to unexpected circumstances at the same time, then the safe_to_bootstrap of all nodes is 0, because no node has time to modify the value of safe_to_bootstrap. When the safe_to_bootstrap of all nodes is 0, the PXC cluster cannot be started.
In this case, we can only manually select a node, modify safe_to_bootstrap to 1, and then start this node as the first node:
[ root@PXC-Node1 ~]# vim /var/lib/mysql/grastate.dat
...
safe_to_bootstrap:1[root@PXC-Node1 ~]# systemctl start [email protected]
Then start other nodes in turn:
[ root@PXC-Node2 ~]# systemctl start mysqld
5、 If there are still runnable nodes in the cluster, then other offline nodes only need to go online as normal nodes
[ root@PXC-Node2 ~]# systemctl start mysqld
Recommended Posts