Ubuntu18.04 perfectly builds Tensorflow-gpu
Ubuntu18.04 perfect build Tensorflow-GPU1.8
0. Introduction
This is the last working day of 18 years, and it took a long time to ponder this article!
Regarding the article update, there is no guarantee that one will be written every day, because I will go home on holiday, haha!
18 Year in review
Light city

please enter

Article sharing and mutual promotion

Insist on sharing, mutual promotion and common progress
Persist in sharing and promote mutual progress
Build and help together
19 Year outlook
Light city
The paper reproduces the maximum offer


please enter

Insist on writing questions, direct to Offer
Stick to the brush, go straight to Offer
Help with the problem
Today’s article is mainly about, I deleted all my own systems, and then installed a single system, Ubuntu 18.04!
Then build a deep learning environment on Ubuntu!
This time, I built the environment, mainly in the Ubuntu 18.04 version. I also tried to build a deep learning environment for the Centos system yesterday. The driver and cuda have been installed successfully! But it's a pity that the computer couldn't start up inexplicably, and then I switched to Ubuntu this time. In summary, I found that Ubuntu is much simpler than Centos!
**Sometimes you need to be tough on yourself and leave no way out. Just like this time you change the system, uninstall them all, leaving only a single Linux system, so that you can rekindle your passion and vitality on Linux, and constantly temper your learning perseverance and ability ! **
1. Drive
1.1 an examination
Before configuring the deep learning GPU environment, first understand whether your GPU is CUDA-capable!
lspci | grep -i nvidia
Enter the above command, you will see the following output:

If so, support, otherwise not!
1.2 Forbidden to drive
Regardless of whether it is a centos or ubuntu system, the system will have its own nouveau driver, and this driver will affect the subsequent cuda installation, improper operation will cause a black screen!
Now let's check if there is nouveau device, enter the following command, if there is output, it means the driver is being loaded!
lsmod|grep nouveau
The next thing we need to do is to disable this driver!
Edit the blacklist.conf configuration file
sudo gedit /etc/modprobe.d/blacklist.conf
Append at the end:
blacklist nouveau
options nouveau modeset=0
Update configuration file
sudo update-initramfs -u
Check again whether the driver is loaded
lsmod | grep nouveau
The above operation cannot completely disable nouveau, just remove the nouveau.ko and nouveau.ko.org files!
Do as follows:
cd /lib/modules/4.15.0-29-generic/kernel/drivers/gpu/drm/nouveau
sudo rm -rf nouveau.ko
sudo rm -rf nouveau.ko.org
The above 4.15.0-29 is not necessarily the same, here it is enough to directly tab completion, and then the others are the same!
Later, doing updates
sudo update-initramfs -u
Check again
lsmod | grep nouveau
If there is still output, just restart, otherwise there is no output, which means the disable is successful!
1.3 Install nvidia driver
After uninstalling the above original driver, start to install the nvidia driver!
- Uninstall the original nvidia driver
sudo apt-get remove --purge nvidia-*
- install driver
There are two ways to install:
The first way is to open "Software and Updates" directly, then find the additional driver, and just select the nvidia driver to install, but unfortunately the internet speed is relatively slow and error-prone, so this method of installation is not recommended. This is my first time Fooling around, just do it like this, it won't work!
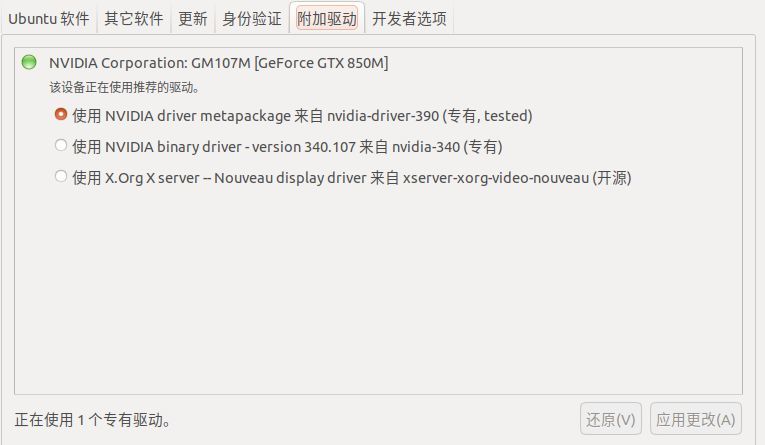
The second way is also the way I suggest:
First determine the driver version you need to install:
ubuntu-drivers devices
will see:
driver : nvidia-340- distro non-free
driver : nvidia-driver-390- distro non-free recommended
driver : xserver-xorg-video-nouveau - distro free builtin
Then come to install the driver, generally look at the second line, we see an English word recommended, which means it is recommended to install the driver!
sudo apt-get install nvidia-driver-390
The above one-click installation is enough. After installation, test:
nvidia-smi
Output:
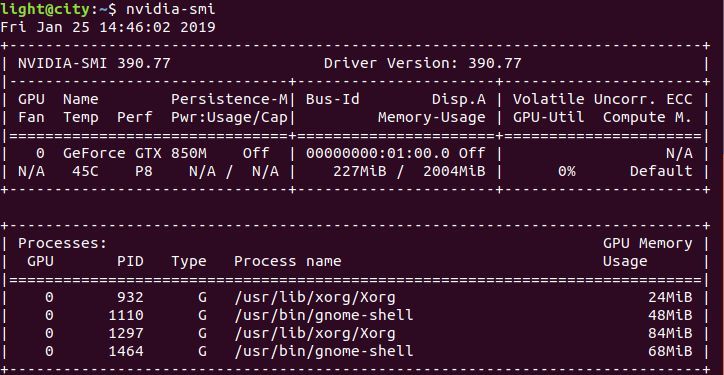
If the above table is displayed, it means that the driver nvidia is installed successfully!
2. Cuda
2.1 Version
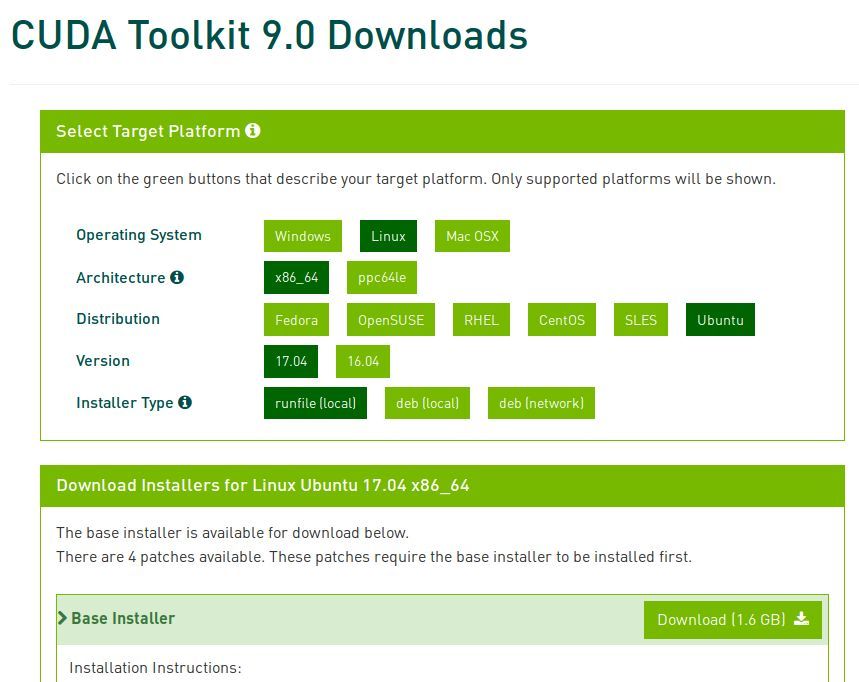
Regarding the version, I choose Cuda9.0!
download link:
https://developer.nvidia.com/cuda-90-download-archive?target_os=Linux&target_arch=x86_64&target_distro=Ubuntu&target_version=1704&target_type=runfilelocal
After entering the above download address, we found that the selected Ubuntu system supports 17.04. I was also wondering at the time. There is no 18.04, so what should I do?
I thought about it for a long time, but in the end, it didn't matter, so just follow the download and installation that I checked below, don't worry!
2.2 Installation
Enter the following command to install:
sudo sh cuda_9.0.176_384.81_linux.run
In the middle, you will be prompted whether it is NVIDIA installation, because it has been installed before, so select no, and the rest is the default. The installation process, if the installation path is modified, please remember that the following configuration needs to be used!
2.3 Environment variables
Configure environment variables
sudo gedit /etc/profile
Append tail
export  PATH=/usr/local/cuda-9.0/bin:$PATH
export  LD_LIBRARY_PATH=/usr/local/cuda-9.0/lib64$LD_LIBRARY_PATH
After saving the above, then restart the computer!
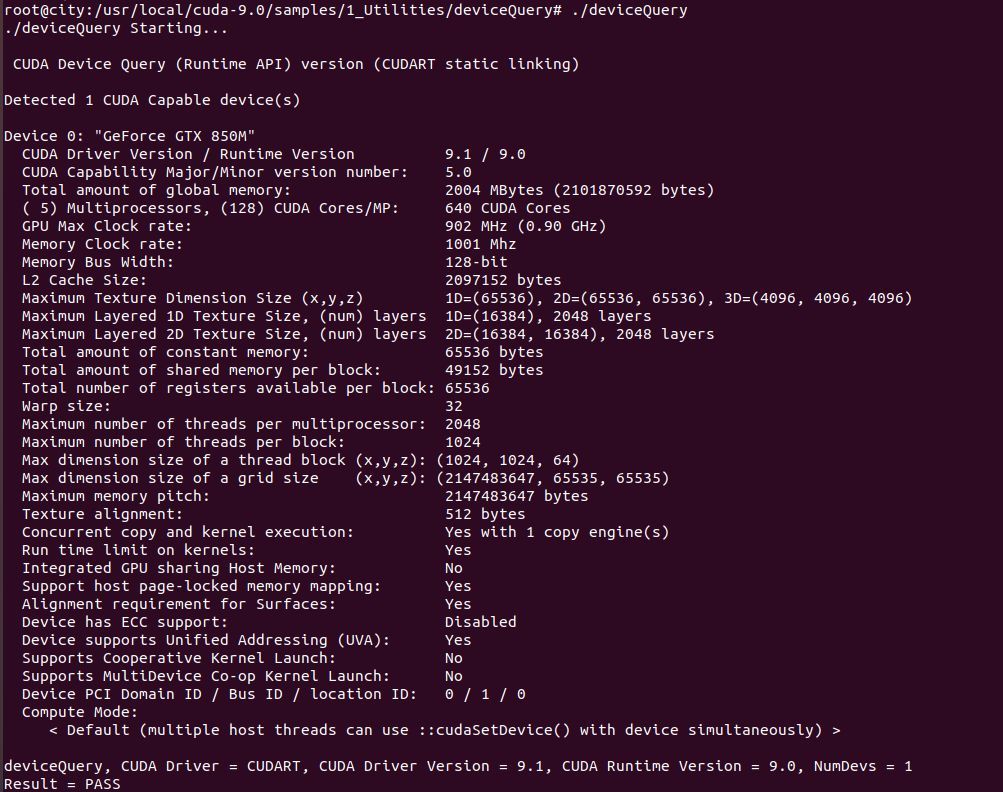
2.4 Test Cuda
Enter the following commands in sequence
cd  /usr/local/cuda-9.0/samples/1_Utilities/deviceQuery
sudo make
. /deviceQuery
If the corresponding information of the GPU is displayed, it is successful!
As shown below:
Installation of additional library files
sudo apt-get install freeglut3-dev build-essential libx11-dev libxmu-dev libxi-dev libgl1-mesa-glx libglu1-mesa libglu1-mesa-dev
2.5 Dynamic link
Edit ~/.bashrc file
vi ~/.bashrc
Append tail
export PATH=/usr/local/cuda-9.0/bin${PATH:+:${PATH}}export LD_LIBRARY_PATH=/usr/local/cuda-9.0/lib64${LD_LIBRARY_PATH:+:${LD_LIBRARY_PATH}}
Open the environment configuration file
sudo gedit /etc/profile
Append tail
export PATH=/usr/local/cuda/bin:$PATH
Create link file
sudo gedit /etc/ld.so.conf.d/cuda.conf
Add to
/usr/local/cuda/lib64
Implementation effective
sudo ldconfig
3. CudNN
3.1 Version
cudnn-9.0-linux-x64-v7.tgz
download link:
https://developer.nvidia.com/cudnn
Registration required!
3.2 Installation
Unzip and install
tar -xzvf cudnn-9.0-linux-x64-v7.tgz sudo cp cuda/include/cudnn.h /usr/local/cuda/include sudo cp cuda/lib64/libcudnn*/usr/local/cuda/lib64 sudo chmod a+r /usr/local/cuda/include/cudnn.h
Update link
cd /usr/local/cuda/lib64/
sudo chmod +r libcudnn.so.7.0.3  #View for yourself.version of so
sudo ln -sf libcudnn.so.7.0.3. libcudnn.so.7
sudo ln -sf libcudnn.so.7 libcudnn.so
sudo ldconfig
4. Anaconda3
4.1 Version
The version is:
Anaconda3-5.2.0-Linux-x86_64.sh
download link:
https://repo.continuum.io/archive/
This 5.2.0 has a bug! It is recommended to change to 5.3 or above!
4.2 Installation
bash Anaconda3-5.2.0-Linux-x86_64.sh
Always choose the default, just press Enter!
An installation note in the middle: whether to choose to add environment variables to ~/.bashrc, choose yes!
Final execution
source ~/.bashrc
4.3 Test
Enter python
If the above Anaconda is displayed, the installation is successful! You can see if the conda command can be used!

5. Tensorflow-GPU
5.1 Version
Version: tensorflow-gpu-1.8
5.2 Installation
Direct input:
conda install tensorflow-gpu==.
Finally, I found that you can directly enter pip, so the above is replaced by:
pip install tensorflow-gpu==.
The difference between the two is that cond installation will update the package, but pip will not!
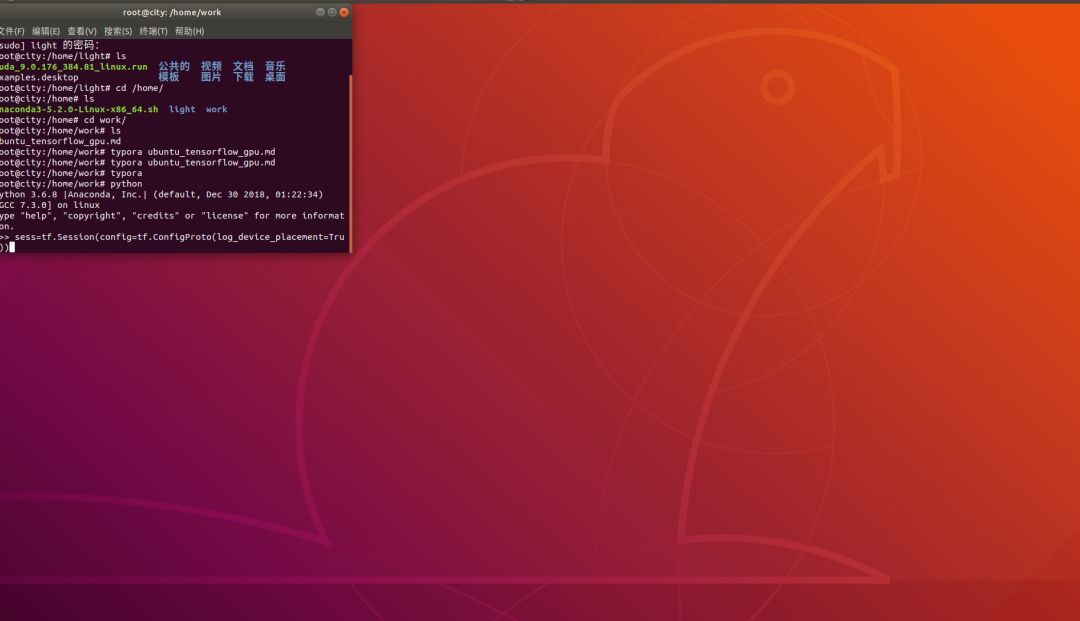
6. Test
Enter the following commands in sequence:
import tensorflow as tf
a = tf.constant([1.0,2.0,3.0],name='a')
b = tf.constant([3.0,4.0,5.0],name='b')
c = a + b
sess = tf.Session()print(sess.run(c))
The test results are as follows:
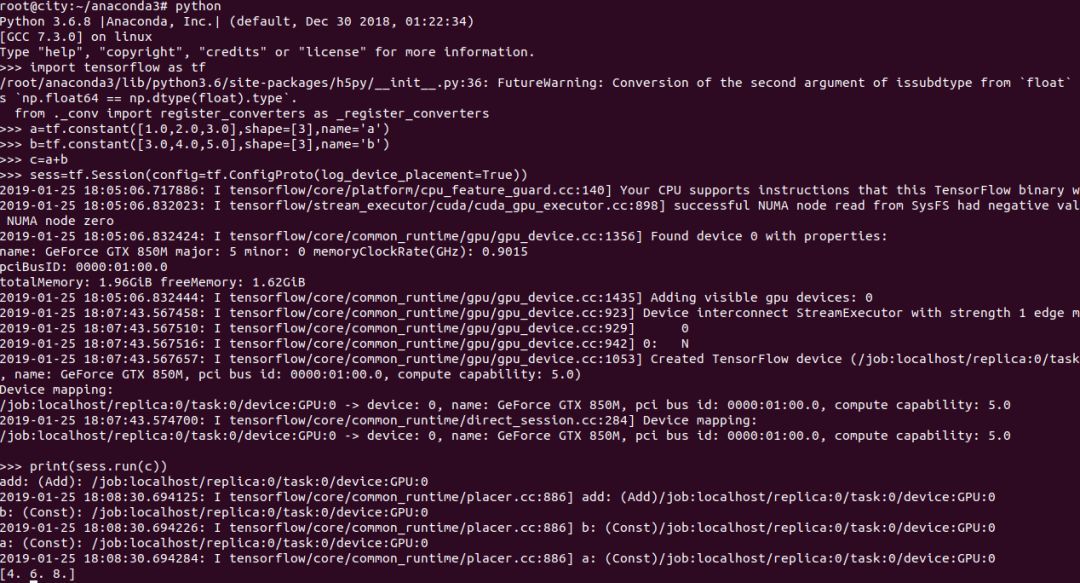
See [4. 6. 8.], and see your GPU device, the test is successful!
But I found a small bug, there was a warning when importing the package above, this can be ignored, but in pursuit of perfection, the final solution is: just reinstall h5py!

The warning in the picture above is that h5py is not compatible with numpy. After I uninstalled it and reinstalled it, the warning was resolved!
Reinstall the solution as shown below:
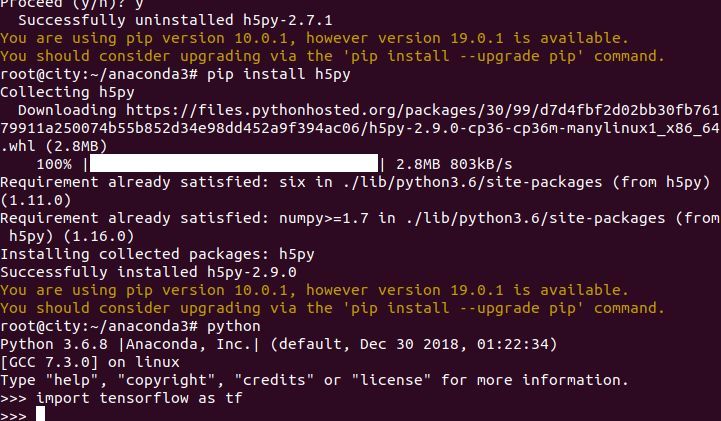
After guiding the package, there is no warning, it is perfect! Haha, finally the installation is complete!
7. to sum up
Since cuda8.0 or higher does not support gcc5.0 or higher, you must ensure the gcc and g++ versions of your computer! Downgrade these two. There are many solutions to the problem on the Internet. If you encounter the installation process, you can leave a message or Google!
I hope that through this article, everyone can have a deeper understanding of the deep learning environment and have a deeper understanding of the operation of the Ubuntu system!
Recommended Posts