Server upgrade to centos8 website configuration-php and mysql upgrade from 5.6 to php7 and msyql
linux centos8 install php7 nginx1.4 mysql8, run php website, configure each module from scratch
The choice between CentOS7 and centOS8
At present, the default centos system version of major domestic [cloud servers] (https://cloud.tencent.com/product/cvm?from=10680) is still 7. There is currently no supporting support for centos, and the default for foreign cloud server manufacturers is 8, such as vultr
The performance of centos8 is improved, the official website introduces more clearly
Install the centos8 min version, check on my system and find that nginx defaults to 1.14
Development language version
- Python 3.6
- PHP 7.2
- Ruby 2.5
- Node.js 10
- java::OpenJDK 11
Database version
And my server msyql is msyql5.6 php is php5.6, I chose to try it again.
centos8 installs nginx mysql php system default version from scratch to build php website
centos8 install nginx
- Install nginx
yum install nginx php
-
Start nginx
systemctl start nginx.service -
View nginx status
systemctl status nginx -
Set nginx to boot up
systemctl enable nginx.service
centos8 install php
- Install php
- yum install php
- **Install php extension library **
- yum install php-json php-xml php-mysqlnd php-mbstring php-common php-gd
- Start php
- systemctl start php-fpm
- View php version
- php -V
- Set php to boot up
- systemctl enable php-fpm
centos8 install mysql
- Check if MySQL is installed
rpm -qa | grep mysql - Download the installation package file
wget http://repo.mysql.com/mysql-community-release-el7-5.noarch.rpm - Install the mysql-community-release-el7-5.noarch.rpm package
rpm -ivh mysql-community-release-el7-5.noarch.rpm - View available installation packages
yum repolist all | grep mysql - Install mysql
yum install mysql-server - Check whether mysql is installed successfully.
rpm -qa | grep mysql - Start the mysql service
systemctl start mysqld.service
Website nginx selinux file permission configuration##
Website nginx configuration
Nginx basic configuration, I won’t talk about it here, check "[Nginx Sunflower Collection-Grassroots Webmaster Configuration Nginx Operation and Maintenance Encyclopedia] (https://www.zhoulujun.cn/html/tools/webServer/nginx/2018_0618_8124.html)"
For small water pipe sites like me, it’s important to note that nginx limits the current
The general configuration is as follows
 # 1 M can store 16384 states, the value of rete must be an integer,
 # If one request is limited to two seconds, it can be set to 30r/m, where$binary_remote_addr sometimes needs to be based on its own log_format variable configuration to replace
 limit_conn_zone $binary_remote_addr zone=perip:1m;
 limit_conn_zone $server_name zone=perserver:1m;
 # limit_req   zone=perip burst=10;
  # Limit the number of concurrent client connections to 20, allow only one connection per an IP address at a time (each time).;
 # Is to limit each IP can only initiate 20 connections (addr must be followed by limit_conn_corresponding to zone variables)
 # Indicates that ip is the key to restrict each ip from accessing lmit.When html file, at most one can be online, otherwise the rest will be unavailable.
 limit_conn perip 14;
 limit_conn perserver 10;
 limit_req_zone $binary_remote_addr zone=per_ip:1m rate=400r/s;
 limit_req_zone $server_name zone=per_server:10m rate=600r/s;
 limit_req zone=per_ip burst=300 nodelay;
 limit_req zone=per_server burst=500;
Specifically, it is recommended to read "[Super detailed analysis of burst parameters of limit_req module under Nginx] (https://blog.csdn.net/hellow__world/article/details/78658041)"
The nginx configuration directory structure is as follows

Post the configuration of this site here
nginx basic configuration####
The nginx configuration file is HOCON, edited by intellij, the configuration view: "HOCON: What format type folder is the suffix conf of the nginx configuration file? How to edit intellij", other editors should also have corresponding plug-ins. There is a plug-in that recognizes the code, and the editor should be more comfortable.
# For more information on configuration, see:
# * Official English Documentation: http://nginx.org/en/docs/
# * Official Russian Documentation: http://nginx.org/ru/docs/

user nginx;
worker_processes auto;
error_log /var/log/nginx/error.log;
pid /run/nginx.pid;

# Load dynamic modules. See /usr/share/doc/nginx/README.dynamic.
include /etc/nginx/modules/*.conf;

events {
 # essential for linux, optmized to serve many clients with each thread
  # Linux key configuration allows a single thread to handle multiple client requests.
  use epoll;
  # Determines how many clients will be served by each worker process.
  # ( Max clients = worker_connections * worker_processes)
  # " Max clients" is also limited by the number of socket connections available on the system (~64k)
  # Configure the number of clients that can be served by a single Nginx process, (maximum number of clients=Number of connections per process*Number of processes)
  # The maximum number of clients is also affected by the number of operating system socket connections (maximum 64K)
  worker_connections 51200;

  # Used to configure whether the nginx server may receive multiple client connection requests, the default value is off
  multi_accept on;
}
# http config
include /etc/nginx/http/default.conf;
# include /etc/nginx/http/http_web.conf;
nginx http configuration
http {
################################ logs  #######################
 log_format  main  '$remote_addr - $remote_user [$time_local] "$request" ''$status $body_bytes_sent "$http_referer" ''"$http_user_agent" "$http_x_forwarded_for"';
 # Buffer log writes to speed up IO, or disable them altogether
 # Write the log to the high-speed IO storage device, or close the log directly.
 # access_log /var/log/nginx/access.log main buffer=16k;
 access_log off;
 # only log critical errors Only record critical error logs
 error_log /var/log/nginx/error.log crit;

################################ file  #######################
 # types
 include             /etc/nginx/mime.types;
 default_type        application/octet-stream;

 charset UTF-8;
 # Only allow get post requests
 add_header 'Access-Control-Allow-Methods''GET, POST';
 # Hide the version number of nginx
 server_tokens off;
################################ Enable gzip compression related configuration#######################
 gzip on;
 gzip_disable   "MSIE [1-6]\.";
 gzip_min_length  1k;
 gzip_buffers     4 16k;
 gzip_http_version 1.1;
 gzip_comp_level 4;
 gzip_types     text/plain application/javascript application/x-javascript text/javascript text/css application/xml application/xml+rss;
 gzip_vary on;
 gzip_proxied   expired no-cache no-store private auth;

 # Request to set up optimized configuration#######################
 tcp_nodelay         on;
 # sendfile()Not only can reduce the number of switching but also reduce the number of copies.
 sendfile            on;
 # Send the data in the buffer immediately
 tcp_nopush          on;
 # Specify how long each TCP connection can last. The default value of Nginx is 75 seconds, some browsers only hold 60 seconds at most, so it can be set to 60 seconds
 # Configure connection keep-alive timeout, the server will close the corresponding connection after the timeout
 keepalive_timeout   65;
 types_hash_max_size 2048;
 client_max_body_size 2m;
 # Number of requests a client can make over the keep-alive connection. This is set high for testing.
 # A single client keeps-The number of requests that can be sent on the alive connection. In the test environment, a relatively large value needs to be configured.
 keepalive_requests  10000;
 # Timeout for keep-alive connections. Server will close connections after this time.
 # Configure connection keep-alive timeout, the server will close the corresponding connection after the timeout.
 # The timeout period for the client to send a complete request header to the server. If the client does not send a complete request header within the specified time, Nginx returns HTTP 408 (Request Timed Out
 client_header_timeout 40s;
 # send the client a "request timed out"if the body is not loaded by this time. Default 60.
 # Specify the timeout period for sending the request body after the client establishes a connection with the server. If the client does not send any content within the specified time, Nginx returns HTTP 408 (Request Timed Out)
 client_body_timeout 40s;
 reset_timedout_connection on;
 # If the client stops reading data, free up the stale client connection after this much time. Default 60.
 # Client data read timeout configuration, the client stops reading data, and disconnects the corresponding connection after the timeout period. The default is 60 seconds. The timeout period for the server to transmit data to the client
 send_timeout 30;
 server_names_hash_bucket_size 128;
 # The buffer size of the client request header. This can be set according to the page size of your system. Generally, the size of a request header will not exceed 1k. However, since the general system page is larger than 1k, it is set to the page size here.
 client_header_buffer_size 32k;
 large_client_header_buffers 4 32k;

################################ Speed limit configuration################################
 limit_conn_log_level error;
 limit_conn_status 503;
 # limit_conn_zone $binary_remote_addr zone=one:1m;
 # limit_conn_zone $server_name zone=perserver:1m;
 # Define a limit named allips_req_The zone is used to store the session, the size is 10M memory,
 # To$binary_remote_addr is key,Limit the average number of requests per second to 20,
 # 1 M can store 16384 states, the value of rete must be an integer,
 # If one request is limited to two seconds, it can be set to 30r/m, where$binary_remote_addr sometimes needs to be based on its own log_format variable configuration to replace
 limit_conn_zone $binary_remote_addr zone=perip:1m;
 limit_conn_zone $server_name zone=perserver:1m;

 # limit_req   zone=perip burst=10;
  # Limit the number of concurrent client connections to 20, allow only one connection per an IP address at a time (each time).;
 # Is to limit each IP can only initiate 20 connections (addr must be followed by limit_conn_corresponding to zone variables)
 # Indicates that ip is the key to restrict each ip from accessing lmit.When html file, at most one can be online, otherwise the rest will be unavailable.
 limit_conn perip 14;
 limit_conn perserver 10;
 limit_req_zone $binary_remote_addr zone=per_ip:1m rate=400r/s;
 limit_req_zone $server_name zone=per_server:10m rate=600r/s;
 limit_req zone=per_ip burst=300 nodelay;
 limit_req zone=per_server burst=500;
################################ web server #######################
 include  /etc/nginx/http/http_web.conf;}
Nginx empty domain name settings, ip access is prohibited
Prevent the domain name from being resolved to our ip server, causing our ip to be walled
# Turn off nginx empty host header to prevent nginx empty host header and malicious domain name pointing
server {
 listen *:80default;
 server_name _;
 # index index.html index.php index.htm;
 # root  /data/wwwroot/zhoulujun;
 # include /etc/nginx/conf.d/php.conf;
 # rewrite ^(.*)//zhoulujun.cn permanent;return301 https://www.zhoulujun.cn$request_uri;}
nginx php support configuration
################################ php related configuration#######################
 # Load modular configuration files from the /etc/nginx/conf.d directory.
 # include /etc/nginx/conf.d/php-fpm.conf
 upstream php-fpm {
  server unix:/run/php-fpm/www.sock;}
################################ php fastcgi related configuration#######################
 fastcgi_connect_timeout 300;
 fastcgi_send_timeout 300;
 fastcgi_read_timeout 300;
 fastcgi_buffer_size 64k;
 fastcgi_buffers 4 64k;
 fastcgi_busy_buffers_size 128k;
 fastcgi_temp_file_write_size 256k;

################################ host ################################
 include  /etc/nginx/site/default.conf;
Linux server web directory permission setting###
Set 644 for the files that need to be read, set 755 for the files that need to be pointed to, such as php articles, and set 777 for the folders that need to be read and written, such as the html uploadfile folder
For specific permission settings, please refer to the article I wrote before "Clearing User Group Concepts and File Permissions—Understanding Website Permission Settings"
Set permissions, because centos8 enables selinux by default, the website still cannot be accessed. 403 error is generally reported.
centos8 web server selinux settings###
Searching on the Internet generally says to close selinux, but personally do not recommend closing
Set selinux to read permissions for web directory####
chcon -v -R --type=httpd_sys_content_t /data/www/
Set selinux to write permissions to the web directory####
chcon -R -t httpd_sys_rw_content_t /data/www/
For details, please refer to "[centos8 nginx server root points to a custom directory such as (/data/www), access report 403 404, all file user groups are root permissions 755] (https://www.cnblogs.com/zhoulujun/p/12111367.html)"
After setting up, the website is ready to run
linux website basic security settings##
linux add user, modify user password, modify user authority, set root operation###
- Add a user named andyZhou
useradd andyZhou - change Password
passwd chenjiafa - Give the user root privileges
usermod -g root chenjiafa
The website usually uses this newly added user to log in. If root permission is required, switch to su
For details, see "[Linux add user, modify user password, modify user authority, set root user operation] (https://www.cnblogs.com/zhoulujun/p/12177956.html)"
Prohibit root ssh login to modify the default port
Modify ssh configuration file
Modify ssh login port####
vim /etc/ssh/sshd_config
Find "#Port 22", directly type "yyp" on this line to copy this line to the next line, and then remove the "#" sign that is the comment of the two lines and modify it to:
# Port 22
Port 10086
When you modify the port, it is best to choose a port number between 10000 and 65535. The port number below 10000 is easy to be occupied by the system or some special software, or when a new application prepares to occupy the port in the future, it will be occupied by you first, causing the software Can not operate**.
Prohibit root ssh login
PermitRootLogin no
Add ssh common login user####
AllowUsers andyzhou
Restart ssh service
systemctl restart sshd
linux firewall port setting
- Linux firewall closes a port
firewall-cmd --permanent --zone=public --remove-port=8080/tcp - Linux firewall opens a certain port
firewall-cmd --permanent --add-port=10086/tcp - Reload firewall policy:
firewall-cmd --reload - Check firewall port opening
firewall-cmd --list-ports
linux virtual memory settings
My personal blog is 1g small memory, mysql runs up and often crashes.
free -m View the memory, set the memory according to the situation, generally the virtual machine memory is twice the physical memory. Then set 2g virtual memory, the command is as follows
dd if=/dev/zero of=/opt/swap bs=1024 count=2048000
chmod 600/opt/swap
mkswap /opt/swap
swapon /opt/swap
mysql creates a new user and authorizes it, prohibits root login###
The following lines of sql should meet your needs
-
- Create a user and log in with this user later
CREATE USER'userName' @'Access Restrictions' IDENTIFIED BY'password';
-
- Authorize users, give data permissions
GRANT ALL PRIVILEGES ON database name. Table name TO'userName'@'access restrictions';
-
-
- Change user password (change root password)
-
ALTER USER 'root'@'localhost' IDENTIFIED BY 'newPassword';
-
- Refresh user permissions
FLUSH PRIVILEGES;
Website cloudflare speed up##
Alibaba Cloud, export the zone file, then clouefare export the template, then copy and paste
There are many online tutorials, such as "[How to use CDN to accelerate your website-Cloudflare free version detailed usage tutorial] (https://www.jianshu.com/p/1e73c2d66ac8)"
Here are a few points to note
If you turn on Under Attack Mode, there will always be a 5m startup page, and now free users can’t configure it in the customer page
The specific configuration is as follows: "[cloudflare how to customize the 5-second shield page tutorial] (https://www.zhujib.com/rhzdymdymjc.html)"
The second is that cloudflare Rocket Loader is blocked in China, and my asynchronous execution, the inserted js will be blocked by this js. No matter what the domestic users, it is better to close.
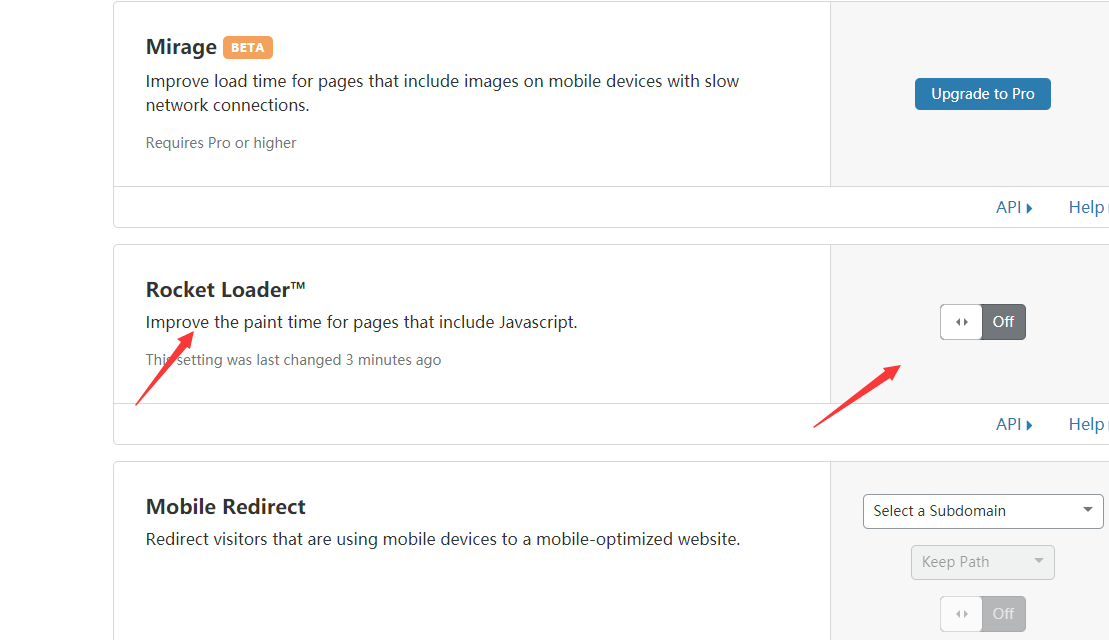
Reference link: "cloudflare Rocket Loader Chinese users are best not to use"
After the website is configured, you can mirror one locally, the portal: "vmware14install centos8"
First, organize so many according to the personal website migration steps. Organize the text later
Reprinted this site article "Server upgrade to centos8 website configuration-php and mysql upgrade from 5.6 to php7 and msyql8",
Please indicate the source: https://www.zhoulujun.cn/html/os/linux/8242.html
Recommended Posts