CentOS7.xでiSCSIネットワークストレージを構成する
著作権表示:この記事はShaonPuppetによるオリジナル記事です。転載の元のアドレスを教えてください。ありがとうございます。 https://blog.csdn.net/wh211212/article/details/52981305
1.iSCSIの概要##
- [ iSCSI](http://linux-iscsi.sourceforge.net/)(インターネットSCSI)テクノロジは、IBMによって研究開発されています。これは、IPプロトコルの上位層で実行できるハードウェアデバイス用のSCSI命令セットです。この命令このコレクションは、IPネットワーク上でSCSIプロトコルを実行するように実装できるため、高速ギガビットイーサネットなどでルーティングを実行できます。 iSCSIテクノロジーは、既存のSCSIインターフェイスとイーサネットテクノロジーを組み合わせて、サーバーがIPネットワークを使用してストレージデバイスとデータを交換できるようにする新しいストレージテクノロジーです。
- iSCSIは、IPストレージデバイス、ホスト、およびクライアント間の相互接続を確立および管理し、ストレージエリアネットワーク(SAN)を作成するために使用されるTCP / IPベースのプロトコルです。さん
SCSIプロトコルを高速データ伝送ネットワークに適用することが可能です。この伝送は、ブロックレベルで複数のデータストレージネットワーク間で実行されます。 SCSI
構造はC / Sモードに基づいており、通常のアプリケーション環境は次のとおりです。デバイスは互いに近接しており、これらのデバイスはSCSIバスで接続されています。 - iSCSIの主な機能は、TCP / IPネットワーク上のホストシステム(イニシエーター)とストレージデバイス(ターゲット)です。
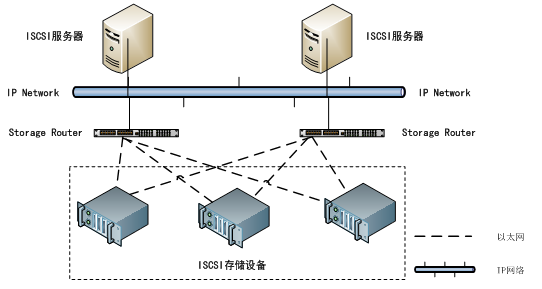
- 完全なiSCSIシステムのトポロジ構造は次のとおりです。
- 備考:上記の段落の出典:[http://www.cnblogs.com/mchina/p/centos-iscsi-network-storage.html](http://www.cnblogs.com/mchina/p/centos-iscsi-network-storage.html)
2、実験環境##
オペレーティングシステム:CentOS Linuxリリース7.2.1511(コア)
iSCSI Target:10.1.1.56 / vdevops.org
iSCSI Initiator:10.1.1.53 / linuxprobe.org
ファイアウォールが閉じている/ iptables:ファイアウォールが実行されていません。
SELINUXが無効になっています:SELINUX = disable
3、iSCSIターゲットを構成します##
- 最初に管理ツールをインストールします
[ root@vdevops ~]# yum -y install targetcli - iSCSIターゲットを構成します。
たとえば、/ iscsi_disksディレクトリにディスクイメージを作成し、それをSCSIデバイスとして設定します
# 管理コンソールに入る
[ root@vdevops ~]# targetcli
Warning: Could not load preferences file /root/.targetcli/prefs.bin.
targetcli shell version 2.1.fb41
Copyright 2011-2013 by Datera, Inc and others.
For help on commands, type 'help'.
# に/iscsi_disks/disk01.2Gを使用して、imgに「disk01」という名前のディスクイメージを作成します
/> cd backstores/fileio
/backstores/fileio> create disk01 /iscsi_disks/disk01.img 2G
Created fileio disk01 with size 2147483648/backstores/fileio> cd /iscsi
# 目標を作成する
/iscsi> create iqn.2016-10.vdevops.org:storage.target00
Created target iqn.2016-10.vdevops.org:storage.target00.
Created TPG 1.
Global pref auto_add_default_portal=true
Created default portal listening on all IPs(0.0.0.0), port 3260./iscsi> cd iqn.2016-10.vdevops.org:storage.target00/tpg1/luns
# ルンを設定する
/iscsi/iqn.20...t00/tpg1/luns> create /backstores/fileio/disk01
Created LUN 0./iscsi/iqn.20...t00/tpg1/luns> cd ../acls
/iscsi/iqn.20...t00/tpg1/acls> create iqn.2016-10.vdevops.org:vdevops.org
Created Node ACL for iqn.2016-10.vdevops.org:vdevops.org
Created mapped LUN 0.
# ACLを設定します(接続を許可されるのはイニシエーターのIQNです)
/iscsi/iqn.20...t00/tpg1/acls> cd iqn.2016-10.vdevops.org:vdevops.org/
# 認証用のユーザーIDを設定します
/iscsi/iqn.20...g:vdevops.org>set auth userid=username
Parameter userid is now 'username'./iscsi/iqn.20...g:vdevops.org>set auth password=password
Parameter password is now 'password'./iscsi/iqn.20...g:vdevops.org> exit
Global pref auto_save_on_exit=true
Last 10 configs saved in/etc/target/backup.
Configuration saved to /etc/target/saveconfig.json
[ root@vdevops ~]# ss -napt | grep 3260
LISTEN     0256*:3260*:*[root@vdevops ~]# systemctl enable target
Created symlink from/etc/systemd/system/multi-user.target.wants/target.service to /usr/lib/systemd/system/target.service.[root@vdevops ~]# firewall-cmd --add-service=iscsi-target --permanent
success
[ root@vdevops ~]# firewall-cmd --reload
success
- iSCSIを使用してストレージサーバーを構成する
これは、scsi-target-utilsを使用してiSCSIターゲットを構成する例です。
[1] scsiをインストールします-target-utils.
# EPELソースを使用してインストール
[ root@vdevops ~]# yum --enablerepo=epel -y install scsi-target-utils
[2] iSCSIターゲットを構成します。
たとえば、[/ iscsi_disks]ディレクトリの下にディスクイメージを作成し、共有ディスクとして設定します。
# ハードディスクイメージを作成する
[ root@vdevops ~]# mkdir /iscsi_disks   #再作成する必要はありません
[ root@vdevops ~]# dd if=/dev/zero of=/iscsi_disks/disk01.img count=0 bs=1 seek=2G  #再作成する必要はありません
[ root@vdevops iscsi_disks]# vi /etc/tgt/targets.conf
< target iqn.2016-10.vdevops.org:target00>
 # provided devicce as a iSCSI target
  #
 backing-store /iscsi_disks/disk01.img
 # iSCSI Initiator's IP address you allow to connect
  #
 initiator-address 10.1.1.53
 # authentication info(set anyone you like for"username","password")
  #
 incominguser username password
< /target>[3]SElinuxが有効になっている場合,SElinuxタイプを変更する.[root@vdevops ~]# chcon -R -t tgtd_var_lib_t /iscsi_disks
[ root@vdevops ~]# semanage fcontext -a -t tgtd_var_lib_t /iscsi_disks
[4] ファイアウォールが有効になっている場合は、iSCSIターゲットサービスを許可します
[ root@vdevops ~]# firewall-cmd --add-service=iscsi-target --permanent
success
[ root@vdevops ~]# firewall-cmd --reload
success
- tgtdを開始し、ステータスを確認します
[ root@vdevops ~]# systemctl start tgtd
[ root@vdevops ~]# systemctl status tgtd
● tgtd.service - tgtd iSCSI target daemon
 Loaded:loaded(/usr/lib/systemd/system/tgtd.service; disabled; vendor preset: disabled)
 Active:active(running) since Mon 2016-10-3120:46:10 CST; 7s ago
 Process:2860 ExecStartPost=/usr/sbin/tgtadm --op update --mode sys --name State -v ready(code=exited, status=0/SUCCESS)
 Process:2830 ExecStartPost=/usr/sbin/tgt-admin -e -c $TGTD_CONFIG(code=exited, status=0/SUCCESS)
 Process:2829 ExecStartPost=/usr/sbin/tgtadm --op update --mode sys --name State -v offline(code=exited, status=0/SUCCESS)
 Process:2828 ExecStartPost=/bin/sleep 5(code=exited, status=0/SUCCESS)
 Main PID:2827(tgtd)
 CGroup:/system.slice/tgtd.service
   └─2827/usr/sbin/tgtd -f

Oct 3120:46:04 vdevops.org systemd[1]: Starting tgtd iSCSI target daemon...
Oct 3120:46:04 vdevops.org tgtd[2827]: tgtd:iscsi_tcp_init_portal(347) unable to bind server socket, Address already in use
Oct 3120:46:04 vdevops.org tgtd[2827]: tgtd:iser_ib_init(3436) Failed to initialize RDMA; load kernel modules?
Oct 3120:46:04 vdevops.org tgtd[2827]: tgtd:work_timer_start(146) use timer_fd based scheduler
Oct 3120:46:04 vdevops.org tgtd[2827]: tgtd:bs_init_signalfd(267) could not open backing-store module directory /usr/lib64/tgt/backing-store
Oct 3120:46:04 vdevops.org tgtd[2827]: tgtd:bs_init(386) use signalfd notification
Oct 3120:46:10 vdevops.org tgtd[2827]: tgtd:device_mgmt(246) sz:29 params:path=/iscsi_disks/disk01.img
Oct 3120:46:10 vdevops.org tgtd[2827]: tgtd:bs_thread_open(408)16
Oct 3120:46:10 vdevops.org systemd[1]: Started tgtd iSCSI target daemon.
Hint: Some lines were ellipsized, use -l to show in full.[root@vdevops ~]# systemctl enable tgtd
Created symlink from/etc/systemd/system/multi-user.target.wants/tgtd.service to /usr/lib/systemd/system/tgtd.service.
# ステータスを確認する
[ root@vdevops ~]# tgtadm --mode target --op show
Target 1: iqn.2016-10.world.srv:target00
 System information:
  Driver: iscsi
  State: ready
 I_T nexus information:
 LUN information:
  LUN:0
   Type: controller
   SCSI ID: IET     00010000
   SCSI SN: beaf10
   Size:0 MB, Block size:1
   Online: Yes
   Removable media: No
   Prevent removal: No
   Readonly: No
   SWP: No
   Thin-provisioning: No
   Backing store type:null
   Backing store path: None
   Backing store flags:
  LUN:1
   Type: disk
   SCSI ID: IET     00010001
   SCSI SN: beaf11
   Size:2147 MB, Block size:512
   Online: Yes
   Removable media: No
   Prevent removal: No
   Readonly: No
   SWP: No
   Thin-provisioning: No
   Backing store type: rdwr
   Backing store path:/iscsi_disks/disk01.img
   Backing store flags:
 Account information:
  username
 ACL information:10.1.1.53
- iSCSIイニシエーターを構成する
# EPELを使用してiscsiをインストールします-initiator-utils
[ root@linuxprobe ~]# yum -y install iscsi-initiator-utils
[ root@linuxprobe ~]# vi /etc/iscsi/initiatorname.iscsi
# change to the same IQN you set on the iSCSI target server
InitiatorName=iqn.2016-10.vdevops.org:vdevops.org
[ root@linuxprobe ~]# vi /etc/iscsi/iscsid.conf
# line 57:コメントを外す
node.session.auth.authmethod = CHAP
# line 61,62:コメントを外し、iSCSIターゲットサーバーで設定したユーザー名とパスワードを指定します
node.session.auth.username = username
node.session.auth.password = password
# ターゲットが見つかりました
[ root@linuxprobe ~]# iscsiadm -m discovery -t sendtargets -p 10.1.1.5610.1.1.56:3260,1 iqn.2016-10.vdevops.org:storage.target00
[ root@linuxprobe ~]# iscsiadm -m node -o show
# BEGIN RECORD 6.2.0.873-33.2
node.name = iqn.2016-10.vdevops.org:storage.target00
node.tpgt =1
node.startup = automatic
node.leading_login = No
......
node.conn[0].iscsi.MaxXmitDataSegmentLength =0
node.conn[0].iscsi.MaxRecvDataSegmentLength =262144
node.conn[0].iscsi.HeaderDigest = None
node.conn[0].iscsi.IFMarker = No
node.conn[0].iscsi.OFMarker = No
# END RECORD
# ログインターゲット
[ root@linuxprobe ~]# iscsiadm -m node --login
Logging in to [iface:default, target: iqn.2016-10.vdevops.org:storage.target00, portal:10.1.1.56,3260](multiple)
Login to [iface:default, target: iqn.2016-10.vdevops.org:storage.target00, portal:10.1.1.56,3260] successful.
# 接続状態を確認する
[ root@linuxprobe ~]# iscsiadm -m session -o show
tcp:[1]10.1.1.56:3260,1 iqn.2016-10.vdevops.org:storage.target00(non-flash)
# パーティションのステータスを確認する
[ root@linuxprobe ~]# cat /proc/partitions
major minor  #blocks  name

 204 fd0
 8020971520 sda
 81512000 sda1
 8220458496 sda2
 1104228096 sr0
 253018317312 dm-025312097152 dm-18162097152 sdb
 # ターゲットサーバーから追加された新しいデバイスは「sdb」です
- iSCSIデバイスをセットアップした後、イニシエーターの構成は次のようになります
# ラベルを作成する
[ root@linuxprobe ~]# parted --script /dev/sdb "mklabel msdos"
# パーティションを作成する
[ root@linuxprobe ~]# parted --script /dev/sdb "mkpart primary 0% 100%"
# フォーマットパーティション
[ root@linuxprobe ~]# mkfs.xfs -i size=1024-s size=4096/dev/sdb1
meta-data=/dev/sdb1              isize=1024   agcount=4, agsize=130560 blks
   =      sectsz=4096  attr=2, projid32bit=1=                       crc=0        finobt=0
data     =                       bsize=4096   blocks=522240, imaxpct=25=                       sunit=0      swidth=0 blks
naming   =version 2              bsize=4096   ascii-ci=0 ftype=0
log      =internal log           bsize=4096   blocks=2560, version=2=                       sectsz=4096  sunit=1 blks, lazy-count=1
realtime =none                   extsz=4096   blocks=0, rtextents=0
# パーティションをマウントします
[ root@linuxprobe ~]# mount /dev/sdb1 /mnt/
# システムマウントを表示
[ root@linuxprobe ~]# df -hT
Filesystem              Type      Size  Used Avail Use% Mounted on
/dev/mapper/centos-root xfs        18G  1.9G   16G  11% /
devtmpfs                devtmpfs  483M     0  483M   0%/dev
tmpfs                   tmpfs     493M     0  493M   0%/dev/shm
tmpfs                   tmpfs     493M  6.7M  487M   2%/run
tmpfs                   tmpfs     493M     0  493M   0%/sys/fs/cgroup
/dev/sda1               xfs       497M  125M  373M  26%/boot
tmpfs                   tmpfs      99M     0   99M   0%/run/user/0**/dev/sdb1               xfs       2.0G   33M  2.0G   2%/mnt**
この時点で、ISCSI構成が完了し、正常に使用できることがわかります。
- ISCSI Baidu百科事典:[http://baike.baidu.com/link?url=-OA1le_DbAh5ybVq1ZBTbPHJqQb5-jma5vhKR5nCAC7C11UDSwNn_6mPYj0AiABrm8OM2MoExN__9GvzvhVg8K](http://baike.baidu.com/link?url=-OA1le_DbAh5ybVq1ZBTbPHJqQb5-jma5vhKR5nCAC7C11UDSwNn_6mPYj0AiABrm8OM2MoExN__9GvzvhVg8K)
Recommended Posts