GitLabのインストールと基本的な使用
[ TOC]
0 x00序文####
オープンソースの世界では、終わりはありません!
説明:GitLabは非常に優れたプロジェクトです。これは、ユーザーが自分のサーバーでGitHubと同様のプロジェクト管理システムを実行できるようにするオープンソースプロジェクトです。
GitLabを使用して、一般公開前にプライベートプロジェクトを開発できます。
公式サイトアドレス:[https://about.gitlab.com/](https://about.gitlab.com/)
ヘルプドキュメント:[https://about.gitlab.com/install/](https://about.gitlab.com/install/)
コンポーネントリファレンス:[https://docs.gitlab.com/ce/development/architecture.html](https://docs.gitlab.com/ce/development/architecture.html)
GitLabは従来のオープンソースビジネスモデルを使用しており、次の2つの製品があります。
- 無料のオープンソースソフトウェア、ユーザーは自分のサーバーにインストールでき、GitHubと同様のホスティングサービス。
- 無料のコミュニティバージョン
GitlabCEと有料のエンタープライズバージョンGitlab EE - エンタープライズバージョンはコミュニティバージョンに基づいていますが、企業のお客様向けの他の機能が付属しています。WordPress.orgまたはWordpress.comが提供するサービスとほぼ同じです。
Gitlabの利点:
- オープンソースと無料バージョンがあり、プライベート開発のためにアップロードおよびプルできます。
- Community Editionは非常にスケーラブルであり、単一のサーバーまたはクラスターで25,000人のユーザーをサポートできます
- GitLabの一部の機能には、Gitウェアハウス管理、コードレビュー、問題追跡、アクティビティソース、およびWikiが含まれます。
- 継続的な統合と配信のためのGitLabCIが装備されています
0 x01環境のインストール####
CentOS
Gitlabの基本要件:GitLabを実行するために少なくとも4GBの空きRAM
- システム:CentOS Linuxリリース8.0.1905(コア)GitLab 12.9.2(ac5568eb5d8)GitLab Shell 12.0.0 GitLab Workhorse v8.25.1 GitLab APIv 4 Ruby 2.6.5p114 Rails 6.0.2 [PostgreSQL](https://cloud.tencent.com/product/postgresql?from=10680)10.12Gitalyサーバー
Gitlabのインストール方法:
- 公式の推奨事項は、迅速なインストールにOmnibusを使用することです(インストールと展開にrpmソフトウェアパッケージを使用します(国内では直接ミラーソースのダウンロードを推奨します))。#これは、curlの例としてコミュニティバージョンですhttps://packages.gitlab.com/install/repositories/gitlab/gitlab- ce / script.rpm.sh | sudo bash sudo EXTERNAL_URL = "https://gitlab.example.com" dnf install -y gitlab-ee
- インストールと展開にはyumを使用します。
インストールプロセス:
ステップ1.rpmを使用してコミュニティバージョンのgitlabをインストールします(更新ソースを置き換えて、自分で選択します)。
sudo dn8 install -y curl policycoreutils openssh-server wget
# wgetを使用してrpmパッケージをダウンロードしてインストールできます
wget https://mirrors.tuna.tsinghua.edu.cn/gitlab-ce/yum/el8/gitlab-ce-12.9.2-ce.0.el8.x86_64.rpm
# dnf install gitlab-ce-12.9.2-ce.0.el8.x86_64.rpm
rpm -ivh gitlab-ce-12.9.2-ce.0.el8.x86_64.rpm
ステップ2.インストールが完了すると、インストールが成功したことが次のように表示されます。
Thank you for installing GitLab!
GitLab was unable to detect a valid hostname for your instance.
Please configure a URL for your GitLab instance by setting `external_url`
configuration in/etc/gitlab/gitlab.rb file.
Then, you can start your GitLab instance by running the following command:
sudo gitlab-ctl reconfigure
ステップ3.gitlabのデフォルト構成を変更します
$vim /etc/gitlab/gitlab.rb
# 独自のドメイン名またはIPに一重引用符で変更し、以前のhttpを変更しないでください(そしてドメイン名をホストに追加します)
external_url 'http://gitlab.weiyigeek.top'

# メール設定、メールサーバーはメールサービス機能を閉じることができません
# gitlab_rails['smtp_enable']=false
# gitlab_rails['smtp_address']=""
# gitlab_rails['smtp_port']=587
# gitlab_rails['smtp_user_name']=""
# gitlab_rails['smtp_password']=""
# gitlab_rails['smtp_authentication']=""
# gitlab_rails['smtp_enable_starttls_auto']=
# gitlab_rails['smtp_tls']=
# gitlab_rails['gitlab_email_from']=''
ステップ4.変更が完了したら、構成を再ロードしてから再起動する必要があります。
$ gitlab-ctl reconfigure
# [2020- 04- 15 T10:33:44+08:00] WARN: Please install an English UTF-8 locale for Chef to use, falling back to C locale and disabling UTF-8 support. #不快に感じる場合は、自分でシステム言語を設定してください
# [2020- 04- 15 T10:33:45+08:00] WARN: Please install an English UTF-8 locale for Chef to use, falling back to C locale and disabling UTF-8 support.
# Starting Chef Client, version 14.14.29
# resolving cookbooks for run list:["gitlab"]
# Synchronizing Cookbooks:
# - redis(0.1.0)
# - package(0.1.0)
# - postgresql(0.1.0)
# - mattermost(0.1.0)
# - consul(0.1.0)
# - letsencrypt(0.1.0)
# - gitlab(0.0.1)
# - runit(4.3.0)
# - monitoring(0.1.0)
# - praefect(0.1.0)
# - gitaly(0.1.0)
# - registry(0.1.0)
# - acme(4.1.1)
# - nginx(0.1.0)
# - crond(0.1.0)
# Running handlers:
# Running handlers complete
# Chef Client finished,541/1460 resources updated in03 minutes 14 seconds
# gitlab Reconfigured!

$ gitlab-ctl restart
# [2020- 04- 15 T10:37:51+08:00] WARN: Please install an English UTF-8 locale for Chef to use, falling back to C locale and disabling UTF-8 support.
# ok: run: alertmanager:(pid 21410) 1s
# ok: run: gitaly:(pid 21422) 0s
# ok: run: gitlab-exporter:(pid 21429) 1s
# ok: run: gitlab-workhorse:(pid 21444) 0s
# ok: run: grafana:(pid 21463) 0s
# ok: run: logrotate:(pid 21474) 0s
# ok: run: nginx:(pid 21480) 0s
# ok: run: node-exporter:(pid 21563) 1s
# ok: run: postgres-exporter:(pid 21569) 0s
# ok: run: postgresql:(pid 21580) 0s
# ok: run: prometheus:(pid 21589) 0s
# ok: run: redis:(pid 21601) 0s
# ok: run: redis-exporter:(pid 21708) 0s
# ok: run: sidekiq:(pid 21716) 0s
# ok: run: unicorn:(pid 21727) 0s
ステップ5.再構成が失敗した場合は、 systemctl enable gitlab-runsvdir && systemctl restart gitlab-runsvdirを実行して、gitlab-runsvdirサービスを再起動する必要があります。
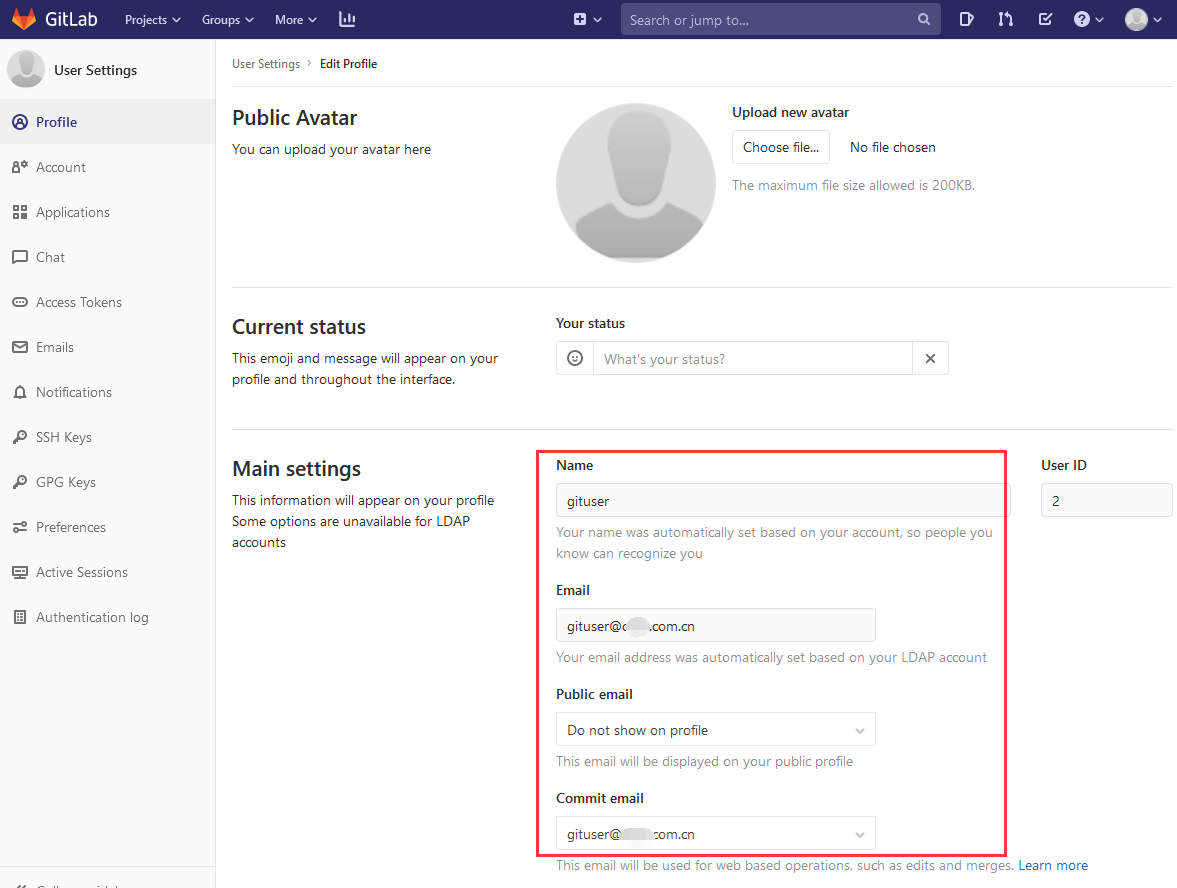
手順6.ブラウザを開いてアカウントを初期化し、パスワードを設定します。このパスワードは、root管理者アカウントのパスワードです。パスワードを設定すると、自動的にログインページにジャンプします。
応用:http://gitlab.weiyigeek.top/
口座番号:root
パスワード:WeiyiGeek #8以上
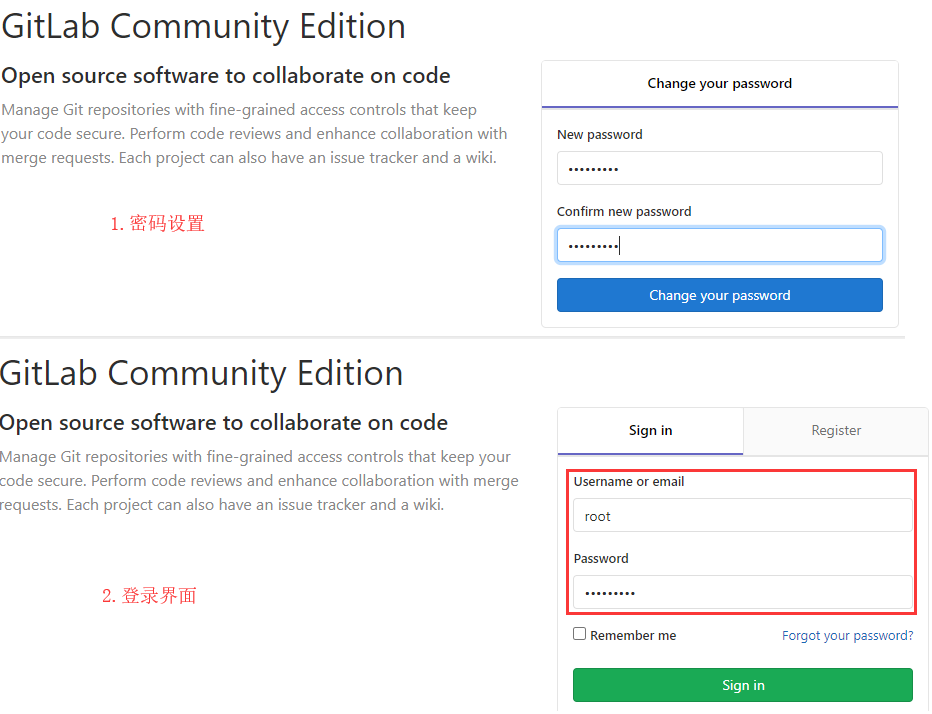
WeiyiGeek.
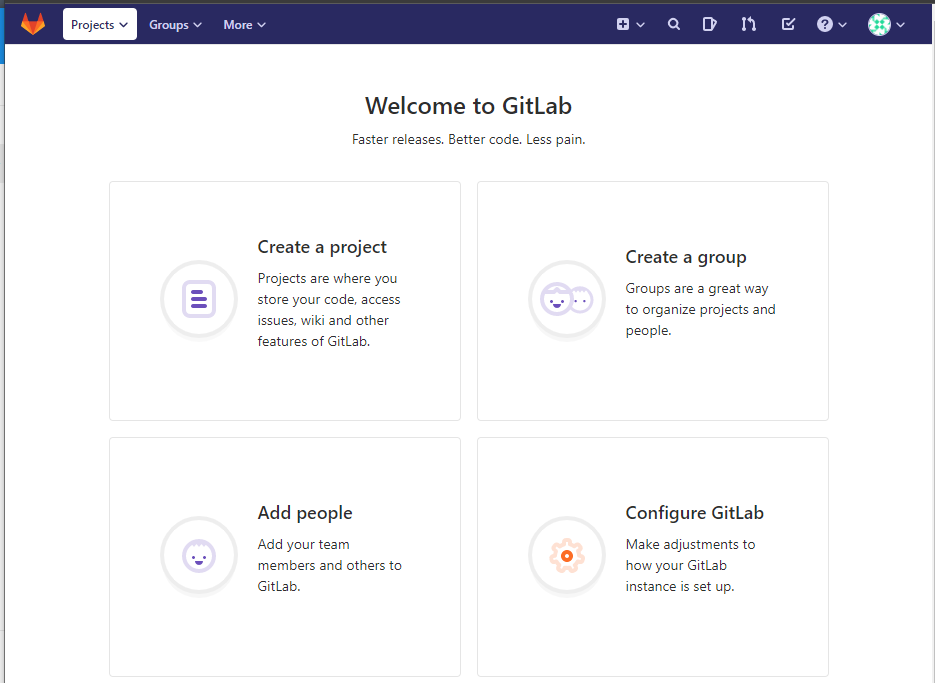
ステップ7.ログインインターフェイスは成功しました。コードを書きたいというクレイジーな衝動はありますか。
WeiyiGeek.
ステップ8.英語は英語が苦手な初心者には不向きかもしれません。中国語化します(「注:12.3.5以降のバージョンでは中国語化は必要ありません。ユーザー設定でカスタム言語を直接設定して、簡略化された中国語を選択してください」)。
# gitlabを停止します
gitlab-ctl stop

# 現在インストールされているバージョンのパッチを入手する
git clone https://gitlab.com/xhang/gitlab.git
cd gitlab
# すべてのブランチバージョンを表示
git branch -a
gitlab_version=$(cat /opt/gitlab/embedded/service/gitlab-rails/VERSION)
# 中国のラベルを元のラベルと比較し、パッチ用にdiffファイルをエクスポートします
# git diff v${gitlab_version} v${gitlab_version}-zh >../${gitlab_version}-zh.diff
git diff remotes/origin/12-3-stable remotes/origin/12-3-stable-zh >../${gitlab_version}-zh.diff

# パッチを適用すると、一部のパッチファイルが存在しないというプロンプトが表示されます。これらのファイルは必ずスキップしてください。スキップしないと、再構成時にエラーが発生します。
patch -d /opt/gitlab/embedded/service/gitlab-rails -p1 <../${gitlab_version}-zh.diff

# 再コンパイルして開始
gitlab-ctl reconfigure
gitlab-ctl start
Docker
説明:dockerを管理し、dockerでgitlabサービスを展開するために、特権の低いユーザーを採用します。
環境の説明:
$lsb_release -a
Description:    Ubuntu 20.04.1 LTS
Release:20.04
Codename:       focal

$docker version
Client: Docker Engine - Community
 Version:19.03.13
 API version:1.40
 Go version:        go1.13.15
 Git commit:        4484c46d9d
 Built:             Wed Sep 1617:02:522020
 OS/Arch:           linux/amd64
 Experimental:false

Server: Docker Engine - Community
 Engine:
 Version:19.03.13
 API version:1.40(minimum version 1.12)
 Go version:       go1.13.15
 Git commit:       4484c46d9d
 Built:            Wed Sep 1617:01:202020
 OS/Arch:          linux/amd64
 Experimental:false
 containerd:
 Version:1.3.7
 GitCommit:        8fba4e9a7d01810a393d5d25a3621dc101981175
 runc:
 Version:1.0.0-rc10
 GitCommit:        dc9208a3303feef5b3839f4323d9beb36df0a9dd
 docker-init:
 Version:0.18.0
 GitCommit:        fec3683
作業手順:
# 1. 新しい低特権ユーザーを作成し、そのユーザーをdockerグループに追加します
sudo useradd -m -g docker WeiyiGeek-gitlab && sudo passwd WeiyiGeek-gitlab
sudo gpasswd -a WeiyiGeek-gitlab docker

# 2. 権限の低いWeiyiGeekに切り替えます-gitlabユーザーはgitlabの最新のコミュニティバージョンをプルします
[ email protected]:~$ docker pull gitlab/gitlab-ce
# Using default tag: latest
# latest: Pulling from gitlab/gitlab-ce
# 4 f53fa4d2cf0: Pull complete
# 6 af7c939e38e: Pull complete
# 903 d0ffd64f6: Pull complete
# 04 feeed388b7: Pull complete
# 25 d5e5c7360d: Pull complete
# 0 cc025692f2b: Pull complete
# eac308723fda: Pull complete
# 2135 ce2185ba: Pull complete
# 3 d2db784a8b0: Pull complete
# d2942fac7230: Pull complete
# Digest: sha256:b7daf0c109a62e776f5f72b728a01191059a51f43b5df82c53ef997e877a784f
# Status: Downloaded newer image for gitlab/gitlab-ce:latest
# docker.io/gitlab/gitlab-ce:latest

# 3. 永続ディレクトリを設定し、gitlabを実行します-server
$ mkdir -vp ~/{config,logs,data}
# mkdir: created directory '/home/WeiyiGeek-gitlab/config'
# mkdir: created directory '/home/WeiyiGeek-gitlab/logs'
# mkdir: created directory '/home/WeiyiGeek-gitlab/data'
$ docker run -d -p 443:443-p 80:80-p 22:22--name gitlab-server --restart always -v /home/WeiyiGeek-gitlab/config:/etc/gitlab -v /home/WeiyiGeek-gitlab/logs:/var/log/gitlab -v /home/WeiyiGeek-gitlab/data:/var/opt/gitlab gitlab/gitlab-ce
512 c45077bafaf1c617ddd6e43f4b8a9a147ca3c8b9e8e889b14d58f151647fe

# 4. dockerログを使用して、gitlabの初期化が完了したかどうかを確認します
[ email protected]:~$ docker logs -f --tail 100 512c
==> /var/log/gitlab/puma/puma_stdout.log <=={"timestamp":"2020-10-10T06:14:37.385Z","pid":767,"message":"PumaWorkerKiller: Consuming 3219.65625 mb with master and 4 workers."}

# 5. ホスト名の構成
sudo tee /etc/hosts <<'EOF'192.168.10.222 gitlab.weiyigeek.top
EOF
PS:構成ファイルアドレス / etc / WeiyiGeek-gitlab / configを構成する方法については、次の記事を参照してください。これ以上の説明はありません。
# 変更されたキーと値のペア
sudo egrep -v "^#|^$"/home/WeiyiGeek-gitlab/config/gitlab.rb
[ sudo] password for WeiyiGeek:

external_url 'http://gitlab.WeiyiGeek.top'
user['git_user_name']="Gitlab"
user['git_user_email']="[email protected]"、
gitlab_rails['gitlab_ssh_host']='gitlab.WeiyiGeek.top'
gitlab_rails['gitlab_shell_ssh_port']=2222
gitlab_rails['gitlab_shell_git_timeout']=800
gitlab_rails['time_zone']='Asia/Shanghai'
gitlab_rails['gitlab_email_enabled']=true
gitlab_rails['gitlab_email_from']='[email protected]'
gitlab_rails['gitlab_email_display_name']='Gitlab'
gitlab_rails['gitlab_email_reply_to']='[email protected]'
gitlab_rails['gitlab_email_subject_suffix']='WeiyiGeek-IT'
gitlab_rails['object_store']['enabled']=false
gitlab_rails['object_store']['connection']={}
gitlab_rails['object_store']['storage_options']={}
gitlab_rails['object_store']['proxy_download']=false
gitlab_rails['object_store']['objects']['artifacts']['bucket']= nil
gitlab_rails['object_store']['objects']['external_diffs']['bucket']= nil
gitlab_rails['object_store']['objects']['lfs']['bucket']= nil
gitlab_rails['object_store']['objects']['uploads']['bucket']= nil
gitlab_rails['object_store']['objects']['packages']['bucket']= nil
gitlab_rails['object_store']['objects']['dependency_proxy']['bucket']= nil
gitlab_rails['object_store']['objects']['terraform_state']['bucket']= nil
gitlab_rails['smtp_enable']=true
gitlab_rails['smtp_address']="smtp.exmail.qq.com"
gitlab_rails['smtp_port']=465
gitlab_rails['smtp_user_name']="[email protected]"
gitlab_rails['smtp_password']="Hm595Yb"
gitlab_rails['smtp_domain']="WeiyiGeek.com.top"
gitlab_rails['smtp_authentication']="login"
gitlab_rails['smtp_tls']=true

# 変更後、gitlabコンテナを再起動します
$ docker restart gitlab
0 x02取扱説明書####
Gitlab関連の操作と手順:
# Gitlabバージョンを表示
cat /opt/gitlab/embedded/service/gitlab-rails/VERSION

/etc/gitlab/gitlab.rb          #gitlab構成ファイル
/opt/gitlab                    #gitlabプログラムのインストールディレクトリ
/var/opt/gitlab                #gitlabディレクトリデータディレクトリ(gitlab経由.rbによって変更されたサブモジュール構成ファイルが保存されます)/var/opt/gitlab/git-data       #倉庫データを保存する
/var/opt/gitlab/backups        #デフォルトのバックアップディレクトリ

# Gitlabのサービス構造:
gitlab-shell:Gitコマンドを処理し、許可されたキーのリストを変更するために使用されます
gitlab-workhorse:軽量リバースプロキシサーバー
logrotate:ログファイル管理ツール
nginx:静的Webサーバー
postgresql:データベース
redis:キャッシュデータベース
sidekiq:バックグラウンドでキュータスクを実行するために使用されます(非同期実行)
unicorn:GitLabRailsアプリケーションはこのサーバーでホストされています。
gitlab-ctlコマンド#####
基本的なコマンド:
# 一般的なコマンド
gitlab-ctl reconfigure         #構成を生成してサービスを再起動します
gitlab-ctl start               #すべてのgitlabコンポーネントを起動します。
gitlab-ctl status              #gitlabのすべてのサービスの現在の実行ステータスを表示する
gitlab-ctl stop                #gitlabサービスを停止します
gitlab-ctl pg-upgrade          #PostgreSQLの最新バージョンにアップグレードします

# セパレートスタート|やめる|サービスを再起動します
gitlab-ctl start nginx            #nginxコンポーネントを開始します
gitlab-ctl stop postgresql        #すべてのgitlabpostgresqlコンポーネントを停止します。
gitlab-ctl restart unicorn        #関連するデータ接続サービスを再起動します
gitlab-ctl restart sidekiq        #関連するデータ接続サービスを再起動します
gitlab-ctl restart  gitlab-workhorse #すべてのgitlabを再起動しますgitlab-主力コンポーネント:

# ログ管理
gitlab-ctl tail         #すべてのサービスのログを表示する
gitlab-ctl tail redis   #redisログをリアルタイムで確認します(特定のサービスを拡張する場合も同様です)
gitlab-railsコマンド#####
基本的な例:
# gitlabリセットパスワード
gitlab-rails console
> u=User.where(id:1).first        #これは管理者向けで、メールなども使用できます。
> u.password ='your_password'    #パスワードにはフォーマットの制限があります。私は8桁以上しか知りません。そうしないと、保存に失敗します。
> u.password_confirmation ='your_password'> u.save
gitlab-rakeコマンド#####
基本的な例:
gitlab-rake gitlab:check SANITIZE=true--trace #gitlabを確認してください
gitlab-rake db:migrate #データベース関係のアップグレード
gitlab-rake cache:clear #redisキャッシュをクリーンアップします
0 x03基本構成####
Gitlab初期化設定#####
0) ユーザーテーマと言語設定
プロセス:右上隅の個人用アバター->設定->設定-> テーマ設定|構文強調表示テーマ|カスタム言語と地域関連設定
1) ** [ Network Acceleration **](https://cloud.tencent.com/product/dsa?from=10680)のGravatarアバター機能をオフにします
設定->グラバターが有効(拡張展開)-> チェックされていないグラバターが有効-> Savaの変更
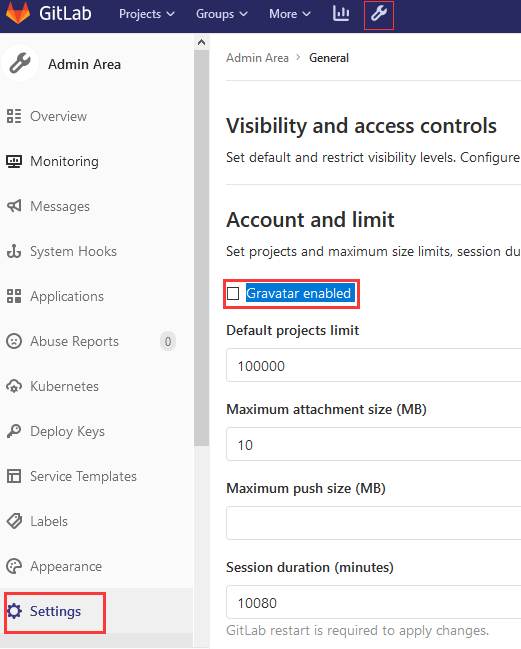
WeiyiGeek.
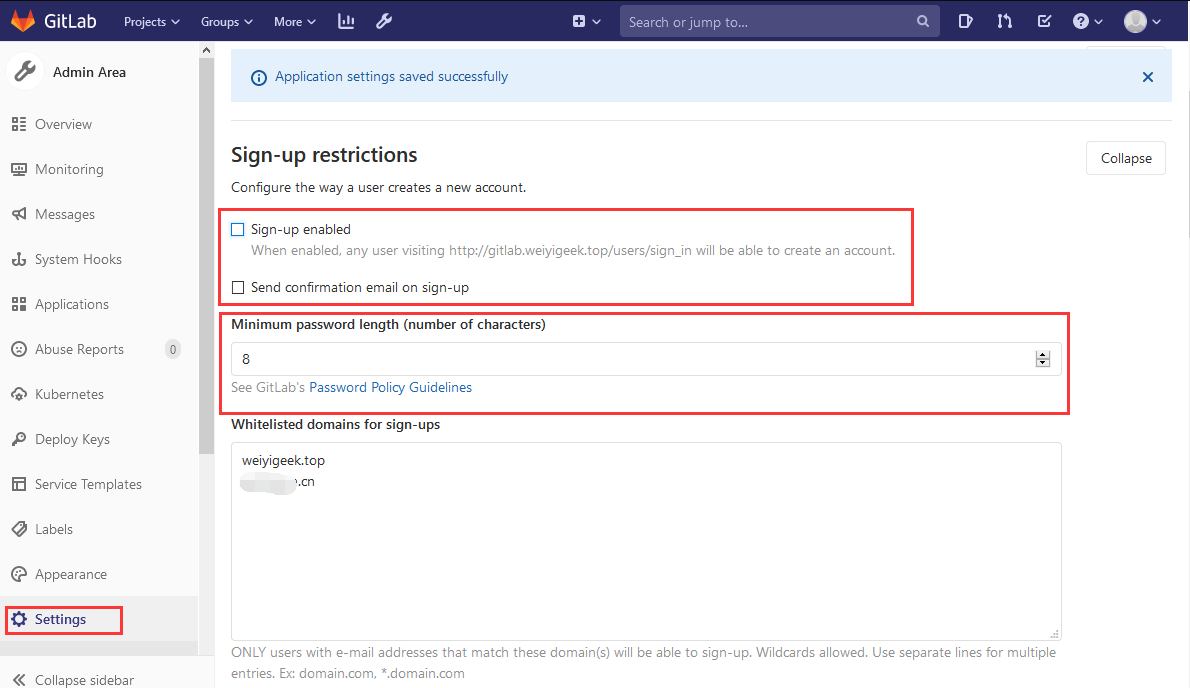
2) ユーザー管理および登録関連の設定
説明:ユーザーが自分自身を登録し、パスワードポリシー、登録済みの電子メールドメイン名(ホワイト|ブラックリスト)およびその他の情報を設定するかどうかにかかわらず、閉じた場合、ホームページには登録が表示されません。
WeiyiGeek.
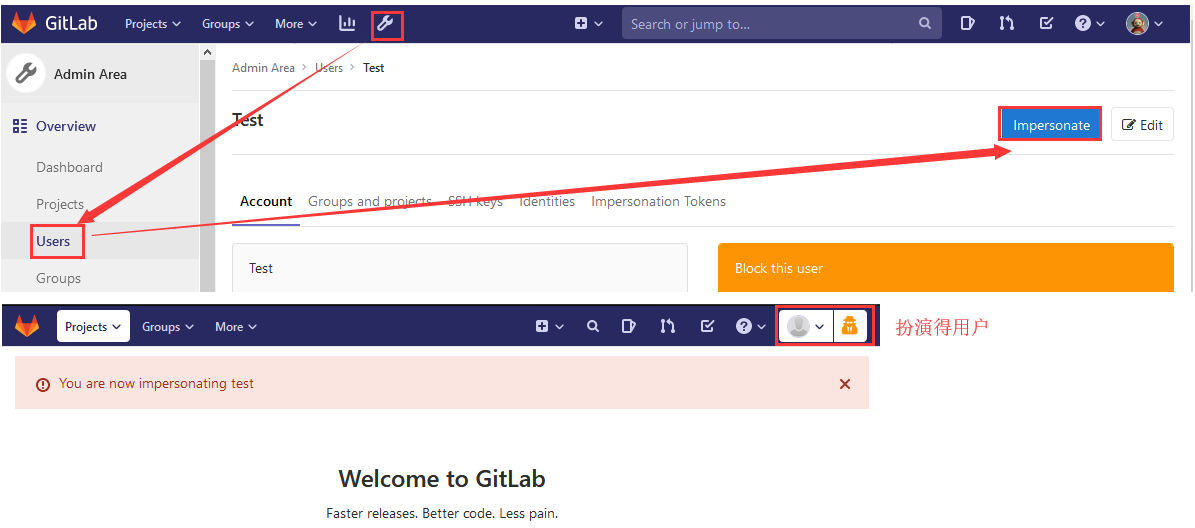
- ユーザーの作成:
管理エリア->ユーザー->新規ユーザー->アイテム制限(作成数はデフォルト)->グループを作成できます(内部推奨キャンセル)->ユーザーの作成(ユーザーメールボックスは受信します登録メール) - ユーザーのなりすまし偽装:ログアウトしてログインしなくても、ユーザーのログインを模倣できます。
WeiyiGeek.
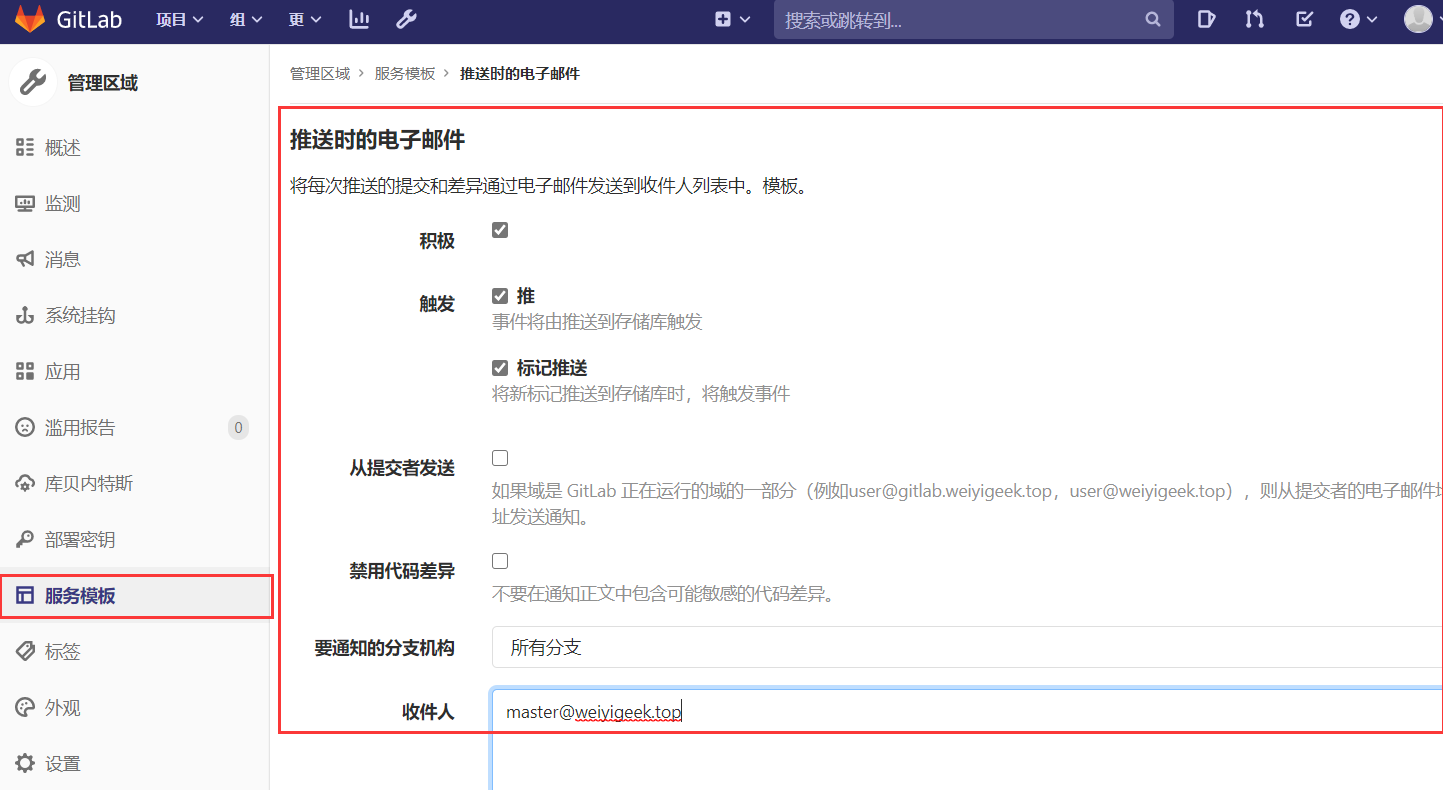
3) コードプッシュリマインダー機能
説明:コードが送信された後に通知を通知するために、指定されたメールボックスに電子メールを送信するプロジェクトを追加します。これは、少なくとも新しいコードをプッシュしたユーザー、更新されたコンテンツなどを知るために、コードのレビューに役立ちます。
管理者はgitlabインターフェイスの「管理領域」->「サービステンプレート」->「プッシュ時のメール」にログインし、「アクティブ」をチェックします。受信者はこのプロジェクトの更新をプッシュする必要がある人を入力し、複数のスペースまたはコンマを区切ります。
WeiyiGeek.
4) sshシェルのポートを設定します
Gitコマンドを処理し、許可されたキーのリストを変更するために使用されます
gitlab_rails['gitlab_shell_ssh_port']=9022
5) gitlabリポジトリ(リポジトリ)ストレージディレクトリを変更します
説明:インストール後、リポジトリ(リポジトリ)を大きなハードディスクに配置する必要があるため、リポジトリに対応するディレクトリを変更する必要があります。
( 注:最初にすべてのリポジトリを削除してから、次の操作を実行します。また、 / var / opt / gitlab / git-data / repository / usernameディレクトリ内のユーザー名の下にあるすべてのファイルも削除します。ディレクトリのみが削除されます。空のフォルダが残っています)
# ディスクスペースを表示(追加したディスクに合わせて操作できます)
$df -h
/dev/mapper/cl-home   24G  954M   24G    4%/home

# 新しいウェアハウスディレクトリを作成します
$mkdir -p /home/gitlab/git-data

# gitlabのデータ保存場所を次のように構成します/ホームディレクトリ
$vi /etc/gitlab/gitlab.rb
git_data_dirs({"default"=>{"path"=>"/home/gitlab/git-data"}})

# 構成をリロードします
$sudo gitlab-ctl reconfigure

# リロード後、変更した倉庫の住所にデータが保存されていることがわかりました
$ls /home/gitlab/git-data/
repositories
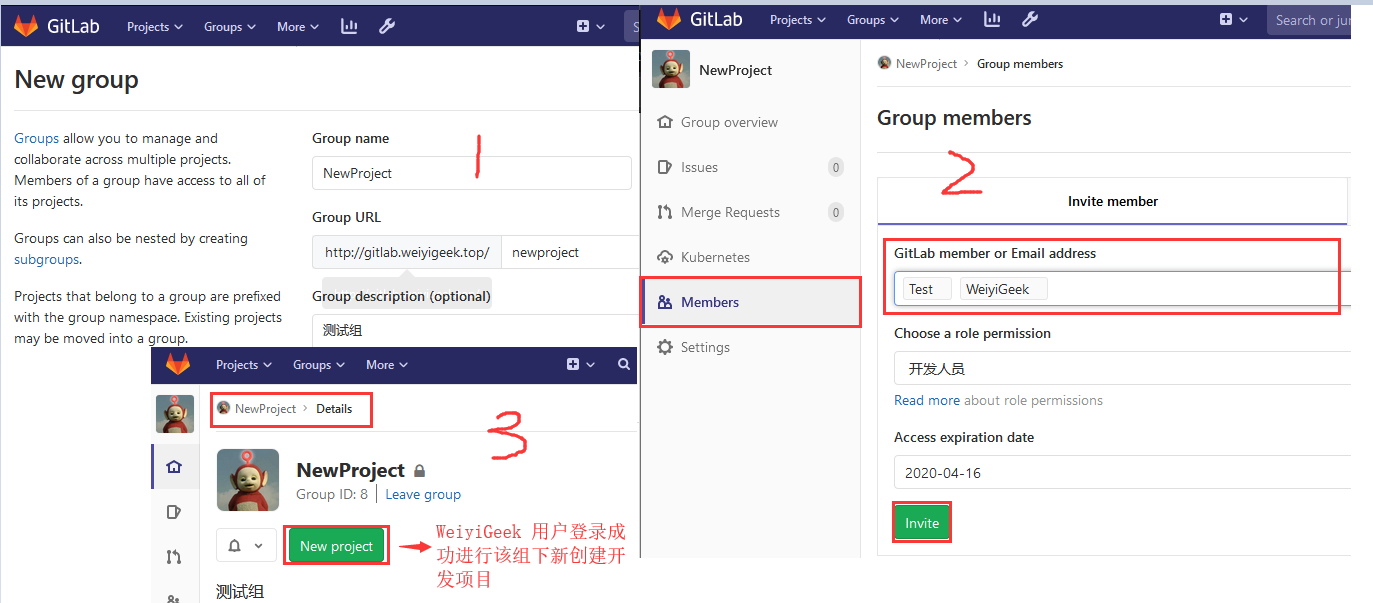
6) 開発チームを作成する
Gitlabにログインした後、メインページで[グループの作成]をクリックし、作成する関連グループ情報を入力します。
メンバーをグループに招待します。メンバー ->グループメンバー ->メンバーを招待 ->新しく作成されたグループとロールのアクセス許可に参加するユーザーを選択します。
WeiyiGeek.
7) プロジェクトの作成と初期化
Gitlabのgitアドレスの構成はgithubと同じです(わからないことを教えてください): gitlabアドレス+ユーザー/グループ+カスタム名
目に見えるタイプのGitlabプロジェクトには3つのレベルがあります。
- プライベートプロジェクト:このレベルでは、プロジェクトの所有者または許可された人だけがプロジェクトにアクセスできます。または、これらの人はプロジェクトチームのメンバーです。
- 内部プロジェクト:ユーザー名とパスワードがあれば、プロジェクトが配置されている「Gitlabサーバーにログインでき」、プロジェクトにアクセスできます。
- 公開プロジェクト:プロジェクトの特定の場所がパスであることがわかっている限り、プロジェクトにアクセスできます。「デフォルトではゲスト権限を使用します」。
たとえば、上記の開発グループプロジェクトでプロジェクトを作成する操作プロセスは次のとおりです。
- 開発グループに入る->新しいプロジェクト->プロジェクト名を設定する->プロジェクトを作成する
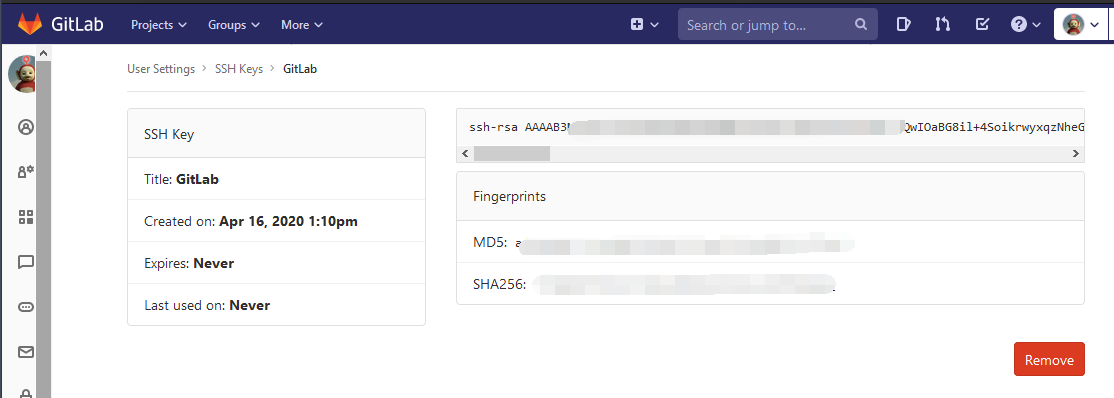
- パスワードをプッシュおよびプルせずにSSHキーをGitlabに追加することをお勧めします[
[emailprotected]](https://weiyigeek.top/cdn-cgi/l/email-protection#6f0f08061b2f08061b030e0d41180a061606080a0a04411b001f):newproject / secopsdev.git:設定-> SSH;
$ ls ~/.ssh/
id_ed25519  id_ed25519.pub  id_rsa  id_rsa.pub  known_hosts
WeiyiGeek.
- プロジェクトの初期化:
# 基本設定(gitをダウンロードする必要がある前提条件)
git config --global user.name "WeiyiGeek"
git config --global user.email "[email protected]"

# 新しいリポジトリを作成する
git clone [email protected]:newproject/secopsdev.git
cd secopsdev
touch README.md
git add README.md
git commit -m "add README"

# 既存のフォルダをプッシュ
cd existing_folder
git init
git remote add origin http://gitlab.weiyigeek.top/newproject/secopsdev.git
git add .
git commit -m "Initial commit"

# 既存のGitリポジトリをプッシュする
cd existing_repo
git remote rename origin old-origin  #ローカルブランチの名前を変更します
git remote add origin http://gitlab.weiyigeek.top/newproject/secopsdev.git
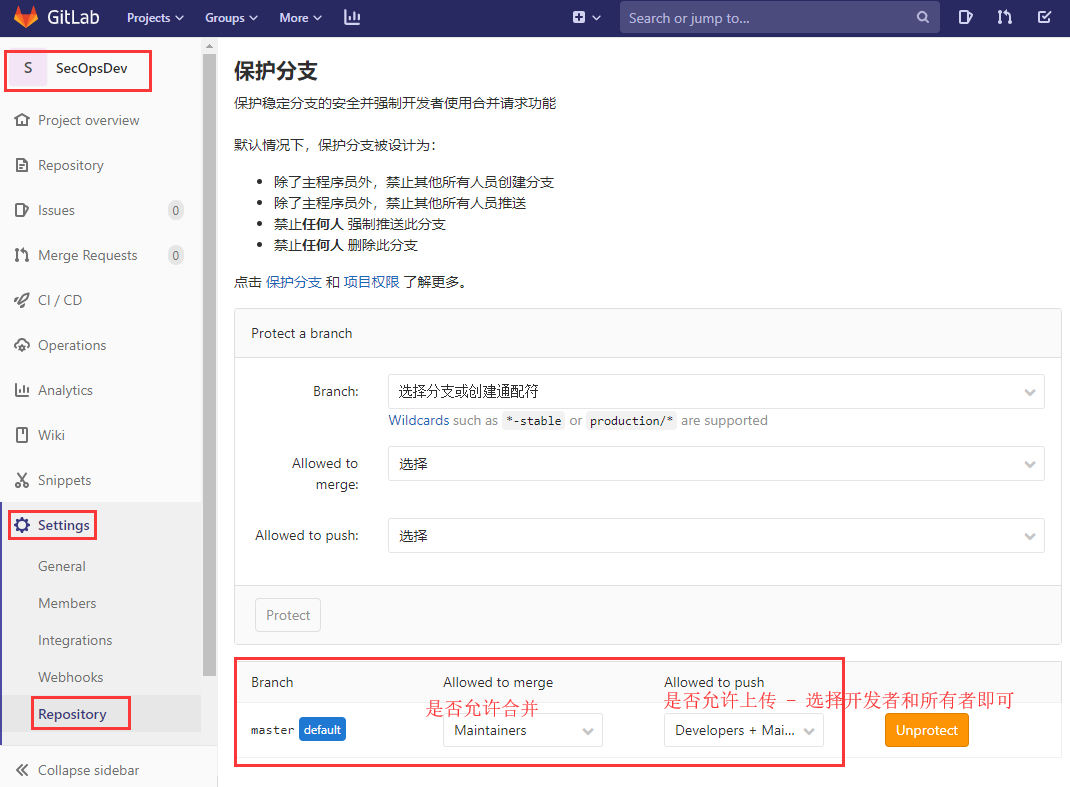
- デフォルトは送信できないことに注意してください。これは、マスターブランチの保護が原因です。マスターブランチに直接変更を加えたいが、サブブランチを作成したくない場合は、
メンテナーのユーザーがマスターブランチをアップロードする必要があるという条件で、次の方法を使用できます。設定後;
プロジェクト->設定->リポジトリ->ブランチ(ブランチ権限設定)または保護の削除。
WeiyiGeek.
8) ユーザープロジェクトの権限管理
権利管理の理解:
- (1). 新しいユーザーを作成するときに、共通の権限と管理者権限を選択できます。
- (2). gitライブラリを構築するときに、グループまたはメンバーを関連付けることができます
- (3). グループに追加された人々は、ゲストレポーター開発者マスターオーナーを設定できます
- (4). 異なるgitライブラリに関連付けられている同じメンバーは、異なる権限を設定できます
- (5). 異なるgitライブラリの同じグループに異なる権限を設定することはできません
- (6). gitライブラリは1つのグループメンバーにのみ関連付けることができます
- (7). グループメンバーは、同じ権限を持つ複数のgitリポジトリに関連付けることができます
- (8). メンバーは、複数のgitライブラリまたはグループメンバーによって関連付けることができ、権限は異なる場合があります
- (9). 上記のレポーターのみがコード権限を持っています
- (10). エンタープライズアクセス制御:
- 開発者:開発者権限
- コードレビューMDE:マスターオーソリティ
プロジェクトグループとxプロジェクト権限の管理:
- プロジェクト名->メンバー->ユーザーメンバーと
役割の権限を選択->および有効期限の設定
[ 公式ドキュメントのウェブサイトを参照してください](http://gitlab.com/help/user/permissions#project-members-permissions)には、「ゲスト、レポーター、開発者、メンテナー(マスター)、所有者」に対応する権限がリストされています。デフォルトでは、Dev設定には保護されたブランチへのプッシュ権限がありません。
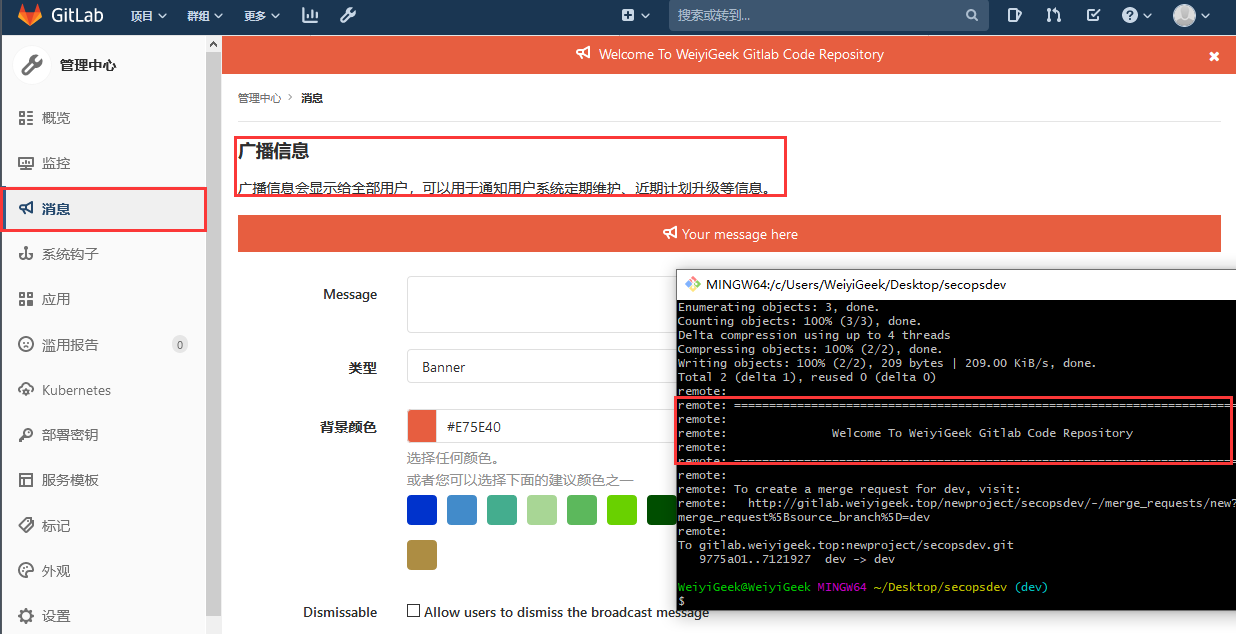
9) 放送情報設定
説明:ブロードキャスト情報はすべてのユーザーに表示されます。定期的なシステムメンテナンス、近い将来のアップグレードの計画などをユーザーに通知するために使用できます。ユーザーのログインインターフェイスに表示され、ユーザーがコードを送信したときに表示されます。
エリア管理者->メッセージ->ブロードキャスト情報(設定するだけ)
WeiyiGeek.
Gitlabデータのバックアップとリカバリ#####
説明:GitLabは、会社のプロジェクトコードのバージョン管理システムです。データは非常に重要であるため、バックアップする必要があります。
Gitlabは、次の2種類のバックアップを提供します。
- ローカルバックアップ
- リモートバックアップ
ローカルバックアップ
#1. GitLabバックアップのデフォルトディレクトリは
/var/opt/gitlab/backups

#2. バックアップディレクトリを変更する
$vim /etc/gitlab/gitlab.rb
gitlab_rails['backup_path']='/home/backups'
# 7日間のバックアップ保持
gitlab_rails['backup_keep_time']=604800

#3. 構成を変更した後、構成を再ロードします
$gitlab-ctl reconfigure

#4. バックアップコマンドを実行する
$gitlab-rake gitlab:backup:create
# 2020- 04- 1609:44:52+0800- - Dumping database ...
# Dumping PostgreSQL database gitlabhq_production ...[DONE]
# 2020- 04- 1609:44:53+0800- - done
# 2020- 04- 1609:44:53+0800- - Dumping repositories ...
# 2020- 04- 1609:44:53+0800- - done
# 2020- 04- 1609:44:53+0800- - Dumping uploads ...
# 2020- 04- 1609:44:53+0800- - done
# 2020- 04- 1609:44:53+0800- - Dumping builds ...
# 2020- 04- 1609:44:53+0800- - done
# 2020- 04- 1609:44:53+0800- - Dumping artifacts ...
# 2020- 04- 1609:44:53+0800- - done
# 2020- 04- 1609:44:53+0800- - Dumping pages ...
# 2020- 04- 1609:44:53+0800- - done
# 2020- 04- 1609:44:53+0800- - Dumping lfs objects ...
# 2020- 04- 1609:44:53+0800- - done
# 2020- 04- 1609:44:53+0800- - Dumping container registry images ...
# 2020- 04- 1609:44:53+0800- - [ DISABLED]
# Creating backup archive: 1587001493_2020_04_16_12.9.2_gitlab_backup.tar ... done
# Uploading backup archive to remote storage  ... skipped

#5. バックアップファイルを表示する,圧縮されたパッケージには、GitLabの完全な部分全体が含まれています,おおよそのフォーマットxxxxxxxx_gitlab_backup.tar
$ls /var/opt/gitlab/backups
1587001493_2020_04_16_12.9.2_ gitlab_backup.tar
補足:
- タスクプランによる自動バックアップの実現crontab#コマンドを入力crontab -e sudo crontab -e 0 2 * * * / opt / gitlab / bin / gitlab-rake gitlab:backup:create#サービスを再起動しますsystemctl restart crond
gitlab.rbとgitlab-secrets.jsonには機密データが含まれているため、上記のバックアップの形式でバックアップすることはできません。これらは「手動バックアップ」によってのみバックアップできます。
リモートバックアップ
説明:実際には、バックアップサーバーのpub公開キーをgitlabサーバーに追加すると、バックアップサーバーがGitlabサーバーにアクセスしてプルします。もちろん、バックアップにrsyncを使用することもできます。
# 環境が次のようになっていると仮定します:
# バックアップサーバー:192.168.1.2
# GitLabサーバー:192.168.1.250

#1. バックアップサーバーの作成が承認されました_キーファイル
mkdir -p /root/.ssh
touch /root/.ssh/authorized_keys
chmod 400/root/.ssh/authorized_keys

#2. Gitlabサーバーはrsa公開キーを生成し、証明書をバックアップサーバーにアップロードします(実際の環境では、最も特権の少ないユーザーをお勧めします)
$ssh-keygen -t rsa -C "[email protected]"
# Enter file in which to save the key(/root/.ssh/id_rsa):エラーパス
# Enter passphrase(empty for no passphrase):公開鍵パスワード
# Enter same passphrase again:パスワードを照合します
# Your public key has been saved in/root/.ssh/id_rsa.pub. #ルートを保存
# The key fingerprint is:
# SHA256:YahioDs7XZ9No********RS9jWX1NNXo04i4ZHOLY [email protected]
# The key's randomart image is:
# +- - - [ RSA 2048]----+
# |..++|
# |.+. o o.+|
# |. o.oo=.+.|
# |....=. E.++|
# | o o..+ oS=..|
# |.=+.+ o ..|
# |+*..=+|
# | oo= o o .|
# |. o.+|
# +- - - - [ SHA256]-----+

$ls /root/.ssh/
id_rsa  id_rsa.pub

$scp /root/.ssh/id_rsa.pub [email protected]:/root/.ssh/

#3. バックアップサーバーはID_rsa.pubファイルのコンテンツが承認済みに追加されます_キーファイル、および許可された変更_キーファイルの権限
$cat /root/.ssh/id_rsa.pub >>/root/.ssh/authorized_keys

#4. gitlabバックアップスクリプト(主な執行機関の訴え)バックアップファイルをサーバーにコピーします
$cat >/home/gitlab/auto_backup_to_remote.sh<<'END'
DATE=`date +"%Y_%m_%d"`
BackupIP=192.168.1.2
BackupUser=root
BackupPATH=/var/opt/gitlab/backups

# 7日前にローカルバックアップを削除する
find ${BackupPATH}-type f -mtime +7-name '*.tar'-exec rm {} \;

# ファイルをバックアップする必要がない場合は、ウェアハウスディレクトリをバックアップすることもできます。
find ${BackupPATH}-name *${DATE}*-exec scp -r {} ${root}@${BackupIP}:/tmp/ \;
END

$chmod +x /home/gitlab/auto_backup_to_remote.sh

#5. タイムスケジュールを追加(毎日午前1時に実行)、crondサービスを再起動します
cat >>/etc/crontab <<END
01***/home/gitlab/auto_backup_to_remote.sh
END

systemctl restart crond
Gitlabデータリカバリ
例:上記では、バックアップする必要があります: / var / opt / gitlab / backups / 1587001493_2020_04_16_12.9.2_gitlab_backup.tar;
操作プロセスは次のとおりです。
# 関連するデータ接続サービスを停止します(データベースへの新しい接続がなく、書き込みデータがないことを確認するため)
gitlab-ctl stop unicorn
gitlab-ctl stop sidekiq

# リカバリファイルを指定すると、自動的にバックアップディレクトリに移動して形式が検索されます:1587001493_2020_04_16_12.9.2
cd /var/opt/gitlab/backups/&& chmod -R 777*
gitlab-rake gitlab:backup:restore BACKUP=1587001493_2020_04_16_12.9.2

# Gitlabを起動します
gitlab-ctl restart
Gitlabは電子メールアドレスを追加します#####
電子メールパスワードの回復:
- gitlabは常に実行されているため、変更する前に構成ファイルを記録してバックアップする必要があります。
cp /etc/gitlab/gitlab.rb{,.bak}
- 構成ファイルを変更します。/etc/gitlab/gitlab.rbここでは、会社の企業メールボックスを使用して電子メールを送信します。
$egrep -v "^$|^#"/etc/gitlab/gitlab.rb
external_url 'http://gitlab.weiyigeek.top'
gitlab_rails['time_zone']='Asia/Shanghai'
gitlab_rails['gitlab_email_enabled']=true
gitlab_rails['gitlab_email_from']='[email protected]'
gitlab_rails['gitlab_email_display_name']='Gitlab CE'
gitlab_rails['gitlab_email_reply_to']='[email protected]'
gitlab_rails['smtp_enable']=true
gitlab_rails['smtp_address']="smtp.exmail.qq.com"
gitlab_rails['smtp_port']=465
gitlab_rails['smtp_user_name']="[email protected]"
gitlab_rails['smtp_password']="メールのパスワード"
gitlab_rails['smtp_domain']="weiyigeek.top"
gitlab_rails['smtp_authentication']="login"
gitlab_rails['smtp_enable_starttls_auto']=true
gitlab_rails['smtp_tls']=true
user['git_user_email']="[email protected]"
- 変更を保存して構成を更新します。
# 変更した構成ファイル情報を構成ファイルに更新するだけです
gitlab-ctl reconfigure
実際、構成ファイルgitlab.rbは上記で変更されています。その構成は、このコマンドによって呼び出され、インストールディレクトリの複数の構成ファイルに書き込まれます: / var / opt / gitlab / gitlab-rails / etc /
$ls /var/opt/gitlab/gitlab-rails/etc/
database.yml         gitlab_shell_secret      gitlab.yml      resque.yml   smtp_settings.rb #直接変更することもできます
gitlab_pages_secret  gitlab_workhorse_secret  rack_attack.rb  secrets.yml  unicorn.rb
smtp_settings.rbファイルを直接変更する場合は、 gitlab-ctlrestartを再起動してください。
- コンソールビューの構成とテスト送信
$gitlab-rails console
--------------------------------------------------------------------------------
 GitLab:12.9.2(ac5568eb5d8) FOSS
 GitLab Shell:12.0.0
 PostgreSQL:10.12--------------------------------------------------------------------------------
Loading production environment(Rails 6.0.2)irb(main):001:0> ActionMailer::Base.delivery_method
=>: smtp

irb(main):002:0> ActionMailer::Base.smtp_settings
=>{: authentication=>:login,:address=>"smtp.exmail.qq.com",:port=>465,:user_name=>"[email protected]",:password=>"Pa****20",:domain=>"weiyigeek.top",:enable_starttls_auto=>true,:tls=>true,:ca_file=>"/opt/gitlab/embedded/ssl/certs/cacert.pem"}irb(main):003:0> Notify.test_email('[email protected]','GitLabテストメール','GitLabページ情報').deliver_now
Notify#test_email: processed outbound mail in2.0ms
Delivered mail [email protected](1543.7ms)
Date: Wed,15 Apr 202021:12:37+0800
From: Gitlab CE <[email protected]>
Reply-To: Gitlab CE <[email protected]>
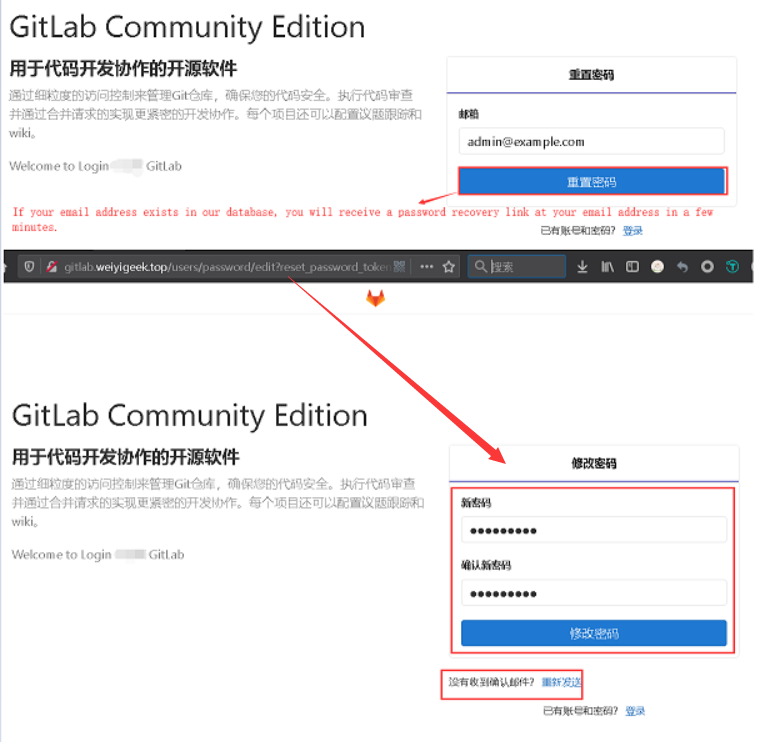
上記の操作が完了したら、ログインページに戻り、[パスワードをお忘れですか?]を選択します。メールを受信するアカウントのメールアドレスを入力し、メールアドレスに従って新しいパスワードを変更します。
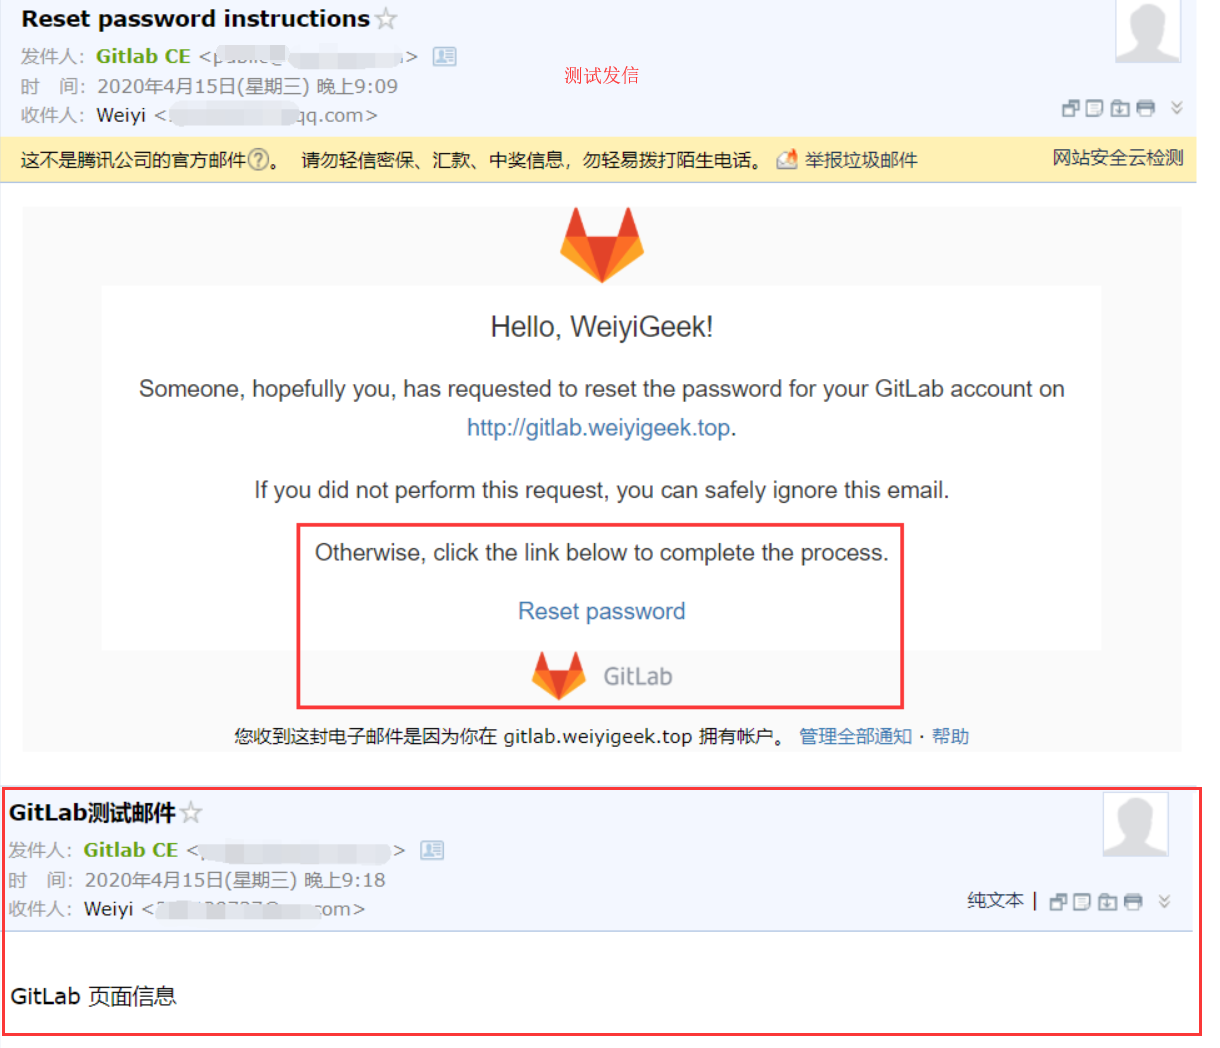
WeiyiGeek.sendemail
- 補足:*
- 一部のECSプライベートネットワークホストでは、gitlabリポジトリが構成されています。これは、デフォルトでこれらのプライベートネットワークECSホストがポート25で無効になっているため、それに応じて、465プロトコルを使用してgitlab.rbの構成が変更されているためです。 #次の2行のみを変更し、変更後に構成を更新しますgitlab_rails ['smtp_port'] = 25 gitlab_rails ['smtp_tls'] = true
GitlabはLDAP認証を追加します#####
LDAP構成手順:[http://gitlab.weiyigeek.top/help/administration/auth/ldap](http://gitlab.weiyigeek.top/help/administration/auth/ldap)
ステップ1.gitlab構成ファイルを変更して、LDAPサーバーに接続するためのパラメーター、つまりbindPassのDNを設定します。
vim /etc/gitlab/gitlab.rb
gitlab_rails['ldap_enabled']=true
# gitlab_rails['prevent_ldap_sign_in']=false
###!**remember to close this block with'EOS' below**
gitlab_rails['ldap_servers']= YAML.load <<-'EOS'
 main: # 'main' is the GitLab 'provider ID'ofthis LDAP server
  label:'LDAP'
  host:'10.10.107.245'
  port:389
  timeout:10
  uid:'uid'
  bind_dn:'cn=admin,dc=WeiyiGeek,dc=com,dc=cn'
  password:'WeiyiGeek'
  encryption:'plain' # "start_tls" or "simple_tls" or "plain"
  verify_certificates:false
  smartcard_auth:false
  active_directory:true
  allow_username_or_email_login:true
  lowercase_usernames:false
  block_auto_created_users:false
  base:'dc=WeiyiGeek,dc=com,dc=cn'
  # user_filter:'(&(objectclass=inetOrgPerson)(memberof=cn=gitlab,ou=Group,dc=WeiyiGeek,dc=com,dc=cn))'
  attribute:
  username:['uid']
  email:['mail']
  name:'cn'
  first_name:['sn']
EOS
ステップ2.LDAPは、ユーザーグループを取得してユーザーをバインドするために groupOfUniqueNames属性を確立します。
dn: cn=gitlab,ou=Group,dc=WeiyiGeek,dc=com,dc=cn
uniqueMember: uid=gituser,ou=People,dc=WeiyiGeek,dc=com,dc=cn

dn: uid=gituser,ou=People,dc=WeiyiGeek,dc=com,dc=cn
objectClass: posixAccount
objectClass: inetOrgPerson
objectClass: organizationalPerson
objectClass: person
loginShell:/bin/bash
homeDirectory:/home/gituser
userPassword:: e1NTSEF9UGVyM21xc1dJcnV3K1d2bWRiVmVpd3RWZHVVeVN6Tks=
uid: gituser
cn: gituser
uidNumber:10000
gidNumber:10000
sn: gituser
mail:[email protected]
ステップ3.LDAPユーザーが存在しないか、フィルターエントリが存在しない場合のログインテストでは、「「jenkuserの資格情報が無効です」ため、Ldapmainから認証できませんでした」というエラーが報告されます。
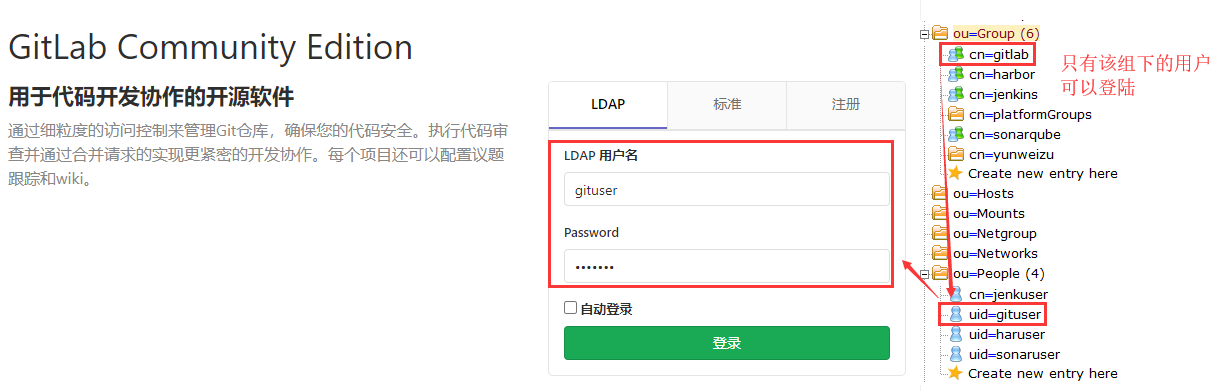
WeiyiGeek.
ステップ4.ログイン成功インターフェースは次のとおりです。
WeiyiGeek.
0 x04ピットソリューションへ####
**(0) ユーザーがコードをgitlab **にプルおよびプッシュする際のよくある間違い
-
エラー1:
要求されたURLがエラーを返しました:403 -
理由:関連するコードをプル/プッシュする権限がなく、関連するgitlabアカウントの権限を「開発または保守担当者」に変更する必要があることを意味します。
-
エラー2:gitlab.weiyigeek.top:newproject / secopsdev.gitへ![リモート拒否]マスター->マスター(受信前フックが拒否されました)エラー:一部の参照を '[電子メール保護]:newproject /secopsdev.gitにプッシュできませんでした'
-
理由:コードをアップロードするためのgitlabユーザー権限は開発者であるため、デフォルトではプライベートプロジェクトが作成されます。デフォルトでは、マスターブランチの保護メカニズムがオンになります。プロジェクトのブランチブランチを、開発として「マージを許可|プッシュを許可」に設定する必要があります。 + Maintiner;#最後のマスターブランチとdevブランチは、前回リモートで正常にテストされました。gitlab.weiyigeek.top:newproject / secopsdev.gitへ* [新しいブランチ] dev-> devブランチ「dev」はリモートブランチ「dev」を追跡するように設定されています'origin'から。
(1) gitlabパスワードのリセット方法を忘れた
- 方法1:gitlab-railsを介してリセット
$ gitlab-rails consoleロード中の実稼働環境(Rails 6.0.2)> u = User.where(id:1).first#これは管理者用であり、電子メールなども使用できます。> u.password = 'your_password' #Password has形式の制限、8桁を超えることしかわかりません。そうしないと、保存に失敗します> u.password_confirmation = 'your_password'> u.save - 方法2:メール設定を初期化して管理者を取得するか、ローカルの接尾辞で未送信のメールを確認します。これがルートユーザーの[[メール保護]](https://weiyigeek.top/cdn-cgi/l/email -保護#9afbfef7f3f4daffe2fbf7eaf6ffb4f9f5f7)例として、通常、デフォルトは変更されていません(実際にはあまり意味のない方法です)。
ここでは、サービスを外部ネットワークにリンクできないことを前提としています(以下の操作を再現するため)。
# (1)送信できないメールキューを表示する
$postqueue -p
- Queue ID---Size------Arrival Time-----Sender/Recipient-------
# そのようなアドレスがないため、送信できず、メールキューにとどまることができます。
908 DCCAC62     6871 Wed Apr 1519:54:32[email protected] #(実際、パスワードメールを取得します)(Host or domain name not found. Name service error for name=example.com type=MX: Host not found,try again)[email protected]

# (2)メールキューの保存場所
$postconf -d | grep queue_directory  #デフォルトでは変更はありません
queue_directory =/var/spool/postfix

# (3)ディレクトリに移動し、上記のメールのキューID番号を見つけます
$find /var/spool/postfix/-name 908DCCAC62
/var/spool/postfix/defer/9/908DCCAC62
/var/spool/postfix/deferred/9/908DCCAC62

# (4) postfixに付属のツールを使用して、メールの内容を表示し、パスワードを変更する場所を見つけます
$postcat /var/spool/postfix/deferred/9/908DCCAC62
*** ENVELOPE RECORDS /var/spool/postfix/deferred/9/908DCCAC62 ***
message_size:68712741068710
message_arrival_time: Wed Apr 1519:54:322020
create_time: Wed Apr 1519:54:322020
named_attribute: rewrite_context=local
sender:[email protected]
named_attribute: dsn_orig_rcpt=rfc822;[email protected]
original_recipient:[email protected].....
If you did not perform this request, you can safely ignore this email.
Otherwise, click the link below to complete the process:
# 次のパスワードを見つけて接続を変更し、それをブラウザーにコピーしてパスワードをリセットします
http://gitlab.weiyigeek.top/users/password/edit?reset_password_token=gd9MyL7FaSt5R2F3_qA_
WeiyiGeek.
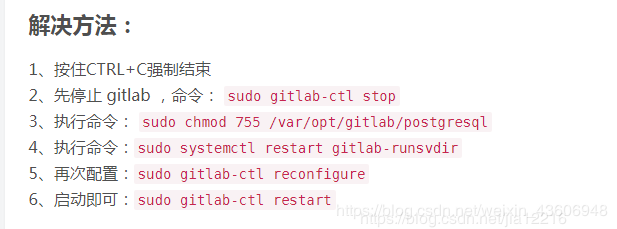
(2) GitLabデータベースとそのソリューションによって引き起こされた502エラー
説明:GitLabのホームページアドレスhttp:/gitlab.weiyigeek.top/エラー502を開き、ステータスを再起動または確認して、正常な sudo gitlab-ctl statusであることを確認し、ポート番号が使用されていないことを確認し、構成の更新 gitlab-を確認します。 ctlreconfigureがエラーを検出しました。
エラーメッセージは次のとおりです。
# gitlab-ctl reconfigure
Running handlers:
There was an error running gitlab-ctl reconfigure:

bash[migrate gitlab-rails database](gitlab::database_migrations line 51) had an error: Mixlib::ShellOut::ShellCommandFailed: Expected process to exit with[0], but received '1'---- Begin output of"bash""/tmp/chef-script20190308-65247-12ck9rp"----
STDOUT: rake aborted!
PG::ConnectionBad: could not connect to server: No such file or directory
 Is the server running locally and accepting
 connections on Unix domain socket "/var/opt/gitlab/postgresql/.s.PGSQL.5432"?/opt/gitlab/embedded/service/gitlab-rails/lib/tasks/gitlab/db.rake:52:in`block (3 levels) in <top (required)>
/opt/gitlab/embedded/bin/bundle:23:in `load'
/opt/gitlab/embedded/bin/bundle:23:in `<main>'
Tasks: TOP => gitlab:db:configure(See full trace by running task with--trace)
STDERR:---- End output of"bash""/tmp/chef-script20190308-65247-12ck9rp"----
Ran "bash""/tmp/chef-script20190308-65247-12ck9rp" returned 1

# gitlab-ctl tail
WeiyiGeek.
(3) gitlab-ceバージョンアップグレードレコード
[データセキュリティ](https://cloud.tencent.com/solution/data_protection?from=10680)を確保するために、段階的に徐々にアップグレードします。公式ソースの使用は遅くなる可能性があります。国内ソースを使用できます(アップグレードおよび直接rpmパッケージ展開にOmnibusを使用):[https://mirrors.tuna.tsinghua.edu.cn/gitlab-ce/yum](https://mirrors.tuna.tsinghua.edu.cn/gitlab-ce/yum)
アップグレード方法:最初に現在のメジャーバージョンの最後のバージョンにアップグレードし(これが私の提案です。通常、最後のいくつかのバージョンで問題ありません)、次にメジャーバージョン間でアップグレードし、最初にメジャーバージョンの下位バージョンからアップグレードしてから最後までアップグレードします。バージョンのアップグレードなど。バージョンが多すぎて直接アップグレードしようとしたため、例外が発生しました。実際は、主にデータベースのデータのインポートとバックアップの問題でした。新しいバージョンと古いバージョンの関連性が高すぎると、エラーが報告されます。
たとえば、アップグレードプロセスは非常に長く、簡単なテストも行いました
# アップグレードされたバージョン
8.3.1-->8.3.7-->8.8.5-->8.17.4-->9.5.6-->10.0.6-->10.8.5-->11.0.3

# 故障中
gitlab-ctl stop unicorn
gitlab-ctl stop sidekiq
gitlab-ctl stop nginx

# 更新の失敗を防ぐためにデータバックアップを作成する(非常に重要)
gitlab-rake gitlab:backup:create

# アップグレードパッケージをインストールします
# yum update gitlab-ce #GitLabをアップグレードする-ceバージョン(この方法はお勧めしません)
rpm -Uvh gitlab-7.4.2_omnibus-1.el6.x86_64.rpm

# 構成をリロードします&Gitlabサービスを再起動します
gitlab-ctl reconfigure
gitlab-ctl restart
たとえば、プロジェクトでバックアップされたデータ、ユーザー情報、応答速度などに異常がないか、個人的にはもっと一般的だと思います。
実際、以前にアップグレードしたことがある限り、これ以上はこのようにはなりません。このような低バージョンから一度にアップグレードしました。通常、同じバージョン番号を維持することをお勧めします。新しすぎるとバグが発生する可能性があり、古すぎると多くの歴史的な問題が発生する可能性があります。
アップグレードが完了すると、さらにいくつかのプロセスが見つかります。メモリ要件など、システムハードウェアに対する要件が高くなる場合があります。
提案:本質的でない機能要件のためのコードリポジトリが必要な場合は、 11.x.-12.3.xの間に個人的に設定して使用することをお勧めします。
(4) gitlab-railsデータベースの初期化に失敗しました
環境の説明
Centos7:3.10.0-327.el7.x86_64
gitlabバージョン:オリジナルは8です.8.バージョン5が新しいバージョンにアップグレードされました;
問題:同じCentos7マシンで古いバージョンのgitlabをアンインストールし、新しいバージョンのgitlab-ceを再インストールした後、インストール後に構成が変更され、構成の初期化時に次のエラーが発生しました。
Running handlers:
There was an error running gitlab-ctl reconfigure:

bash[migrate gitlab-rails database](gitlab::database_migrations line 49) had an error: Mixlib::ShellOut::ShellCommandFailed: Expected process to exit with[0], but received '1'---- Begin output of"bash""/tmp/chef-script20190628-7065-vx17en"----
STDOUT: rake aborted!
PG::ConnectionBad: could not connect to server: No such file or directory
 Is the server running locally and accepting
 connections on Unix domain socket "/var/opt/gitlab/postgresql/.s.PGSQL.5432"?/opt/gitlab/embedded/service/gitlab-rails/lib/tasks/gitlab/db.rake:49:in`block (3 levels) in <top (required)>'
/opt/gitlab/embedded/bin/bundle:23:in `load'
/opt/gitlab/embedded/bin/bundle:23:in `<main>'
Tasks: TOP => gitlab:db:configure(See full trace by running task with--trace)
STDERR:---- End output of"bash""/tmp/chef-script20190628-7065-vx17en"----
Ran "bash""/tmp/chef-script20190628-7065-vx17en" returned 1
理由:古いバージョンがアンインストールされたときに古いデータが削除されなかったため、直接インストールすると、プログラムは構成ファイルを検出し、上書きせずにデータファイルをスキップします。新しいバージョンは古いバージョンのデータファイルを使用します[バージョンが多すぎるため詳細]は認識されません。
解決策:古いバージョンをアンインストールした後、古いインストールデータの「構成ファイル、インストールディレクトリ、データディレクトリなど」を削除し、新しいバージョンのgitlab-ceを再インストールして正常に起動することを忘れないでください。
rm -rf /var/opt/gitlab//opt/gitlab//etc/gitlab/
(5) Gitlabデータベースpostgresqlがアカウント情報を更新
問題の説明:内部Ldap認証サーバーのハードディスクが壊れているため、その上で実行されているLdapサービスは、JenkinsおよびGitlabプラットフォームで集中認証を実行できません。その結果、Gitlabのアカウントはプラットフォームにログインできず、プルを送信できません。コードも。
- ソリューション:*
- 方法1:Ldapサービスを再構成して、以前のデータベースをインポートし、それを新しいマシンに移行してから、Gitlab認証サービスアドレスを変更します。
- 方法2:Gitlabデータベースを直接変更し、アカウントの認証方法を変更します。
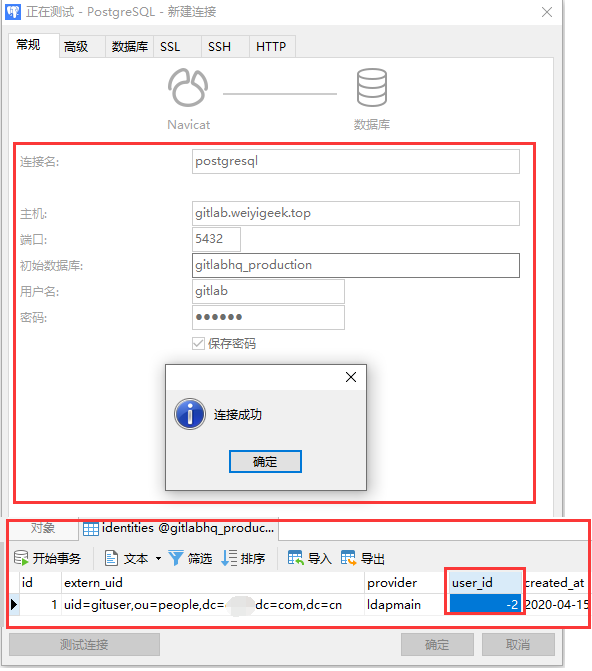
操作方法2を選択するプロセスは次のとおりです。
- ステップ1.gitlabのデータベース構成を変更し、リモートアクセス(デフォルトのローカルアクセス)を有効にします12345678910111213141516171819202122232425262728#1。構成ファイルを変更し、最後の2行を追加しますegrep -v "^#| ^
接続後、対応するIDテーブルを見つけて、対応するフィールドを変更します。実際には、フィールドのuser_idを変更します。ここで行うのは、ユーザーのuser_idを負の数に変更して、Ldap認証中に検出されないようにすることです。したがって、標準認証です。 (これは、Gitlabを再起動せずに実行されます)。
WeiyiGeek.
補足:
- 更新後もログインできないという問題がある場合は、この時点でWeb側のgitlabにログインし、パスワードを忘れることを選択し、パスワードを忘れてパスワードをリセットすることができます。 (パスワード取得機能を実現していることが前提です)
- すべての操作が完了したら、リモート構成をコメントアウトまたは削除してから、postgresqlサービスを再起動してください。
0 x05スクリプト付録####
GitLabワンクリックインストール構成スクリプト
#! /bin/bash
# Desc:Gitlabコードサーバーの自動展開
# Author:WeiyiGeek
# SupportOS:CentOS7 / CentOS8

GITLAB_BASEDOMAIN=weiyigeek.top
GITLAB_VERSION=12.9.2
GITlABOS7=gitlab-ce-${GITLAB_VERSION}-ce.0.el7.x86_64.rpm
GITlABOS8=gitlab-ce-${GITLAB_VERSION}-ce.0.el8.x86_64.rpm

GITLABRUNNER_VERSION=12.9.0-1
GITLABRUNNER_NAME=gitlab-runner-${GITLABRUNNER_VERSION}.x86_64.rpm
CheckOSVersion=$(uname -r | grep -c el8)

## [ ソース設定をミラーリング]functionrepoChange(){
 mv /etc/yum.repos.d/CentOS-Base.repo /etc/yum.repos.d/CentOS-Base.repo.$(date +"%Y%m%d").backup
 if[ $CheckOSVersion -eq 1];then
 # CentOS8ソース
 curl -o /etc/yum.repos.d/CentOS-Base.repo http://mirrors.aliyun.com/repo/Centos-8.repo
 # epel構成パッケージをインストールし、アドレスをAliyunミラーステーションのアドレスに置き換えます
 dnf install -y https://mirrors.aliyun.com/epel/epel-release-latest-8.noarch.rpm
 sed -i 's|^#baseurl=https://download.fedoraproject.org/pub|baseurl=https://mirrors.aliyun.com|'/etc/yum.repos.d/epel*
 sed -i 's|^metalink|#metalink|'/etc/yum.repos.d/epel*
 dnf clean all
 dnf makecache
 else
 # CentOS7ソース
 curl -o /etc/yum.repos.d/CentOS-Base.repo http://mirrors.aliyun.com/repo/Centos-7.repo
 sed -i -e '/mirrors.cloud.aliyuncs.com/d'-e '/mirrors.aliyuncs.com/d'/etc/yum.repos.d/CentOS-Base.repo
 wget -O /etc/yum.repos.d/epel.repo http://mirrors.aliyun.com/repo/epel-7.repo
# GitLabのGPG公開鍵を信頼するために追加
sudo cat >/etc/yum.repos.d/gitlab-ce.repo <<EOF
[ gitlab-ce]
name=Gitlab CE Repository
baseurl=https://mirrors.tuna.tsinghua.edu.cn/gitlab-ce/yum/el7/
gpgcheck=0
enabled=1
gpgkey=https://packages.gitlab.com/gpg.key
EOF
 yum clean all
 yum makecache
 fi
}

#[ yumインストール]functionyumInstall(){
 # 利用可能なバージョンを表示するneng'b
 yum list gitlab-ce --showduplicates
 # デフォルトで最新バージョンをインストールします
 yum install -y gitlab-ce
 # 指定されたバージョン12をインストールします.3.5
 # yum install gitlab-ce-12.3.5-ce.0.el7.x86_64.rpm
}

#[ rpmインストール-推奨される方法]functionOmnibusInstall(){if[ $CheckOSVersion -eq 1];then
 wget -O $GITlABOS8 https://mirrors.tuna.tsinghua.edu.cn/gitlab-ce/yum/el8/${GITlABOS8}
 rpm -i $GITlABOS8
 else
 wget -O $GITlABOS7 https://mirrors.tuna.tsinghua.edu.cn/gitlab-ce/yum/el7/${GITlABOS7}
 rpm -i  $GITlABOS7
 fi
} functiongitlabSetting(){
 sed -i "s#example.com#${GITLAB_BASEDOMAIN}#g"/etc/gitlab/gitlab.rb
 echo "127.0.0.1 gitlab.${GITLAB_BASEDOMAIN}">/etc/hosts
} functionuseage(){
 echo -e "\e[32m# Description:Gitlabの自動インストールおよび展開スクリプト"
 echo -e "usage: $0 [rpm|yum] #rpmインストールまたはyumインストールを指定します"
 echo -e "Author:WeiyiGeek\e[0m"}

#[ 12未満.3.xバージョンにのみ設定]functionChinesization(){
 # gitlabを停止します
 gitlab-ctl stop

 # 現在インストールされているバージョンのパッチを入手する
 git clone https://gitlab.com/xhang/gitlab.git
 cd gitlab
 gitlab_version=$(cat /opt/gitlab/embedded/service/gitlab-rails/VERSION)

 # 対応するバージョンのパッチファイルを生成します
 git diff remotes/origin/12-3-stable remotes/origin/12-3-stable-zh >../${gitlab_version}-zh.diff

 # パッチを適用すると、一部のパッチファイルが存在しないというプロンプトが表示されます。これらのファイルは必ずスキップしてください。スキップしないと、再構成時にエラーが発生します。
 patch -d /opt/gitlab/embedded/service/gitlab-rails -p1 <../${gitlab_version}-zh.diff
 gitlab-ctl reconfigure
 gitlab-ctl restart
}

## [ インストール構成スクリプト入力機能]functionmain(){
 # Sellinuxをオフにします
 echo "現在のSelinux: $(getenforce)"
 setenforce 0
 sed -i 's/SELINUX=enforcing/SELINUX=disabled/g'/etc/selinux/config
 echo "Selinuxをセットアップする: $(getenforce)"

 # 環境に依存するインストール
 repoChange
 sudo yum install -y curl policycoreutils openssh-server wget postfix git htop ncdu net-tools
 systemctl enable postfix
 systemctl start postfix

 # 防護壁の設定
 sudo firewall-cmd --permanent --add-service=http
 sudo firewall-cmd --permanent --add-service=https
 sudo systemctl reload firewalld

 # インストール方法を選択してください
 if[ $1=="rpm"];then
 OmnibusInstall
 elif [ $1=="yum"];then
 yumInstall
 else
 usage
 fi

 gitlabSetting
 gitlab-ctl reconfigure
 gitlab-ctl start
 gitlab-ctl status
}

#[ パラメータ検証]if[ $# -ne 1];then
 usage
else
 main $1
fi
Recommended Posts