PDFおよびCDFの例を処理するPython
データを取得した後、最も重要なタスクの1つは、データの分布を確認することです。データの配布には、pdfとcdfの2種類があります。
以下に、pythonを使用してpdfを生成する方法について説明します。
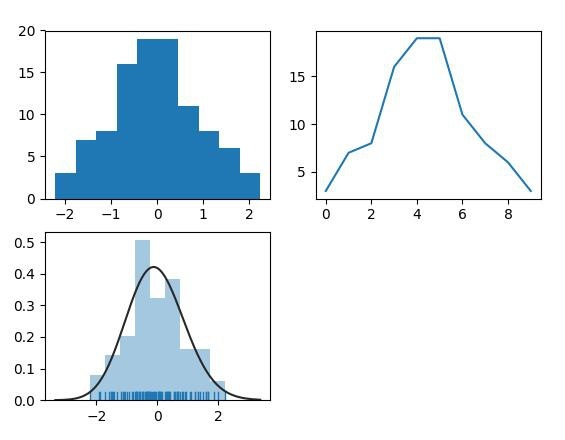
matplotlibの描画インターフェイスhist()を使用して、pdfディストリビューションを直接描画します。
numpyのデータ処理関数histogram()を使用すると、pdf分布データを生成して、さらにcdfを生成するなど、後続のデータ処理を容易にすることができます。
seabornのdistplot()を使用すると、pdf分布を適合させ、独自のデータの分布タイプを確認できるという利点があります。

上の図は、3つのアルゴリズムによって生成されたpdfを示しています。以下はソースコードです。
from scipy import stats
import matplotlib.pyplot as plt
import numpy as np
import seaborn as sns

arr = np.random.normal(size=100)

# plot histogram
plt.subplot(221)
plt.hist(arr)

# obtain histogram data
plt.subplot(222)
hist, bin_edges = np.histogram(arr)
plt.plot(hist)

# fit histogram curve
plt.subplot(223)
sns.distplot(arr, kde=False, fit=stats.gamma, rug=True)
plt.show()
以下では、pythonを使用してcdfを生成する方法について説明します。
numpyのデータ処理関数histogram()を使用してpdf分布データを生成し、さらにcdfを生成します。
seabornのcumfreq()を使用して、cdfを直接描画します。

上の図は、2つのアルゴリズムによって生成されたcdfグラフを示しています。以下はソースコードです。
from scipy import stats
import matplotlib.pyplot as plt
import numpy as np
import seaborn as sns

arr = np.random.normal(size=100)

plt.subplot(121)
hist, bin_edges = np.histogram(arr)
cdf = np.cumsum(hist)
plt.plot(cdf)

plt.subplot(122)
cdf = stats.cumfreq(arr)
plt.plot(cdf[0])

plt.show()
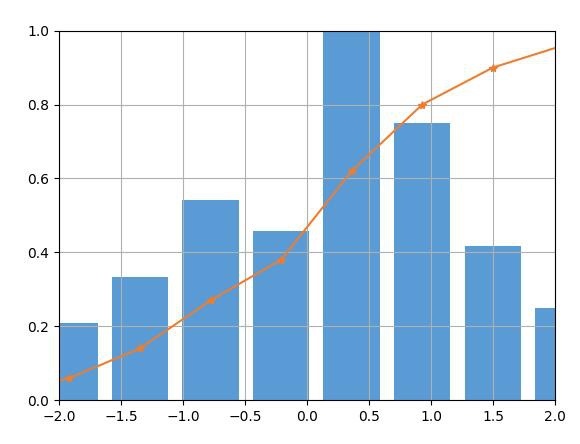
多くの場合、データ分布をより適切に表示するために、pdfとcdfを組み合わせる必要があります。この実装では、pdfとcdfをそれぞれ正規化する必要があります。

上の図は、正規化されたpdfとcdfを示しています。以下はソースコードです。
from scipy import stats
import matplotlib.pyplot as plt
import numpy as np
import seaborn as sns

arr = np.random.normal(size=100)

hist, bin_edges = np.histogram(arr)
width =(bin_edges[1]- bin_edges[0])*0.8
plt.bar(bin_edges[1:], hist/max(hist), width=width, color='#5B9BD5')

cdf = np.cumsum(hist/sum(hist))
plt.plot(bin_edges[1:], cdf,'-*', color='#ED7D31')

plt.xlim([-2,2])
plt.ylim([0,1])
plt.grid()

plt.show()
上記のPythonでPDFとCDFを処理する例は、エディターが共有するすべてのコンテンツです。参考にしてください。
Recommended Posts