[FastDFS]友人は、CentOS 8サーバーでFastDFS環境を構築すると、常にエラーが報告されると言いましたか?
著者は、正確なタイミングタスクと遅延キュー処理機能を備えた、高い同時実行シナリオの下で、シンプルで安定したスケーラブルな遅延[メッセージキュー](https://cloud.tencent.com/product/cmq?from=10680)フレームワークを個人的に開発しました。半年以上のオープンソース以来、それは十数以上の中小企業に正確なタイミングスケジューリングソリューションを提供することに成功し、生産環境のテストに耐えてきました。より多くの子供たちの靴に利益をもたらすために、オープンソースフレームワークのアドレスが与えられました:
https://github.com/sunshinelyz/mykit-delay
PS:スターソースコードへようこそ。素晴らしいコードを作成することもできます。
前に書く
[Glacier Technology] WeChatオフィシャルアカウントの[Distributed Storage]のトピックでは、シングルノードのFastDFS環境と高可用性のFastDFSクラスター環境を構築しました。ただし、以前の環境はCentOS6.8サーバーに基づいて構築されていました。私が書いた記事によると、CentOS 8サーバーにFastDFS環境をセットアップすると、多くの友人が失敗すると報告しました。私の友人からこれらの問題を見て、今日、CentOS8サーバー上にFastDFS環境を構築する方法をあなたと共有します。
FastDFSとは
ここでは、Baidu百科事典のFastDFSの説明を抽出します。
FastDFSは、オープンソースで軽量の分散ファイルシステムであり、ファイルを管理します。その機能には、[ファイルストレージ](https://cloud.tencent.com/product/cfs?from=10680)、ファイル同期、ファイルアクセス(ファイルアップロード、ファイルダウンロード)などがあり、大量ストレージの問題を解決します。 [負荷分散](https://cloud.tencent.com/product/clb?from=10680)の問題。フォトアルバムのWebサイト、ビデオのWebサイトなど、ファイルをキャリアとして使用するオンラインサービスに特に適しています。
FastDFSは、冗長バックアップ、負荷分散、線形拡張などのメカニズムを十分に考慮し、高可用性や高性能などの指標に注意を払って、インターネット向けにカスタマイズされています。FastDFSを使用して高性能ファイルサーバークラスターを構築し、ファイルのアップロードとダウンロードを簡単に行うことができます。およびその他のサービス。
ファイルのアップロードとダウンロードのプロセス
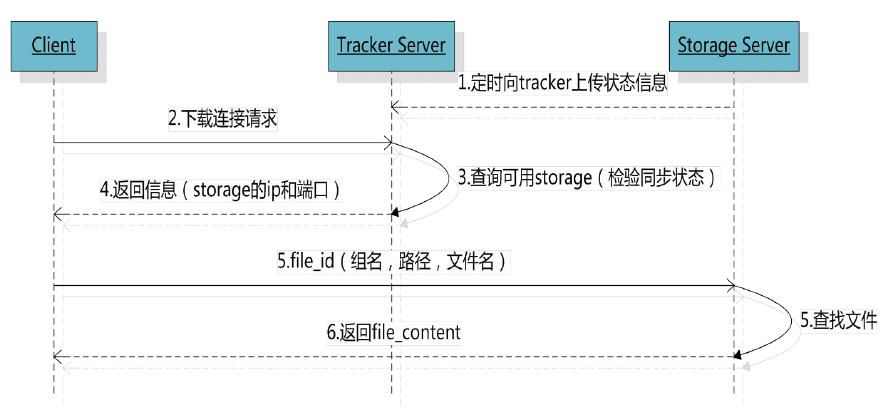
ここでは、FastDFSファイルのアップロードとダウンロードのプロセスを説明するために2つの図を使用します。このようにして、友人はFastDFSの実行プロセスを一目で確認することもできます。
ファイルのアップロード
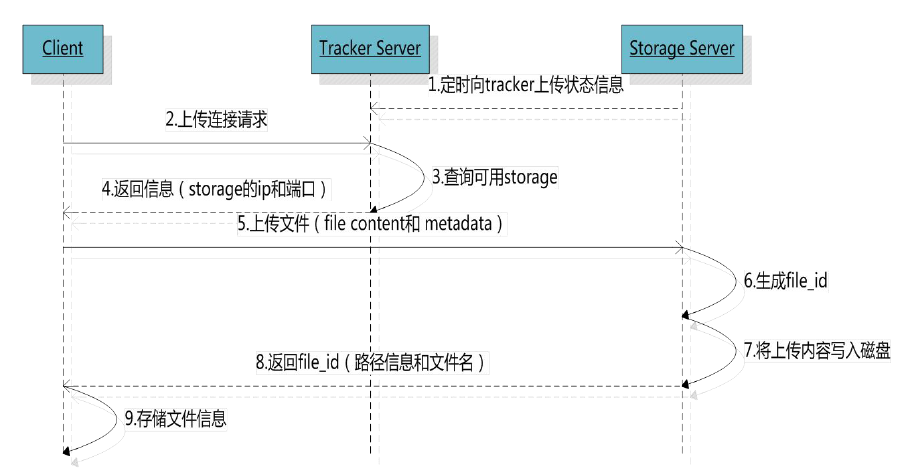
ドキュメントのダウンロード
FastDFSのこれらの基本的な知識を理解した後。次に、CentOS8サーバーでFastDFS環境を構築する方法を見てみましょう。
サーバーバージョン
FastDFS環境を正式に構築する前に、まずサーバーのバージョンを確認しましょう。ここで使用するCentOSサーバーのカーネルバージョンは、以下に示すようにリリース8.1.1911です。
[ root@binghe lib]# cat /etc/redhat-release
CentOS Linux release 8.1.1911(Core)
FastDFSをダウンロード
ここで使用するFastDFSバージョンは6.0.6で、公式アドレスはhttps://github.com/happyfish100です。
FastDFS 6.0.6には、以下に示す3つのサブモジュールがあります。
fastdfs v6.06
libfastcommon v1.0.43
fastdfs-nginx-module   v 1.22
CentOS 8サーバーのコマンドラインで次のコマンドを実行して、これらのモジュールをダウンロードできます。
[ root@binghe source]# wget https://github.com/happyfish100/fastdfs/archive/V6.06.tar.gz
[ root@binghe source]# wget https://github.com/happyfish100/fastdfs-nginx-module/archive/V1.22.tar.gz
[ root@binghe source]# wget https://github.com/happyfish100/libfastcommon/archive/V1.0.43.tar.gz
**Nginx **をダウンロード##
Nginxの公式ウェブサイトは次のとおりです。http://nginx.org/
CentOS 8サーバーのコマンドラインで次のコマンドを入力すると、Nginxをダウンロードできます。
[ root@binghe source]# wget http://nginx.org/download/nginx-1.17.8.tar.gz
FastDFSの依存関係をインストールする
[ root@binghe dest]# yum install gcc gcc-c++[root@binghe dest]# yum install libtool zlib zlib-devel openssl openssl-devel
[ root@binghe dest]# yum -y install pcre pcre-devel libevent libevent-devel perl unzip net-tools wget
**libfastcommon **をインストールします##
**libfastcommon **の圧縮パッケージを解凍します###
[ root@binghe source]# tar -zxvf V1.0.43.tar.gz
コンパイルしてインストール
[ root@binghe source]# cd libfastcommon-1.0.43/[root@binghe libfastcommon-1.0.43]# ./make.sh &&./make.sh install
インストール結果のテスト
[ root@binghe libfastcommon-1.0.43]# ls /usr/lib64|grep libfastcommon
libfastcommon.so
[ root@binghe libfastcommon-1.0.43]# ls /usr/lib|grep libfastcommon
libfastcommon.so
fastdfsをコンパイルしてインストールします
FastDFSを解凍
[ root@binghe source]# tar -zxvf V6.06.tar.gz
FastDFSをインストール
[ root@binghe source]# cd fastdfs-6.06/[root@binghe fastdfs-6.06]# ./make.sh &&./make.sh install
**FastDFS **のインストールステータスを確認してください###
[ root@binghe fastdfs-6.06]# ls /usr/bin|grep fdfs
fdfs_appender_test
fdfs_appender_test1
fdfs_append_file
fdfs_crc32
fdfs_delete_file
fdfs_download_file
fdfs_file_info
fdfs_monitor
fdfs_regenerate_filename
fdfs_storaged
fdfs_test
fdfs_test1
fdfs_trackerd
fdfs_upload_appender
fdfs_upload_file
FastDFS構成ファイルを変更する
[ root@binghe fastdfs-6.06]# cd /etc/fdfs/[root@binghe fdfs]# cp storage.conf.sample storage.conf
[ root@binghe fdfs]# cp client.conf.sample client.conf
[ root@binghe fdfs]# cp tracker.conf.sample tracker.conf
FastDFSを開始
トラッカーサービスを開始する
(1)トラッカーサービスに必要なディレクトリを作成します
[ root@binghe fdfs]# mkdir /data/fastdfs
[ root@binghe fdfs]# mkdir /data/fastdfs/tracker
[ root@binghe fdfs]# chmod 777/data/fastdfs/tracker
(2)トラッカーサービスを構成する
tracker.confファイルを変更します。
[ root@binghe fdfs]# vi /etc/fdfs/tracker.conf
base_pathの値を上記で作成したディレクトリに変更するだけです。
base_path =/data/fastdfs/tracker
(3)トラッカーサービスを開始する
[ root@binghe fdfs]# /etc/init.d/fdfs_trackerd start
(4)トラッカーサービスが正常に開始されているかどうかを確認します
[ root@binghe fdfs]# ps auxfww | grep fdfs
root      150670.00.012320964 pts/0    S+01:140:00||           \_ grep --color=auto fdfs
root      150260.00.1901605940?        Sl   01:130:00/usr/bin/fdfs_trackerd /etc/fdfs/tracker.conf
fdfs_trackerdが表示され、トラッカーサービスが正常に開始されたことを示しています
**(5)トラッカーサービスがポート22122 **にバインドされているかどうかを確認します
[ root@binghe dest]# netstat -anp | grep 22122
tcp        000.0.0.0:221220.0.0.0:*               LISTEN      15026/fdfs_trackerd
注:ポート22122は/etc/fdfs/tracker.confで定義されています。次のように:
# the tracker server port
port =22122
ストレージサービスを開始します
(1)ストレージサービスに必要なディレクトリを作成します
[ root@binghe fdfs]# mkdir /data/fastdfs/storage
[ root@binghe fdfs]# chmod 777/data/fastdfs/storage/
(2)ストレージサービスを構成する
ストレージ構成ファイルを編集します。
[ root@binghe fdfs]# vi /etc/fdfs/storage.conf
各構成アイテムには次のものが含まれます。
base_pathを上記で作成したストレージディレクトリとして構成します。ここで、store_pathはストレージが配置されているディレクトリであり、複数の設定を設定できます。0から開始するように注意してください。
base_path =/data/fastdfs/storage
store_path0 =/data/fastdfs/storage
tracker_serverのIPとポートを構成します。
tracker_server =192.168.175.100:22122
httpサービスのポートを指定します
http.server_port =80
(3)ストレージサービスを開始する
[ root@binghe fdfs]# /etc/init.d/fdfs_storaged start
fdfsの開始_storaged(via systemctl):                   [決定する]
(4)ストレージサービスが正常に開始されているかどうかを確認しますか?
[ root@binghe fdfs]# ps auxfww | grep fdfs
root      156300.00.012320972 pts/0    S+15:460:00||           \_ grep --color=auto fdfs
root      150260.00.11556966964?        Sl   15:130:00/usr/bin/fdfs_trackerd /etc/fdfs/tracker.conf
root      155732.71.715073666292?        Sl   15:450:02/usr/bin/fdfs_storaged /etc/fdfs/storage.conf
注:ストレージサービスが正常に開始されたことを示すfdfs_storagedを参照してください
(5)ストレージサービスがポートにバインドされているかどうかを確認します:23000?
[ root@binghe fdfs]# netstat -anp | grep 23000
tcp        000.0.0.0:230000.0.0.0:*               LISTEN      15573/fdfs_storaged
注:23000ポートは、以下に示すように、構成ファイル/etc/fdfs/storage.confで定義されています。
# the storage server port
port =23000
クライアントファイルを構成する
(1)クライアントが使用するようにclient.confを構成します
[ root@binghe fdfs]# vi /etc/fdfs/client.conf
次の2つの構成で使用されるトラッカーディレクトリとサーバーアドレスポート
base_path =/data/fastdfs/tracker
tracker_server =192.168.175.100:22122
(2)クライアントの構成からわかります。クライアントはtracker_serverの情報を知っているだけでよく、トラッカーサーバーの役割は負荷分散とスケジューリングでもあります。
(3)ストレージサーバーの機能はファイルストレージであり、クライアントによってアップロードされたファイルは最終的にストレージサーバーに保存されます。
**nginxとfastdfs-nginx-module **をインストールします##
nginxを解凍します:
[ root@binghe source]# tar -zxvf nginx-1.17.8.tar.gz
**fastdfs-nginx-module ** ###を解凍します
[ root@binghe source]# tar -zxvf V1.22.tar.gz
構成ファイルを変更します
構成ファイルを変更し、/ usr / localを/ usrに置き換えます
[ root@binghe source]# cd fastdfs-nginx-module-1.22/[root@binghe fastdfs-nginx-module-1.22]# cd src
[ root@binghe src]# vi config
**Nginx ** ###を構成します
Nginx構成、fastdfs-nginx-moduleおよびhttp_stub_status_moduleモジュールを追加します
[ root@binghe fdfs]# cd /usr/local/source/nginx-1.17.8/[root@binghe nginx-1.17.8]# ./configure --prefix=/usr/local/soft/nginx --with-http_stub_status_module --add-module=/usr/local/source/fastdfs-nginx-module-1.22/src/
**Nginx ** ###をコンパイルしてインストールします
[ root@binghe nginx-1.17.8]# make && make install
**インストールが成功したかどうかを確認しますか? **
[ root@binghe nginx-1.17.8]# ls /usr/local/soft/| grep nginx
nginx
Nginx構成を確認します
[ root@binghe fdfs]# /usr/local/soft/nginx/sbin/nginx -V
nginx version: nginx/1.17.8
built by gcc 8.3.120190507(Red Hat 8.3.1-4)(GCC)
configure arguments:--prefix=/usr/local/soft/nginx --with-http_stub_status_module --add-module=/usr/local/source/fastdfs-nginx-module-1.22/src/
**fastdfs-nginx-module **を構成します##
構成ファイルをコピー
[ root@binghe nginx-1.17.8]# cp /usr/local/source/fastdfs-nginx-module-1.22/src/mod_fastdfs.conf /etc/fdfs/
構成ファイルの編集
[ root@binghe nginx-1.17.8]# vi /etc/fdfs/mod_fastdfs.conf
次の項目を構成します
connect_timeout=10
tracker_server=192.168.175.100:22122
url_have_group_name =true
store_path0=/data/fastdfs/storage
Web構成ファイルをコピー
Webアクセスに使用される他の2つの構成ファイルをfdfs構成ディレクトリにコピーします。
[ root@binghe nginx-1.17.8]# cd /usr/local/source/fastdfs-6.06/conf/[root@binghe conf]# cp http.conf /etc/fdfs/[root@binghe conf]# cp mime.types /etc/fdfs/
**nginx **を構成します##
nginxの構成ファイルを編集します。
[ root@binghe conf]# vi /usr/local/soft/nginx/conf/nginx.conf
サーバーリッスン80のサーバー構成では、
位置を追加する
location ~/group([0-9]){
 root  /data/fastdfs/storage/data;
 ngx_fastdfs_module;}
nginxを開始
Nginxを開始
[ root@binghe storage]# /usr/local/soft/nginx/sbin/nginx
nginxが正常に開始されたかどうかを確認します
[ root@binghe storage]# ps auxfww | grep nginx
root      245900.00.012320980 pts/0    S+16:440:00||           \_ grep --color=auto nginx
root      245680.00.041044428?        Ss   16:440:00  \_ nginx: master process /usr/local/soft/nginx/sbin/nginx
nobody    245690.00.1745164940?        S    16:440:00      \_ nginx: worker process
画像のアップロードをテストする
(1)コマンドラインから写真をアップロード
[ root@binghe storage]# /usr/bin/fdfs_upload_file /etc/fdfs/client.conf /home/binghe/image/test.jpg
group1/M00/00/00/Ch8FQl9txnyAfrePAADhyYH1AP4653.jpg
fdfsによって返されるアドレスに注意してください。アクセスにはこのアドレスを使用する必要があります
(2)ブラウザを開きます:このアドレスにアクセスしてください
http://192.168.175.100/group1/M00/00/00/Ch8FQl9txnyAfrePAADhyYH1AP4653.jpg
写真を見ることができます
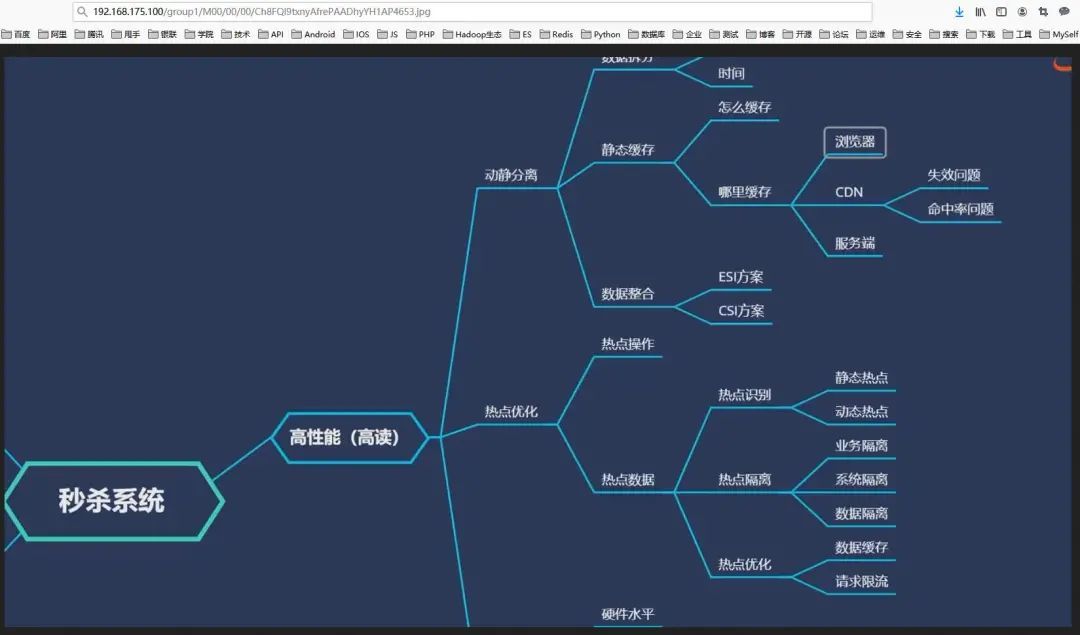
その中で、192.168.175.100はスプライスされたローカルサーバーのIPです
コマンドラインを使用して、サーバー上の画像の実際のストレージパスを表示できます。
[ root@binghe data]# pwd
/data/fastdfs/storage/data
[ root@binghe data]# ls 00/00
Ch8FQl9txnyAfrePAADhyYH1AP4653.jpg
2つのディレクトリ/ group1 / M00はfdfsによって管理および生成され、fdfsによって生成されたグループ名とディスクを表していることがわかります。
FastDFSその他のコマンド
**fdfs **のバージョンを表示する###
[ root@binghe data]# fdfs_monitor /etc/fdfs/client.conf | grep version
[2020- 09- 2401:58:01] DEBUG - base_path=/data/fastdfs/tracker, connect_timeout=5, network_timeout=60, tracker_server_count=1, anti_steal_token=0, anti_steal_secret_key length=0, use_connection_pool=0, g_connection_pool_max_idle_time=3600s, use_storage_id=0, storage server id count:0

version =6.06
**fdfs **の実行ステータスを表示する###
[ root@binghe data]# fdfs_monitor /etc/fdfs/client.conf