Deep learning environment configuration guide! (Full explanation on Windows, Mac and Ubuntu)
**Author: Wu Zhou days, the horse was in Europe, Chen Hsin-up **
Introducing deep learning, many people have experienced the sad journey from getting started to giving up, and they fell on the first hurdle of getting started: the problem of environmental configuration. As the saying goes, the environment is not right, learn two lines of tears.
If you are facing the pain of configuring your environment, whether you are a Windows user, an Ubuntu user or a diehard Apple fan, this article is tailored for you. Next, I will talk about the configuration of the deep learning environment of Windows, Mac and Ubuntu in turn.
1. Windows system deep learning environment configuration
System: Win10 64-bit operating system
Installation combination: Anaconda+PyTorch(GPU version)+GTX1060
Open source contribution: Wu Tianzhou, Inner Mongolia Agricultural University
1.1 Open Anaconda Prompt
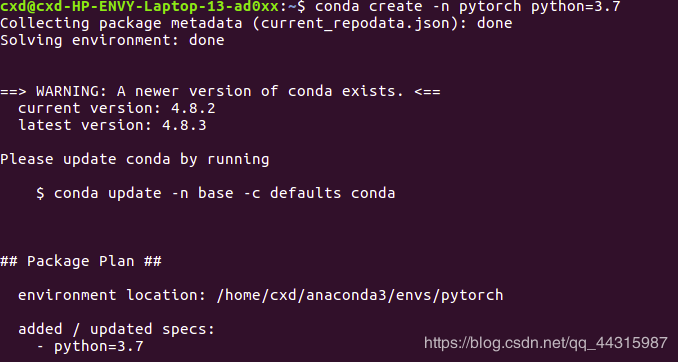
1、 conda create -n pytorch python=3.7.0: Create a virtual environment named pytorch, and install python=3.7 for the environment.
2、 activate pytorch: activate the environment named pytorch

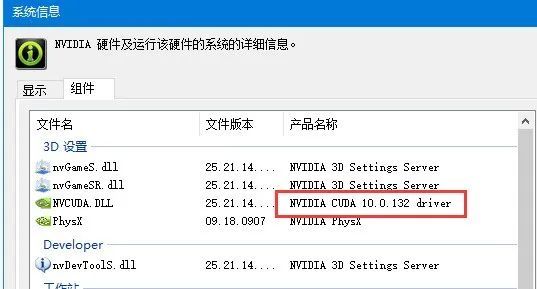
1.2 Determine the CUDA version supported by the hardware
NVIDIA Control Panel-Help-System Information-Components
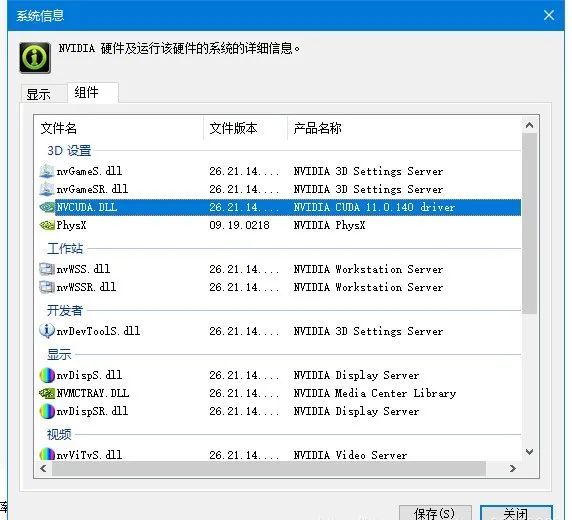
2020 At 16:46:31 on May 19th, 2015, I updated the graphics card driver and saw that my cuda supports less than 11
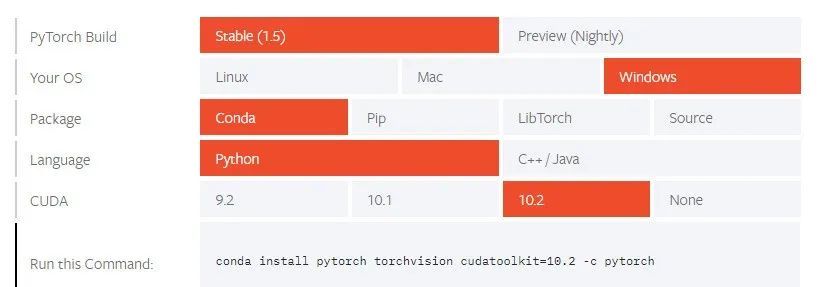
1.3 Determine pytorch version, torchvision version
Enter pytorch official website: https://pytorch.org/get-started/locally/
Because the official source is too slow, use Tsinghua source to download here
1.4 Download the corresponding installation package in the mirror
Tsinghua Mirror:
https://mirrors.tuna.tsinghua.edu.cn/anaconda/cloud/pytorch/win-64/
pytorch:

torchvision:

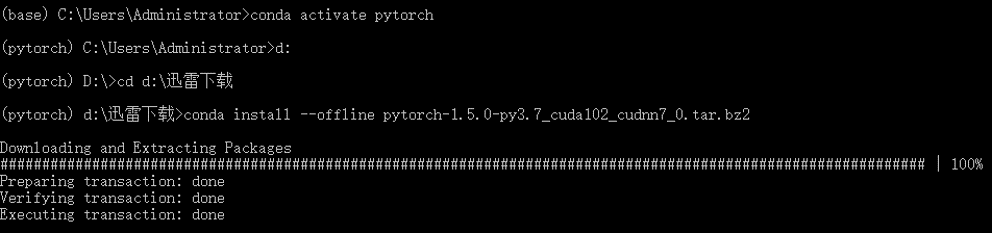
1.5 Local installation
Then the first step is to install in the pytorch environment and enter the following commands in sequence.

Then go back to the directory where the virtual environment is located and use conda install anaconda to install the basic packages required by the environment

1.6 test
Code 1:
from future import print_function
import torch
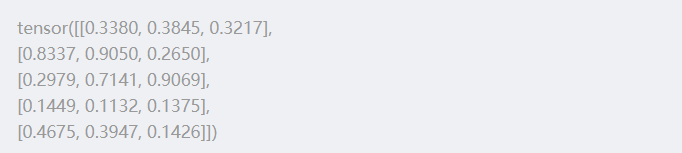
x = torch.rand(5,3)print(x)
The output is similar to the following tensor:
Code 2:
import torch
torch.cuda.is_available()
Output: True
If there is no abnormal output of the above two pieces of code, it indicates that the environment is set up successfully.
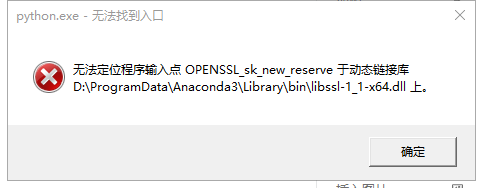
1.7 Problems encountered
- Use the following command to create a virtual environment and report an error
conda create -n py37_torch131 python=3.7
[Solution] https://blog.csdn.net/weixin_42329133/article/details/102640763
The environment will be saved in the envs folder under the Anaconda directory
- PackagesNotFoundError: The following packages are not available from current channels
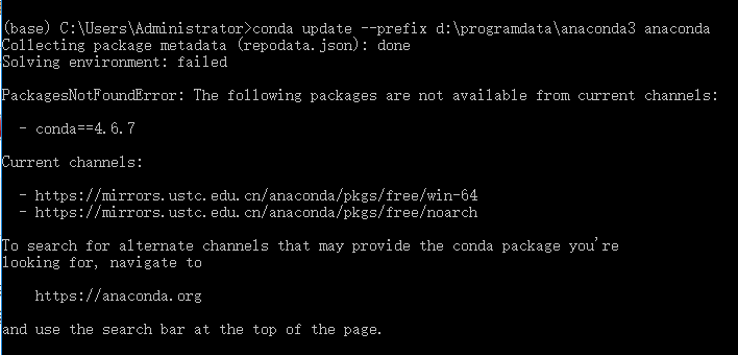
【Solution】:
https://www.cnblogs.com/hellojiaojiao/p/10790273.html
- **Conda download is too slow **
[Solution] https://mirror.tuna.tsinghua.edu.cn/help/anaconda/
I call Tsinghua NB!
- cuda installation
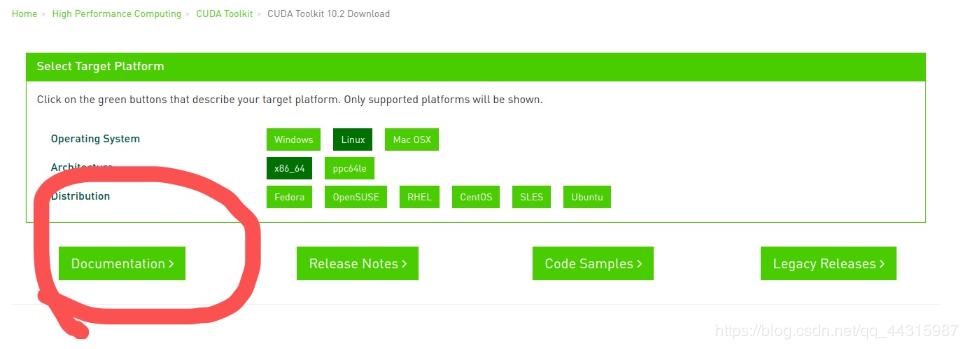
Download historical version of cuda: https://developer.nvidia.com/cuda-toolkit-archive
It depends on the components of NVIDIA, which version of CUDA supports, I am a 1060 graphics card, so I am using version 10.0 of cuda
- pytorch installation
The official website does not have my combination, I am full of question marks
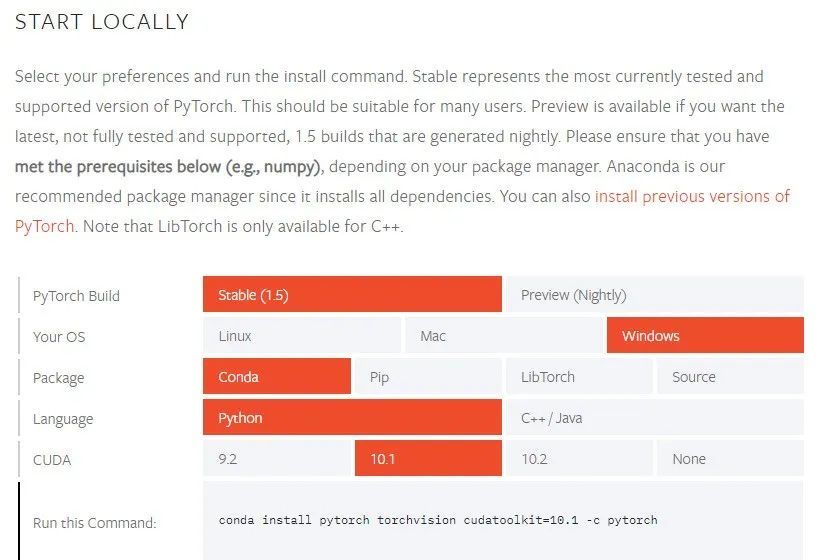
Here I am directly (don’t forget to enter the newly created environment first)
conda install pytorch torchvision cudatoolkit=10.0-c pytorch
- How to enter the virtual environment of jupyter note
python -m ipykernel install --name virtual environment name
-
Open Anaconda Prompt, enter conda env list to view the existing environment
-
Enter activate name (name is the environment you want to switch)
-
conda install ipykernel install the necessary plugins
-
python -m ipykernel install --name Name adds the environment to Jyputer (Name is the name of this environment displayed in Jyputer, which can be customized)
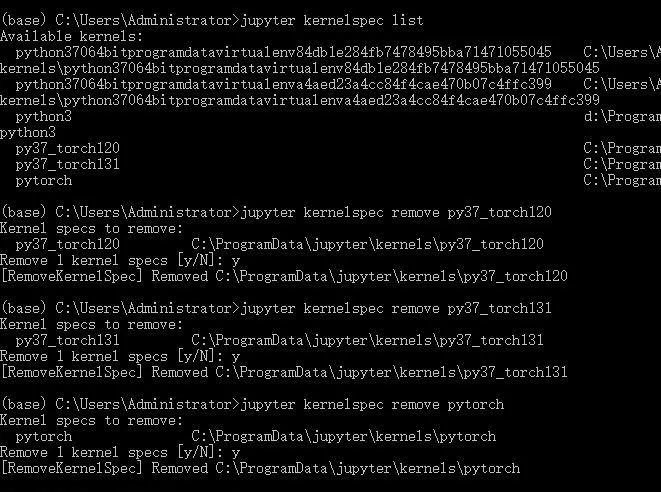
Remove kernel
jupyter kernelspec remove kernel name
Report an error [Errono 13]
[ Errno 13] Permission denied: ‘/usr/local/share/jupyter’
To do this, you need to add the -user option to generate the configuration file in the home directory of this account.
python -m ipykernel install --user --name py27-caffe-notebook
At this point, adding the kernel is complete. View the existing kernel:
jupyter kernelspec list
Delete the existing kernel
jupyter kernelspec remove kernelname
The above command deletion is only the configuration file, and does not uninstall the ipykernel of the corresponding virtual environment. Therefore, if you want to install the kernel of the corresponding python virtual environment again, you only need to activate the virtual environment, and then
python -m ipykernel install --name kernelname
- Half of conda installation always fails
Download the file to the local, enter the directory of the file, and then use the command
conda install --offline package name
2. Mac deep learning environment configuration
Installation combination: Anaconda+PyTorch (GPU version)
Open source contribution: Ma Zengou, University of London
2.1 Install Anaconda
There are two ways to install Anaconda, here is only one of the most intuitive-macOS graphical install.
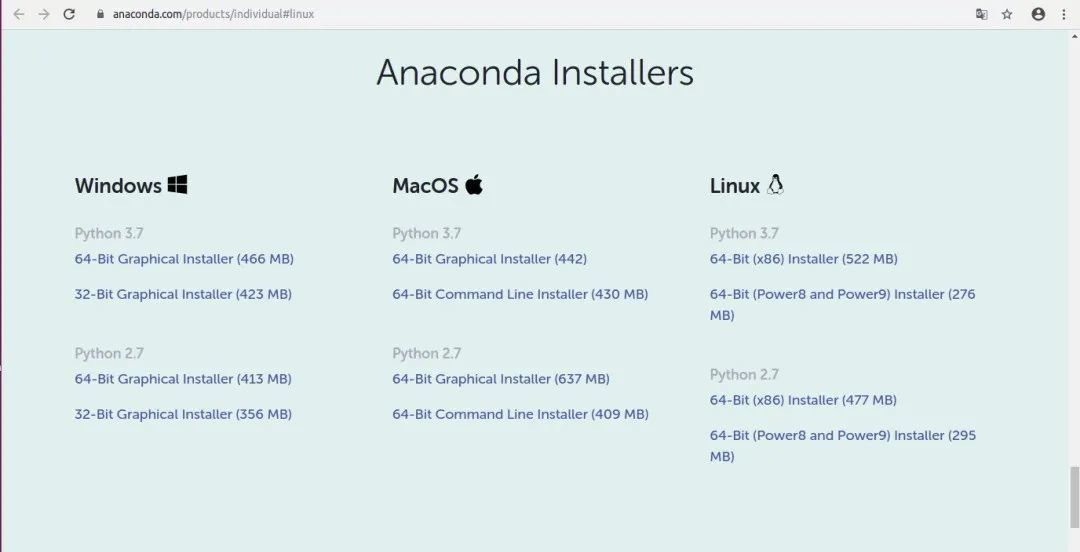
In https://www.anaconda.com/products/individual, the location of Anaconda Installers, select "64-Bit Graphical Installer (442)" under Python 3.7. Good download
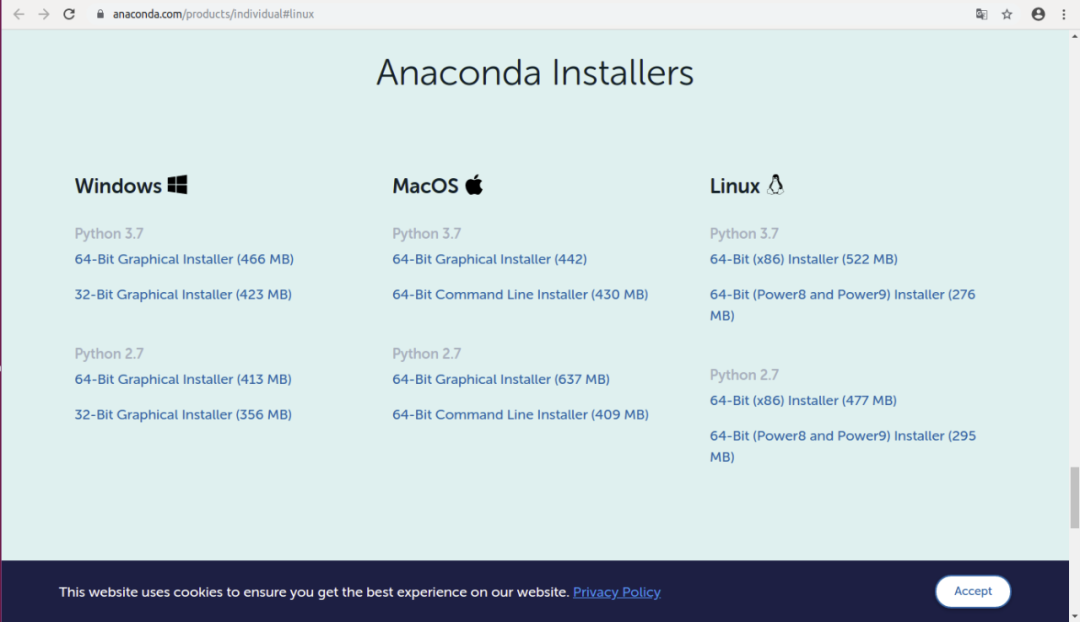
After pkg installs the package, click to enter and click Next to complete the installation. The default installation location is ~/opt. If you want to use command line install, please refer to it yourself: https://docs.anaconda.com/anaconda/install/mac-os/
2.2 Confirm download status

In Terminal of Mac, type
python --version
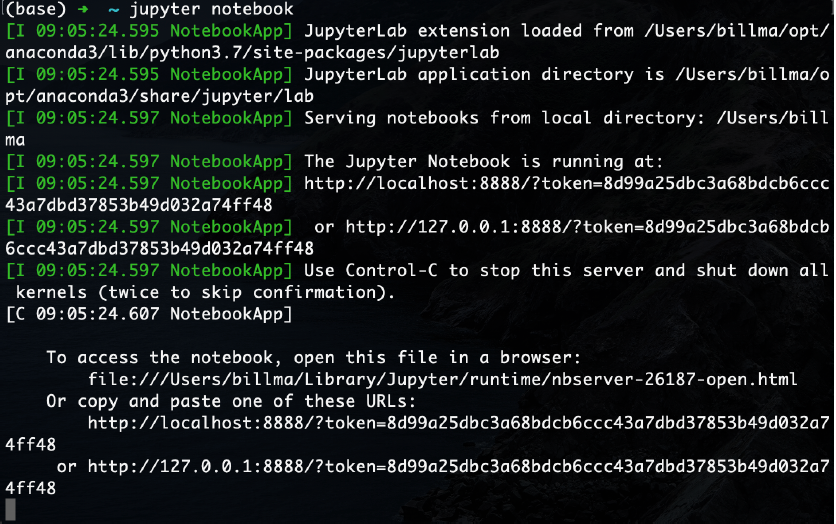
Make sure that the installed Python is 3.x version. Enter in Terminal
jupyter notebook
The webpage pops up and you can enter the notebook.
Click Quit in the upper right corner of the webpage, or return to Terminal, command + c to exit the notebook.

2.2.1 common problem
If multiple Anaconda is downloaded to the computer, conflicts may occur during runtime. Enter in Terminal
cd ~
Go back to the home directory and enter
cat .bash_profile
If you can only see one Anaconda version, there is no problem. If there are multiple, it is possible to download the package
Cause a certain conflict. Use vim, nano or other text editor to change the old version of Anaconda
export PATH=...
delete.
2.3 Download of virtual environment and package
It is very simple to use conda to create a virtual environment and download the corresponding package.
2.3.1 Graphic
Click on Anaconda-Navigator, you can see the applications you have downloaded, the "Applications on" in the upper left corner should point to "base (root)", and click "Environments" on the left to see the virtual environment and corresponding packages you created Up. Click Create in the lower left corner to create a new virtual environment.
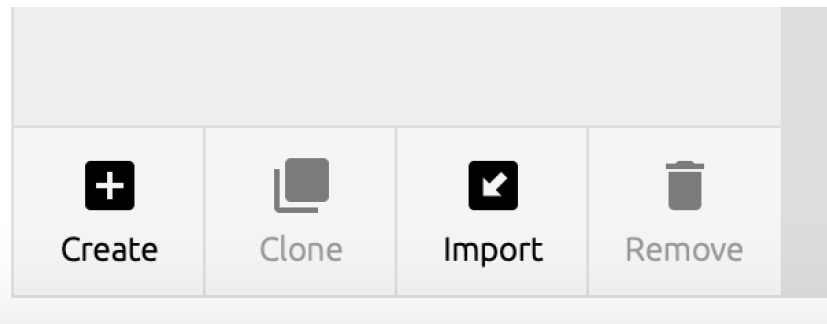
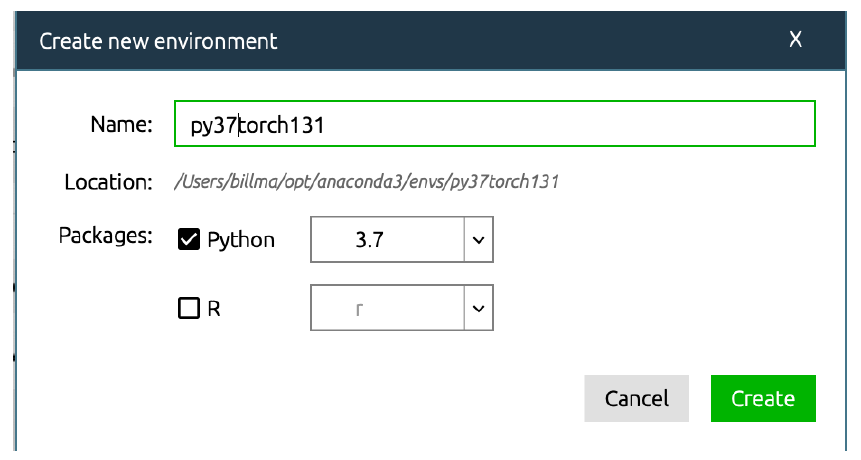
Enter the environment name and python version, and click create to create it.
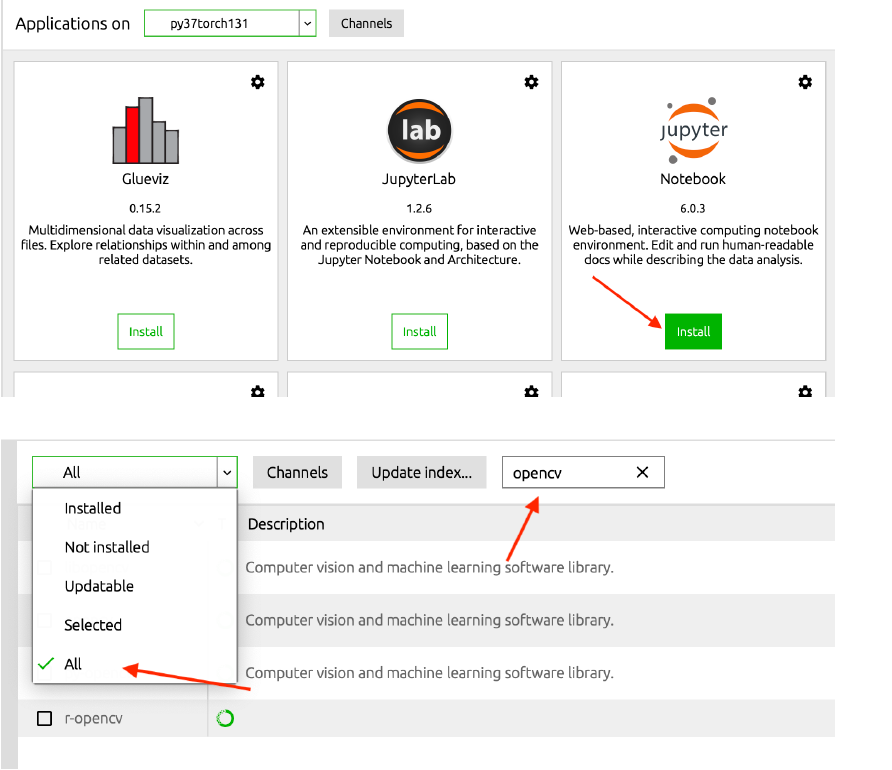
Then on the Home page, make sure that the upper left corner points to the name of the environment you just created. Install jupyter notebook in this environment. Note that the originally installed notebook is in the base and cannot be used universally.
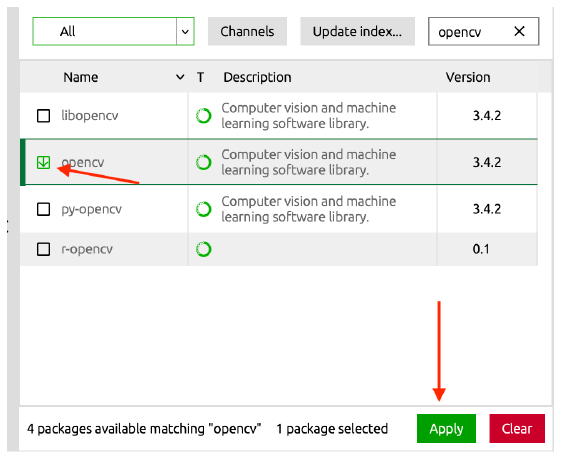
Back to Environments, you can see all the packages in this environment, select All at the top left, and then enter the name of the package you want to download
Then select to download
2.3.2 Command Line
It is also very concise to complete the above operations with command line. Take Pytorch as an example this time. Enter in Terminal
conda create --name env_name
You can create a virtual environment called "env_name". enter
conda env list
You can see all the virtual environments created, and the one marked with * is the current environment. enter
conda activate env_name
Enter the environment
conda deactivate
Exit the current virtual environment and enter the base.
2.3.3 Download Pytorch
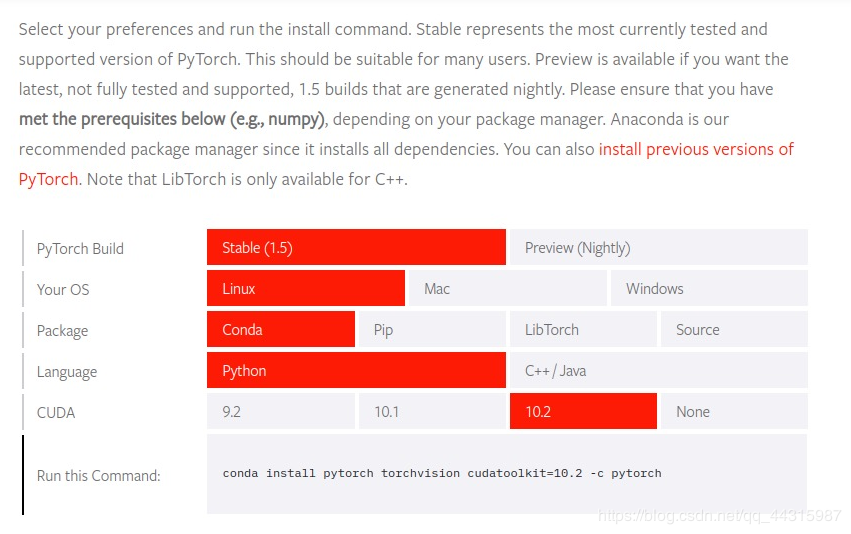
Generally, Mac does not support CUDA. Enter https://pytorch.org/ to see
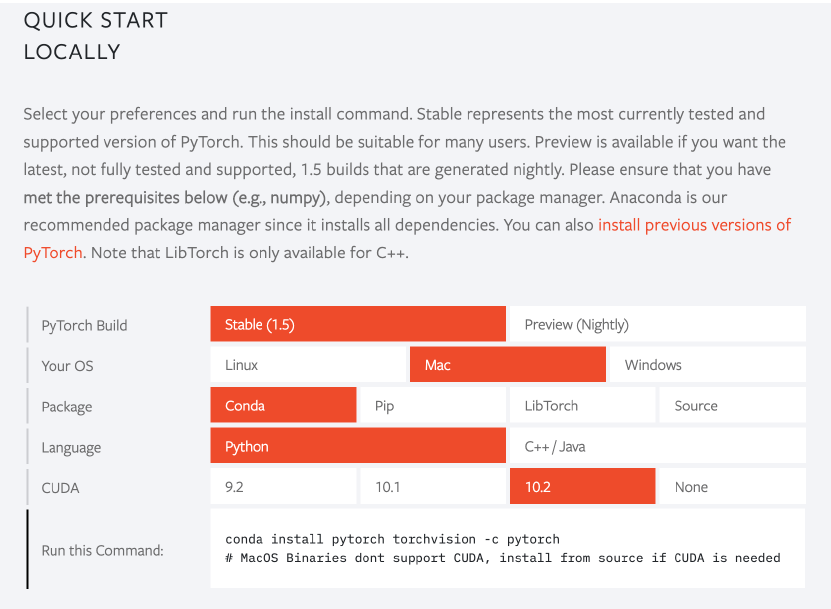
The pytorch official website displays the download statements that the current device should use. In this case, mine is
conda install pytorch torchvision -c pytorch
Copy it, paste it into Terminal and run it to start downloading.
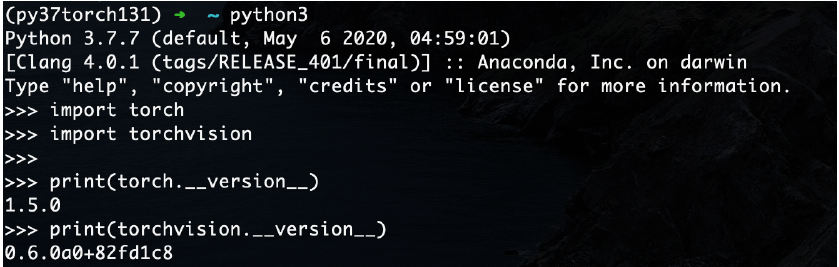
After the download is complete, enter in Terminal
python3
Then import the two packages you just downloaded and confirm that the download is complete
import torch
import torchvision

print(torch.__version__)print(torchvision.__version__)
If the import and output are normal, the configuration is complete! enter
quit()
It's ok.
2.4 Extra circumstances
If you use conda to download directly in China, it may be very slow. You can change the download source for acceleration. For the source replacement method, please refer to the Linux section in the following materials: https://zhuanlan.zhihu.com/p/87123943.
The problem of "Solving environment: failed..." often appears in conda downloads. If the virtual environment is created normally, this problem should be no problem. If it still occurs, you can create another virtual environment.
Conda has a large community. Basically, the problems encountered are likely to be encountered and answered. Google will be a good solution.
Three, Ubuntu deep learning environment configuration
Installation combination: Anaconda+PyTorch (CPU version) or PyTorch (GPU version)
Open source contribution: Chen Xinda, North China Electric Power University
3.1 Anacond installation
Anaconda and Python versions are corresponding, so you need to choose to install the corresponding Python2.7 version or Python3.7 version or other versions, and download the appropriate installation package according to your needs.
Download link: https://www.anaconda.com/download/#linux
Click the 64-Bit (x86) Installer (522 MB) below to download the 64-bit version.
The file name after downloading is: Anaconda3-2020.02-Linux-x86_64.sh.
cd to the directory where Anaconda3-2020.02-Linux-x86_64.sh is located:

Execute bash Anaconda3-2020.02-Linux-x86_64.sh to start the installation:
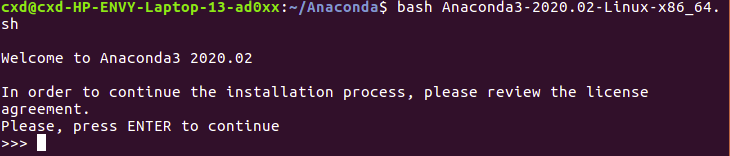
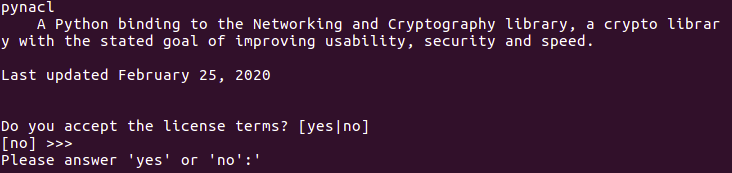
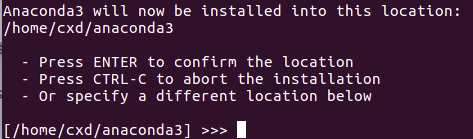
Keep pressing enter until the following interface, and then enter yes:
Press Enter here to install to the default path, or enter a custom path after >>>
Wait for the installation progress bar to finish, and then the following prompt appears, yes is to add environment variables, no is not to add environment variables, here we take no as an example

Next, manually add environment variables, first cd to ~, and then edit the .bashrc file: sudo vim .bashrc

Add the following lines at the bottom (note that there is a space after the .):
# Distinguish between anaconda python and system built-in python
alias python3="/usr/bin/python3.5"
alias python2="/usr/bin/python2.7"./home/cxd/anaconda3/etc/profile.d/conda.sh
Then press esc +: + wq! to save

Enter source.bashrc to execute the newly modified initialization document

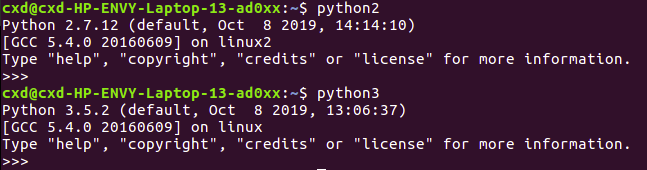
Enter conda env list below to test whether the environment variables are set successfully:

Try the commands you just set to use the built-in python: python2, python3
If this is over, everyone will definitely suffer when installing the package~ Here you need to change the source of anaconda (adding Tsinghua source):
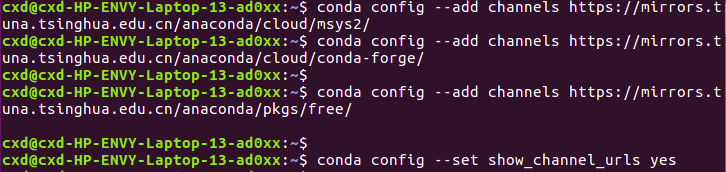
Then we created a virtual environment called pytorch and found that the following error was reported:
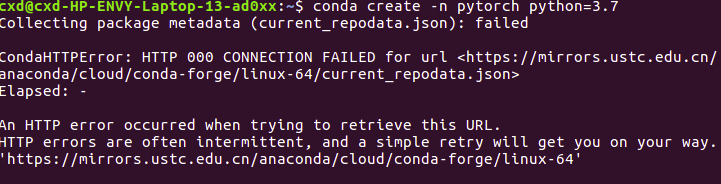
The reason is that we did not clear the source left over from the last installation. Enter sudo vim .condarc and modify the content of the file (remember to delete the default line):

Then enter source .condarc to create the virtual environment again:
3.2 pytorch cpu version installation
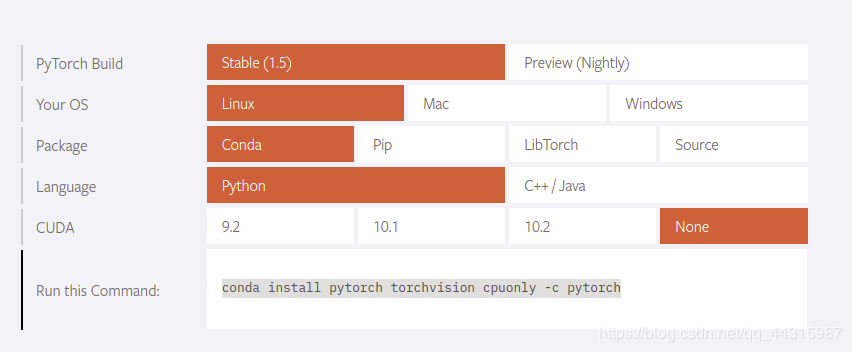
Open pytorch official website: https://pytorch.org/
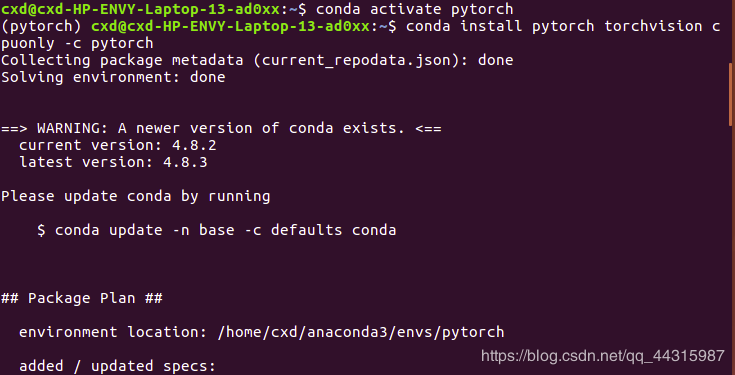
Activate the virtual environment just created: conda activate pytorch add the following source before installation:
conda config --add channels https://mirrors.tuna.tsinghua.edu.cn/anaconda/cloud/pytorch
Then enter the following code:
conda install pytorch torchvision cpuonly -c pytorch
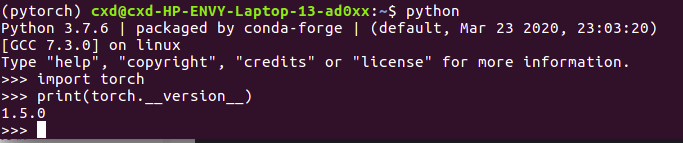
After the installation is complete, test whether the installation is complete:
import torch
print(torch.__version__)
The output is as follows, the installation is successful:
3.3 pytorch-gpu installation
3.3.1 GPU driver installation
- Detect graphics card type
Execute the command:'ubuntu-drivers devices'
== /sys/devices/pci0000:00/0000:00:01.0/0000:01:00.0==
modalias : pci:v000010DEd00001C8Dsv00001028sd0000086Fbc03sc02i00
vendor   : NVIDIA Corporation
model    : GP107M [GeForce GTX 1050 Mobile]
driver   : nvidia-driver-390- distro non-free
driver   : nvidia-driver-435- distro non-free
driver   : nvidia-driver-440- distro non-free recommended
driver   : xserver-xorg-video-nouveau - distro free builtin

== /sys/devices/pci0000:00/0000:00:14.3==
modalias : pci:v00008086d0000A370sv00008086sd000042A4bc02sc80i00
vendor   : Intel Corporation
model    : Wireless-AC 9560[Jefferson Peak]
manual_install: True
driver   : backport-iwlwifi-dkms - distro free
As you can see, there is a GTX1050 device here. The recommended driver is 440.
- install driver
Install all recommended drivers
sudo ubuntu-drivers autoinstall
Install a driver
sudo apt install nvidia-440
3.3.2 Install cuda
The cuda installation needs to correspond to the appropriate graphics driver. The following is the version correspondence between the driver and cuda
Table 1. CUDA Toolkit and Compatible Driver Versions
CUDA Toolkit    Linux x86_64 Driver Version Windows x86_64 Driver Version
CUDA 10.2.89>=440.33>=441.22
CUDA 10.1(10.1.105 general release, and updates)>=418.39>=418.96
CUDA 10.0.130>=410.48>=411.31
CUDA 9.2(9.2.148 Update 1)>=396.37>=398.26
CUDA 9.2(9.2.88)>=396.26>=397.44
CUDA 9.1(9.1.85)>=390.46>=391.29
CUDA 9.0(9.0.76)>=384.81>=385.54
CUDA 8.0(8.0.61 GA2)>=375.26>=376.51
CUDA 8.0(8.0.44)>=367.48>=369.30
CUDA 7.5(7.5.16)>=352.31>=353.66
CUDA 7.0(7.0.28)>=346.46>=347.62
cuda download link: http://suo.im/6dY8rL
The Installer Type can choose the first or the second. But first check the gcc version after obtaining the cuda file. Take the first runfile (local) installation method as an example.
- Install gcc
Linux usually comes with gcc, let’s check the gcc version of our system first
gcc --version
The gcc dependency version of cuda will be given in the installation guide of the official document
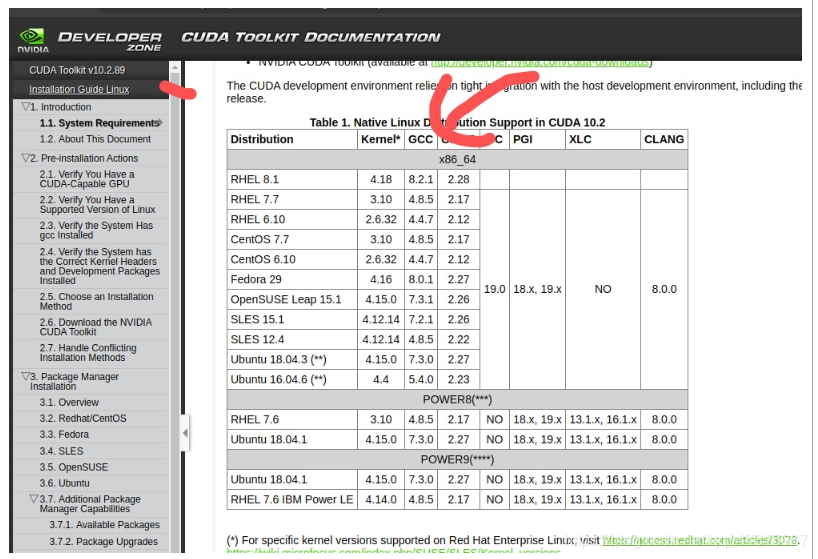
If the version does not correspond to cuda's dependency on gcc, install the version required by cuda
sudo apt-get install gcc-7.0
sudo apt-get install g++-7.0
After the installation is complete, you need to change the system gcc version
sudo update-alternatives --install /usr/bin/gcc gcc /usr/bin/gcc-750
sudo update-alternatives --install /usr/bin/g++ g++/usr/bin/g++-750
Choose the required version
sudo update-alternatives --config gcc

 Select path priority status
- - - - - - - - - - - - - - - - - - - - - - - - - - - - - - - - - - - - - - - - - - - - - - - - - - - - - - - - - - - - *0 /usr/bin/gcc-950 automatic mode
 1 /usr/bin/g++-950 manual mode
 2 /usr/bin/gcc-750 manual mode
Just enter the number shown above.
- Install cuda
sudo sh cuda_Your version_linux.run
- Configure environment variables
sudo vim ~/.bashrc
Copy the following command into
export PATH=/usr/local/cuda-10.2/bin${PATH:+:$PATH}}export LD_LIBRARY_PATH=/usr/local/cuda-10.2/lib64${LD_LIBRARY_PATH:+:${LD_LIBRARY_PATH}}
Check if the installation is successful
nvcc -V
3.3.3 Install cudnn
https://developer.nvidia.com/cudnn select the version corresponding to cuda

Then copy the include and lib64 folders after decompression of cudnn to cuda
sudo cp cuda/include/cudnn.h    /usr/local/cuda-10.2/include    #The decompressed folder name is cuda-10.2
sudo cp cuda/lib64/libcudnn*/usr/local/cuda-10.2/lib64
sudo chmod a+r /usr/local/cuda-10.2/include/cudnn.h   /usr/local/cuda-10.2/lib64/libcudnn*
3.3.4 Install pytorch-gpu
conda installation:
# Choose your own version of cuda
conda install pytorch torchvision cudatoolkit=10.2
pip installation:
pip install torch torchvision -i https://pypi.mirrors.ustc.edu.cn/simple
Four, write at the end
This is the end of all the deep learning environment installation guides, hoping to solve the environment configuration difficulties you face.
Recommended Posts