[FastDFS] Friends said that building a FastDFS environment on CentOS 8 server always reports errors?
The author personally developed a simple, stable and scalable delay [message queue] (https://cloud.tencent.com/product/cmq?from=10680) framework in high concurrency scenarios, with precise timing tasks and delay queue processing functions. Since open source for more than half a year, it has successfully provided more than a dozen small and medium-sized enterprises with precise timing scheduling solutions, and has withstood the test of the production environment. In order to benefit more children's shoes, the open source framework address is now given:
https://github.com/sunshinelyz/mykit-delay
PS: Welcome to Star source code, you can also pr your awesome code.
Write in front
In the topic [Distributed Storage] of [Glacier Technology] WeChat Official Account, we have built a single-node FastDFS environment and a high-availability FastDFS cluster environment. However, the previous environment was built based on CentOS 6.8 server. Many friends reported that they would fail when they set up a FastDFS environment on a CentOS 8 server according to the article I wrote! Seeing these problems from my friends, I will share with you how to build a FastDFS environment on a CentOS 8 server today.
What is FastDFS?
Here, I will extract the description of FastDFS on Baidu Encyclopedia.
FastDFS is an open source and lightweight distributed file system. It manages files. Its functions include: [File Storage] (https://cloud.tencent.com/product/cfs?from=10680), file synchronization, file access (file upload, file download), etc., which solves the problem of mass storage and [Load Balancing] (https://cloud.tencent.com/product/clb?from=10680) problem. Especially suitable for online services that use files as the carrier, such as photo album websites, video websites, and so on.
FastDFS is tailor-made for the Internet, taking full consideration of mechanisms such as redundant backup, load balancing, and linear expansion, and paying attention to indicators such as high availability and high performance. It is easy to build a high-performance file server cluster with FastDFS to provide file upload and download And other services.
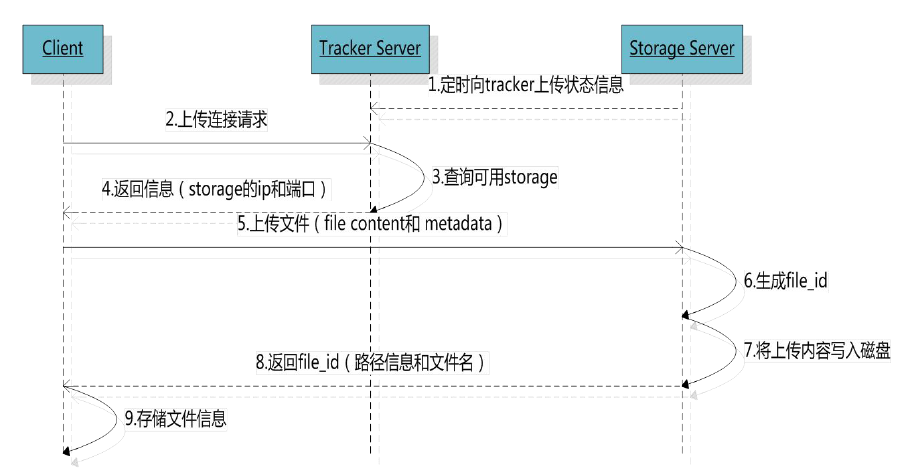
File upload and download process
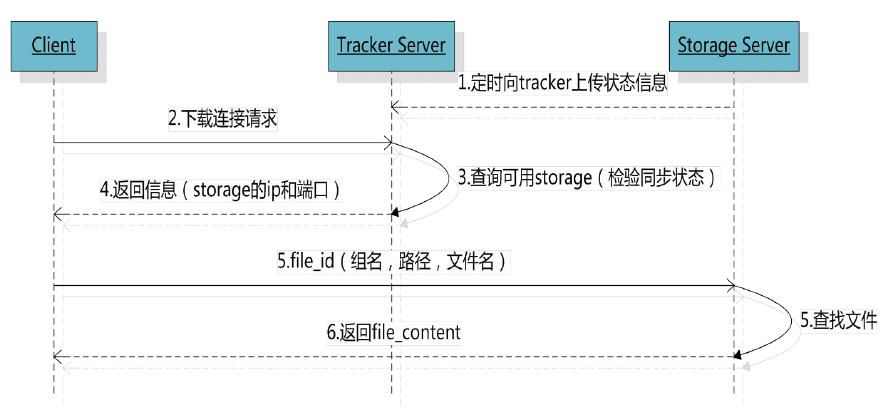
Here, we use two pictures to illustrate the process of uploading and downloading FastDFS files. In this way, friends can also see the execution process of FastDFS at a glance.
File Upload
Download Document
After understanding these basic knowledge of FastDFS. Next, let's take a look at how to build a FastDFS environment on a CentOS 8 server.
Server version
Before we officially start to build the FastDFS environment, we first determine the version of the server. The kernel version of the CentOS server I use here is release 8.1.1911, as shown below.
[ root@binghe lib]# cat /etc/redhat-release
CentOS Linux release 8.1.1911(Core)
Download FastDFS
Here, the FastDFS version we use is 6.0.6, and the official address is: https://github.com/happyfish100
In FastDFS 6.0.6, there are three sub-modules as shown below.
fastdfs v6.06
libfastcommon v1.0.43
fastdfs-nginx-module   v 1.22
We can execute the following commands on the command line of the CentOS 8 server to download these modules.
[ root@binghe source]# wget https://github.com/happyfish100/fastdfs/archive/V6.06.tar.gz
[ root@binghe source]# wget https://github.com/happyfish100/fastdfs-nginx-module/archive/V1.22.tar.gz
[ root@binghe source]# wget https://github.com/happyfish100/libfastcommon/archive/V1.0.43.tar.gz
Download Nginx
The official website of Nginx is: http://nginx.org/
We can download Nginx by entering the following command on the CentOS 8 server command line.
[ root@binghe source]# wget http://nginx.org/download/nginx-1.17.8.tar.gz
Install FastDFS dependencies
[ root@binghe dest]# yum install gcc gcc-c++[root@binghe dest]# yum install libtool zlib zlib-devel openssl openssl-devel
[ root@binghe dest]# yum -y install pcre pcre-devel libevent libevent-devel perl unzip net-tools wget
Install libfastcommon
Unzip the compressed package of libfastcommon
[ root@binghe source]# tar -zxvf V1.0.43.tar.gz
Compile and install
[ root@binghe source]# cd libfastcommon-1.0.43/[root@binghe libfastcommon-1.0.43]# ./make.sh &&./make.sh install
Test installation result
[ root@binghe libfastcommon-1.0.43]# ls /usr/lib64|grep libfastcommon
libfastcommon.so
[ root@binghe libfastcommon-1.0.43]# ls /usr/lib|grep libfastcommon
libfastcommon.so
Compile and install fastdfs
Unzip FastDFS
[ root@binghe source]# tar -zxvf V6.06.tar.gz
Install FastDFS
[ root@binghe source]# cd fastdfs-6.06/[root@binghe fastdfs-6.06]# ./make.sh &&./make.sh install
Check the installation status of FastDFS
[ root@binghe fastdfs-6.06]# ls /usr/bin|grep fdfs
fdfs_appender_test
fdfs_appender_test1
fdfs_append_file
fdfs_crc32
fdfs_delete_file
fdfs_download_file
fdfs_file_info
fdfs_monitor
fdfs_regenerate_filename
fdfs_storaged
fdfs_test
fdfs_test1
fdfs_trackerd
fdfs_upload_appender
fdfs_upload_file
Modify FastDFS configuration file
[ root@binghe fastdfs-6.06]# cd /etc/fdfs/[root@binghe fdfs]# cp storage.conf.sample storage.conf
[ root@binghe fdfs]# cp client.conf.sample client.conf
[ root@binghe fdfs]# cp tracker.conf.sample tracker.conf
Start FastDFS
Start tracker service
(1) Create the required directory for tracker service
[ root@binghe fdfs]# mkdir /data/fastdfs
[ root@binghe fdfs]# mkdir /data/fastdfs/tracker
[ root@binghe fdfs]# chmod 777/data/fastdfs/tracker
(2) Configure tracker service
Modify the tracker.conf file.
[ root@binghe fdfs]# vi /etc/fdfs/tracker.conf
Just modify the value of base_path to the directory we created above.
base_path =/data/fastdfs/tracker
(3) Start tracker service
[ root@binghe fdfs]# /etc/init.d/fdfs_trackerd start
(4) Check whether the tracker service is started successfully
[ root@binghe fdfs]# ps auxfww | grep fdfs
root      150670.00.012320964 pts/0    S+01:140:00||           \_ grep --color=auto fdfs
root      150260.00.1901605940?        Sl   01:130:00/usr/bin/fdfs_trackerd /etc/fdfs/tracker.conf
You can see fdfs_trackerd, indicating that the tracker service started successfully
(5) Check whether the tracker service is bound to port 22122
[ root@binghe dest]# netstat -anp | grep 22122
tcp        000.0.0.0:221220.0.0.0:*               LISTEN      15026/fdfs_trackerd
Note: Port 22122 is defined in /etc/fdfs/tracker.conf. As follows:
# the tracker server port
port =22122
Start storage service
(1) Create the directory required for the storage service
[ root@binghe fdfs]# mkdir /data/fastdfs/storage
[ root@binghe fdfs]# chmod 777/data/fastdfs/storage/
(2) Configure storage service
Edit the storage configuration file:
[ root@binghe fdfs]# vi /etc/fdfs/storage.conf
Each configuration item includes:
Configure base_path as the storage directory created above, where store_path is the directory where the storage is located. You can set more than one. Note that it starts from 0.
base_path =/data/fastdfs/storage
store_path0 =/data/fastdfs/storage
Configure the ip and port of tracker_server.
tracker_server =192.168.175.100:22122
Specify the port of the http service
http.server_port =80
(3) Start storage service
[ root@binghe fdfs]# /etc/init.d/fdfs_storaged start
Starting fdfs_storaged(via systemctl):                   [determine]
(4) Check whether the storage service is started successfully?
[ root@binghe fdfs]# ps auxfww | grep fdfs
root      156300.00.012320972 pts/0    S+15:460:00||           \_ grep --color=auto fdfs
root      150260.00.11556966964?        Sl   15:130:00/usr/bin/fdfs_trackerd /etc/fdfs/tracker.conf
root      155732.71.715073666292?        Sl   15:450:02/usr/bin/fdfs_storaged /etc/fdfs/storage.conf
Note: see fdfs_storaged, indicating that the storage service started successfully
(5) Check whether the storage service is bound to port: 23000?
[ root@binghe fdfs]# netstat -anp | grep 23000
tcp        000.0.0.0:230000.0.0.0:*               LISTEN      15573/fdfs_storaged
Note: The 23000 port is defined in the configuration file /etc/fdfs/storage.conf, as shown below.
# the storage server port
port =23000
Configure client files
**(1) Configure the client.conf to be used by the client **
[ root@binghe fdfs]# vi /etc/fdfs/client.conf
The tracker directory and server address port used in the following two configurations
base_path =/data/fastdfs/tracker
tracker_server =192.168.175.100:22122
(2) It can be seen from the configuration of the client: the client only needs to know the information of tracker_server, and the role of the tracker server is also load balancing and scheduling
(3) The role of the Storage server is file storage, and the files uploaded by the client are ultimately stored on the Storage server.
Install nginx and fastdfs-nginx-module
**Unzip nginx: **
[ root@binghe source]# tar -zxvf nginx-1.17.8.tar.gz
Unzip fastdfs-nginx-module
[ root@binghe source]# tar -zxvf V1.22.tar.gz
Modify the config file
Modify the config file and replace /usr/local with /usr
[ root@binghe source]# cd fastdfs-nginx-module-1.22/[root@binghe fastdfs-nginx-module-1.22]# cd src
[ root@binghe src]# vi config
Configure Nginx
Nginx configuration, add fastdfs-nginx-module and http_stub_status_module modules
[ root@binghe fdfs]# cd /usr/local/source/nginx-1.17.8/[root@binghe nginx-1.17.8]# ./configure --prefix=/usr/local/soft/nginx --with-http_stub_status_module --add-module=/usr/local/source/fastdfs-nginx-module-1.22/src/
Compile and install Nginx
[ root@binghe nginx-1.17.8]# make && make install
**Check whether the installation is successful? **
[ root@binghe nginx-1.17.8]# ls /usr/local/soft/| grep nginx
nginx
Verify Nginx configuration
[ root@binghe fdfs]# /usr/local/soft/nginx/sbin/nginx -V
nginx version: nginx/1.17.8
built by gcc 8.3.120190507(Red Hat 8.3.1-4)(GCC)
configure arguments:--prefix=/usr/local/soft/nginx --with-http_stub_status_module --add-module=/usr/local/source/fastdfs-nginx-module-1.22/src/
Configure fastdfs-nginx-module
Copy configuration file
[ root@binghe nginx-1.17.8]# cp /usr/local/source/fastdfs-nginx-module-1.22/src/mod_fastdfs.conf /etc/fdfs/
Edit configuration file
[ root@binghe nginx-1.17.8]# vi /etc/fdfs/mod_fastdfs.conf
Configure the following items
connect_timeout=10
tracker_server=192.168.175.100:22122
url_have_group_name =true
store_path0=/data/fastdfs/storage
Copy web configuration file
Copy the other two configuration files used for web access to the fdfs configuration directory:
[ root@binghe nginx-1.17.8]# cd /usr/local/source/fastdfs-6.06/conf/[root@binghe conf]# cp http.conf /etc/fdfs/[root@binghe conf]# cp mime.types /etc/fdfs/
Configure nginx
Edit the configuration file of nginx:
[ root@binghe conf]# vi /usr/local/soft/nginx/conf/nginx.conf
Under the server configuration of server listen 80,
Add a location
location ~/group([0-9]){
 root  /data/fastdfs/storage/data;
 ngx_fastdfs_module;}
Start nginx
Start Nginx
[ root@binghe storage]# /usr/local/soft/nginx/sbin/nginx
Check if nginx has been successfully started
[ root@binghe storage]# ps auxfww | grep nginx
root      245900.00.012320980 pts/0    S+16:440:00||           \_ grep --color=auto nginx
root      245680.00.041044428?        Ss   16:440:00  \_ nginx: master process /usr/local/soft/nginx/sbin/nginx
nobody    245690.00.1745164940?        S    16:440:00      \_ nginx: worker process
Test picture upload
(1) Upload pictures from the command line
[ root@binghe storage]# /usr/bin/fdfs_upload_file /etc/fdfs/client.conf /home/binghe/image/test.jpg
group1/M00/00/00/Ch8FQl9txnyAfrePAADhyYH1AP4653.jpg
Pay attention to the address returned by fdfs, we need to use this address for access
(2) Open the browser: visit this address
http://192.168.175.100/group1/M00/00/00/Ch8FQl9txnyAfrePAADhyYH1AP4653.jpg
Can see the picture
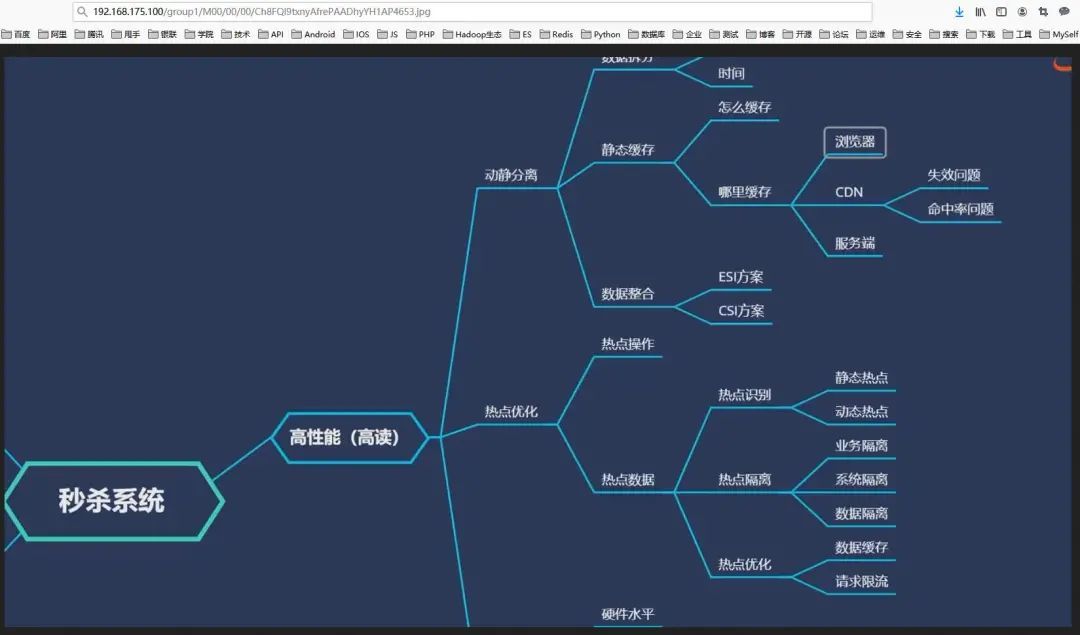
Among them, 192.168.175.100 is the ip of the spliced local server
We can view the real storage path of the picture on the server through the command line.
[ root@binghe data]# pwd
/data/fastdfs/storage/data
[ root@binghe data]# ls 00/00
Ch8FQl9txnyAfrePAADhyYH1AP4653.jpg
It can be seen that the two directories /group1/M00 are managed and generated by fdfs, and they represent the group name and disk generated by fdfs.
FastDFS other commands
View the version of fdfs
[ root@binghe data]# fdfs_monitor /etc/fdfs/client.conf | grep version
[2020- 09- 2401:58:01] DEBUG - base_path=/data/fastdfs/tracker, connect_timeout=5, network_timeout=60, tracker_server_count=1, anti_steal_token=0, anti_steal_secret_key length=0, use_connection_pool=0, g_connection_pool_max_idle_time=3600s, use_storage_id=0, storage server id count:0

version =6.06
View the running status of fdfs
[ root@binghe data]# fdfs_monitor /etc/fdfs/client.conf