Detailed explanation of building Hadoop environment on CentOS 6.5
This article records the detailed process of building Hadoop on the development server CentOS 6.5 in detail.
SSH connection password-free configuration
As the configuration process requires frequent ssh connections to the development server to execute commands and copy files to the server through the scp command, operations that rely on ssh connections. Therefore, configuring the SSH password-free connection between the local environment and the server can effectively improve work efficiency.
Since my machine has already generated the public key, I only need to copy the existing public key to the server. It is recommended to use the ssh-copy-id command, which is simple and error-free. Manual copy and then append the end of the public key file, it is easy to be unable to correctly identify the public key due to operational problems.
Note: If you have not generated a public key, you can generate a public key through the ssh-keygen command. Just follow the default configuration.
On my mac, the ssh-copy-id command is not installed yet. You can install it through the brew command.
brew install ssh-copy-id
Then copy the public key to the specified host
ssh-copy-id [email protected]
Among them, [email protected] is changed to the username@IP of the server you need to access. Enter the password once as prompted. After success, all ssh-based commands you only need to use the username @IP to directly access the server.
New user, user group creation
In order to better control permissions and develop good Linux usage habits, we first create a user (group) dps-hadoop to manage and use the hadoop cluster. This is also the environment configuration required for Hadoop cluster management.
groupadd dps-hadoop
useradd -d /home/dps-hadoop -g dps-hadoop dps-hadoop
Taking into account the inevitable need to use sudo to escalate privileges, configure the user to the sudo list and modify the /etc/sudoers file.
vim /etc/sudoers
Add a new record:
dps-hadoop ALL=(ALL) ALL
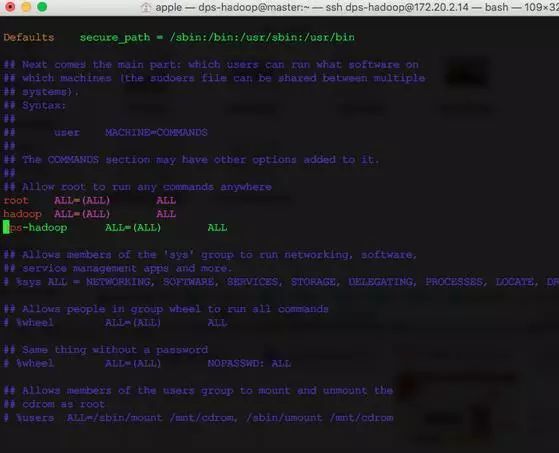
Since then, we all use dps-hadoop users to operate.
Configure local DNS server
Earlier I introduced how to build a local DNS server with Docker, which finally comes in handy. If you don't have a local DNS server, you can also modify the /etc/hosts file. For CentOS, the temporarily effective configuration file is
/etc/resolv.conf
You can see that the beginning of the file prompts you that the file is automatically generated. Restart the network service will cover, permanent configuration modification
/etc/sysconfig/network-scripts/ifcfg-eth0
Modify the
DNS1=172.20.2.24
Among them, ifcfg-eth0, just change to your own network card name.
Install JDK
Hadoop is developed in Java and naturally needs to rely on jre to run. I have adopted the method of comparing the books, and now the Oracle official website downloads jdk-8u77 to the local, and then copies it to the server through the scp command. Enter the folder where jdk is located and execute
scp jdk-8u77-linux-x64.rpm [email protected]:~/download
In fact, it can be downloaded through wget, but the commands given on the Internet
wget --no-cookie --no-check-certificate --header "Cookie: gpw_e24=http%3A%2F%2Fwww.oracle.com%2F" http://download.oracle.com/otn-pub/java/jdk/7u10-b18/jdk-7u10-linux-i586.rpm
I tried many times without success. I have a stupid way, which is to get the download through the browser to get the real download address

Then download via wget:
wget http://download.oracle.com/otn-pub/java/jdk/8u77-b03/jdk-8u77-linux-x64.rpm?AuthParam=1460511903_6b2f8345927b3fc4f961fbcaba6a01b3
After downloading, you may need to rename it once to remove the redundant ?AuthParam suffix.
mv jdk-8u77-linux-x64.rpm?AuthParam=1460511903_6b2f8345927b3fc4f961fbcaba6a01b3 jdk-8u77-linux-x64.rpm
Finally, install jdk
rpm -i jdk-8u77-linux-x64.rpm
Configure JAVA_HOME
Modify the dps-hadoop user's own environment variable configuration file.
vim ~/.bashrc
Note: There are many ways to configure environment variables mentioned on the Internet. The rude one is to directly configure them in global configuration files such as /etc/environment or /etc/profile, which will take effect for all users. This practice is not recommended. For user-level variables, there are also two ~/.bash_profile and ~/.bashrc, please study the difference yourself. If you want to start and stop the Hadoop cluster remotely by executing scripts such as start-dfs.sh, then please configure it in ~/.bashrc, otherwise Hadoop will not find the environment variables you configured.
For example: Error: JAVA_HOME is not set and could not be found.
Add to
export JAVA_HOME="/usr/java/jdk1.8.0_77"
It is not recommended to configure it under /etc/environment because it will take effect for all users.
Install Hadoop 2.6.4
According to the official website, the Hadoop project actually contains the following modules:
Hadoop Common: The common utilities that support the other Hadoop modules.
Hadoop Distributed File System (HDFS™): A distributed file system that provides high-throughput access to application data.
Hadoop YARN: A framework for job scheduling and cluster resource management.
Hadoop MapReduce: A YARN-based system for parallel processing of large data sets.
First, download directly from the mirror station through wget.
wget http://mirrors.cnnic.cn/apache/hadoop/common/hadoop-2.6.4/hadoop-2.6.4.tar.gz
Unzip to user directory
tar -xvzf hadoop-2.6.4.tar.gz -C ~/
Configure HADOOP_HOME and also modify the ~/.bashrc file. increase
export HADOOP_HOME="/home/dps-hadoop/hadoop-2.6.4"
Repeat all the above configuration operations on other nodes.
Add user
Configure dps-hadoop users, from the master to each slave node ssh password-free access.
Modify DNS server address
Install JDK
Download and unzip Hadoop
Configure Hadoop environment variables
Configure the cluster
From a module perspective, configuring a hadoop cluster should include the three parts of HDFS, YARN, and MapReduce.
HDFS configuration
Regardless of tuning, it is only understood from the function that the function can run. HDFS configuration needs to configure the ip and port number of the namenode and datanode respectively. Number of data backup copies. Data storage address. So the configuration is as follows:
namenode
core-site.xml
< configuration>
< property>
< name>hadoop.tmp.dir
< value>/home/dps-hadoop/tmpdata
< /property>
< property>
< name>fs.default.name
< value>hdfs://master:54000/
< /property>
hdfs-site.xml
< configuration>
< property>
< name>dfs.namenode.name.dir
< value>/home/dps-hadoop//namedata
< /property>
< property>
< name>dfs.replication
< value>2
< /property>
Datanode
core-site.xml
< configuration>
< property>
< name>hadoop.tmp.dir
< value>/home/dps-hadoop/tmpdata
< /property>
< property>
< name>fs.default.name
< value>hdfs://master:54000/
< /property>
hdfs-site.xml
< configuration>
< property>
< name>dfs.datanode.data.dir
< value>/home/dps-hadoop/datadir
< /property>
There is only the configuration of hadoop.tmp.dir in core-site.xml that we have not mentioned before. This configuration is to modify the storage path of temporary files to avoid the loss of temporary files due to system restart, which may cause the cluster to be impossible to use.
2016- 04- 28 Note:
< property>
< name>fs.default.name
< value>hdfs://master:54000/
< /property>
This configuration must be configured in the core-site.xml configuration file, the previous configuration is wrong. Otherwise, each hdfs node is not in a cluster.
Start the HDFS cluster
Just like using a hard disk, HDFS also needs to be formatted before use
bin/hdfs namenode -format
Then start
sbin/start-dfs.sh
Through the console, you can view the HDFS cluster status
http://172.20.2.14:50070/
An episode
A WARN log was found during startup.
16 /04/19 13:59:18 WARN util.NativeCodeLoader: Unable to load native-hadoop library for your platform… using builtin-java classes where applicable
Unable to load local library. Judging from the answers on stackoverflow, there are three main possibilities.
The java.library.path environment variable is not specified.
The local library is not compatible with the system. (64-bit system, 32-bit native library is provided)
GLIBC version is not compatible
View through the file command
file lib/native/*
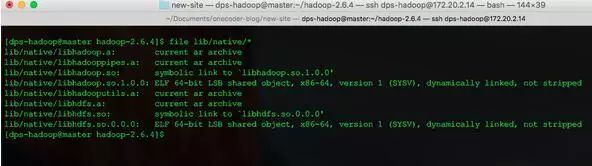
It is already a 64-bit native library.
Modify log4j.properties to open the debug level loaded locally
log4j.logger.org.apache.hadoop.util.NativeCodeLoader=DEBUG
Start again and find the problem
16 /04/19 14:27:00 DEBUG util.NativeCodeLoader: Failed to load native-hadoop with error: java.lang.UnsatisfiedLinkError: /home/dps-hadoop/hadoop-2.6.4/lib/native/libhadoop.so.1.0.0: /lib64/libc.so.6: version `GLIBC_2.14’ not found (required by /home/dps-hadoop/hadoop-2.6.4/lib/native/libhadoop.so.1.0.0)
by
ldd --version
I found that the version of my local environment is 2.12. This is difficult to solve without upgrading the system version. Change log to ERROR, so I don’t see it or worry about it for now.
YARN configuration
In YARN, the master node is called ResourceManager, and the slave node is called NodeManager. According to understanding, it is necessary to inform the communication address of NodeManager and ResouceManager. For ResourceManager, all slave nodes have been configured in slaves. Therefore, the configuration is as follows:
NodeManager
yarn-site.xml
< configuration>
< property>
< name>yarn.resourcemanager.hostname
< value>master
< /property>
Start yarn, the master node executes
. sbin/start-yarn.sh
MapReduce JobHistoryServer
For MapReduce, no special configuration is required by default. Hadoop provides a service JobHistoryServer that manages the execution history of tasks. Just start it on demand.
mr-jobhistory-daemon.sh stop historyserver
At this point, a basic Hadoop cluster has been started.
WebUI address of the cluster management environment
By default, Hadoop provides a web service for viewing the cluster status, which is started on the master node. The default ports are as follows.
HDFS cluster management, the default port is 50070. http://master:50070/
ResourceManager management, default port 8088 http://master:8088/
JobHistory default port 19888 http://master:19888