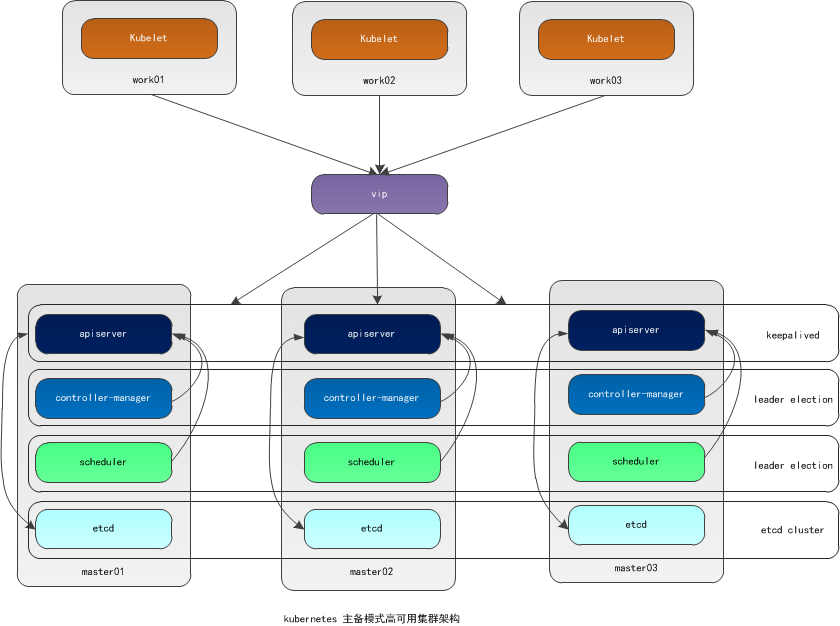
CentOS7.7はk8をデプロイします(3マスター+3ノード+1クライアント)
VMwareは、7つのvms、仕様2cpu 2G mem 200Gディスク、およびNATネットワークカードを作成します
環境の説明:
ホスト名オペレーティングシステムバージョンip備考
master01 Centos 7.7.1908192.168.174.159マスターホスト
master02 Centos 7.7.1908192.168.174.160マスターホスト
master03 Centos 7.7.1908192.168.174.161マスターホスト
(VIP 192.168.174.200は3つのマスターノードにフロートします)
work01 Centos 7.7.1908192.168.174.162ワーカーノード
work02 Centos 7.7.1908192.168.174.163ワーカーノード
work03 Centos 7.7.1908192.168.174.164ワーカーノード
クライアントCentos7.7.1908192.168.174.165クライアントノード
予備準備(すべてのノード)#
ホスト名を変更します(osのインストール時に変更されている場合はスキップします)
# hostnamectl set-hostname <hostname>
ホストファイルを変更する
# cat << EOF >>/etc/hosts
192.168.174.159 master01
192.168.174.160 master02
192.168.174.161 master03
192.168.174.162 work01
192.168.174.163 work02
192.168.174.164 work03
192.168.174.165 client
192.168.174.200 master
EOF
一般的な基本パッケージvim、wget、yum-utils、device-mapper-persistent-data、lvm2、bash-completionをインストールします
# yum install -y vim wget yum-utils device-mapper-persistent-data lvm2 bash-completion
# source /etc/profile.d/bash_completion.sh
**ファイアウォール、selinux、swap **をオフにします##
# systemctl stop firewalld
# systemctl disable firewalld
# setenforce 0
SELINUX=施行がSELINUXに変更されました=disabled
# sed -i 's/SELINUX=.*/SELINUX=disabled/g'/etc/selinux/config
# swapoff -a
# sed -i.bak '/swap/s/^/#/'/etc/fstab
パスワードなしのログイン
最初のノードの実行
# ssh-keygen -t rsa
Enterキーを押して終了します
秘密鍵は他のノードと同期されます
ssh-copy-id -i /root/.ssh/id_rsa.pub root@<その他のノード>
パスワードなしのログインテスト
最初のノードの実行
# ssh <他のノードのIP>
# ssh <他のノードのホスト名>
docker(すべてのノード)をインストールします#
ドッカーソースを設定
# yum-config-manager --add-repo https://download.docker.com/linux/centos/docker-ce.repo
DockerCEをインストールする
# yum list docker-ce --showduplicates | sort -r
# yum install -y docker-ce-18.09.6 docker-ce-cli-18.09.6 containerd.io
**docker ** ##を開始します
# systemctl start docker
# systemctl enable docker
国内ミラーアクセラレーションを構成する
ログインアドレスはhttps://cr.console.aliyun.comです。まだ登録していない場合は、最初にAlibabaCloudアカウントを登録できます。
左下の「ミラーセンター」の「ミラーアクセラレータ」をクリックします
# mkdir -p /etc/docker
# sudo tee /etc/docker/daemon.json <<-'EOF'{"registry-mirrors":["https://w6pljua0.mirror.aliyuncs.com"]}
EOF
# systemctl daemon-reload
# systemctl restart docker
Dockerのインストールを確認する
# docker --version
# docker run hello-world
keepalivedインストール#
master01, master02,master03は個別に実行します
# yum -y install keepalived
master01で実行
# cat /etc/keepalived/keepalived.conf
! Configuration File for keepalived
global_defs {
 router_id master01
}
vrrp_instance VI_1 {
 state MASTER
 interfaceens33
 virtual_router_id 50
 priority 100
 advert_int 1
 authentication {
  auth_type PASS
  auth_pass 1111}
 virtual_ipaddress {192.168.174.200}}
# cat /etc/keepalived/keepalived.conf
! Configuration File for keepalived
global_defs {
 router_id master02
}
vrrp_instance VI_1 {
 state BACKUP
 interfaceens33
 virtual_router_id 50
 priority 90
 advert_int 1
 authentication {
  auth_type PASS
  auth_pass 1111}
 virtual_ipaddress {192.168.174.200}}
# cat /etc/keepalived/keepalived.conf
! Configuration File for keepalived
global_defs {
 router_id master03
}
vrrp_instance VI_1 {
 state BACKUP
 interfaceens33
 virtual_router_id 50
 priority 80
 advert_int 1
 authentication {
  auth_type PASS
  auth_pass 1111}
 virtual_ipaddress {192.168.174.200}
# service keepalived start
# systemctl enable keepalived
vipビュー
# ip a
k8sインストール前の準備(すべてのノード)#
カーネルパラメータの変更
# cat <<EOF >/etc/sysctl.d/k8s.conf
net.bridge.bridge-nf-call-ip6tables =1
net.bridge.bridge-nf-call-iptables =1
EOF
# sysctl -p /etc/sysctl.d/k8s.conf
Cgroupドライバーの変更
# vim /etc/docker/daemon.json
追加'"exec-opts":["native.cgroupdriver=systemd"’
# cat /etc/docker/daemon.json
{" registry-mirrors":["https://v16stybc.mirror.aliyuncs.com"],"exec-opts":["native.cgroupdriver=systemd"]}
ドッカーをリロード
# systemctl daemon-reload
# systemctl restart docker
cgroupdriverは、警告を排除するように変更されています。
[ WARNING IsDockerSystemdCheck]: detected "cgroupfs"as the Docker cgroup driver. The recommended driver is "systemd". Please follow the guide at https://kubernetes.io/docs/setup/cri/
kubernetesソースを設定する
# cat <<EOF >/etc/yum.repos.d/kubernetes.repo
[ kubernetes]
name=Kubernetes
baseurl=https://mirrors.aliyun.com/kubernetes/yum/repos/kubernetes-el7-x86_64/
enabled=1
gpgcheck=1
repo_gpgcheck=1
gpgkey=https://mirrors.aliyun.com/kubernetes/yum/doc/yum-key.gpg https://mirrors.aliyun.com/kubernetes/yum/doc/rpm-package-key.gpg
EOF
# yum clean all
# yum -y makecache
k8s(マスターノード、ワークノード)をインストールします#
# yum list kubelet --showduplicates | sort -r
# yum install -y kubelet-1.16.4 kubeadm-1.16.4 kubectl-1.16.4
kubeletを起動し、起動するように設定します
# systemctl enable kubelet && systemctl start kubelet
kubeletコマンドの完了
# echo "source <(kubectl completion bash)">>~/.bash_profile
# source .bash_profile
スクリプトを編集してミラーをダウンロードします
# cat image.sh
#! /bin/bash
url=registry.cn-hangzhou.aliyuncs.com/loong576
version=v1.16.4
images=(`kubeadm config images list --kubernetes-version=$version|awk -F '/' '{print $2}'`)for imagename in ${images[@]};do
 docker pull $url/$imagename
 docker tag $url/$imagename k8s.gcr.io/$imagename
 docker rmi -f $url/$imagename
done
# chmod u+x image.sh
# . /image.sh
# docker images
REPOSITORY                           TAG                 IMAGE ID            CREATED             SIZE
k8s.gcr.io/kube-proxy                v1.14.2             5c24210246bb        10 months ago       82.1MB
k8s.gcr.io/kube-apiserver            v1.14.2             5eeff402b659        10 months ago       210MB
k8s.gcr.io/kube-controller-manager   v1.14.2             8be94bdae139        10 months ago       158MB
k8s.gcr.io/kube-scheduler            v1.14.2             ee18f350636d        10 months ago       81.6MB
k8s.gcr.io/coredns                   1.3.1               eb516548c180        15 months ago       40.3MB
k8s.gcr.io/etcd                      3.3.10              2c4adeb21b4f        16 months ago       258MB
k8s.gcr.io/pause                     3.1                 da86e6ba6ca1        2 years ago         742kB
マスターを初期化します(master01ノードでのみ実行されます)#
# cat kubeadm-config.yaml
apiVersion: kubeadm.k8s.io/v1beta2
kind: ClusterConfiguration
kubernetesVersion: v1.16.4
apiServer:
 certSANs:    #すべての久部を記入してください-apiserverノードのホスト名、IP、VIP
 - master01
 - master02
 - master03
 - work01
 - work02
 - work03
  -192.168.174.159-192.168.174.160-192.168.174.161-192.168.174.162-192.168.174.163-192.168.174.164-192.168.174.200
controlPlaneEndpoint:"192.168.174.200:6443"
networking:
 podSubnet:"10.244.0.0/16"
# kubeadm init --config=kubeadm-config.yaml
[ init] Using Kubernetes version: v1.16.4[preflight] Running pre-flight checks
[ preflight] Pulling images required for setting up a Kubernetes cluster
[ preflight] This might take a minute or two, depending on the speed of your internet connection
[ preflight] You can also perform this action in beforehand using 'kubeadm config images pull'[kubelet-start] Writing kubelet environment file with flags to file "/var/lib/kubelet/kubeadm-flags.env"[kubelet-start] Writing kubelet configuration to file "/var/lib/kubelet/config.yaml"[kubelet-start] Activating the kubelet service
[ certs] Using certificateDir folder "/etc/kubernetes/pki"[certs] Generating "ca" certificate and key
[ certs] Generating "apiserver" certificate and key
[ certs] apiserver serving cert is signed for DNS names [master01 kubernetes kubernetes.default kubernetes.default.svc kubernetes.default.svc.cluster.local master01 master02 master03 work01 work02 work03] and IPs [10.96.0.1192.168.174.159192.168.174.200192.168.174.159192.168.174.160192.168.174.161192.168.174.162192.168.174.163192.168.174.164192.168.174.200][certs] Generating "apiserver-kubelet-client" certificate and key
[ certs] Generating "front-proxy-ca" certificate and key
[ certs] Generating "front-proxy-client" certificate and key
[ certs] Generating "etcd/ca" certificate and key
[ certs] Generating "etcd/server" certificate and key
[ certs] etcd/server serving cert is signed for DNS names [master01 localhost] and IPs [192.168.174.159127.0.0.1::1][certs] Generating "etcd/peer" certificate and key
[ certs] etcd/peer serving cert is signed for DNS names [master01 localhost] and IPs [192.168.174.159127.0.0.1::1][certs] Generating "etcd/healthcheck-client" certificate and key
[ certs] Generating "apiserver-etcd-client" certificate and key
[ certs] Generating "sa" key and public key
[ kubeconfig] Using kubeconfig folder "/etc/kubernetes"[kubeconfig] Writing "admin.conf" kubeconfig file
[ kubeconfig] Writing "kubelet.conf" kubeconfig file
[ kubeconfig] Writing "controller-manager.conf" kubeconfig file
[ kubeconfig] Writing "scheduler.conf" kubeconfig file
[ control-plane] Using manifest folder "/etc/kubernetes/manifests"[control-plane] Creating static Pod manifest for"kube-apiserver"[control-plane] Creating static Pod manifest for"kube-controller-manager"[control-plane] Creating static Pod manifest for"kube-scheduler"[etcd] Creating static Pod manifest for local etcd in"/etc/kubernetes/manifests"[wait-control-plane] Waiting for the kubelet to boot up the control plane asstatic Pods from directory "/etc/kubernetes/manifests". This can take up to 4m0s
[ apiclient] All control plane components are healthy after 19.501964 seconds
[ upload-config] Storing the configuration used in ConfigMap "kubeadm-config"in the "kube-system" Namespace
[ kubelet] Creating a ConfigMap "kubelet-config-1.16"in namespace kube-system with the configuration for the kubelets in the cluster
[ upload-certs] Skipping phase. Please see --upload-certs
[ mark-control-plane] Marking the node master01 as control-plane by adding the label "node-role.kubernetes.io/master=''"[mark-control-plane] Marking the node master01 as control-plane by adding the taints [node-role.kubernetes.io/master:NoSchedule][bootstrap-token] Using token: l1x9vx.bbqycpviej5ya31s
[ bootstrap-token] Configuring bootstrap tokens, cluster-info ConfigMap, RBAC Roles
[ bootstrap-token] configured RBAC rules to allow Node Bootstrap tokens to post CSRs in order for nodes to get long term certificate credentials
[ bootstrap-token] configured RBAC rules to allow the csrapprover controller automatically approve CSRs from a Node Bootstrap Token
[ bootstrap-token] configured RBAC rules to allow certificate rotation for all node client certificates in the cluster
[ bootstrap-token] Creating the "cluster-info" ConfigMap in the "kube-public" namespace
[ addons] Applied essential addon: CoreDNS
[ addons] Applied essential addon: kube-proxy

Your Kubernetes control-plane has initialized successfully!

To start using your cluster, you need to run the following as a regular user:

 mkdir -p $HOME/.kube
 sudo cp -i /etc/kubernetes/admin.conf $HOME/.kube/config
 sudo chown $(id -u):$(id -g) $HOME/.kube/config

You should now deploy a pod network to the cluster.
Run "kubectl apply -f [podnetwork].yaml"with one of the options listed at:
 https://kubernetes.io/docs/concepts/cluster-administration/addons/

You can now join any number of control-plane nodes by copying certificate authorities
and service account keys on each node and then running the following as root:

 kubeadm join 192.168.174.200:6443--token l1x9vx.bbqycpviej5ya31s \
 - - discovery-token-ca-cert-hash sha256:396670c9fa96a5866aaeedc2a69b767aa0d751c6d55c6f8e8bc37e8f230ec5f0 \
 - - control-plane

Then you can join any number of worker nodes by running the following on each as root:

kubeadm join 192.168.174.200:6443--token l1x9vx.bbqycpviej5ya31s \
 - - discovery-token-ca-cert-hash sha256:396670c9fa96a5866aaeedc2a69b767aa0d751c6d55c6f8e8bc37e8f230ec5f0

初期化に失敗した場合は、kubeadmresetを実行して再初期化してください
# kubeadm reset
# rm -rf $HOME/.kube/config
環境変数をロードする
# echo "export KUBECONFIG=/etc/kubernetes/admin.conf">>~/.bash_profile
# source .bash_profile
ポッドネットワークをインストールする
# kubectl apply -f https://raw.githubusercontent.com/coreos/flannel/2140ac876ef134e0ed5af15c65e414cf26827915/Documentation/kube-flannel.yml
podsecuritypolicy.policy/psp.flannel.unprivileged created
clusterrole.rbac.authorization.k8s.io/flannel created
clusterrolebinding.rbac.authorization.k8s.io/flannel created
serviceaccount/flannel created
configmap/kube-flannel-cfg created
daemonset.apps/kube-flannel-ds-amd64 created
daemonset.apps/kube-flannel-ds-arm64 created
daemonset.apps/kube-flannel-ds-arm created
daemonset.apps/kube-flannel-ds-ppc64le created
daemonset.apps/kube-flannel-ds-s390x created
https://raw.githubusercontent.com/coreos/flannel/2140ac876ef134e0ed5af15c65e414cf26827915/Documentation/kube-flannel.yml
下のリンクをクリックしてダウンロードし、ダウンロード後に解凍することもできます
kubeをダウンロード-flannel.tar.gz
コントロールプレーンノードがクラスターに参加します#
master01でスクリプト証明書を実行します-main-master.sh、証明書をmaster02とmaster03に配布します
# cat cert-main-master.sh
USER=root # customizable
CONTROL_PLANE_IPS="192.168.174.160 192.168.174.161"for host in ${CONTROL_PLANE_IPS};do
 scp /etc/kubernetes/pki/ca.crt "${USER}"@$host:
 scp /etc/kubernetes/pki/ca.key "${USER}"@$host:
 scp /etc/kubernetes/pki/sa.key "${USER}"@$host:
 scp /etc/kubernetes/pki/sa.pub "${USER}"@$host:
 scp /etc/kubernetes/pki/front-proxy-ca.crt "${USER}"@$host:
 scp /etc/kubernetes/pki/front-proxy-ca.key "${USER}"@$host:
 scp /etc/kubernetes/pki/etcd/ca.crt "${USER}"@$host:etcd-ca.crt
 # Quote this line if you are using external etcd
 scp /etc/kubernetes/pki/etcd/ca.key "${USER}"@$host:etcd-ca.key
done
# chmod u+x cert-main-master.sh
# . /cert-main-master.sh
master02でスクリプト証明書を実行します-other-master.sh、証明書を指定されたディレクトリに移動します
[ root@master02 ~]# cat cert-other-master.sh
USER=root # customizable
mkdir -p /etc/kubernetes/pki/etcd
mv /${USER}/ca.crt /etc/kubernetes/pki/
mv /${USER}/ca.key /etc/kubernetes/pki/
mv /${USER}/sa.pub /etc/kubernetes/pki/
mv /${USER}/sa.key /etc/kubernetes/pki/
mv /${USER}/front-proxy-ca.crt /etc/kubernetes/pki/
mv /${USER}/front-proxy-ca.key /etc/kubernetes/pki/
mv /${USER}/etcd-ca.crt /etc/kubernetes/pki/etcd/ca.crt
# Quote this line if you are using external etcd
mv /${USER}/etcd-ca.key /etc/kubernetes/pki/etcd/ca.key
[ root@master02 ~]# chmod u+x cert-other-master.sh
[ root@master02 ~]# ./cert-other-master.sh
また、master03でスクリプト証明書を実行します-other-master.sh
# . /cert-other-master.sh
次のコマンドはmaster01ノードで実行されます
トークンを表示
# kubeadm token list
初期化時のトークンの有効期限が切れていることがわかりました
新しいトークンを生成する
# kubeadm token create
wob9v2.2t7fwzg3sdfvbe05
新しい暗号化された文字列を生成します
# openssl x509 -pubkey -in/etc/kubernetes/pki/ca.crt | openssl rsa -pubin -outform der 2>/dev/null|    openssl dgst -sha256
396670 c9fa96a5866aaeedc2a69b767aa0d751c6d55c6f8e8bc37e8f230ec5f0
master02がクラスターに参加します(master02で実行されます)
# kubeadm join 192.168.174.200:6443--token wob9v2.2t7fwzg3sdfvbe05 \
 - - discovery-token-ca-cert-hash sha256:396670c9fa96a5866aaeedc2a69b767aa0d751c6d55c6f8e8bc37e8f230ec5f0 \
 - - control-plane
[ preflight] Running pre-flight checks
[ preflight] Reading configuration from the cluster...[preflight] FYI: You can look at this config file with'kubectl -n kube-system get cm kubeadm-config -oyaml'[preflight] Running pre-flight checks before initializing the newcontrol plane instance
[ preflight] Pulling images required for setting up a Kubernetes cluster
[ preflight] This might take a minute or two, depending on the speed of your internet connection
[ preflight] You can also perform this action in beforehand using 'kubeadm config images pull'[certs] Using certificateDir folder "/etc/kubernetes/pki"[certs] Generating "front-proxy-client" certificate and key
[ certs] Generating "etcd/server" certificate and key
[ certs] etcd/server serving cert is signed for DNS names [master02 localhost] and IPs [192.168.174.160127.0.0.1::1][certs] Generating "etcd/peer" certificate and key
[ certs] etcd/peer serving cert is signed for DNS names [master02 localhost] and IPs [192.168.174.160127.0.0.1::1][certs] Generating "etcd/healthcheck-client" certificate and key
[ certs] Generating "apiserver-etcd-client" certificate and key
[ certs] Generating "apiserver" certificate and key
[ certs] apiserver serving cert is signed for DNS names [master02 kubernetes kubernetes.default kubernetes.default.svc kubernetes.default.svc.cluster.local master01 master02 master03 work01 work02 work03] and IPs [10.96.0.1192.168.174.160192.168.174.200192.168.174.159192.168.174.160192.168.174.161192.168.174.162192.168.174.163192.168.174.164192.168.174.200][certs] Generating "apiserver-kubelet-client" certificate and key
[ certs] Valid certificates and keys now exist in"/etc/kubernetes/pki"[certs] Using the existing "sa" key
[ kubeconfig] Generating kubeconfig files
[ kubeconfig] Using kubeconfig folder "/etc/kubernetes"[kubeconfig] Writing "admin.conf" kubeconfig file
[ kubeconfig] Writing "controller-manager.conf" kubeconfig file
[ kubeconfig] Writing "scheduler.conf" kubeconfig file
[ control-plane] Using manifest folder "/etc/kubernetes/manifests"[control-plane] Creating static Pod manifest for"kube-apiserver"[control-plane] Creating static Pod manifest for"kube-controller-manager"[control-plane] Creating static Pod manifest for"kube-scheduler"[check-etcd] Checking that the etcd cluster is healthy
[ kubelet-start] Downloading configuration for the kubelet from the "kubelet-config-1.16" ConfigMap in the kube-system namespace
[ kubelet-start] Writing kubelet configuration to file "/var/lib/kubelet/config.yaml"[kubelet-start] Writing kubelet environment file with flags to file "/var/lib/kubelet/kubeadm-flags.env"[kubelet-start] Activating the kubelet service
[ kubelet-start] Waiting for the kubelet to perform the TLS Bootstrap...[etcd] Announced newetcd member joining to the existing etcd cluster
[ etcd] Creating static Pod manifest for"etcd"[etcd] Waiting for the newetcd member to join the cluster. This can take up to 40s
{" level":"warn","ts":"2020-04-13T17:04:13.333+0800","caller":"clientv3/retry_interceptor.go:61","msg":"retrying of unary invoker failed","target":"passthrough:///https://192.168.174.160:2379","attempt":0,"error":"rpc error: code = DeadlineExceeded desc = context deadline exceeded"}[upload-config] Storing the configuration used in ConfigMap "kubeadm-config"in the "kube-system" Namespace
[ mark-control-plane] Marking the node master02 as control-plane by adding the label "node-role.kubernetes.io/master=''"[mark-control-plane] Marking the node master02 as control-plane by adding the taints [node-role.kubernetes.io/master:NoSchedule]

This node has joined the cluster and a newcontrol plane instance was created:* Certificate signing request was sent to apiserver and approval was received.* The Kubelet was informed of the newsecure connection details.* Control plane(master) label and taint were applied to the newnode.* The Kubernetes control plane instances scaled up.* A newetcd member was added to the local/stacked etcd cluster.

To start administering your cluster fromthis node, you need to run the following as a regular user:

  mkdir -p $HOME/.kube
  sudo cp -i /etc/kubernetes/admin.conf $HOME/.kube/config
  sudo chown $(id -u):$(id -g) $HOME/.kube/config

Run 'kubectl get nodes' to see this node join the cluster.

master03がクラスターに参加します(master03で実行されます)
# kubeadm join 192.168.174.200:6443--token wob9v2.2t7fwzg3sdfvbe05 \
 - - discovery-token-ca-cert-hash sha256:396670c9fa96a5866aaeedc2a69b767aa0d751c6d55c6f8e8bc37e8f230ec5f0 \
 - - control-plane
[ preflight] Running pre-flight checks
[ preflight] Reading configuration from the cluster...[preflight] FYI: You can look at this config file with'kubectl -n kube-system get cm kubeadm-config -oyaml'[preflight] Running pre-flight checks before initializing the newcontrol plane instance
[ preflight] Pulling images required for setting up a Kubernetes cluster
[ preflight] This might take a minute or two, depending on the speed of your internet connection
[ preflight] You can also perform this action in beforehand using 'kubeadm config images pull'[certs] Using certificateDir folder "/etc/kubernetes/pki"[certs] Generating "apiserver" certificate and key
[ certs] apiserver serving cert is signed for DNS names [master03 kubernetes kubernetes.default kubernetes.default.svc kubernetes.default.svc.cluster.local master01 master02 master03 work01 work02 work03] and IPs [10.96.0.1192.168.174.161192.168.174.200192.168.174.159192.168.174.160192.168.174.161192.168.174.162192.168.174.163192.168.174.164192.168.174.200][certs] Generating "apiserver-kubelet-client" certificate and key
[ certs] Generating "front-proxy-client" certificate and key
[ certs] Generating "etcd/peer" certificate and key
[ certs] etcd/peer serving cert is signed for DNS names [master03 localhost] and IPs [192.168.174.161127.0.0.1::1][certs] Generating "apiserver-etcd-client" certificate and key
[ certs] Generating "etcd/server" certificate and key
[ certs] etcd/server serving cert is signed for DNS names [master03 localhost] and IPs [192.168.174.161127.0.0.1::1][certs] Generating "etcd/healthcheck-client" certificate and key
[ certs] Valid certificates and keys now exist in"/etc/kubernetes/pki"[certs] Using the existing "sa" key
[ kubeconfig] Generating kubeconfig files
[ kubeconfig] Using kubeconfig folder "/etc/kubernetes"[kubeconfig] Writing "admin.conf" kubeconfig file
[ kubeconfig] Writing "controller-manager.conf" kubeconfig file
[ kubeconfig] Writing "scheduler.conf" kubeconfig file
[ control-plane] Using manifest folder "/etc/kubernetes/manifests"[control-plane] Creating static Pod manifest for"kube-apiserver"[control-plane] Creating static Pod manifest for"kube-controller-manager"[control-plane] Creating static Pod manifest for"kube-scheduler"[check-etcd] Checking that the etcd cluster is healthy
[ kubelet-start] Downloading configuration for the kubelet from the "kubelet-config-1.16" ConfigMap in the kube-system namespace
[ kubelet-start] Writing kubelet configuration to file "/var/lib/kubelet/config.yaml"[kubelet-start] Writing kubelet environment file with flags to file "/var/lib/kubelet/kubeadm-flags.env"[kubelet-start] Activating the kubelet service
[ kubelet-start] Waiting for the kubelet to perform the TLS Bootstrap...[etcd] Announced newetcd member joining to the existing etcd cluster
[ etcd] Creating static Pod manifest for"etcd"[etcd] Waiting for the newetcd member to join the cluster. This can take up to 40s
[ upload-config] Storing the configuration used in ConfigMap "kubeadm-config"in the "kube-system" Namespace
[ mark-control-plane] Marking the node master03 as control-plane by adding the label "node-role.kubernetes.io/master=''"[mark-control-plane] Marking the node master03 as control-plane by adding the taints [node-role.kubernetes.io/master:NoSchedule]

This node has joined the cluster and a newcontrol plane instance was created:* Certificate signing request was sent to apiserver and approval was received.* The Kubelet was informed of the newsecure connection details.* Control plane(master) label and taint were applied to the newnode.* The Kubernetes control plane instances scaled up.* A newetcd member was added to the local/stacked etcd cluster.

To start administering your cluster fromthis node, you need to run the following as a regular user:

  mkdir -p $HOME/.kube
  sudo cp -i /etc/kubernetes/admin.conf $HOME/.kube/config
  sudo chown $(id -u):$(id -g) $HOME/.kube/config

Run 'kubectl get nodes' to see this node join the cluster.

master02とmaster03でkubectlコマンドを実行するために、master02とmaster03は環境変数をロードします(次の3つのコマンドはそれぞれmaster02とmaster03で実行されます)
# scp master01:/etc/kubernetes/admin.conf /etc/kubernetes/
# echo "export KUBECONFIG=/etc/kubernetes/admin.conf">>~/.bash_profile
# source .bash_profile
クラスターノードビュー
# kubectl get nodes
NAME       STATUS   ROLES    AGE     VERSION
master01   Ready    master   29m     v1.16.4
master02   Ready    master   5m16s   v1.16.4
master03   Ready    master   4m3s    v1.16.4
# kubectl get pod -o wide -n kube-system
NAME                               READY   STATUS    RESTARTS   AGE     IP                NODE       NOMINATED NODE   READINESS GATES
coredns-5644d7b6d9-8slvg           1/1     Running   0          30m     10.244.0.2        master01   <none><none>
coredns-5644d7b6d9-pw8mz           1/1     Running   0          30m     10.244.0.3        master01   <none><none>
etcd-master01                      1/1     Running   0          29m     192.168.174.159   master01   <none><none>
etcd-master02                      1/1     Running   0          6m22s   192.168.174.160   master02   <none><none>
etcd-master03                      1/1     Running   0          5m9s    192.168.174.161   master03   <none><none>
kube-apiserver-master01            1/1     Running   0          29m     192.168.174.159   master01   <none><none>
kube-apiserver-master02            1/1     Running   0          6m22s   192.168.174.160   master02   <none><none>
kube-apiserver-master03            1/1     Running   0          5m9s    192.168.174.161   master03   <none><none>
kube-controller-manager-master01   1/1     Running   1          29m     192.168.174.159   master01   <none><none>
kube-controller-manager-master02   1/1     Running   0          6m22s   192.168.174.160   master02   <none><none>
kube-controller-manager-master03   1/1     Running   0          5m10s   192.168.174.161   master03   <none><none>
kube-flannel-ds-amd64-j48v5        1/1     Running   0          6m23s   192.168.174.160   master02   <none><none>
kube-flannel-ds-amd64-njhpb        1/1     Running   0          20m     192.168.174.159   master01   <none><none>
kube-flannel-ds-amd64-wxwdm        1/1     Running   0          5m10s   192.168.174.161   master03   <none><none>
kube-proxy-2tqqt                   1/1     Running   0          30m     192.168.174.159   master01   <none><none>
kube-proxy-l8cbn                   1/1     Running   0          5m10s   192.168.174.161   master03   <none><none>
kube-proxy-mcss8                   1/1     Running   0          6m23s   192.168.174.160   master02   <none><none>
kube-scheduler-master01            1/1     Running   1          29m     192.168.174.159   master01   <none><none>
kube-scheduler-master02            1/1     Running   0          6m23s   192.168.174.160   master02   <none><none>
kube-scheduler-master03            1/1     Running   0          5m9s    192.168.174.161   master03   <none><none>
すべてのコントロールプレーンノードは準備完了状態にあり、すべてのシステムコンポーネントは正常です。
作業ノードがクラスターに参加します#
それぞれ3つの作業ノードで実行します
# kubeadm join 192.168.174.200:6443--token wob9v2.2t7fwzg3sdfvbe05 \
- - discovery-token-ca-cert-hash sha256:396670c9fa96a5866aaeedc2a69b767aa0d751c6d55c6f8e8bc37e8f230ec5f0
[ preflight] Running pre-flight checks
[ preflight] Reading configuration from the cluster...[preflight] FYI: You can look at this config file with'kubectl -n kube-system get cm kubeadm-config -oyaml'[kubelet-start] Downloading configuration for the kubelet from the "kubelet-config-1.16" ConfigMap in the kube-system namespace
[ kubelet-start] Writing kubelet configuration to file "/var/lib/kubelet/config.yaml"[kubelet-start] Writing kubelet environment file with flags to file "/var/lib/kubelet/kubeadm-flags.env"[kubelet-start] Activating the kubelet service
[ kubelet-start] Waiting for the kubelet to perform the TLS Bootstrap...

This node has joined the cluster:* Certificate signing request was sent to apiserver and a response was received.* The Kubelet was informed of the newsecure connection details.

Run 'kubectl get nodes' on the control-plane to see this node join the cluster.

クラスターノードビュー
# kubectl get nodes
NAME       STATUS     ROLES    AGE     VERSION
master01   Ready      master   33m     v1.16.4
master02   Ready      master   9m24s   v1.16.4
master03   Ready      master   8m11s   v1.16.4
work01     Ready      <none>   54s     v1.16.4
work02     NotReady   <none>   9s      v1.16.4
work03     NotReady   <none>   4s      v1.16.4
クライアント構成#
# mkdir -p /etc/kubernetes
# scp 192.168.174.159:/etc/kubernetes/admin.conf /etc/kubernetes/
# echo "export KUBECONFIG=/etc/kubernetes/admin.conf">>~/.bash_profile
# source .bash_profile
# kubectl get nodes
# kubectl get cs
# kubectl get po -o wide -n kube-system
クラスターの高可用性テスト(クライアントノードで実行)#
[ root@master01 ~]# ip a|grep 200
 inet 192.168.174.200/32 scope global ens33
# kubectl get endpoints kube-controller-manager -n kube-system -o yaml |grep holderIdentity
 control-plane.alpha.kubernetes.io/leader:'{"holderIdentity":"master03_e1abdbd5-350c-4da0-9086-922ca883d67c","leaseDurationSeconds":15,"acquireTime":"2020-04-14T00:11:42Z","renewTime":"2020-04-14T02:09:26Z","leaderTransitions":2}'
# kubectl get endpoints kube-scheduler -n kube-system -o yaml |grep holderIdentity
 control-plane.alpha.kubernetes.io/leader:'{"holderIdentity":"master01_6a213e1a-9dba-466b-b840-f483c214fb39","leaseDurationSeconds":15,"acquireTime":"2020-04-14T00:11:29Z","renewTime":"2020-04-14T02:09:34Z","leaderTransitions":2}'
コンポーネント名が配置されているノード
apiserver master01
controller-manager master03
scheduler master01
master01を閉じる
[ root@master01 ~]# init 0[root@master02 ~]# ip a|grep 200
 inet 192.168.174.200/32 scope global ens33
# kubectl get endpoints kube-controller-manager -n kube-system -o yaml |grep holderIdentity
 control-plane.alpha.kubernetes.io/leader:'{"holderIdentity":"master02_41b9bc77-ead4-4a56-81a0-09410d38c9d2","leaseDurationSeconds":15,"acquireTime":"2020-04-14T02:14:09Z","renewTime":"2020-04-14T02:14:27Z","leaderTransitions":3}'
# kubectl get endpoints kube-scheduler -n kube-system -o yaml |grep holderIdentity
 control-plane.alpha.kubernetes.io/leader:'{"holderIdentity":"master03_70c057d9-d62b-4a5a-97b4-385b86bd716d","leaseDurationSeconds":15,"acquireTime":"2020-04-14T02:14:08Z","renewTime":"2020-04-14T02:14:36Z","leaderTransitions":3}'
コンポーネント名が配置されているノード
apiserver master02
controller-manager master02
scheduler master03
# kubectl get nodes
NAME       STATUS     ROLES    AGE   VERSION
master01   NotReady   master   17h   v1.16.4
master02   Ready      master   17h   v1.16.4
master03   Ready      master   17h   v1.16.4
work01     Ready      <none>   17h   v1.16.4
work02     Ready      <none>   17h   v1.16.4
work03     Ready      <none>   17h   v1.16.4
master01ステータスはNotReadyです
# cat nginx-master.yaml
apiVersion: apps/v1             #記述ファイルは拡張子に従います/Kubernetes API v1beta1
kind: Deployment                #デプロイメントとしてリソースタイプを作成します
metadata:                       #リソースメタデータ
 name: nginx-master            #展開名
spec:                           #展開仕様
 selector:
 matchLabels:
  app: nginx
 replicas:3                   #部数を3に指定します
 template:                     #ポッドテンプレートを定義する
 metadata:                   #ポッドメタデータを定義する
  labels:                   #ラベルを定義する
  app: nginx              #ラベルのキーと値はそれぞれappとnginxです
 spec:                       #ポッドの仕様
  containers:- name: nginx             #コンテナの名前
  image: nginx:latest     #コンテナで使用されるイメージを作成します

# kubectl apply -f nginx-master.yaml
deployment.apps/nginx-master created
# kubectl get po -o wide
NAME                            READY   STATUS    RESTARTS   AGE     IP           NODE     NOMINATED NODE   READINESS GATES
nginx-master-75b7bfdb6b-fnk5n   1/1     Running   0          2m34s   10.244.3.4   work01   <none><none>
nginx-master-75b7bfdb6b-qzqr4   1/1     Running   0          2m34s   10.244.5.3   work03   <none><none>
nginx-master-75b7bfdb6b-t75bv   1/1     Running   0          2m34s   10.244.4.4   work02   <none><none>
コントロールプレーンノードがダウンすると、VIPがドリフトし、クラスターの機能は影響を受けません。
master01をシャットダウンしながらmaster02をシャットダウンして、クラスターが引き続き外部で正常に機能できるかどうかをテストします。
[ root@master02 ~]# init 0[root@master03 ~]# ip a|grep 200
vipは唯一の制御面にドリフトします:master03
# kubectl get endpoints kube-controller-manager -n kube-system -o yaml |grep holderIdentity
# kubectl get nodes
Unable to connect to the server: dial tcp 192.168.174.200:6443: connect: no route to host
etcdクラスターがクラッシュし、k8sクラスター全体を外部から提供できなくなります。
THE
END
Recommended Posts