CentOS7.7はk8をデプロイします(1マスター+ 2ノード)
VMwareは、3つのvms、仕様2cpu 4G mem 200Gディスク、およびNATネットワークカードを作成します
環境の説明:
ホスト名オペレーティングシステムバージョンip備考
マスターセントス7.7.1908192.168.174.156マスターホスト
node01 Centos 7.7.1908192.168.174.157ノードノード
node02 Centos 7.7.1908192.168.174.158ノードノード
予備準備(すべてのノード)#
ホスト名を変更します(osのインストール時に変更されている場合はスキップします)
# hostnamectl set-hostname <hostname>
ホストファイルを変更する
# cat << EOF >>/etc/hosts
192.168.174.156 master
192.168.174.157 node01
192.168.174.158 node02
EOF
一般的な基本パッケージvim、wget、yum-utils、device-mapper-persistent-data、lvm2、bash-completionをインストールします
# yum install -y vim wget yum-utils device-mapper-persistent-data lvm2 bash-completion
# source /etc/profile.d/bash_completion.sh
**ファイアウォール、selinux、swap **をオフにします##
# systemctl stop firewalld
# systemctl disable firewalld
# setenforce 0
SELINUX=施行がSELINUXに変更されました=disabled
# sed -i 's/SELINUX=.*/SELINUX=disabled/g'/etc/selinux/config
# swapoff -a
# sed -i.bak '/swap/s/^/#/'/etc/fstab
パスワードなしのログイン
最初のノードの実行
# ssh-keygen -t rsa
Enterキーを押して終了します
秘密鍵は他のノードと同期されます
ssh-copy-id -i /root/.ssh/id_rsa.pub root@<その他のノード>
パスワードなしのログインテスト
最初のノードの実行
# ssh <他のノードのIP>
# ssh <他のノードのホスト名>
docker(すべてのノード)をインストールします#
ドッカーソースを設定
# yum-config-manager --add-repo https://download.docker.com/linux/centos/docker-ce.repo
DockerCEをインストールする
# yum list docker-ce --showduplicates | sort -r
# yum install -y docker-ce-18.09.6 docker-ce-cli-18.09.6 containerd.io
**docker ** ##を開始します
# systemctl start docker
# systemctl enable docker
国内ミラーアクセラレーションを構成する
ログインアドレスはhttps://cr.console.aliyun.comです。まだ登録していない場合は、最初にAlibabaCloudアカウントを登録できます。
左下の「ミラーセンター」の「ミラーアクセラレータ」をクリックします
# mkdir -p /etc/docker
# sudo tee /etc/docker/daemon.json <<-'EOF'{"registry-mirrors":["https://w6pljua0.mirror.aliyuncs.com"]}
EOF
# systemctl daemon-reload
# systemctl restart docker
Dockerのインストールを確認する
# docker --version
# docker run hello-world
k8sインストール前の準備(すべてのノード)#
カーネルパラメータの変更
# cat <<EOF >/etc/sysctl.d/k8s.conf
net.bridge.bridge-nf-call-ip6tables =1
net.bridge.bridge-nf-call-iptables =1
EOF
# sysctl -p /etc/sysctl.d/k8s.conf
Cgroupドライバーの変更
# vim /etc/docker/daemon.json
追加'"exec-opts":["native.cgroupdriver=systemd"’
# cat /etc/docker/daemon.json
{" registry-mirrors":["https://v16stybc.mirror.aliyuncs.com"],"exec-opts":["native.cgroupdriver=systemd"]}
ドッカーをリロード
# systemctl daemon-reload
# systemctl restart docker
cgroupdriverは、警告を排除するように変更されています。
[ WARNING IsDockerSystemdCheck]: detected "cgroupfs"as the Docker cgroup driver. The recommended driver is "systemd". Please follow the guide at https://kubernetes.io/docs/setup/cri/
kubernetesソースを設定する
# cat <<EOF >/etc/yum.repos.d/kubernetes.repo
[ kubernetes]
name=Kubernetes
baseurl=https://mirrors.aliyun.com/kubernetes/yum/repos/kubernetes-el7-x86_64/
enabled=1
gpgcheck=1
repo_gpgcheck=1
gpgkey=https://mirrors.aliyun.com/kubernetes/yum/doc/yum-key.gpg https://mirrors.aliyun.com/kubernetes/yum/doc/rpm-package-key.gpg
EOF
# yum clean all
# yum -y makecache
k8s(マスターノード)をインストールします#
# yum list kubelet --showduplicates | sort -r
# yum install -y kubelet-1.14.2 kubeadm-1.14.2 kubectl-1.14.2
kubeletを起動し、起動するように設定します
# systemctl enable kubelet && systemctl start kubelet
kubeletコマンドの完了
# echo "source <(kubectl completion bash)">>~/.bash_profile
# source .bash_profile
スクリプトを編集してミラーをダウンロードします
# cat image.sh
#! /bin/bash
url=registry.cn-hangzhou.aliyuncs.com/google_containers
version=v1.14.2
images=(`kubeadm config images list --kubernetes-version=$version|awk -F '/' '{print $2}'`)for imagename in ${images[@]};do
 docker pull $url/$imagename
 docker tag $url/$imagename k8s.gcr.io/$imagename
 docker rmi -f $url/$imagename
done
# chmod u+x image.sh
# . /image.sh
# docker images
REPOSITORY                           TAG                 IMAGE ID            CREATED             SIZE
k8s.gcr.io/kube-proxy                v1.14.2             5c24210246bb        10 months ago       82.1MB
k8s.gcr.io/kube-apiserver            v1.14.2             5eeff402b659        10 months ago       210MB
k8s.gcr.io/kube-controller-manager   v1.14.2             8be94bdae139        10 months ago       158MB
k8s.gcr.io/kube-scheduler            v1.14.2             ee18f350636d        10 months ago       81.6MB
k8s.gcr.io/coredns                   1.3.1               eb516548c180        15 months ago       40.3MB
k8s.gcr.io/etcd                      3.3.10              2c4adeb21b4f        16 months ago       258MB
k8s.gcr.io/pause                     3.1                 da86e6ba6ca1        2 years ago         742kB
マスターを初期化します
# kubeadm init --apiserver-advertise-address 192.168.174.156--pod-network-cidr=10.244.0.0/16[init] Using Kubernetes version: v1.14.2[preflight] Running pre-flight checks
[ preflight] Pulling images required for setting up a Kubernetes cluster
[ preflight] This might take a minute or two, depending on the speed of your internet connection
[ preflight] You can also perform this action in beforehand using 'kubeadm config images pull'[kubelet-start] Writing kubelet environment file with flags to file "/var/lib/kubelet/kubeadm-flags.env"[kubelet-start] Writing kubelet configuration to file "/var/lib/kubelet/config.yaml"[kubelet-start] Activating the kubelet service
[ certs] Using certificateDir folder "/etc/kubernetes/pki"[certs] Generating "ca" certificate and key
[ certs] Generating "apiserver" certificate and key
[ certs] apiserver serving cert is signed for DNS names [master kubernetes kubernetes.default kubernetes.default.svc kubernetes.default.svc.cluster.local] and IPs [10.96.0.1192.168.174.156][certs] Generating "apiserver-kubelet-client" certificate and key
[ certs] Generating "front-proxy-ca" certificate and key
[ certs] Generating "front-proxy-client" certificate and key
[ certs] Generating "etcd/ca" certificate and key
[ certs] Generating "etcd/server" certificate and key
[ certs] etcd/server serving cert is signed for DNS names [master localhost] and IPs [192.168.174.156127.0.0.1::1][certs] Generating "etcd/peer" certificate and key
[ certs] etcd/peer serving cert is signed for DNS names [master localhost] and IPs [192.168.174.156127.0.0.1::1][certs] Generating "etcd/healthcheck-client" certificate and key
[ certs] Generating "apiserver-etcd-client" certificate and key
[ certs] Generating "sa" key and public key
[ kubeconfig] Using kubeconfig folder "/etc/kubernetes"[kubeconfig] Writing "admin.conf" kubeconfig file
[ kubeconfig] Writing "kubelet.conf" kubeconfig file
[ kubeconfig] Writing "controller-manager.conf" kubeconfig file
[ kubeconfig] Writing "scheduler.conf" kubeconfig file
[ control-plane] Using manifest folder "/etc/kubernetes/manifests"[control-plane] Creating static Pod manifest for"kube-apiserver"[control-plane] Creating static Pod manifest for"kube-controller-manager"[control-plane] Creating static Pod manifest for"kube-scheduler"[etcd] Creating static Pod manifest for local etcd in"/etc/kubernetes/manifests"[wait-control-plane] Waiting for the kubelet to boot up the control plane asstatic Pods from directory "/etc/kubernetes/manifests". This can take up to 4m0s
[ apiclient] All control plane components are healthy after 16.003857 seconds
[ upload-config] storing the configuration used in ConfigMap "kubeadm-config"in the "kube-system" Namespace
[ kubelet] Creating a ConfigMap "kubelet-config-1.14"in namespace kube-system with the configuration for the kubelets in the cluster
[ upload-certs] Skipping phase. Please see --experimental-upload-certs
[ mark-control-plane] Marking the node master as control-plane by adding the label "node-role.kubernetes.io/master=''"[mark-control-plane] Marking the node master as control-plane by adding the taints [node-role.kubernetes.io/master:NoSchedule][bootstrap-token] Using token: zupr44.5ad2wpkkxl3qesko
[ bootstrap-token] Configuring bootstrap tokens, cluster-info ConfigMap, RBAC Roles
[ bootstrap-token] configured RBAC rules to allow Node Bootstrap tokens to post CSRs in order for nodes to get long term certificate credentials
[ bootstrap-token] configured RBAC rules to allow the csrapprover controller automatically approve CSRs from a Node Bootstrap Token
[ bootstrap-token] configured RBAC rules to allow certificate rotation for all node client certificates in the cluster
[ bootstrap-token] creating the "cluster-info" ConfigMap in the "kube-public" namespace
[ addons] Applied essential addon: CoreDNS
[ addons] Applied essential addon: kube-proxy

Your Kubernetes control-plane has initialized successfully!

To start using your cluster, you need to run the following as a regular user:

 mkdir -p $HOME/.kube
 sudo cp -i /etc/kubernetes/admin.conf $HOME/.kube/config
 sudo chown $(id -u):$(id -g) $HOME/.kube/config

You should now deploy a pod network to the cluster.
Run "kubectl apply -f [podnetwork].yaml"with one of the options listed at:
 https://kubernetes.io/docs/concepts/cluster-administration/addons/

Then you can join any number of worker nodes by running the following on each as root:

kubeadm join 192.168.174.156:6443--token zupr44.5ad2wpkkxl3qesko \
 - - discovery-token-ca-cert-hash sha256:d129df5787b082de4f6c5101881b6977e615d65a76cf59d0849a51c339731e12
初期化に失敗した場合は、kubeadmresetを実行して再初期化してください
# kubeadm reset
# rm -rf $HOME/.kube/config
環境変数をロードする
# echo "export KUBECONFIG=/etc/kubernetes/admin.conf">>~/.bash_profile
# source .bash_profile
ポッドネットワークをインストールする
# kubectl apply -f https://raw.githubusercontent.com/coreos/flannel/master/Documentation/kube-flannel.yml
podsecuritypolicy.policy/psp.flannel.unprivileged created
clusterrole.rbac.authorization.k8s.io/flannel created
clusterrolebinding.rbac.authorization.k8s.io/flannel created
serviceaccount/flannel created
configmap/kube-flannel-cfg created
daemonset.apps/kube-flannel-ds-amd64 created
daemonset.apps/kube-flannel-ds-arm64 created
daemonset.apps/kube-flannel-ds-arm created
daemonset.apps/kube-flannel-ds-ppc64le created
daemonset.apps/kube-flannel-ds-s390x created
https://raw.githubusercontent.com/coreos/flannel/master/Documentation/kube-flannel.yml
下のリンクをクリックしてダウンロードし、ダウンロード後に解凍することもできます
kubeをダウンロード-flannel.tar.gz
マスターノードのデフォルトの汚染を削除します(オプション)
汚染:汚染の意味。ノードが汚染されている場合、ポッドはこのノードで実行できません
デフォルトでは、クラスターはマスターでポッドをスケジュールしません。マスターでポッドをスケジュールする場合は、次の操作を実行できます。
汚れを見る:
# kubectl describe node master|grep -i taints
Taints: node-role.kubernetes.io/master:NoSchedule
デフォルトのステインを削除します。
# kubectl taint nodes master node-role.kubernetes.io/master-
node/master untainted
# kubectl describe node master|grep -i taints
Taints:<none>
文法:
kubectl taint node [node] key=value[effect]
その中で[effect]可能な値:[ NoSchedule | PreferNoSchedule | NoExecute ]
NoSchedule:スケジュールしてはいけません
PreferNoSchedule:スケジュールしないようにしてください
NoExecute:スケジュールしないだけでなく,また、ノード上の既存のポッドを削除します
染色
# kubectl taint node master key1=value1:NoSchedule
node/master tainted
# kubectl describe node master|grep -i taints
Taints: key1=value1:NoSchedule
キーはkey1、値はvalue1(値は空にすることができます)であり、効果はNoScheduleです。これは、スケジュールされてはならないことを意味します。
汚れを取り除く:
kubectl taint nodes master key1-
node/master untainted
# kubectl describe node master|grep -i taints
Taints:<none>
指定されたキーのすべての効果を削除します,‘-'key1をキーとしてすべての汚れを取り除く手段
k8sインストール(ノードノード)#
# yum install -y kubelet-1.14.2 kubeadm-1.14.2 kubectl-1.14.2
kubeletを起動し、起動するように設定します
# systemctl enable kubelet && systemctl start kubelet
kubeletコマンドの完了
# echo "source <(kubectl completion bash)">>~/.bash_profile
# source .bash_profile
スクリプトを編集してミラーをダウンロードします
# cat image.sh
#! /bin/bash
url=registry.cn-hangzhou.aliyuncs.com/google_containers
version=v1.14.2
images=(`kubeadm config images list --kubernetes-version=$version|awk -F '/' '{print $2}'`)for imagename in ${images[@]};do
 docker pull $url/$imagename
 docker tag $url/$imagename k8s.gcr.io/$imagename
 docker rmi -f $url/$imagename
done
# chmod u+x image.sh
# . /image.sh
# docker images
次のコマンドはマスターノードで実行されます
トークンを表示
# kubeadm token list
初期化時のトークンの有効期限が切れていることがわかりました
新しいトークンを生成する
# kubeadm token create
ns2eo4.3tbeaiji7y1jx4hj
新しい暗号化された文字列を生成します
# openssl x509 -pubkey -in/etc/kubernetes/pki/ca.crt | openssl rsa -pubin -outform der 2>/dev/null|    openssl dgst -sha256 -hex | sed 's/^.* //'
d129df5787b082de4f6c5101881b6977e615d65a76cf59d0849a51c339731e12
ノードノードがクラスターに参加します(ノードノードでそれぞれ次の操作を実行します)
# kubeadm join 192.168.174.156:6443--token ns2eo4.3tbeaiji7y1jx4hj --discovery-token-ca-cert-hash sha256:d129df5787b082de4f6c5101881b6977e615d65a76cf59d0849a51c339731e12
[ preflight] Running pre-flight checks
[ preflight] Reading configuration from the cluster...[preflight] FYI: You can look at this config file with'kubectl -n kube-system get cm kubeadm-config -oyaml'[kubelet-start] Downloading configuration for the kubelet from the "kubelet-config-1.14" ConfigMap in the kube-system namespace
[ kubelet-start] Writing kubelet configuration to file "/var/lib/kubelet/config.yaml"[kubelet-start] Writing kubelet environment file with flags to file "/var/lib/kubelet/kubeadm-flags.env"[kubelet-start] Activating the kubelet service
[ kubelet-start] Waiting for the kubelet to perform the TLS Bootstrap...

This node has joined the cluster:* Certificate signing request was sent to apiserver and a response was received.* The Kubelet was informed of the newsecure connection details.

Run 'kubectl get nodes' on the control-plane to see this node join the cluster.
クラスターテスト#
コマンド展開アプリケーション
# kubectl run httpd-app --image=httpd --replicas=3
kubectl run --generator=deployment/apps.v1 is DEPRECATED and will be removed in a future version. Use kubectl run --generator=run-pod/v1 or kubectl create instead.
deployment.apps/httpd-app created
コマンドラインを介してapacheサービスを展開する
プロファイルモードでアプリケーションをデプロイします
cat >> nginx.yml << EOF
apiVersion: extensions/v1beta1
kind: Deployment
metadata:
name: nginx
spec:
replicas:3
template:
metadata:
labels:
app: nginx
spec:
restartPolicy: Always
containers:- name: nginx
image: nginx:latest
EOF
[ root@master ~]# kubectl apply -f nginx.yml
deployment.extensions/nginx created
構成ファイルを介してnginxサービスをデプロイします
ノードステータスの表示
# kubectl get nodes
ポッドのステータスを表示する
# kubectl get pod --all-namespaces
NAMESPACE NAME READY STATUS RESTARTS AGE
default httpd-app-6df58645c6-gfqmf 1/1 Running 0 48s
default httpd-app-6df58645c6-lsvc5 1/1 Running 0 48s
default httpd-app-6df58645c6-zqv7m 1/1 Running 0 48s
default nginx-9d4cf4f77-4rdqj 1/1 Running 0 17s
default nginx-9d4cf4f77-8rkv8 0/1 ContainerCreating 0 17s
default nginx-9d4cf4f77-jptbh 1/1 Running 0 17s
kube-system coredns-fb8b8dccf-76l4s 1/1 Running 0 81m
kube-system coredns-fb8b8dccf-7tdh6 1/1 Running 0 81m
kube-system etcd-master 1/1 Running 0 80m
kube-system kube-apiserver-master 1/1 Running 0 80m
kube-system kube-controller-manager-master 1/1 Running 0 80m
kube-system kube-flannel-ds-amd64-4gzpb 1/1 Running 0 2m26s
kube-system kube-flannel-ds-amd64-czb96 1/1 Running 0 2m31s
kube-system kube-flannel-ds-amd64-xm4rc 1/1 Running 0 76m
kube-system kube-proxy-46gnt 1/1 Running 0 2m31s
kube-system kube-proxy-lpgks 1/1 Running 0 2m26s
kube-system kube-proxy-vs8ck 1/1 Running 0 81m
kube-system kube-scheduler-master 1/1 Running 0 80m
コピー数を表示
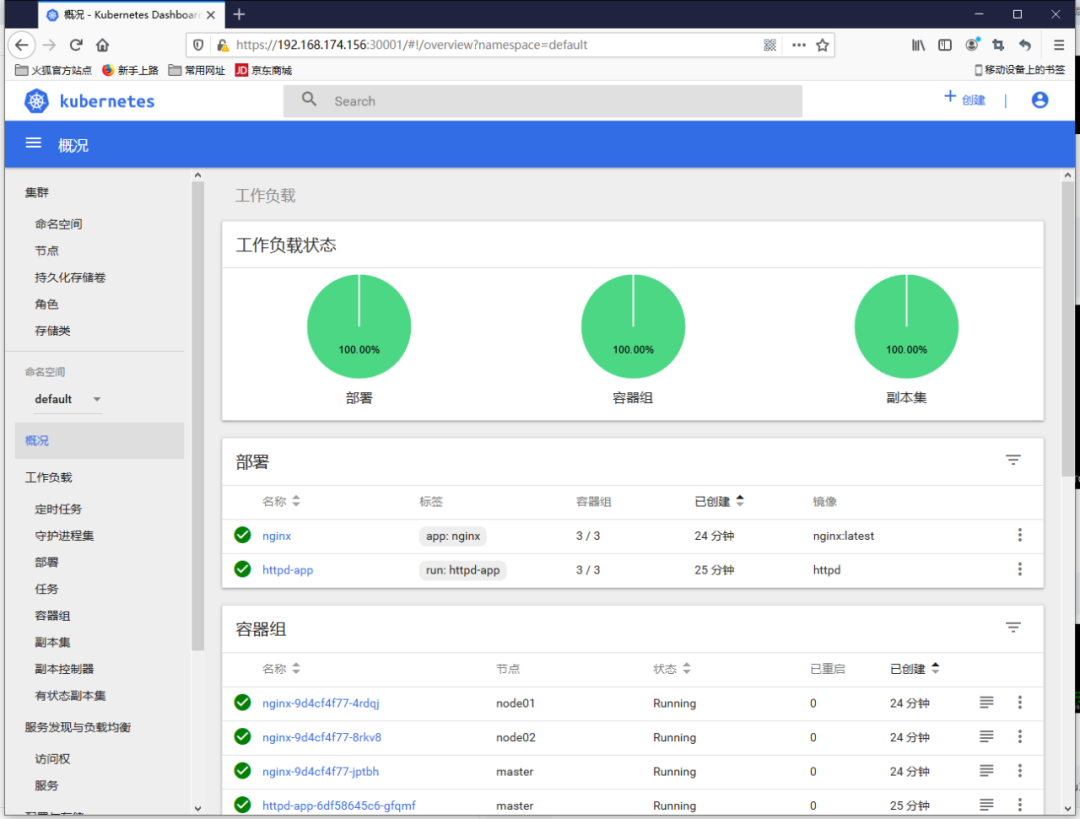
# kubectl get deployments
NAME READY UP-TO-DATE AVAILABLE AGE
httpd-app 3/333 72s
nginx 3/333 41s
# kubectl get pod -o wide
NAME READY STATUS RESTARTS AGE IP NODE NOMINATED NODE READINESS GATES
httpd-app-6df58645c6-gfqmf 1/1 Running 0 78s 10.244.0.4 master <none><none>
httpd-app-6df58645c6-lsvc5 1/1 Running 0 78s 10.244.2.2 node02 <none><none>
httpd-app-6df58645c6-zqv7m 1/1 Running 0 78s 10.244.1.2 node01 <none><none>
nginx-9d4cf4f77-4rdqj 1/1 Running 0 47s 10.244.1.3 node01 <none><none>
nginx-9d4cf4f77-8rkv8 1/1 Running 0 47s 10.244.2.3 node02 <none><none>
nginx-9d4cf4f77-jptbh 1/1 Running 0 47s 10.244.0.5 master <none><none>
nginxとhttpdの3つのレプリカポッドが3つのノードに均等に分散されていることがわかります。
展開の詳細を表示する
# kubectl describe deployments
Name: httpd-app
Namespace:default
CreationTimestamp: Fri,10 Apr 202017:08:26+0800
Labels: run=httpd-app
Annotations: deployment.kubernetes.io/revision:1
Selector: run=httpd-app
Replicas:3 desired |3 updated |3 total |3 available |0 unavailable
StrategyType: RollingUpdate
MinReadySeconds:0
RollingUpdateStrategy:25% max unavailable,25% max surge
Pod Template:
Labels: run=httpd-app
Containers:
httpd-app:
Image: httpd
Port:<none>
Host Port:<none>
Environment:<none>
Mounts:<none>
Volumes:<none>
Conditions:
Type Status Reason
----------------
Available True MinimumReplicasAvailable
Progressing True NewReplicaSetAvailable
OldReplicaSets:<none>
NewReplicaSet: httpd-app-6df58645c6(3/3 replicas created)
Events:
Type Reason Age From Message
-------------------------
Normal ScalingReplicaSet 107s deployment-controller Scaled up replica set httpd-app-6df58645c6 to 3
Name: nginx
Namespace:default
CreationTimestamp: Fri,10 Apr 202017:08:57+0800
Labels: app=nginx
Annotations: deployment.kubernetes.io/revision:1
kubectl.kubernetes.io/last-applied-configuration:{"apiVersion":"extensions/v1beta1","kind":"Deployment","metadata":{"annotations":{},"name":"nginx","namespace":"default"},"spec":{"replica...
Selector: app=nginx
Replicas:3 desired |3 updated |3 total |3 available |0 unavailable
StrategyType: RollingUpdate
MinReadySeconds:0
RollingUpdateStrategy:1 max unavailable,1 max surge
Pod Template:
Labels: app=nginx
Containers:
nginx:
Image: nginx:latest
Port:<none>
Host Port:<none>
Environment:<none>
Mounts:<none>
Volumes:<none>
Conditions:
Type Status Reason
----------------
Available True MinimumReplicasAvailable
OldReplicaSets:<none>
NewReplicaSet: nginx-9d4cf4f77(3/3 replicas created)
Events:
Type Reason Age From Message
-------------------------
Normal ScalingReplicaSet 76s deployment-controller Scaled up replica set nginx-9d4cf4f77 to 3
基本的なクラスターコンポーネントのステータスを表示する
# kubectl get cs
NAME STATUS MESSAGE ERROR
scheduler Healthy ok
controller-manager Healthy ok
etcd-0 Healthy {"health":"true"}
ダッシュボードのインストール#
kubernetes-dashboard.yamlファイルを準備します
# wget  https://raw.githubusercontent.com/kubernetes/dashboard/master/aio/deploy/recommended/kubernetes-dashboard.yaml
ミラーアドレスを変更する
# sed -i 's/k8s.gcr.io/registry.cn-hangzhou.aliyuncs.com\/kuberneters/g' kubernetes-dashboard.yaml
デフォルトのミラーウェアハウスネットワークにアクセスできないため、Aliミラーに変更されます
# sed -i '/targetPort:/a\ \ \ \ \ \ nodePort: 30001\n\ \ type: NodePort' kubernetes-dashboard.yaml
httpsを介して外部でNodePortを構成します://NodeIp:NodePortアクセスダッシュボード、現時点でのポートは30001です
管理者アカウントを追加する
# cat >> kubernetes-dashboard.yaml << EOF
---
# - - - - - - - - - - - - - - - - - - - dashboard-admin ------------------- #
apiVersion: v1
kind: ServiceAccount
metadata:
 name: dashboard-admin
 namespace: kube-system

---
apiVersion: rbac.authorization.k8s.io/v1beta1
kind: ClusterRoleBinding
metadata:
 name: dashboard-admin
subjects:- kind: ServiceAccount
 name: dashboard-admin
 namespace: kube-system
roleRef:
 apiGroup: rbac.authorization.k8s.io
 kind: ClusterRole
 name: cluster-admin
 EOF
https://raw.githubusercontent.com/kubernetes/dashboard/master/aio/deploy/recommended/kubernetes-dashboard.yaml
以下のリンクからダウンロードして、ダウンロード後に解凍することもできます
kubernetesをダウンロード-dashboard.tar.gz
上記のリンクをダウンロードした場合、kubernetes-dashboard.ymlファイルのコンテンツを置き換える上記の操作を実行する必要はなく、リンク内のファイルはすでに関連するコンテンツを置き換えています。
ダッシュボードの展開
# kubectl apply -f kubernetes-dashboard.yaml
secret/kubernetes-dashboard-certs created
secret/kubernetes-dashboard-csrf created
serviceaccount/kubernetes-dashboard created
role.rbac.authorization.k8s.io/kubernetes-dashboard-minimal created
rolebinding.rbac.authorization.k8s.io/kubernetes-dashboard-minimal created
deployment.apps/kubernetes-dashboard created
service/kubernetes-dashboard created
serviceaccount/dashboard-admin created
clusterrolebinding.rbac.authorization.k8s.io/dashboard-admin created
ステータスビュー
[ root@master ~]# kubectl get deployment kubernetes-dashboard -n kube-system
NAME READY UP-TO-DATE AVAILABLE AGE
kubernetes-dashboard 1/111 18m
[ root@master ~]# kubectl get pods -n kube-system -o wide
NAME READY STATUS RESTARTS AGE IP NODE NOMINATED NODE READINESS GATES
coredns-fb8b8dccf-76l4s 1/1 Running 0 117m 10.244.0.3 master <none><none>
coredns-fb8b8dccf-7tdh6 1/1 Running 0 117m 10.244.0.2 master <none><none>
etcd-master 1/1 Running 0 116m 192.168.174.156 master <none><none>
kube-apiserver-master 1/1 Running 0 116m 192.168.174.156 master <none><none>
kube-controller-manager-master 1/1 Running 0 116m 192.168.174.156 master <none><none>
kube-flannel-ds-amd64-4gzpb 1/1 Running 0 38m 192.168.174.158 node02 <none><none>
kube-flannel-ds-amd64-czb96 1/1 Running 0 39m 192.168.174.157 node01 <none><none>
kube-flannel-ds-amd64-xm4rc 1/1 Running 0 113m 192.168.174.156 master <none><none>
kube-proxy-46gnt 1/1 Running 0 39m 192.168.174.157 node01 <none><none>
kube-proxy-lpgks 1/1 Running 0 38m 192.168.174.158 node02 <none><none>
kube-proxy-vs8ck 1/1 Running 0 117m 192.168.174.156 master <none><none>
kube-scheduler-master 1/1 Running 0 116m 192.168.174.156 master <none><none>
kubernetes-dashboard-7b87f5bdd6-z7smh 1/1 Running 0 18m 10.244.1.4 node01 <none><none>[root@master ~]# kubectl get services -n kube-system
NAME TYPE CLUSTER-IP EXTERNAL-IP PORT(S) AGE
kube-dns ClusterIP 10.96.0.10<none>53/UDP,53/TCP,9153/TCP 118m
kubernetes-dashboard NodePort 10.111.109.30<none>443:30001/TCP 18m
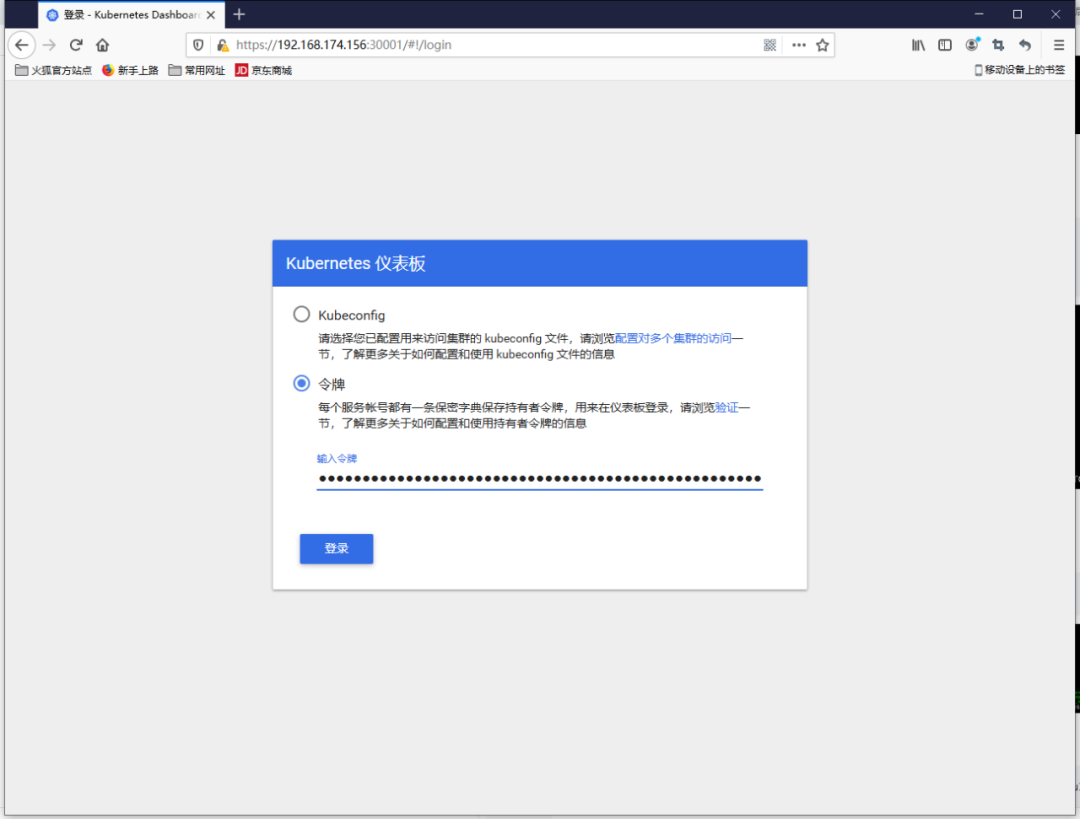
トークンビュー
# kubectl describe secrets -n kube-system dashboard-admin
Name: dashboard-admin-token-j4xtf
Namespace: kube-system
Labels:<none>
Annotations: kubernetes.io/service-account.name: dashboard-admin
kubernetes.io/service-account.uid: 6fd1aa35-7b0d-11ea-ae41-000c29b70c6b
Type: kubernetes.io/service-account-token
Data
====
ca.crt:1025 bytes
namespace:11 bytes
token: eyJhbGciOiJSUzI1NiIsImtpZCI6IiJ9.eyJpc3MiOiJrdWJlcm5ldGVzL3NlcnZpY2VhY2NvdW50Iiwia3ViZXJuZXRlcy5pby9zZXJ2aWNlYWNjb3VudC9uYW1lc3BhY2UiOiJrdWJlLXN5c3RlbSIsImt1YmVybmV0ZXMuaW8vc2VydmljZWFjY291bnQvc2VjcmV0Lm5hbWUiOiJkYXNoYm9hcmQtYWRtaW4tdG9rZW4tajR4dGYiLCJrdWJlcm5ldGVzLmlvL3NlcnZpY2VhY2NvdW50L3NlcnZpY2UtYWNjb3VudC5uYW1lIjoiZGFzaGJvYXJkLWFkbWluIiwia3ViZXJuZXRlcy5pby9zZXJ2aWNlYWNjb3VudC9zZXJ2aWNlLWFjY291bnQudWlkIjoiNmZkMWFhMzUtN2IwZC0xMWVhLWFlNDEtMDAwYzI5YjcwYzZiIiwic3ViIjoic3lzdGVtOnNlcnZpY2VhY2NvdW50Omt1YmUtc3lzdGVtOmRhc2hib2FyZC1hZG1pbiJ9.dP34FDNIndektaXZHpE_vAlXTK7LQLHt255mOsD6jQS87CKhZMrNDmfq_RJmeh4y3fnunWVqP2U_3AxA-Ky384dnpJ5TLEfANRaW_N1loDUbyFiqvh-TU2N5gYt-g0NKd-HNeNID9yakKuXmLNHMQQedB-hY5UaVomtS4rTLTtCvE4Iz8kqbGQCzu3ILUE8P1tZQdfMqT8GblnV6E-ni76zXtqhBITK71Bqge-oNUAaNTZ-nPVYG3WLxkdmwWGR09AtWS9CAuNRkfIwIb93WMvrXW4dQfgTWnd7IsN4vwM8gFTGn2Kb3Y4IIVn1DRc94sA9pb1qDNHAitPo1IQeViQ
トークンは次のとおりです。eyJhbGciOiJSUzI1NiIsImtpZCI6IiJ9.eyJpc3MiOiJrdWJlcm5ldGVzL3NlcnZpY2VhY2NvdW50Iiwia3ViZXJuZXRlcy5pby9zZXJ2aWNlYWNjb3VudC9uYW1lc3BhY2UiOiJrdWJlLXN5c3RlbSIsImt1YmVybmV0ZXMuaW8vc2VydmljZWFjY291bnQvc2VjcmV0Lm5hbWUiOiJkYXNoYm9hcmQtYWRtaW4tdG9rZW4tajR4dGYiLCJrdWJlcm5ldGVzLmlvL3NlcnZpY2VhY2NvdW50L3NlcnZpY2UtYWNjb3VudC5uYW1lIjoiZGFzaGJvYXJkLWFkbWluIiwia3ViZXJuZXRlcy5pby9zZXJ2aWNlYWNjb3VudC9zZXJ2aWNlLWFjY291bnQudWlkIjoiNmZkMWFhMzUtN2IwZC0xMWVhLWFlNDEtMDAwYzI5YjcwYzZiIiwic3ViIjoic3lzdGVtOnNlcnZpY2VhY2NvdW50Omt1YmUtc3lzdGVtOmRhc2hib2FyZC1hZG1pbiJ9.dP34FDNIndektaXZHpE_vAlXTK7LQLHt255mOsD6jQS87CKhZMrNDmfq_RJmeh4y3fnunWVqP2U_3AxA-Ky384dnpJ5TLEfANRaW_N1loDUbyFiqvh-TU2N5gYt-g0NKd-HNeNID9yakKuXmLNHMQQedB-hY5UaVomtS4rTLTtCvE4Iz8kqbGQCzu3ILUE8P1tZQdfMqT8GblnV6E-ni76zXtqhBITK71Bqge-oNUAaNTZ-nPVYG3WLxkdmwWGR09AtWS9CAuNRkfIwIb93WMvrXW4dQfgTWnd7IsN4vwM8gFTGn2Kb3Y4IIVn1DRc94sA9pb1qDNHAitPo1IQeViQ
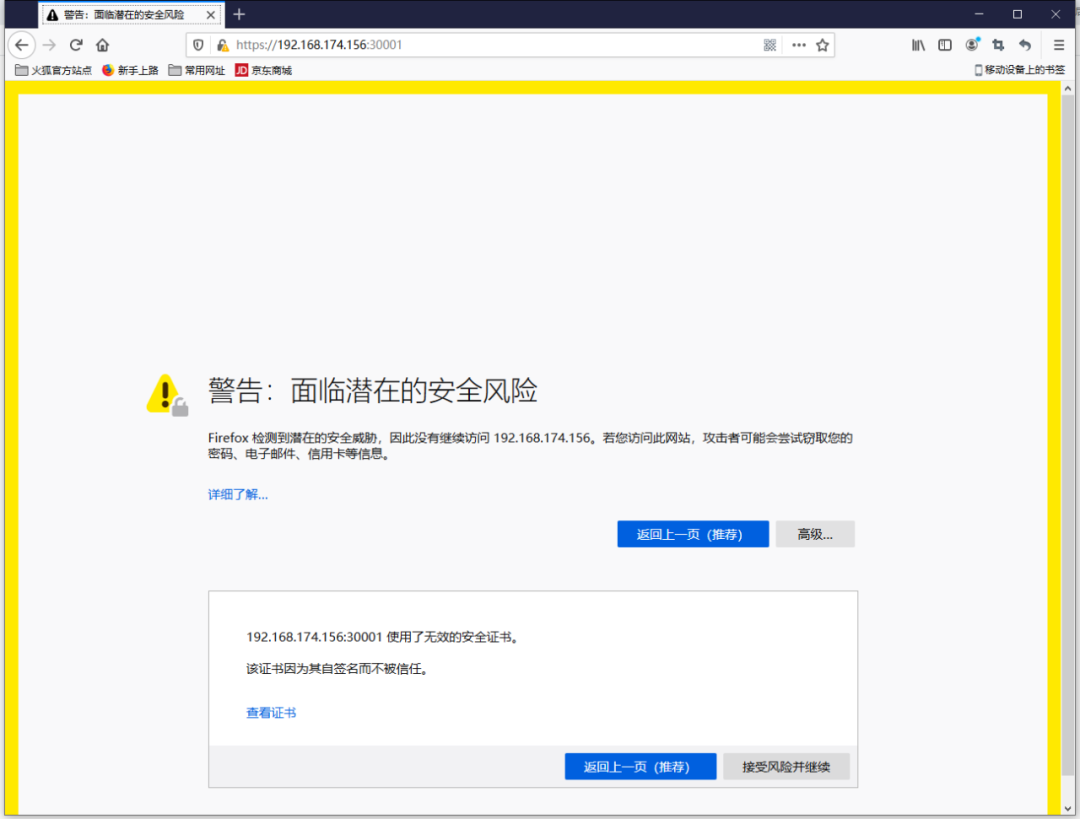
Webアクセス
https://192.168.174.156:30001
つまり、クロムアクセスを開くことができず、Firefoxブラウザを使用してログインし、トークンを介してアクセスします
THE
END
Recommended Posts