Network install CentOS 8 with Kickstart.
Introduction
Previously, I posted an article about network installation using Ubuntu’s automatic installation function, but since it’s a big deal, I’ll leave about Kickstart, which is often used in RHEL systems.
Please refer to the following article for network installation using the automatic installation function of Ubuntu Server 20.04.
-Install on the network with the automatic installation function of Ubuntu Server 20.04.
In addition, this article is a continuation of the following article.
Please go after building the PXE server in the following article.
-Create a PXE boot environment for OS automatic installation
What is Kickstart
This is a network installation method often used in the RHEL system.
I think that the function has been implemented since the introduction of Fedora Core, so I think it has been used in the world for more than 15 years.
Red Hat Manual also has detailed formats and settings, so networks of other OSs I think it’s easier to get to than installing.
Constitution
I created a virtual machine with the following configuration in VirtualBox.
Please refer to the linked article for Building a PXE server.
Below, the operation on the PXE server side is the operation on CentOS8 on VirtualBox.
Memory size is at least 2GB according to CentOS 8.2.2004 Release Notes Since it is necessary, it will be 2GB.
**-Machine configuration for automatic installation **
| Constitution | Type |
|---|---|
| CPU | 1 vCPU |
| Memory size | 2048 MB |
| storage | 16.00 GB |
| Network 1 | Host-only adapter |
| Network 2 | NAT |
** ・ PXE server directory structure **
| directory | path |
|---|---|
| TFTP directory | /tftpboot |
| HTTP directory | /pxeboot |
** ・ Address structure **
| Target | address |
|---|---|
| PXE server | 192.168.56.105 |
| Machines subject to automatic installation | 192.168.56.131 |
- The address of the machine subject to automatic installation is the address after automatic installation.
Construction flow
The PXE server is a prerequisite that it has already been built.
** ・ PXE server side procedure **
- CentOS 8.2.2004 ISO file mount
- A copy of the CentOS 8.2.2004 kernel image
- Create a TFTP boot configuration file
- Create a directory for automatic installation
- Create anaconda file for Kickstart
**-Procedure on the machine for automatic installation **
- Setting the machine to be automatically installed
- Automatic installation
Install with Kickstart
Kickstart will be set up according to the settings described in the ʻanaconda` file.
If the ʻanaconda file is RHEL type, the settings at the time of initial installation are described under / root, so refer to the /root/anaconda-ks.cfg file and set for Kickstart`. I will create a file.
CentOS 8.2.2004 ISO file mount
This time, you don’t have to transfer the ISO image directly to the installation target server like Ubuntu Server installation, so ISO with PXE server Only mount it.
Download CentOS 8.2.2004 from CentOS site, and download the ISO file (CentOS-8.2) from” Device “→” Optical drive “of PXE server. Select .2004-x86_64-dvd1.iso).
Create a directory with the mount destination as / pxeboot / repo / CentOS / 8 / cdrom so that you can specify it later with Kickstart.
Create directory for ISO image mount
sudo mkdir -p /pxeboot/repo/CentOS/8/cdrom
A copy of the CentOS 8.2.2004 kernel image
Mount the ISO file you just loaded and get the kernel image for CentOS 8.2.2004.
Create kernel image storage directory
sudo mkdir /tftpboot/CentOS
ISO image mount
sudo mount /dev/sr0 /pxeboot/repo/CentOS/8/cdrom
Kernel image copy
sudo cp /pxeboot/repo/CentOS/8/cdrom/images/pxeboot/{vmlinuz,initrd.img} /tftpboot/CentOS
About the TFTP boot configuration file
As I introduced before, the name of the boot configuration file to be acquired when booting PXE is decided, and the rules are as follows.
-** UUID ** (Example: a8943708-c6f6-51b9-611e-74e6ac80b93d)
-** 01-MAC_address ** (Example: 01-80-00-27-c6-a1-16)
-** Full 32-bit IP address ** (Example: 0A0000FD)
-** Most significant 28 bits of IP address ** (Example: 0A0000F)
-** Top 24 bits of IP address ** (Example: 0A0000)
-** Top 20 bits of IP address ** (Example: 0A000)
-** Top 16 bits of IP address ** (Example: 0A00)
-** Top 12 bits of IP address ** (Example: 0A0)
-** Most significant 8 bits of IP address ** (Example: 0A)
-** Most significant 4 bits of IP address ** (Example: 0)
-** default ** (default configuration file)
For example, if you store the MAC address file, you can fix the boot configuration file for each host, so you can specify a definition specific to each host.
Also, depending on how you write the settings in the boot configuration file, you can let the user select the OS file or OS image to read at boot time, so you can enter multiple boot definitions in default and select them.
Creating a TFTP boot configuration file
This time, the Kickstart installation definition is described in the MAC address file of the installation target machine.
The interface name and MAC address will proceed based on the following assumptions, so please read as appropriate according to your own environment.
| interface | MAC address |
|---|---|
| enp0s3 | 08:00:27:1d:57:34 |
Since this time it was created with VirtualBox, the interface is ʻenp0s3`, but the interface name changes depending on the environment, so please check the interface name by installing it in advance.
/tftpboot/pxelinux.cfg/01-08-00-27-1d-57-34
sudo cat << _EOF_ | sudo tee /tftpboot/pxelinux.cfg/01-08-00-27-1d-57-34
default kickstart
label kickstart
  kernel CentOS/vmlinuz
  initrd CentOS/initrd.img
  append ks=http://192.168.56.105/pxeboot/vmhost.cfg load initrd=CentOS/initrd.img devfs=nomount ksdevice=enp0s3
_EOF_
About Anaconda file settings
The ʻanaconda file` is divided into several sections, and each section has the specified settings.
As mentioned above, the / root of the RHEL system machine contains the ʻanaconda file` used at the time of installation, so you can see what kind of installation you have done.
Anaconda file example when DVD is installed (extract) </summary> <div>
Anaconda file example
#version=RHEL8
ignoredisk --only-use=sda
autopart --type=lvm
# Partition clearing information
clearpart --none --initlabel
# Use graphical install
graphical
# Use CDROM installation media
cdrom
# Keyboard layouts
keyboard --vckeymap=jp --xlayouts='jp'
# System language
lang ja_JP.UTF-8

# Network information
network  --bootproto=static --device=enp0s3 --ip=192.168.56.105 --netmask=255.255.255.0 --ipv6=auto --activate
network  --bootproto=dhcp --device=enp0s8 --ipv6=auto --activate
network  --hostname=vmpxe01
repo --name="AppStream" --baseurl=file:///run/install/repo/AppStream
# Root password
rootpw --iscrypted $6$GT/YYwgPk.wHIkLs$StfR0tXBveOrReUe95oqGuIdqxBCBgtZaPF2lZYWT/ciPVyvYwt9Jwc4lFQ0jC1LvYy6iBS6.zezUm69I2iST1
# Run the Setup Agent on first boot
firstboot --enable
# Do not configure the X Window System
skipx
# System services
services --enabled="chronyd"
# System timezone
timezone Asia/Tokyo --isUtc
user --name=centos --password=$6$Z9TXdeskUsRw0rwJ$4p.CPUlkJ.yzkN9i8iJVd1mItlkMgQzVUFPg0YcPh0nsghV5wD7El9wkukt5Cni/iDEdWc49KnIcoNeTHi5QU1 --iscrypted --gecos="vmware"

%packages
@^minimal-environment

%end

%addon com_redhat_kdump --disable --reserve-mb='auto'

%end

%anaconda
pwpolicy root --minlen=6 --minquality=1 --notstrict --nochanges --notempty
pwpolicy user --minlen=6 --minquality=1 --notstrict --nochanges --emptyok
pwpolicy luks --minlen=6 --minquality=1 --notstrict --nochanges --notempty
%end
</div></details>
About the section of Anaconda files
There are several sections, but except for the basic settings, they must start with % [section name] and end with % end.
Also, although it is a script section that will be often used when installing with Kickstart, pre and pre-install are basically processed in the situation where the OS is not completely installed. Does not need to be used.
Therefore, if you want to do something after installing the OS, you can write it in the post script session.
section
sectionコマンド
Use
basic configuration
None
ネットワークやディスク設定などのbasic configuration全般
Package section
%packages
Describe the package to install
Add-ons section
%addon [addon_name]
Settings for features provided by add-ons
Anaconda Settings Section
%anaconda
Settings only for the current password policy
pre script section
%pre
Process executed immediately after reading the Kickstart file
pre-install script section
%pre-install
Process executed after network setting
post script section
%post
What happens after the installation is complete and before the first reboot
Preparation before creating Kickstart file
This time, I will create an Anaconda file for Kickstart assuming that the following settings will be added to the above configuration.
–Disable firewalld and SELinux.
–Install Python 3.8.
–Use chrony to query the NICT server.
–Update the package with dnf update.
Create the Anaconda file below, as specified in the TFTP boot configuration file.
File
path
anaconda file
/pxeboot/vmhost.cfg
Also, since the password described in the ʻanaconda` file must also be described as a hash value, generate a hash value by the following method.
- This time, it will be generated with the password
centos.
Password hashing
sudo openssl passwd -6 centos
If you have created a copy of the / root ʻanaconda file, the permissions are 0600, and when you read it with Kickstart`, it will fail because it cannot be read, so fix it. ..
Change permissions for anaconda files
sudo chmod 644 /pxeboot/vmhost.cfg
Disable firewalld and SELinux
There is a definition as a basic setting, so just disable it below.
Disable firewalld and SELinux
selinux --disabled
firewall --disabled
Install Python 3.8
Install the dnf package and configure Python 3.8 usage.
By the way, make pip available as well.
Python3.8 Installation (Packages section)
python38
Python3.8 Settings (Post section)
alternatives --set python /usr/bin/python3.8
update-alternatives --install /usr/bin/pip pip /usr/bin/pip3.8 1
chrony settings
There is no definition to set the address of chrony, so you would use sed in the post section to rewrite the file directly.
chrony settings
sed -i -e "s/^pool/#pool/g" \
       -e "/^#pool 2/a \
pool ntp.nict.jp prefer iburst" /etc/chrony.conf
dnf update
The dnf update also writes directly to the post section.
dnf_update
dnf -y update
Creating a Kickstart file
The Anaconda file created while adding comments is as follows.
I won’t explain it in detail, but I’ve modified and added some parameters for Kickstart.
The trick is to skip the consent selection with ʻeula –agreed, don't specify repo (because the ʻAppStream repository is specified during Kickstart installation), and finally reboot. Is it a reboot setting?
Anaconda file example for Kickstart (extract) </summary> <div>
Anaconda file example for Kickstart
##################################################################
#Basic section
##################################################################
#version=RHEL8
zerombr
ignoredisk --only-use=sda
autopart --type=lvm
# Partition clearing information
clearpart --all --initlabel

#Kickstart installation
text
url --url=http://192.168.56.105/pxeboot/repo/CentOS/8/cdrom/
eula --agreed
reboot

# Keyboard layouts
keyboard --vckeymap=jp --xlayouts='jp'
# System language
lang ja_JP.UTF-8

# Network information
network  --bootproto=static --device=enp0s3 --ip=192.168.56.131 --netmask=255.255.255.0 --nodefroute --noipv6 --onboot=on --activate
network  --bootproto=dhcp --device=enp0s8 --noipv6 --onboot=on --activate
network  --hostname=vmhost

# Root password
rootpw --iscrypted $6$BQJphupSd1P6pREf$RDUQt69lV0np1OZpZ7I9MmpkYzPV7QMJ.Pz5TOKsXusEF.qmnmrcqOF6D5LXfLTciLLB2QIEyXriDhzyMLluv/
# Run the Setup Agent on first boot
firstboot --disable
# Do not configure the X Window System
skipx
# System services
services --enabled="chronyd"
# System timezone
timezone Asia/Tokyo --isUtc
user --name=centos --password=$6$BQJphupSd1P6pREf$RDUQt69lV0np1OZpZ7I9MmpkYzPV7QMJ.Pz5TOKsXusEF.qmnmrcqOF6D5LXfLTciLLB2QIEyXriDhzyMLluv/ --iscrypted --gecos="centos"

#Disable firewalld, SELinux
selinux --disabled
firewall --disabled

##################################################################
# %package section
##################################################################
%packages
@^minimal-environment

# Python3.8 installation
python38

%end

##################################################################
# %addon section
##################################################################
%addon com_redhat_kdump --disable --reserve-mb='auto'

%end

##################################################################
# %anaconda section
##################################################################
%anaconda
pwpolicy root --minlen=6 --minquality=1 --notstrict --nochanges --notempty
pwpolicy user --minlen=6 --minquality=1 --notstrict --nochanges --emptyok
pwpolicy luks --minlen=6 --minquality=1 --notstrict --nochanges --notempty
%end

##################################################################
# %post section (initial settings to be performed after installation)
##################################################################
#log post processing
%post --log=/root/anaconda-post.log --erroronfail

#NTP settings(chronyd)
sed -i -e "s/^pool/#pool/g" \
       -e "/^#pool 2/a \
pool ntp.nict.jp prefer iburst" /etc/chrony.conf

#Python settings
alternatives --set python /usr/bin/python3.8
update-alternatives --install /usr/bin/pip pip /usr/bin/pip3.8 1

# dnf update
dnf -y update

%end
</div></details>
Settings for machines subject to automatic installation
Basically, no settings are required if the machine to be automatically installed can be PXE booted.
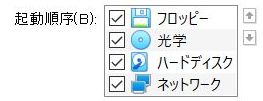
However, if the OS is already installed on the installation disk, change the boot device selection of various BIOS so that PXE boot comes first.
In the case of VirtualBox, if the virtual storage is empty, there is no problem if you confirm that Network is checked in the boot order as shown below.
Automatic installation
The network installation starts when the power of the machine to be automatically installed is turned on.
All you have to do is wait, so be patient.
Summary
Recently, the number of cloud environments such as AWS has increased, so the opportunity to use Kickstart has decreased, but it is a function that can still be used when building on-premises servers, so if you remember it as one of the options, what? It may be useful.
Anaconda file example
#version=RHEL8
ignoredisk --only-use=sda
autopart --type=lvm
# Partition clearing information
clearpart --none --initlabel
# Use graphical install
graphical
# Use CDROM installation media
cdrom
# Keyboard layouts
keyboard --vckeymap=jp --xlayouts='jp'
# System language
lang ja_JP.UTF-8
# Network information
network --bootproto=static --device=enp0s3 --ip=192.168.56.105 --netmask=255.255.255.0 --ipv6=auto --activate
network --bootproto=dhcp --device=enp0s8 --ipv6=auto --activate
network --hostname=vmpxe01
repo --name="AppStream" --baseurl=file:///run/install/repo/AppStream
# Root password
rootpw --iscrypted $6$GT/YYwgPk.wHIkLs$StfR0tXBveOrReUe95oqGuIdqxBCBgtZaPF2lZYWT/ciPVyvYwt9Jwc4lFQ0jC1LvYy6iBS6.zezUm69I2iST1
# Run the Setup Agent on first boot
firstboot --enable
# Do not configure the X Window System
skipx
# System services
services --enabled="chronyd"
# System timezone
timezone Asia/Tokyo --isUtc
user --name=centos --password=$6$Z9TXdeskUsRw0rwJ$4p.CPUlkJ.yzkN9i8iJVd1mItlkMgQzVUFPg0YcPh0nsghV5wD7El9wkukt5Cni/iDEdWc49KnIcoNeTHi5QU1 --iscrypted --gecos="vmware"
%packages
@^minimal-environment
%end
%addon com_redhat_kdump --disable --reserve-mb='auto'
%end
%anaconda
pwpolicy root --minlen=6 --minquality=1 --notstrict --nochanges --notempty
pwpolicy user --minlen=6 --minquality=1 --notstrict --nochanges --emptyok
pwpolicy luks --minlen=6 --minquality=1 --notstrict --nochanges --notempty
%end
% [section name] and end with % end.Kickstart, pre and pre-install are basically processed in the situation where the OS is not completely installed. Does not need to be used.post script session.Kickstart assuming that the following settings will be added to the above configuration.centos.Password hashing
sudo openssl passwd -6 centos
/ root ʻanaconda file, the permissions are 0600, and when you read it with Kickstart`, it will fail because it cannot be read, so fix it. ..Change permissions for anaconda files
sudo chmod 644 /pxeboot/vmhost.cfg
Disable firewalld and SELinux
selinux --disabled
firewall --disabled
Python3.8 Installation (Packages section)
python38
Python3.8 Settings (Post section)
alternatives --set python /usr/bin/python3.8
update-alternatives --install /usr/bin/pip pip /usr/bin/pip3.8 1
sed in the post section to rewrite the file directly.chrony settings
sed -i -e "s/^pool/#pool/g" \
-e "/^#pool 2/a \
pool ntp.nict.jp prefer iburst" /etc/chrony.conf
dnf update also writes directly to the post section.dnf_update
dnf -y update
Kickstart., don't specify repo (because the ʻAppStream repository is specified during Kickstart installation), and finally reboot. Is it a reboot setting?
Anaconda file example for Kickstart (extract) </summary> <div>
Anaconda file example for Kickstart
##################################################################
#Basic section
##################################################################
#version=RHEL8
zerombr
ignoredisk --only-use=sda
autopart --type=lvm
# Partition clearing information
clearpart --all --initlabel
#Kickstart installation
text
url --url=http://192.168.56.105/pxeboot/repo/CentOS/8/cdrom/
eula --agreed
reboot
# Keyboard layouts
keyboard --vckeymap=jp --xlayouts='jp'
# System language
lang ja_JP.UTF-8
# Network information
network --bootproto=static --device=enp0s3 --ip=192.168.56.131 --netmask=255.255.255.0 --nodefroute --noipv6 --onboot=on --activate
network --bootproto=dhcp --device=enp0s8 --noipv6 --onboot=on --activate
network --hostname=vmhost
# Root password
rootpw --iscrypted $6$BQJphupSd1P6pREf$RDUQt69lV0np1OZpZ7I9MmpkYzPV7QMJ.Pz5TOKsXusEF.qmnmrcqOF6D5LXfLTciLLB2QIEyXriDhzyMLluv/
# Run the Setup Agent on first boot
firstboot --disable
# Do not configure the X Window System
skipx
# System services
services --enabled="chronyd"
# System timezone
timezone Asia/Tokyo --isUtc
user --name=centos --password=$6$BQJphupSd1P6pREf$RDUQt69lV0np1OZpZ7I9MmpkYzPV7QMJ.Pz5TOKsXusEF.qmnmrcqOF6D5LXfLTciLLB2QIEyXriDhzyMLluv/ --iscrypted --gecos="centos"
#Disable firewalld, SELinux
selinux --disabled
firewall --disabled
##################################################################
# %package section
##################################################################
%packages
@^minimal-environment
# Python3.8 installation
python38
%end
##################################################################
# %addon section
##################################################################
%addon com_redhat_kdump --disable --reserve-mb='auto'
%end
##################################################################
# %anaconda section
##################################################################
%anaconda
pwpolicy root --minlen=6 --minquality=1 --notstrict --nochanges --notempty
pwpolicy user --minlen=6 --minquality=1 --notstrict --nochanges --emptyok
pwpolicy luks --minlen=6 --minquality=1 --notstrict --nochanges --notempty
%end
##################################################################
# %post section (initial settings to be performed after installation)
##################################################################
#log post processing
%post --log=/root/anaconda-post.log --erroronfail
#NTP settings(chronyd)
sed -i -e "s/^pool/#pool/g" \
-e "/^#pool 2/a \
pool ntp.nict.jp prefer iburst" /etc/chrony.conf
#Python settings
alternatives --set python /usr/bin/python3.8
update-alternatives --install /usr/bin/pip pip /usr/bin/pip3.8 1
# dnf update
dnf -y update
%end
</div></details>
Settings for machines subject to automatic installation
Basically, no settings are required if the machine to be automatically installed can be PXE booted.
However, if the OS is already installed on the installation disk, change the boot device selection of various BIOS so that PXE boot comes first.
In the case of VirtualBox, if the virtual storage is empty, there is no problem if you confirm that Network is checked in the boot order as shown below.
Automatic installation
The network installation starts when the power of the machine to be automatically installed is turned on.
All you have to do is wait, so be patient.
Summary
Recently, the number of cloud environments such as AWS has increased, so the opportunity to use Kickstart has decreased, but it is a function that can still be used when building on-premises servers, so if you remember it as one of the options, what? It may be useful.
Anaconda file example for Kickstart
##################################################################
#Basic section
##################################################################
#version=RHEL8
zerombr
ignoredisk --only-use=sda
autopart --type=lvm
# Partition clearing information
clearpart --all --initlabel
#Kickstart installation
text
url --url=http://192.168.56.105/pxeboot/repo/CentOS/8/cdrom/
eula --agreed
reboot
# Keyboard layouts
keyboard --vckeymap=jp --xlayouts='jp'
# System language
lang ja_JP.UTF-8
# Network information
network --bootproto=static --device=enp0s3 --ip=192.168.56.131 --netmask=255.255.255.0 --nodefroute --noipv6 --onboot=on --activate
network --bootproto=dhcp --device=enp0s8 --noipv6 --onboot=on --activate
network --hostname=vmhost
# Root password
rootpw --iscrypted $6$BQJphupSd1P6pREf$RDUQt69lV0np1OZpZ7I9MmpkYzPV7QMJ.Pz5TOKsXusEF.qmnmrcqOF6D5LXfLTciLLB2QIEyXriDhzyMLluv/
# Run the Setup Agent on first boot
firstboot --disable
# Do not configure the X Window System
skipx
# System services
services --enabled="chronyd"
# System timezone
timezone Asia/Tokyo --isUtc
user --name=centos --password=$6$BQJphupSd1P6pREf$RDUQt69lV0np1OZpZ7I9MmpkYzPV7QMJ.Pz5TOKsXusEF.qmnmrcqOF6D5LXfLTciLLB2QIEyXriDhzyMLluv/ --iscrypted --gecos="centos"
#Disable firewalld, SELinux
selinux --disabled
firewall --disabled
##################################################################
# %package section
##################################################################
%packages
@^minimal-environment
# Python3.8 installation
python38
%end
##################################################################
# %addon section
##################################################################
%addon com_redhat_kdump --disable --reserve-mb='auto'
%end
##################################################################
# %anaconda section
##################################################################
%anaconda
pwpolicy root --minlen=6 --minquality=1 --notstrict --nochanges --notempty
pwpolicy user --minlen=6 --minquality=1 --notstrict --nochanges --emptyok
pwpolicy luks --minlen=6 --minquality=1 --notstrict --nochanges --notempty
%end
##################################################################
# %post section (initial settings to be performed after installation)
##################################################################
#log post processing
%post --log=/root/anaconda-post.log --erroronfail
#NTP settings(chronyd)
sed -i -e "s/^pool/#pool/g" \
-e "/^#pool 2/a \
pool ntp.nict.jp prefer iburst" /etc/chrony.conf
#Python settings
alternatives --set python /usr/bin/python3.8
update-alternatives --install /usr/bin/pip pip /usr/bin/pip3.8 1
# dnf update
dnf -y update
%end
PXE booted.PXE boot comes first.VirtualBox, if the virtual storage is empty, there is no problem if you confirm that Network is checked in the boot order as shown below.network installation starts when the power of the machine to be automatically installed is turned on.Kickstart has decreased, but it is a function that can still be used when building on-premises servers, so if you remember it as one of the options, what? It may be useful.