Using MySQL in C # –2. SELECT and screen display
Assumptions and preparations
C # article
-Use MySQL in C #– 1. Development environment installation
–Using MySQL in C # –2 SELECT / Screen display [This article]
-Use MySQL in C #– 3. Additions and removals
-Determining whether database data is NULL in C #
-C # delegate and => (lambda expression) are treated like pointers to C functions
-Dynamic add control– 1. Button click
-Dynamic add control– 2. Browse textbox
Last time was the work to prepare the development environment using MySQL Connectors .NET in Visual Studio 2019, but actually to MySQL with MySQL Connectors .NET Connect and display the contents of the data on the screen using SELECT (˶ ・ ᴗ ・) ੭
environment
- OS:Windows 10 Pro
–Development environment: Visual Studio 2019 (using MySQL Connectors .NET)
–Database: MySQL 5.7
MySQL server
Test user: * test * (password: test1)
Database: ** manutest **
Table name: ** testtb **
| id | name | memo | |
|---|---|---|---|
| Type | INT | VARCHAR(64) | VARCHAR(256) |
| Required attributes | PRIMARY KEY | NOT NULL | Initial value NULL |
| Other attributes | AUTO_INCREMENT | - | - |
Premise
Visual Studio 2019 and MySQL are installed and MySQL Connectors .NET is installed as in Last time (Visual Studio automatically MySQL Connectors Recognizes the library of
Work procedure
Coding in Visual Studio 2019
Placement of component controls
This time, press the button → pick up the data with MySQL → display it on the screen
I wrote an article about how to use it easily.
For the time being, I think that I will create a new Windows C # form project and Form1.cs will be opened by default, so first of all, in the form,
–Upper left: Datagrid dataGridView1
–Upper right: 2 list boxes listBox1 and listBox2
–Lower left: Button to read SQL button1
Paste these.
The data grid and list box have been placed to display SQL data

Added MySQL Connector .NET reference
As per the article in Last time, we will add references.

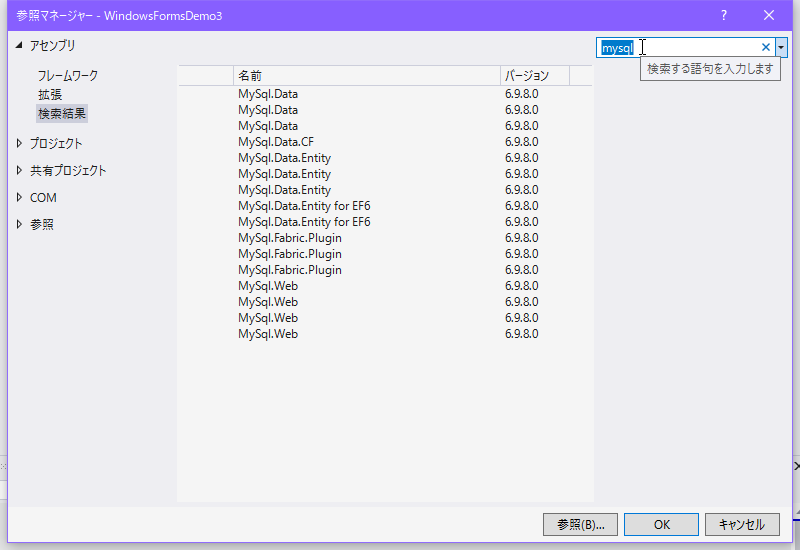
Since it is actually automatically recognized in “Assembly”, if you enter “mysql” in the search screen on the upper right in the reference manager, “** MySql.Data **” will appear in many lines as shown in the screen above. Since it will come out, for the time being, select only one, any one (turn on the check box that appears when you hover the mouse to the left of the line) and select “OK” …

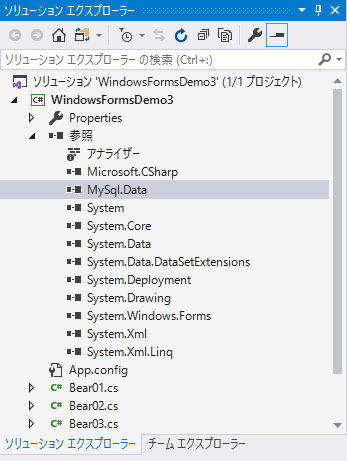
“** MySql.Data **” has been added (\ * ˘꒳˘ \ *)
It contains a C # object that handles MySQL.
Describe the source when the button is clicked
Since we only load the SQL with a button click this time, we will code only the code part of Form1.cs, so double-click the button1 control to automatically generate a click event, so code the event behavior.
Of course, since it connects to MySQL, Users and tables listed in “MySQL server” in “Environment” of “Premises and preparations”.
Form1.cs
using System;
using System.Collections.Generic;
using System.Data;
using System.Windows.Forms;
using MySql.Data.MySqlClient;

namespace MySqlFormsTest
{
    public partial class Form1 : Form
    {
        public Form1()
        {
            InitializeComponent();
        }

        /**In Visual Studio, double-clicking a button control will automatically generate it
         *Connect button(Connect to MySQL server and get list data)
         * */
        private void button1_Click(object sender, EventArgs e)
        {
            string connStr = "server=127.0.0.1;user id=test;password=test1;database=manutest";
            MySqlConnection conn = new MySqlConnection(connStr);

            try
            {
                //Open connection
                conn.Open();

                //Table to get data
                DataTable tbl = new DataTable();

                //Execute SQL
                MySqlDataAdapter dataAdp = new MySqlDataAdapter("SELECT id, name, memo FROM testtb", conn);
                dataAdp.Fill(tbl);

                //Display on the data grid
                dataGridView1.DataSource = tbl;

                //When referencing the execution result line by line
                for (int i = 0; i < tbl.Rows.Count; i++)
                {
                    DataRow row = tbl.Rows[i];  //Data row

                    //Add item to the list box on the right
                    listBox1.Items.Add(row[1]);
                    listBox2.Items.Add(row[2]);
                }

                //Close connection
                conn.Close();
            }
            catch (MySqlException mse)
            {
                MessageBox.Show(mse.Message, "Data acquisition error", MessageBoxButtons.OK, MessageBoxIcon.Error);
            }
        }
    }
}
There was no official basis for MySQL Connectors C #, so I had to rely on third-party information and topics that actually popped up in Visual Studio coding … (´ • ̥ ̫ • ̥ `) … So, I’m using MySqlDataAdapter, although the purpose is not clear, as it is a mixture of “MySqlDataAdapter” and “MySqlCommand” for data acquisition.
string connStr = "server=127.0.0.1;user id=test;password=test1;database=manutest";
This is the connection command, server is the server host, user id is the MySQL ID, password is the password, and database is the DB name to connect to, but if you look at other articles, it is a mixture of uid and UserId. It seemed that it was not very unified. .. ..
MySqlDataAdapter dataAdp = new MySqlDataAdapter("SELECT id, name, memo FROM testtb", conn);
dataAdp.Fill(tbl);
This part is the part that executes the SQL “* SELECT id, name, memo FROM testtb *” and stores the execution result in the data table.
//Display on the data grid
dataGridView1.DataSource = tbl;
This part means to display the data acquired by SELECT in the data grid dataGridView1 on the upper left, and it can be easily displayed by setting the table in which SQL is executed in DataSource.
on the other hand,
//When referencing the execution result line by line
for (int i = 0; i < tbl.Rows.Count; i++)
{
    DataRow row = tbl.Rows[i];  //Data row

    //Add item to the list box on the right
    listBox1.Items.Add(row[1]);
    listBox2.Items.Add(row[2]);
}
In this way, ** each row of the retrieved table tbl can be retrieved with tbl.Rows [i], and each data in it can be retrieved in the form of an array **. This is not limited to MySQL in C #, but it is about DataRow and DataTable in C #, so I will not touch on the details.
Each acquired individual data is displayed in the listBox on the upper right.
Execution result

next time
Now that I’ve been able to view the MySQL data in Visual Studio, I’m planning to add, modify, and delete the data ٩ (. ›‹. ♡) ۶