Ubuntu 20.04 best configuration guide for engineers
Recently Ubuntu released the 20.04 LTS version, and I also installed it for the first time. Since various Linux distributions are not available out of the box like MacOS and Windows, a lot of configuration is required. You need to consult various materials for each configuration. Although there are many configuration articles on the Internet, there are basically some problems:
- Only teach how to do it, not why;
- The document is old and will not be updated;
- The content is missing, not rich;...
Therefore, I hope to compile a best configuration guide, in addition to recording what needs to be done, but also explain the principles and technical background behind it. On the one hand, it is convenient for myself to refer to it in the future. On the other hand, I also want to share this guide with everyone and gradually improve it with everyone. **So, this is an optimal configuration guide that will be updated continuously, with practical principles and rich content. **
Follow the public account BaronTalk and reply to Ubuntu to download the latest PDF version of the configuration document.
1. System configuration
1. Turn off sudo password
In order to avoid entering the password every time the sudo command is used, we can turn off the password. Operation method:
- Enter the command
sudo visudoin the terminal to open visudo; - Find the line
%sudo ALL=(ALL:ALL) ALLand modify it to%sudo ALL=(ALL:ALL) NOPASSWD:ALL
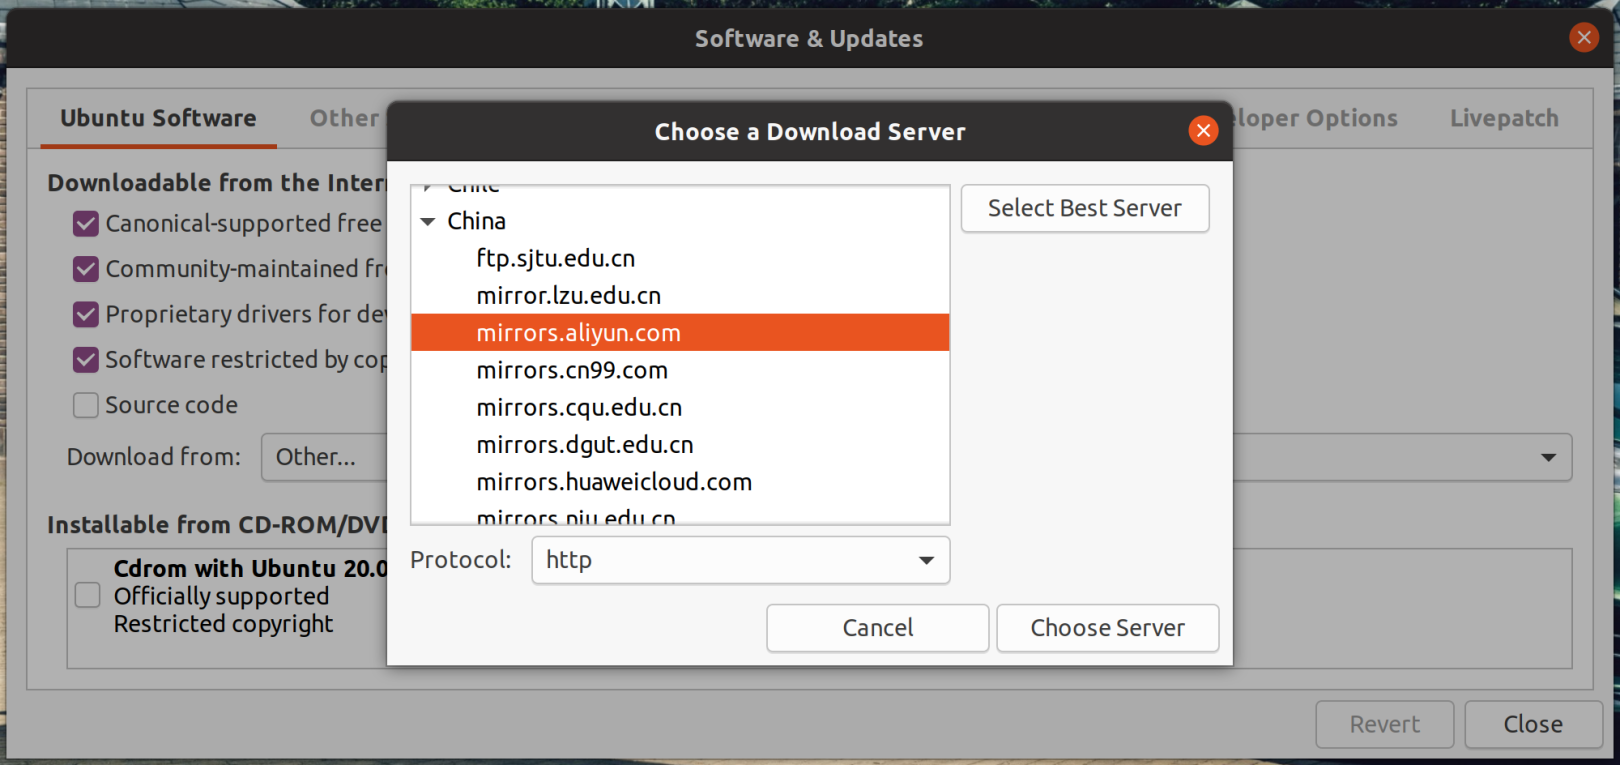
2. Modify software source
The default software source of Ubuntu is overseas, and there will be some problems in speed. We can select the domestic mirror in "Software & Updates".
3. Update system
# Update the local package database
sudo apt update
# Update all installed packages (you can also use full-upgrade)
sudo apt upgrade
# Automatically remove unnecessary packages
sudo apt autoremove
Here are a few commonly used cleanup commands:
| Command | Description |
|---|---|
| apt autoclean | Delete the .deb installation file of the deleted package from the hard disk |
| apt clean | Same as above, but will also delete the installation package of the installed software package |
| apt autoremove | Remove packages that were installed to satisfy the dependencies of other packages but are no longer needed |
| apt remove [package name] | Remove the installed package (retain the configuration file) |
| apt --purge remove [package name] | Remove the installed package (do not retain the configuration file) |
4. High score screen adaptation
By default, the UI elements appear too small on the high-resolution screen, so you need to adjust the zoom ratio of the interface. Ubuntu20.04 is the GNOME desktop by default, GNOME can enable HiDPI support in Settings>Displays to adjust the screen ratio by integer multiples. It can also be set by the following command:
# scaling-factor can only be set to the integer 1=100%,2=200%3=300%......
gsettings set org.gnome.desktop.interfacescaling-factor 2
With integer zoom settings, UI elements are either too large or too small on some devices, so we need to further adjust.
Use the following command to view the Window System (graphics interface protocol) on your Linux device, usually Wayland/X11
echo $XDG_SESSION_TYPE
Wayland
If it is wayland, use the following command to start the experimental non-integer zoom function.
gsettings set org.gnome.mutter experimental-features "['scale-monitor-framebuffer']"
After opening Settings>Displays again, you can select non-integer zoom (125%, 150%, 175%). Ubuntu20.04 has provided a graphical interface in Settings>Displays to enable the experimental non-integer zoom function, so there is no need to enable it through the above command.
I experimented and found that this method cannot normally set non-integer zoom on my device. I think it is because the default Window System of Ubuntu 20.04 is X11 instead of Wayland. If you have Wayland on your device, it should be set up normally. Or you can choose Ubuntu On Wayland when you log in to the desktop system in theory.
X11
For X11, we can use scaling-factor and xrandr at the same time to achieve non-integer scaling, which can make TTF fonts scaled correctly and prevent blurring when using xrandr alone. You can use gsettings or in Settings>Displays to specify the zoom factor, and use xrandr to specify the zoom factor.
First, set the interface zoom factor to the minimum factor of "UI looks too big", usually 2 (200%), if it is not big enough, continue to try a factor of 3 or even larger. Then use xrandr to set the reduction factor. I set it to 1.25 myself. If the UI looks too big, increase the factor, otherwise reduce the factor. The command is as follows:
xrandr --output DP-4--scale 1.25x1.25
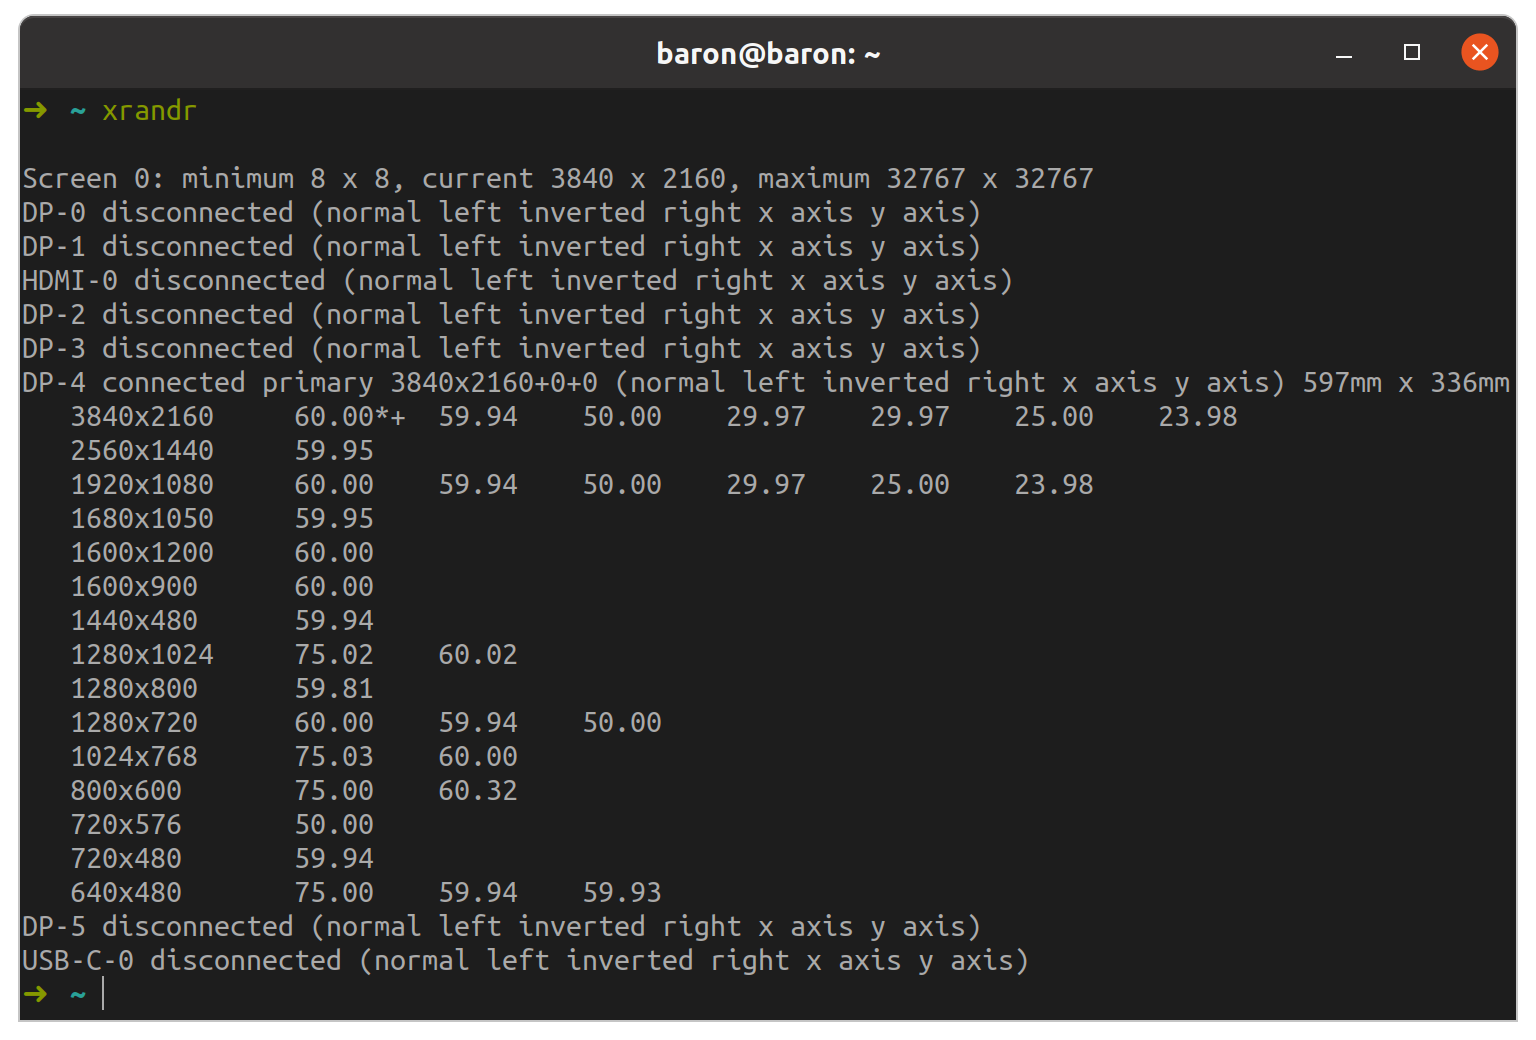
**You may encounter warning: output DP-4 not founnd; gnoring prompt when using the above command, or there is no change in the interface after executing the command. At this point, you need to execute the xrandr command to view your output parameters (that is, the name of the currently displayed interface, which is connected in the log), for example, the DP-4 on my device. **
After the command is executed correctly, the UI element may be too small. Go back to Settings>Displays to see if the integer zoom has been restored to 100%. If it is to re-select the appropriate zoom ratio ( For example, 200%).
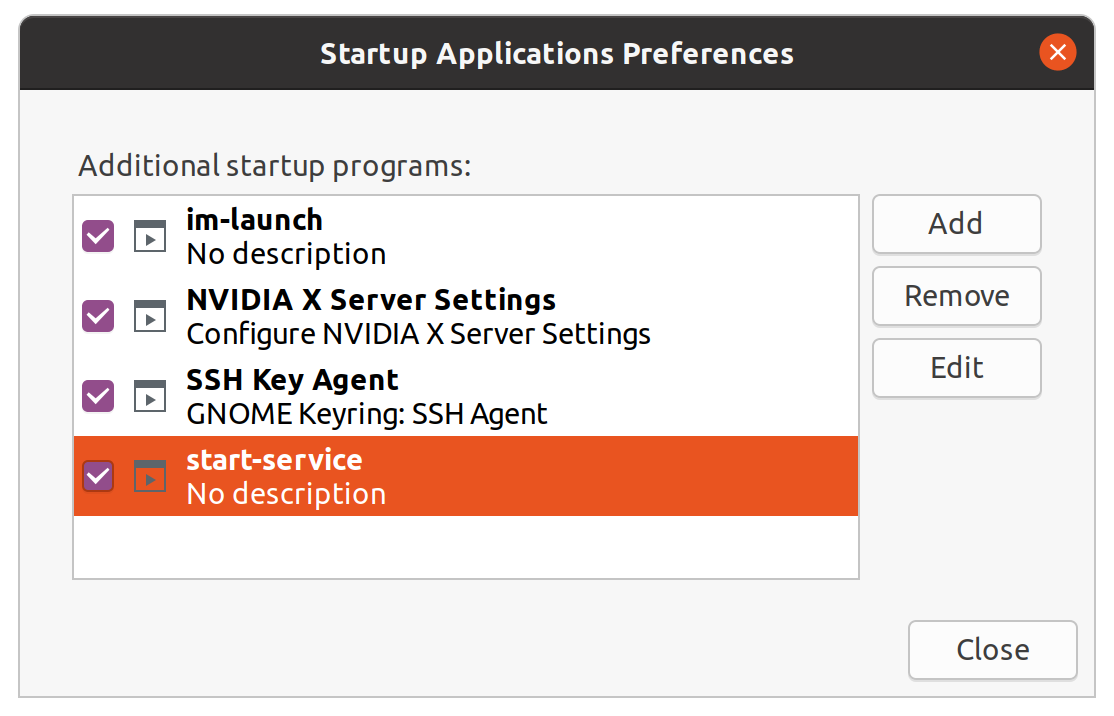
After restarting, the settings of xrandr will become invalid. We can set a script to start automatic execution, such as start-service.sh:
# start-service.sh
#! /bin/bash
xrandr --output DP-4--scale 1.25x1.25
exit 0
Then grant execution permissions to start-service.sh
sudo chmod +x start-service.sh
Then search for "sartup Applications" in Ubuntu and add the script:
So far, it can perfectly support 4K screen display.
5. Install Python2
Ubuntu20.04 comes with python3, but some third-party tools or scripts still use python2, so we need to install it ourselves
apt install python
6. Install Git
apt install git
7. Chinese input method
Because Sogou input method currently does not support Ubuntu 20.04, and its support for high score screens is not very friendly, so I no longer toss and choose ibus-libpinyin.
# installation
sudo apt install ibus-libpinyin
sudo apt install ibus-clutter
Then find "Language Support" in the app and change the "Keyboard input method system" to "IBUS". Restart the system, and then add "Chinese (Intelligent Pinyin)" in Settings>Region & Language>Input Sources to use Chinese input method Up.
2. Build your command line tool (Terminator && ZSH)
1. Install Terminnator
If you are used to iTerm2 under the Mac platform, you will definitely be obsessed with its split-screen function, but Ubuntu's own Terminal is not easy to use. Fortunately, there are various open source terminals under Linux. I personally recommend Terminator, which is as powerful as iTerm2 and supports split screen.
# installation
sudo add-apt-repository ppa:gnome-terminator
sudo apt update
sudo apt install terminator
The default interface of Terminator is ugly, but the configuration is flexible and you can adjust it according to your preferences.
2. Configure Shell (install zsh and oh-my-zsh)
Get the Terminal, then configure the Shell. Execute the following command:
cat /etc/shells
You can see that Ubuntu has built-in various Shells:
/bin/bash
/bin/csh
/bin/dash
/bin/ksh
/bin/sh
/bin/tcsh
Commonly used Linux distributions on the market usually use bash by default, but zsh is much more powerful than bash.
# Install zsh
apt install zsh
# Set zsh as the system default shell
sudo chsh -s /bin/zsh
However, the configuration of zsh is too complicated. Fortunately, someone developed oh-my-zsh, which allows us to configure zsh more conveniently.
# Automatic installation, if you have not installed git, you need to install git first
wget https://github.com/robbyrussell/oh-my-zsh/raw/master/tools/install.sh -O -| sh
# Or you can choose to install manually
git clone git://github.com/robbyrussell/oh-my-zsh.git ~/.oh-my-zsh
cp ~/.oh-my-zsh/templates/zshrc.zsh-template ~/.zshrc
Restart Terminal and you will find the changes.
3. ZSH configuration
The configuration of zsh is mainly concentrated in the ~/.zshrc file. For example, we can configure aliases for common commands:
alias cls='clear'
alias ll='ls -l'
alias la='ls -a'
alias vi='vim'
alias grep="grep --color=auto"
Or choose the theme of zsh
ZSH_THEME="robbyrussell"
There are many themes built in oh-my-zsh, and the corresponding theme files are stored in the ~/.oh-my-zsh/themes directory. You can select or edit themes according to your own preferences.
4. ZSH plugin installation
oh-my-zsh also supports various plug-ins, which are stored in the ~/.oh-my-zsh/plugins directory. Here are a few recommended:
autojump: Quickly switch directory plugin
# installation
apt install autojump

# use
j Document/
zsh-autosuggestions: historical command suggestion plugin when typing command line commands
# installation
git clone https://github.com/zsh-users/zsh-autosuggestions ${ZSH_CUSTOM:-~/.oh-my-zsh/custom}/plugins/zsh-autosuggestions
zsh-syntax-highlighting: command line syntax highlighting plugin
# installation
git clone https://github.com/zsh-users/zsh-syntax-highlighting.git ${ZSH_CUSTOM:-~/.oh-my-zsh/custom}/plugins/zsh-syntax-highlighting
After the plug-in is installed, it can be used after being configured in the ~/.zshrc file. The configuration is as follows:
# turn on~/.zshrc file, find the following line of configuration code, and append the plug-in name
plugins=(Other plugin name autojump zsh-autosuggestions zsh-syntax-highlighting)
5. Fun command line toys
After configuring Terminator and ZSH, we can also add some interesting little toys to the command line.
CMatrix(https://github.com/abishekvashok/cmatrix)
Terminal Matrix Screensaver
# installation
sudo apt install cmatrix

# Run (plus-The lba parameter looks more like a movie, plus-The ol parameter is more like Win/Mac screensaver)
cmatrix
Effect picture:

Steam Locomotive(https://github.com/mtoyoda/sl)
Terminal train dynamic effect
# installation
sudo apt install sl

# run
sl
Effect picture:
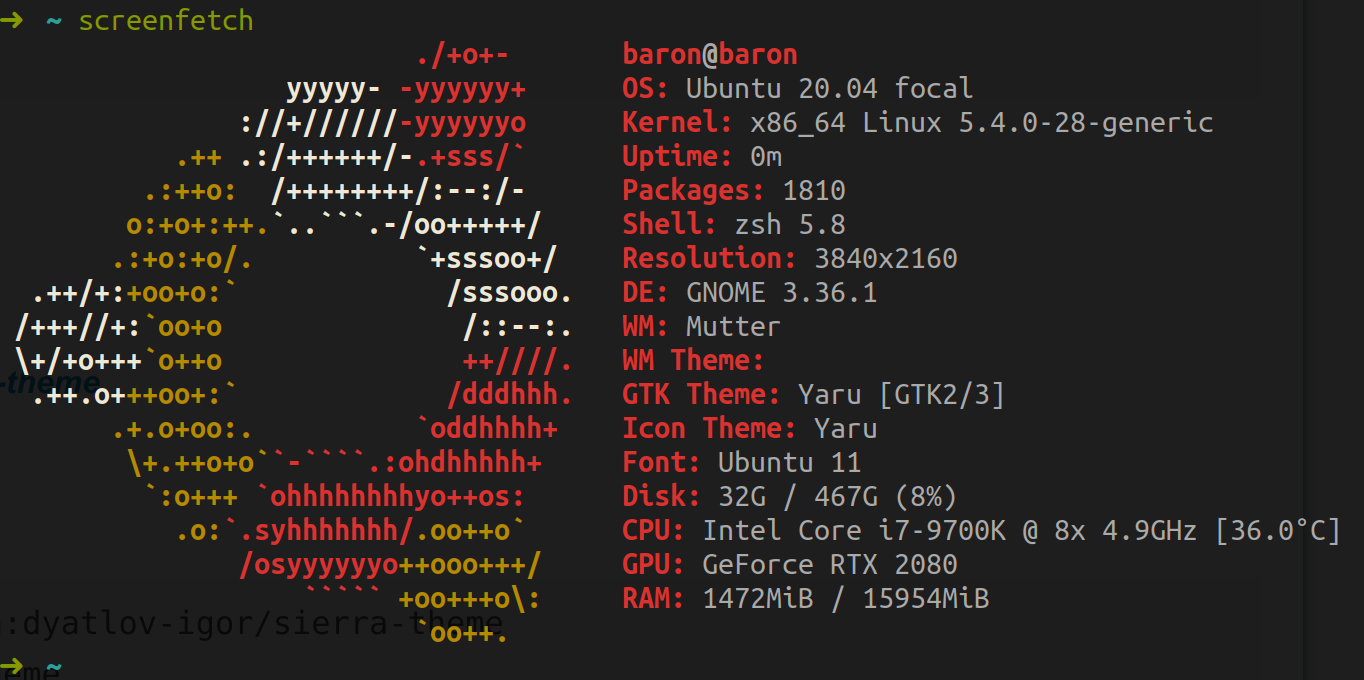
Screenfetch(https://github.com/KittyKatt/screenFetch)
The Bash Screenshot Information Tool, used to display system information and ASCII Linux distribution icons on the terminal
# installation
sudo apt install screenfetch

# run
screenfetch
Effect picture:
3. Software installation
1. Install Clash (take a tizi, you know)
Step 1: Go to https://github.com/Dreamacro/clash/releases to download the latest Linux version of Clash, for example: [clash-linux-amd64-v0.19.0.gz](https://github.com/Dreamacro/clash/releases/download/v0.19.0/clash-linux-amd64-v0. 19.0.gz). After decompression, an executable file clash-linux-amd64-v0.19.0 is obtained:
tar -zxvf clash-linux-amd64-v0.19.0.gz
Step 2: Use the mv command to move to /usr/local/bin/clash:
sudo mv clash-linux-amd64-v0.19.0/usr/local/bin/clash
Step 3: Enter sudo chmod +x /usr/local/bin/clash in the terminal to add execution permissions;
sudo chmod +x /usr/local/bin/clash
Step 4: The terminal executes the clash command to run clash;
# Run clash
clash
At this time, two files will be generated in the /home/{user ID}/.config/clash directory: config.yaml and Country.mmdb; edit the config.yaml file, configure proxy server information and rules, and some businesses will provide yaml files , Copy it after downloading;
Restart clash (close and reopen the terminal, execute the clash command) to load the updated configuration file;
Keep clash running, open the browser to visit clash.razord.top for policy configuration, select proxy line, etc. (you may need to enter the IP, port and password as prompted, the specific content can be viewed in config.yaml;
Continue to keep clash running, set the manual proxy in the system network settings Settings>Network>Network Proxy>Manual, refer to config.yaml for configuration information or the log output by the terminal when clash is started. Now you can access the network through clash.
After configuring in the previous way, you need to open the terminal every time the system starts, execute the clash command, and the terminal cannot be closed, otherwise the entire clash process will end. If you do not want to keep the terminal open all the time, you can use the nohup clash command to start the background operation. Or if you want to start clash automatically after booting, you can add the command
nohup clashto the last of the aforementioned start-service.sh script.
2. Install Typroa(open source MarkDown editor)
# or run:
# sudo apt-key adv --keyserver keyserver.ubuntu.com --recv-keys BA300B7755AFCFAE
wget -qO - https://typora.io/linux/public-key.asc | sudo apt-key add -
# add Typora's repository
sudo add-apt-repository 'deb https://typora.io/linux ./'
sudo apt update
# install typora
sudo apt install typora
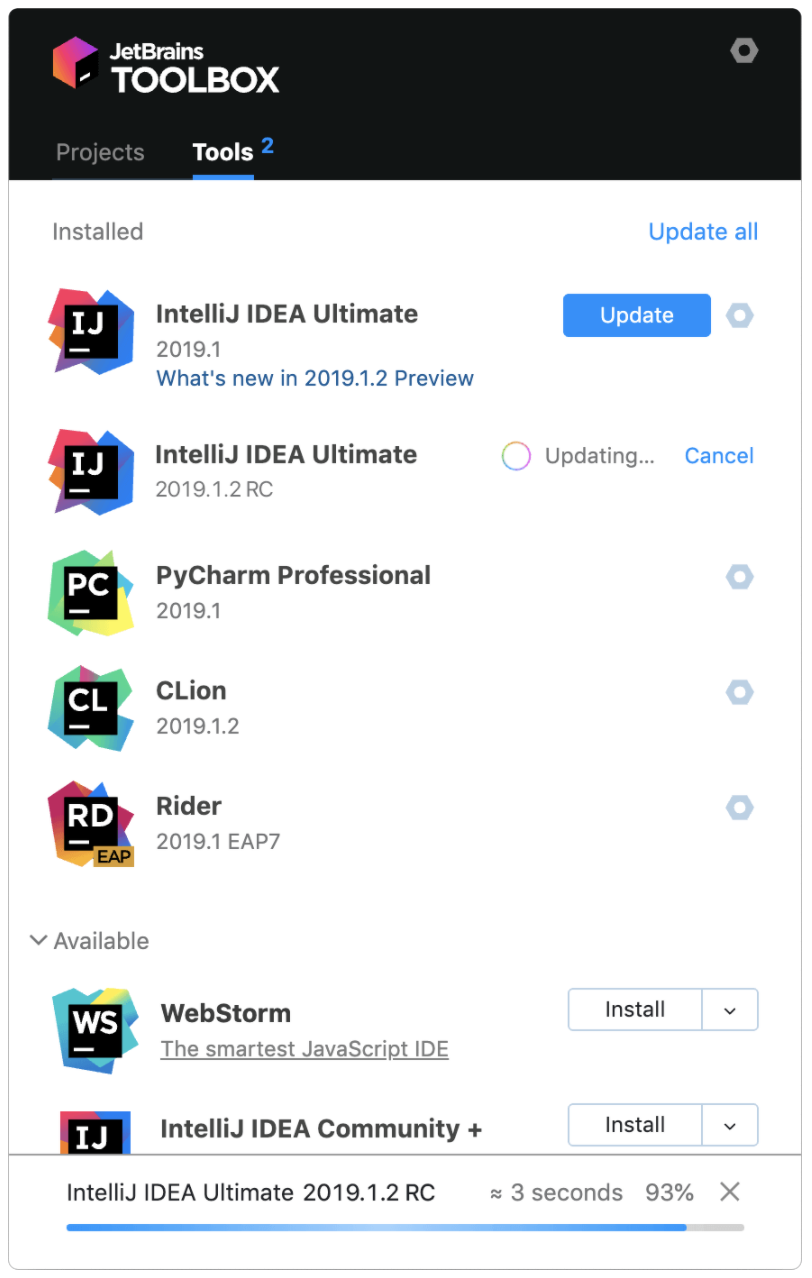
3. JetBrains Family Bucket
After installing JetBrains' ToolBox App, you can install all kinds of IDEs, including Android Studio, with one click.
4. Other application installation
For those who have already provided the Ubuntu version .deb installation file on the official website, after downloading the .deb installation file on the official website, execute the following command to install:
# installation
sudo apt install ./<file>.deb
If you are an earlier Linux distribution, you need to use the following command to install (the same below):
sudo dpkg -i <file>.deb
sudo apt-get install -f # Install dependencies
| Application | Download address |
|---|---|
| Chrome | https://www.google.com/chrome |
| VS Code | https://code.visualstudio.com |
| ZOOM | https://zoom.us/download#client_4meeting |
| WPS | https://www.wps.cn/product/wpslinux |
| NetEase Cloud Music | https://music.163.com/#/download |
| Baidu SkyDrive | Baidu SkyDrive...? What are you doing with this rubbish? ! ! |
| ... | ... |
Note: Some applications are not controlled by the Scale scaling factor, so even after the Scale is set to 200% in Settings>Displays, the UI elements are still displayed too small in the high-resolution screen. For example: ZOOM, NetEase Cloud Music, etc. In order to solve this problem, you can use the following command to start it, and it can be displayed normally.
# Start zoom, the zoom factor can be adjusted as needed
QT_SCALE_FACTOR=2 zoom

# Start NetEase Cloud Music
QT_SCALE_FACTOR=2 netease-cloud-music
5. Use Deepin-Wine to install QQ/TIM/WeChat/Office/...
The official website does not provide the Ubuntu version .deb installation file, but some applications in deepin can be installed using Deepin-Wine.
Wine is a technology that implements part of the Windows system API on the Linux platform, allowing users to seamlessly use Windows platform applications on the Linux platform.
deepin-wine is a wine program that has been modified on deepin linux by the deepin community in China, and the community has transplanted many Windows software on deepin-wine, such as WeChat, QQ, TIM, etc.
Someone on github developed a project deepin-wine-ubuntu, which migrated deepin-wine and various deb packages adapted to it to Ubuntu. To install WeChat, QQ and other software, we need to install deep-wine-ubuntu first. Methods as below:
# First clone deepin-wine-ubuntu source code to local
git clone [email protected]:wszqkzqk/deepin-wine-ubuntu.git

# Switch to the source directory
cd deepin-wine-ubuntu

# Installation script authorization
sudo chmod +x install_2.8.22.sh

# Install deep-wine-ubuntu
. /install_2.8.22.sh
After the installation of deep-wine-ubuntu is complete, we can download various deb software provided by Deepin Community. The specific installation method is the same as the installation method in Section 4:
# installation
sudo apt install ./<file>.deb
Various deb software download addresses provided by Deepin Community:
| Software | Download address |
|---|---|
| https://mirrors.aliyun.com/deepin/pool/non-free/d/deepin.com.qq.im | |
| TIM | https://mirrors.aliyun.com/deepin/pool/non-free/d/deepin.com.qq.office |
| https://mirrors.aliyun.com/deepin/pool/non-free/d/deepin.com.wechat | |
| ... | ... |
For more installation methods and software addresses, please refer to https://github.com/wszqkzqk/deepin-wine-ubuntu
If your system language is not Chinese, the Chinese language of the software started by deepin-wine will appear garbled. You need to modify the WINE_CMD line in the /opt/deepinwine/tools/run.sh file to:
WINE_CMD="LC_ALL=zh_CN.UTF-8 deepin-wine"
6. Install software in rmp format
Many softwares only provide installation packages in rmp format, but not in deb format, for example: xmind. Therefore, we need to convert it to a deb installation package before installing it. Here we take xmind as an example to see how to operate.
For example, we downloaded the xmind installation package XMind-2020.rpm:
# Add universe warehouse (if not added)
sudo add-apt-repository universe

# Update
sudo apt update

# Install Alien
sudo apt install alien

# will.rpm package is converted to.deb package (a deb installation package will be generated in the current directory, such as: XMind-2020.deb)
sudo alien XMind-2020.rpm

# installation
sudo dpkg -i XMind-2020.deb
Four. Desktop Beautification
1. Install tweek
sudo apt install gnome-tweak-tool
2. Install plug-in extension support
# Let gnome support plugin extensions
sudo apt install gnome-shell-extensions

# Chrome browser extension support, you can use the browser to install plug-ins
sudo apt install chrome-gnome-shell
3. List of commonly used plugins
| Plug-in name | Description |
|---|---|
| Dash to Dock | Custom dock |
| Screenshot Tool | Screenshot plugin |
| Clipboard Indicator | Extend the clipboard, you can see the past paste content |
| Coverflow Alt-Tab | Modify Alt-Tab application switching effect |
| Applications Menu | Add application entry in the top status bar |
| OpenWeather | The top status bar displays weather data |
| Places Status Indicator | Add file directory access entry in the top status bar |
| Status Title Bar | Display the title of the current window in the top status bar |
| GTK Title Bar | Remove the title bar of non-gtk applications |
| Hide Top Bar | Auto hide status bar |
| Transparent Top Bar | Transparent Status Bar |
| ... | ... |
You can explore more extensions on https://extensions.gnome.org.
4. Subject
You can download various desktop themes, Shell themes, icon themes on GNOME-LOOK
Install desktop or shell themes
# Unzip the downloaded theme file
tar -xvf FileName.tar //Unzip

# Copy the unzipped theme file to/usr/share/themes
sudo cp -r FileName /usr/share/themes
Install icon theme
# Unzip the downloaded theme file
tar -xvf FileName.tar //Unzip

# Copy the unzipped theme file to/usr/share/icons
sudo cp -r FileName /usr/share/icons
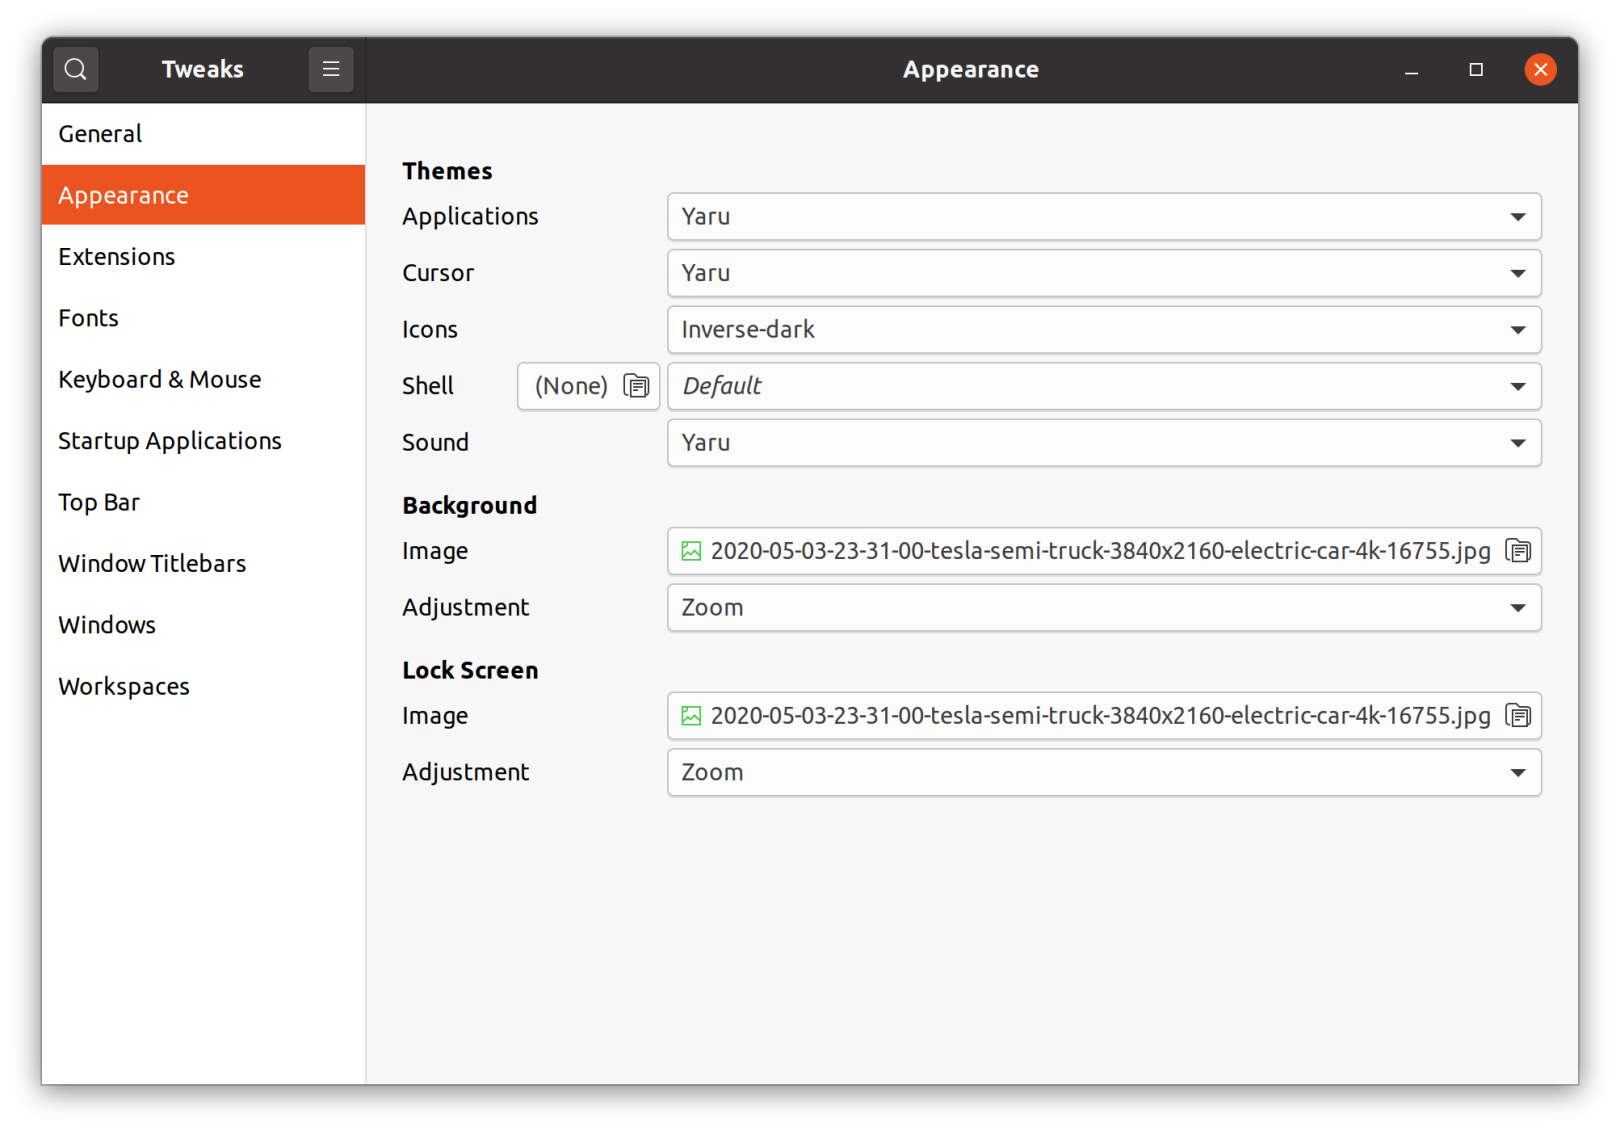
Then open Tweeks and select the theme to install
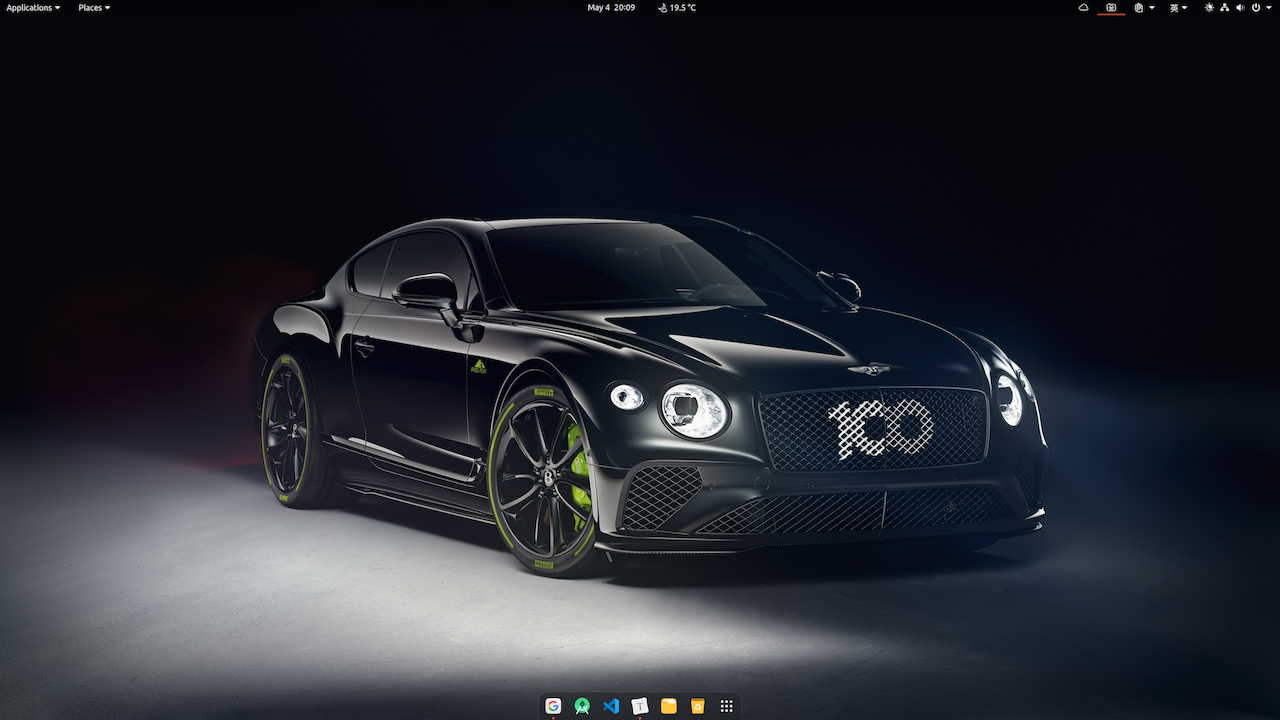
5. Wallpaper
Recommend several websites to download 4K 8K Ultra HD wallpapers:
Finally post a beautified desktop (Applications Theme: SURU++; Icons Theme: Reversal)
Five. Use problem records
Problem 1: Windows and Ubuntu dual system time is not uniform
If you have a dual system, after installing Ubuntu and setting the system time, you will find that the time is not uniform when you return to Windows. In order to understand why, we must first understand the basics:
- UTC (Coordinated Universal Time), Coordinated Universal Time (Uniform Universal Time);
- GMT (Greenwich Mean Time), Greenwich Mean Time.
Windows and Unix-like systems (Unix/Linux/Mac) treat system hardware time in different ways:
- Windows treats the computer hardware time as local time, so the time displayed in the Windows system is the same as the time displayed in the BIOS.
- Unix-like systems treat the computer hardware time as UTC, so after the system is started, it will add the time zone number set by the computer (plus 8 for China), so the time displayed in Ubuntu is always longer than that displayed in Windows The time is up to 8 hours.
When you set the time displayed by the system correctly in Ubuntu, the computer hardware time becomes 8 hours subtracted from this time, so when you switch to the Windows system, it is 8 hours slower. This is the reason.
Solution: Change the computer hardware time to the system display time in Ubuntu, that is, disable UTC in Ubuntu
timedatectl set-local-rtc 1--adjust-system-clock
Question 2: Ubuntu Cyclic Login
I encountered this problem in Ubuntu 19.10 version. I did not verify it in 20.04 version. I am not sure if there is the same problem.
Before solving the problem, let me add a key knowledge point: Display Manager, which is used to provide graphical login, display the graphical login interface to the user, and handle user authentication. Common display managers in Linux include gdm3, kdm, LightDM, etc.:
- gdm3: gdm3 is the successor of gdm, it is GNOME's display manager;
- kdm: kdm is KDE's display manager;
- LightDM: LightDM is a lightweight display manager, it is a standard solution for display managers.
the reason:
Practical verification, it is preliminarily determined that it is caused by a certain bug in dgm3 that is triggered by automatic login in the settings. (Ubuntu19.10 uses the GNOME desktop system by default, and gdm3 is the GNOME display manager)
Solution: Use LightDM to replace gdm3
Step 1: Install LightDM (Because you cannot enter the graphical desktop now, you need to use the ctl + alt + F2 shortcut on the login page to enter the command line mode, enter the account password to log in, and then use the following command to install)
sudo apt-get install lightdm
After the installation is complete, the system will automatically ask you to select the display manager installed in the current system, and select lightdm.
Step 2: Restart
sudo reboot
After restarting, you can log in normally.
At this time, you will find that the login interface has changed. If you want to switch back to the previous login interface, turn off the automatic login after entering the system, and then implement the following command to select the gdm3 display manager again (restart to take effect)
sudo dpkg-reconfigure gdm3
It is not that gdm3 bugs can be avoided after the automatic login is turned off. This may only apply to Ubuntu 19.10 I installed; the reasons I mentioned here may not apply to everyone. But one thing is certain, if there is a cyclic login, replacing the display manager can usually solve the problem.
If you want to view the display manager currently running on the system, you can use the following command:
cat /etc/X11/default-display-manager
Problem 3: NVIDIA driver repair
Ubuntu 20.04 comes with nvidia graphics driver, but I accidentally broke it. Mainly manifested in:
- The xrandr command mentioned earlier is invalid and cannot achieve decimal zooming;
- NVIDIA X Server Settings client opens blank;
- An error occurred when executing the
nvidia-settingscommand from the command line; - Settings>Displays cannot set multiple resolutions, etc.
If you have the same problem as me, or want to manually install the graphics card driver, you can follow the steps below. (You need to first go to NVIDIA official website to download the graphics card driver corresponding to your device)
# Install some dependent libraries first
sudo apt install build-essential libglvnd-dev pkg-config

# Stop the desktop manager and enter the command line to explore
sudo telinit 3

# Delete the installed nvidia driver
sudo apt purge "nvidia*"

# Manually install the graphics driver
sudo bash NVIDIA-Linux-x86_64-440.82.run

# Reboot
sudo reboot
For more graphics driver installation methods, please refer to: https://linuxconfig.org/how-to-install-the-nvidia-drivers-on-ubuntu-20-04-focal-fossa-linux
**Reference documents: **
- HiDPI#Non-integer zoom
- Ultimate Shell
- How to install the NVIDIA drivers on Ubuntu 20.04 Focal Fossa Linux
This document will continue to be updated, follow the public account BaronTalk, reply to Ubuntu to download the latest PDF version of the configuration document.
Recommended Posts