Install Chef server workstation on Ubuntu 18.04
Chef is an automation platform that "can convert the infrastructure model into code form", which allows users to manage and deploy resources across several servers (or several nodes) . The Chef automation platform also allows users to create and download "cookbooks" ("cookbooks" are stored in the "cooking manual" cookbook
Among them), the role of "recipes" is to automate the content and strategies on these nodes.
Chef consists of a Chef server, one or more workstation servers to be configured, and many nodes managed by the Chef client installed on each node.
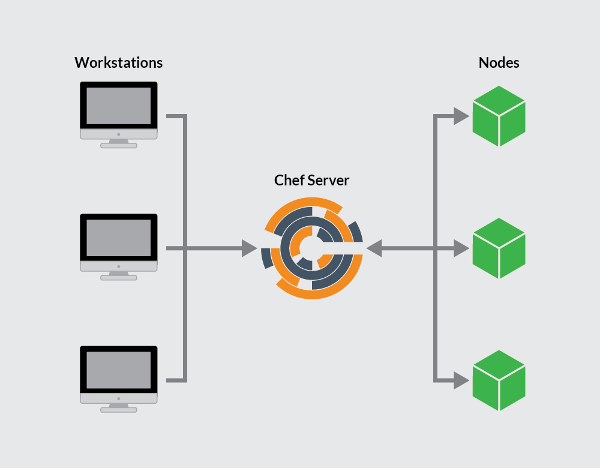 Chef architecture diagram
This guide introduces how to create and configure Chef servers, virtual workstations on Linode (VPS service provider) hosts, and how to run chef clients through boot nodes.
Note This guide is written for non-root users. You can add the prefix
sudoto commands that need to be elevated. If you are not familiar with thesudocommand, you can check our Users and Groups guide.
prerequisites##
A host used to host the Chef server, requires 4GB of RAM, and runs the Ubuntu 18.04 operating system
Two Linode hosts with small content, each running Ubuntu 18.04 operating system, which are used to host workstations and node hosts respectively
Please configure each Linode host according to the introduction of the two articles Linode Getting Started Guide and How to Protect Your Server
Each Linode host needs to be configured with a valid FQDN (fully qualified domain name)
Please ensure that the software on all hosts is up to date:
sudo apt update && sudo apt upgrade
Chef server##
Chef server is the interaction center between all Chef workstations and chef nodes. The configuration changes made on the workstation can be uploaded to the Chef server, and then the Chef server can be accessed by the Chef client, and the configuration changes can be synchronized to each node.
Install Chef Server
Download [the latest Chef service core installation package] (https://downloads.chef.io/chef-server/#ubuntu):
wget https://packages.chef.io/files/current/chef-server/12.17.54+20180531095715/ubuntu/18.04/chef-server-core_12.17.54+20180531095715-1_amd64.deb
Install the Chef service:
sudo dpkg -i chef-server-core_*.deb
Delete the downloaded file:
rm chef-server-core_*.deb
The Chef server contains a command-line utility named chef-server-ctl. Run chef-server-ctl to start the Chef server service:
sudo chef-server-ctl reconfigure
Create Chef User and User Group###
In order to link numerous workstations and sites to the chef server, we need to create an administrator and user group, and associate the two through the RSA private key.
Under the /home directory, create a .chef directory to store the private key:
mkdir .chef
Create a user by executing the chef-server-ctl command. In this example, some adjustments need to be made to the following keywords in the command: USER_NAME, FIRST_NAME, LAST_NAME, EMAIL, and PASSWORD. When adjusting USER_NAME.pem, you only need to change USERNAME, and its suffix name .pem needs to be retained
sudo chef-server-ctl user-create USER_NAME FIRST_NAME LAST_NAME EMAIL 'PASSWORD'--filename ~/.chef/USER_NAME.pem
Next, create a user group and bind the administrator user created in the previous step to the security user group. Change ORG_NAME to the short identifier of the user group, change ORG_FULL_NAME to the full name of the user group, change USER_NAME to the username of the user created in the previous step, and finally change the in ORG_NAME.pem ORG_NAMEG is changed to the user group short identifier, and its suffix name .pem is retained:
sudo chef-server-ctl org-create ORG_NAME "ORG_FULL_NAME"--association_user USER_NAME --filename ~/.chef/ORG_NAME.pem
After the Chef server is installed and the RSA key is generated, you can start configuring each workstation, which will perform all the main tasks for the Chef node.
Chef Workstation##
In the Chef workstation, you can create and configure any "cookbook", "cooking manual", attributes and other changes, which are all valid for the workstation. Although the local host can run any operating system, the benefits of using a remote server as a workstation host are obvious, because you can access it from anywhere.
Set up workstation###
Download the latest Chef Development Kit (Chef Development Kit):
wget https://packages.chef.io/files/stable/chefdk/3.1.0/ubuntu/18.04/chefdk_3.1.0-1_amd64.deb
Install ChefDK (abbreviation of Chef Development Kit):
sudo dpkg -i chefdk_*.deb
Delete installed files:
rm chefdk_*.deb
Generate chef-repo and move to the newly created directory:
chef generate app chef-repo
cd chef-repo
Create a .chef directory to store knife.rb ("cookbook" configuration file), ORGANIZATION-validator.pem and USER.pem files:
mkdir .chef
Add RSA private key###
When setting up the Chef server, you need to put the generated RSA private key on the workstation. The specific process behind this depends on whether you use SSH key authentication when logging in to the linode host.
If there is no login method that uses key authentication, please copy the file directly from the Chef server. For the following command, we need to change user to the username on your Chef server, and IP to the IP of the Chef server, or the URL address on the Chef server:
scp [email protected]:~/.chef/*.pem ~/chef-repo/.chef/
If you use the RSA key-pair authentication login method, you need to use the scp command from the local terminal to copy the file with the extension .pem from the server to the workstation. Change user to the corresponding username, and change 192.0.2.0 and 203.0.113.0 in the following command to the actual Chef server IP and site server IP respectively:
scp -3 [email protected]:~/.chef/*.pem [email protected]:~/chef-repo/.chef/
Use ls to list the contents of the files in the .chef directory to ensure that the files have been successfully copied:
ls ~/chef-repo/.chef
Here should show all files with the extension .pem in the directory.
Add version control###
Chef workstations are generally used to create and edit "cookbook" cookbook and other configuration files, and some form of version control on the workstation is very useful. ChefDK will install Git components on your workstation and initialize the Git repository when creating the Chef repo repository. Before that, we need to configure your username and email address globally in GIT, and add and submit any new files generated in the above steps.
Configure the username and email address of git globally, please modify the following values according to the actual situation:
git config --global user.name yourname
git config --global user.email [email protected]
Add the .chef directory to the .gitignore file:
echo ".chef">.gitignore
Add and submit all existing files:
git add .
git commit -m "initial commit"
Make sure the working directory is clean:
git status
It should output:
On branch master
nothing to commit, working directory clean
Generate knife.rb ("cookbook" configuration file)
Go to the ~/chef-repo/.chef folder and use your text editor to create the knife.rb configuration file.
Copy the following code into the knife.rb file
current_dir = File.dirname(__FILE__)
log_level                :info
log_location             STDOUT
node_name                'node_name'
client_key               "USER.pem"
validation_client_name   'ORG_NAME-validator'
validation_key           "ORGANIZATION-validator.pem"
chef_server_url          'https://example.com/organizations/ORG_NAME'
cache_type               'BasicFile'cache_options(:path =>"#{ENV['HOME']}/.chef/checksums")
cookbook_path            ["#{current_dir}/../cookbooks"]
Change the corresponding value below
Change node_name to the username you created on the chef server.
Change the USER.pem corresponding to client_key to USER.pem created by the user on the chef server to establish the mapping relationship.
Change the ORG_NAME-validator corresponding to validation_client_name to your ORG_NAME to splicing with -validator
Change the ORGANIZATION-validator.pem corresponding to validation_key to your ORG_NAME splicing-validator.pem
Finally, change chef_server_url to the fully qualified domain name of your own server, and add your user group short identifier ORG at the end
Enter the chef-repo directory and copy the necessary SSL certificate files from the server to the directory
cd ..
knife ssl fetch
Note These SSL certificates are automatically generated when the Chef server is installed. Obviously, this type of certificate is self-signed. This also means that there is no need to use third-party signing certificate authority (CA) services. The hostname and FQDN of the Chef server should be the same so that the workstation can obtain and verify the SSL certificate. You can verify the hostname and FQDN of the Chef server by running
hostnameandhostname -frespectively. For details on regenerating the SSL certificate, please refer to Chef documentation.
Please run the command knife.rb on the client to verify that the client is configured correctly:
knife client list
This command should output the validator name.
After configuring the server and workstation, we can boot to the node.
Boot Node##
During the process of booting the client node, the Chef client is automatically installed and the validity of the node is verified. During the boot process, the node is allowed to read relevant information from the Chef server. In the future, the chef client can also modify the relevant configuration information as needed.
Import from your workstation to your ~/chef-repo/.chef directory:
cd ~/chef-repo/.chef
Use the root user of the client node or a user with elevated privileges to guide the client node:
As a user with node root authority, please change the root password and the name of the client node nodename as needed. If you want to use the default host name of the client node, you can omit the option to modify the client node name:
knife bootstrap 192.0.2.0-x root -P password --node-name nodename
As a user with sudo authority, please change the user name username, user password password and the name of the client node nodename as needed. If you want to use the default host name of the client node, you can omit the option to modify the client node name:
knife bootstrap 192.0.2.0-x username -P password --sudo --node-name nodename
As a user with key pair authentication authority, please change the host user name username and the client node name nodename as needed. If you want to use the default host name of the client node, you can omit the option to modify the client node name:
knife bootstrap 192.0.2.0--ssh-user username --sudo --identity-file ~/.ssh/id_rsa.pub --node-name hostname
Make sure that the nodes are all booted by listing the client nodes:
knife client list
The list should contain all the latest clients.
Download Cookbook ('cooking manual') (optional)
When using the Chef service, you will want the Chef client to run on your nodes regularly and push all configuration changes to the Chef central server. For security reasons, you also want to delete the validation file validation.pem that the node client uploaded to the Chef server when booting the node. Although these steps can be completed manually, it is easier and more efficient to perform after setting it as a "recipe".
This part of the content is optional. We only provide instructions on how to download the "recipe" to the workstation and then how to push it to the server. This part of the content includes both an expandable and testable basic "recipe" framework.
Enter* from your workstation to the ~/chef-repo/.chef directory:
cd ~/chef-repo/.chef
Download the cookbook and its dependencies:
knife cookbook site install cron-delvalidate
Open the default.rb file to check the default cookbook "recipe":
#
# Cookbook Name:: cron-delvalidate
# Recipe:: Chef-Client Cron & Delete Validation.pem
#
#

cron "clientrun"do
 minute '0'
 hour '*/1'
 command "/usr/bin/chef-client"
 action :create
end

file "/etc/chef/validation.pem"do
 action :delete
end
cron "clientrun"do defines a timing operation, which means every hour (*/1 means every hour instead of 1 am every day), execute chef-client (/usr/bin/ chef-client) command, create a new scheduled job with the create identifier corresponding to action.
" The "/etc/chef/validation.pem" file is called by the validation.pem file. When the conditions are met, the corresponding operation "delete command" will be executed to remove the file.
In Ruby, these are two very basic operations. When creating Chef's "cooking manual" cookbook, examples of the most basic code structure will be provided. We can edit and extend these sample codes as needed.
Add the recipe to the running list of the node, and replace nodename with the name of the node:
knife node run_list add nodename 'recipecron-delvalidate::default'
Push the recipe cookbook to the Chef server:
knife cookbook upload cron-delvalidate
This command is also used when updating the cookbook.
Switch to your self-check (pull the server’s cookbook automatically) client node and run the initial chef-client command:
chef-client
If you run this command as a non-root user, add sudo before the command.
When running the recipe cookbook in the list, the node will pull the corresponding program from the server and run it. In this case, this kind of recipe usually contains cron-delvalidate timing job. In this way, the recipe pulled from the server can be guaranteed to be completely produced, and then the Chef site and nodes can push the changed configuration to the Chef server, and synchronize the information to the node list, and each node and workstation will automatically pull it every hour cookbook "cooking manual" to its own node. This automated step avoids the need to manually change the operation of the client when connecting to the node in the future.
Recommended Posts