How to install Bacula-Web on Ubuntu 14.04
Introduction
Bacula-Web is a PHP web application that provides an easy way to view summaries and graphs of Bacula backup jobs that have been run. Although it does not allow you to control Bacula in any way, Bacula-Web provides a graphical alternative to viewing jobs from the console. Bacula-Web is particularly useful for new users of Bacula, because its reports make it easy for people to understand how Bacula works.
In this tutorial, we will show you how to install Bacula-Web on an Ubuntu 14.04 server running Bacula server software.
Preparation
To follow this tutorial, you must install the Bacula backup server software on the Ubuntu server. Students who don’t have a server can buy it from here, but I personally recommend you to use the free Tencent Cloud Developer Lab for experimentation, and then buy server.
This tutorial assumes that your Bacula setup uses MySQL as the directory. If you are using other RDBMS, such as PostgreSQL, be sure to make appropriate adjustments to this tutorial. You need to install the corresponding PHP module and adjust the database connection information example.
let's start.
Install Nginx and PHP
Bacula-Web is a PHP application, so we need to install PHP and a web server. We will use Nginx.
Update your apt-get list:
sudo apt-get update
Then, use apt-get to install Nginx, PHP-fpm and some other packages:
sudo apt-get install nginx apache2-utils php5-fpm php5-mysql php5-gd
Now we are ready to configure PHP and Nginx.
Configure PHP-FPM
Open the PHP-FPM configuration file in your favorite text editor. We will use vi:
sudo vi /etc/php5/fpm/php.ini
Find the line specifying cgi.fix_pathinfo, uncomment it, and replace its value 0 with it. It should look like this when you are done.
cgi.fix_pathinfo=0
Now find the date.timezone setting, uncomment it, and replace its value with your time zone. We are in New York, so we are setting values:
date.timezone = America/New_York
If you need a list of supported time zones, please check PHP Document.
Save and exit.
PHP-FPM is configured correctly, so let's restart it for the changes to take effect:
sudo service php5-fpm restart
Configure Nginx
Now it's time to configure Nginx to serve PHP applications.
First, because we don't want unauthorized people to access Bacula-Web, let's create an htpasswd file. Use htpasswd to create an admin user named "admin" (you should use another name) that can access the Bacula-Web interface:
sudo htpasswd -c /etc/nginx/htpasswd.users admin
Enter the password at the prompt. Please remember this login information because you need it to access Bacula-Web.
Now open the Nginx default server block configuration file in a text editor. We will use vi:
sudo vi /etc/nginx/sites-available/default
Use the following code block to replace the contents of the file. Be sure to replace the server_name value with the server's domain name or IP address:
server {
listen 80 default_server;
listen [::]:80 default_server ipv6only=on;
root /usr/share/nginx/html;
index index.php index.html index.htm;
server_name server_domain_name_or_IP;
auth_basic "Restricted Access";
auth_basic_user_file /etc/nginx/htpasswd.users;
location /{
try_files $uri $uri/=404;}
error_page 404/404.html;
error_page 500502503504/50x.html;
location =/50x.html {
root /usr/share/nginx/html;}
location ~ \.php$ {
try_files $uri =404;
fastcgi_split_path_info ^(.+\.php)(/.+)$;
fastcgi_pass unix:/var/run/php5-fpm.sock;
fastcgi_index index.php;
fastcgi_param SCRIPT_FILENAME $document_root$fastcgi_script_name;
include fastcgi_params;}}
Save and exit. This will configure Nginx to serve the PHP application and use the htpasswd file we created earlier for authentication.
For the changes to take effect, restart Nginx.
sudo service nginx restart
Now we are ready to download Bacula-Web.
Download and configure Bacula-Web
Switch to your home directory and download the latest Bacula-Web archive.
cd ~
wget --content-disposition http://www.bacula-web.org/download.html?file=files/bacula-web.org/downloads/bacula-web-7.0.3.tgz
Now create a new directory bacula-web, change it, and extract the Bacula-Web archive:
mkdir bacula-web
cd bacula-web
tar xvf ../bacula-web-*.tgz
Before copying the file to the document root directory of the web server, we should configure it first.
Change to the configuration directory as follows:
cd application/config
Bacula-Web provides a sample configuration. Copy it like this:
cp config.php.sample config.php
Now edit the configuration file in a text editor. We will use vi:
vi config.php
Find // MySQL bacula catalog and uncomment the connection details. In addition, replace the password value with your Bacula database password (can be found in /etc/bacula/bacula-dir.conf in the "dbpassword" setting):
// MySQL bacula catalog
$config[0]['label']='Backup Server';
$config[0]['host']='localhost';
$config[0]['login']='bacula';
$config[0]['password']='bacula-db-pass';
$config[0]['db_name']='bacula';
$config[0]['db_type']='mysql';
$config[0]['db_port']='3306';
Save and exit.
Bacula-Web is now configured. The last step is to place the application files in the appropriate location.
Copy the Bacula-Web application to the document root directory
We use /usr/share/nginx/html to configure Nginx as the document root directory. Use the following command to change it and delete the default value index.html:
cd /usr/share/nginx/html
sudo rm index.html
Now, move the Bacula-Web file to the current location, the Nginx document root directory:
sudo mv ~/bacula-web/* .
Change the ownership of the file to www-data, the daemon user running Nginx:
sudo chown -R www-data:*
Bacula-Web is now fully installed.
Access Bacula-Web through a browser
Bacula-Web can now be accessed on the server's domain name or public IP address.
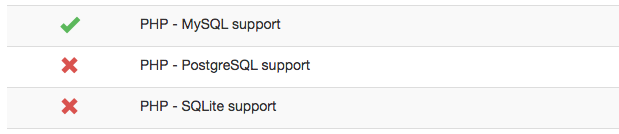
You may want to test that all configurations are correct. Fortunately, a Bacula-Web test page is provided. Access it by opening this URL in a web browser (replace the highlighted part with the server's information):
http://server_public_IP/test.php
You should see a table showing the status of various components of Bacula-Web. Except for the database modules you don't need, they should all have a green check mark status. For example, we are using MySQL, so we do not need other database modules:
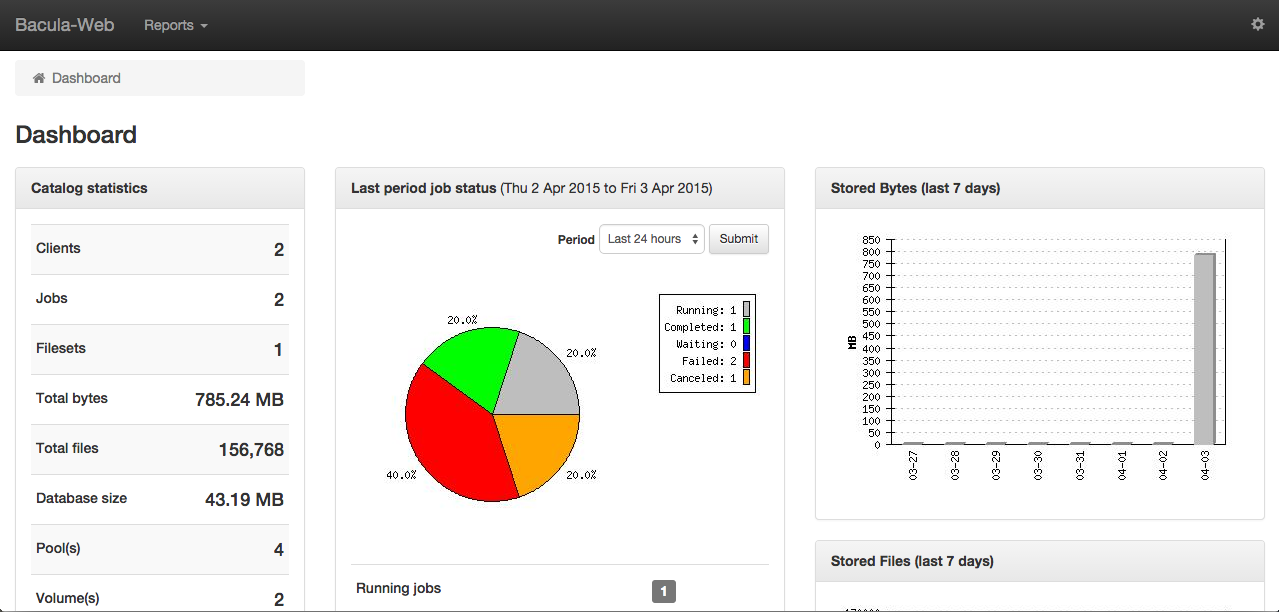
If all goes well, you can use the dashboard. You can access it by clicking the "Bacula-Web" text in the upper left corner or by visiting your server in a web browser:
http://server_public_IP/
It should look like this:
in conclusion
Now you are ready to use Bacula-Web to easily monitor your various Bacula jobs and status.
Have fun!
To learn more about the relevant tutorials on installing Bacula-Web, please go to [Tencent Cloud + Community] (https://cloud.tencent.com/developer?from=10680) to learn more.
Reference: "How To Install Bacula-Web on Ubuntu 14.04"
Recommended Posts