CentOS7はGlusterFSをインストールします
著作権表示:この記事はShaonPuppetによるオリジナル記事です。転載の元のアドレスを教えてください。ありがとうございます。 https://blog.csdn.net/wh211212/article/details/79412081
CentOS7はGlusterFSをインストールします#
GlusterFSの概要##
Glusterは大規模なファイルシステムです。これは、さまざまなストレージサーバーの組み合わせです。これらのサーバーは、イーサネットまたは無制限の帯域幅テクノロジーInfinibandおよびリモートダイレクトメモリアクセスRDMAによって相互に統合され、大規模な並列ファイルシステムネットワークを形成します。生物医学、ドキュメントストレージなど、クラウドコンピューティングを含む複数のアプリケーションがあります。 GlusterはGNUがホストする無料のソフトウェアであり、証明書はAGPLです。 Glusterは、Glusterの主要な商用スポンサーであり、商用製品とGlusterベースのソリューションを提供しています。
Glusterはクライアント/サーバーアーキテクチャです。サーバーは通常、ストレージブリック上に配置されます。各サーバーはglusterfsdと呼ばれるデーモンを実行し、ローカルファイルシステムをボリュームとして出力します。 Glusterのクライアントプロセスは、TCP / IP、InfiniBand、SDPなどのクライアントプロトコルを介してサーバーに接続し、リモートボリュームから大きないわゆるフォールディングトランスレータを形成します。最終ボリュームは、FUSEと呼ばれるユーザースペースファイルメカニズムを介してクライアントマシンにロードされます。多数のファイルアプリケーションを使用するI / Oは、libglusterfsクライアントライブラリを使用してサーバーに直接接続し、ファイルシステムやFUSEを経由せずに内部でトランスレータを実行することもできます。ほとんどのGlusterFS関数は、次のようなトランスレータとして実装されます。
- ファイルベースのミラーリングおよび割り当てテクノロジ
- ファイルベースのデータストレージおよびコンピューティングの分野におけるデータバンドテクノロジー
- ファイルベースの負荷分散テクノロジー
- ボリュームデュアルシステムバックアップテクノロジー
- ディスクキャッシュテクノロジーとスケジューリングテクノロジー
- ストレージ割り当てテクノロジー
GlusterFSのインストール##
GlusterFSの公式ドキュメントを参照してください:[http://docs.gluster.org/en/latest/Quick-Start-Guide/Quickstart/](http://docs.gluster.org/en/latest/Quick-Start-Guide/Quickstart/)
少なくとも2つのノード###
- 2つのCentOS7、ホスト名は次のとおりです。server1server2
- 2つのホスト間のネットワーク通信
- 少なくとも2つの仮想ディスクがあります。1つはOSインストール用で、もう1つはGlusterFSストレージ(sdb)を提供するためのものです(私はlvmボリュームを使用します)
ブリックをフォーマットしてインストールする###
# server1、server2の実行
lvcreate -n glusterfs -L 50G centos
mkfs.xfs -i size=512/dev/mapper/centos-glusterfs
mkdir -p /data/brick1
echo '/dev/mapper/centos-glusterfs  /data/brick1 xfs defaults 1 2'>>/etc/fstab
mount -a && mount
GlusterFSをインストールします###
- 各ノードにGlusterFSをインストールします
yum install glusterfs-server -y
- GlusterFSを起動します
[ root@ovirt ~]# systemctl start glusterd
[ root@ovirt ~]# systemctl status glusterd
● glusterd.service - GlusterFS, a clustered file-system server
 Loaded:loaded(/usr/lib/systemd/system/glusterd.service; disabled; vendor preset: disabled)
 Active:active(running) since Thu 2018-03-0111:50:37 CST; 6s ago
 Process:28808 ExecStart=/usr/sbin/glusterd -p /var/run/glusterd.pid --log-level $LOG_LEVEL $GLUSTERD_OPTIONS(code=exited, status=0/SUCCESS)
 Main PID:28809(glusterd)
 CGroup:/system.slice/glusterd.service
   └─28809/usr/sbin/glusterd -p /var/run/glusterd.pid --log-level INFO

Mar 0111:50:37 ovirt.aniu.so systemd[1]: Starting GlusterFS, a clustered file-system server...
Mar 0111:50:37 ovirt.aniu.so systemd[1]: Started GlusterFS, a clustered file-system server.
- 防火をオンにする場合は、ファイアウォールを構成する必要があります
# iptables
iptables -I INPUT -p all -s <ip-address>-j ACCEPT

# firewalld
firewall-cmd --add-service=glusterfs --permanent  && firewall-cmd --reload
信頼できるプールを構成する###
- server1
gluster peer probe server2
- server1、server2のピアステータスを確認します
# server1
# gluster peer status
Number of Peers:1

Hostname: server2
Uuid: 7529b9d2-f0c5-4702-9417-8d4cf6ca3247
State: Peer inCluster(Connected)

# server2
# gluster peer status
Number of Peers:1

Hostname: server1
Uuid: 7dcde0ed-f2fc-4940-a193-d69d02f356a5
State: Peer inCluster(Connected)
GlusterFSボリュームを設定します###
- server1とserver2で実行します
mkdir -p /data/brick1/gv0

chown vdsm:kvm /data/brick1 -R #オビルトマウント用
- 任意のノードから実行します。
# server1で実行
[ root@ovirt ~]# gluster volume create gv0 replica 2 server1:/data/brick1/gv0 server2:/data/brick1/gv0
Replica 2 volumes are prone to split-brain. Use Arbiter or Replica 3 to avoid this. See: http://docs.gluster.org/en/latest/Administrator%20Guide/Split%20brain%20and%20ways%20to%20deal%20with%20it/.
Do you still want to continue?(y/n) y
volume create: gv0: success: please start the volume to access data
[ root@ovirt ~]# gluster volume start gv0
volume start: gv0: success
- ボリュームが「開始」されていることを確認します
[ root@ovirt ~]# gluster volume info #すべてのノードが実行できます

Volume Name: gv0
Type: Replicate
Volume ID: caab8c47-3617-4d13-900a-5d6ca300e034
Status: Started
Snapshot Count:0
Number of Bricks:1 x 2=2
Transport-type: tcp
Bricks:
Brick1: server1:/data/brick1/gv0
Brick2: server2:/data/brick1/gv0
Options Reconfigured:
transport.address-family: inet
nfs.disable: on
performance.client-io-threads: off
GlusterFSボリュームをテストします###
- 別のサーバーでテストする
# glusterfsクライアントソフトウェアをインストールする
yum -y install glusterfs glusterfs-fuse
# マウント
mount -t glusterfs server1:/gv0 /mnt
for i in`seq -w 1 100`;do cp -rp /var/log/messages /mnt/copy-test-$i; done
#
- マウントポイントを確認してください
ls -lA /mnt/copy*| wc -l
100個のファイルが返されるはずです。次に、各サーバーのGlusterFSブリックマウントポイントを確認します。
# server1,server2で個別に実行
ls -lA /data/brick1/gv0/copy*| wc -l
ここにリストした方法を使用して、各サーバー上の100個のファイルを確認します。コピーがない場合は、配布ボリューム(ここでは詳しく説明しません)に、各ボリュームに約50個のファイルが表示されます。
建築##
- 分散ボリューム
gluster volume create test-volume server1:/exp1 server2:/exp2 server3:/exp3 server4:/exp4
Creation of test-volume has been successful
Please start the volume to access data
#
# gluster volume info
Volume Name: test-volume
Type: Distribute
Status: Created
Number of Bricks:4
Transport-type: tcp
Bricks:
Brick1: server1:/exp1
Brick2: server2:/exp2
Brick3: server3:/exp3
Brick4: server4:/exp4
- Glusterfsボリュームをコピーします
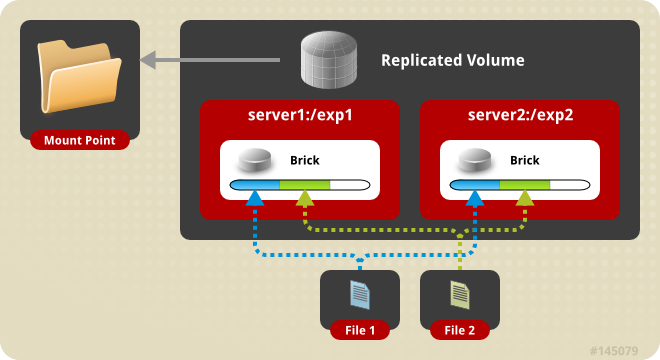
# gluster volume create test-volume replica 2 transport tcp server1:/exp1 server2:/exp2
Creation of test-volume has been successful
Please start the volume to access data
- Glusterfsボリュームの分散レプリケーション
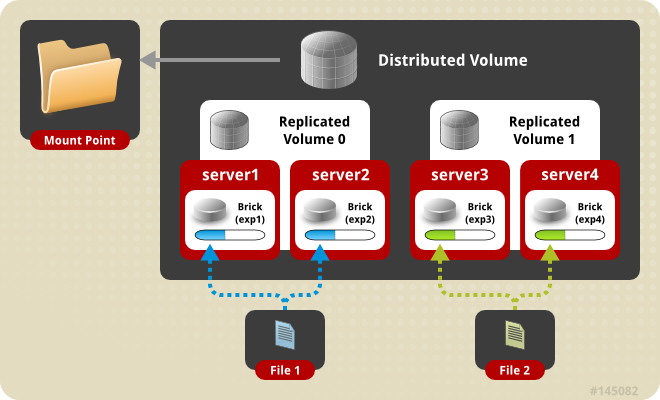
# gluster volume create test-volume replica 2 transport tcp server1:/exp1 server2:/exp2 server3:/exp3 server4:/exp4
Creation of test-volume has been successful
Please start the volume to access data
- 縞模様のGlusterfsボリューム

# gluster volume create test-volume stripe 2 transport tcp server1:/exp1 server2:/exp2
Creation of test-volume has been successful
Please start the volume to access data
- 分散ストライプGlusterfsボリューム

# gluster volume create test-volume stripe 4 transport tcp
 server1:/exp1 server2:/exp2 server3:/exp3 server4:/exp4 server5:/exp5 server6:/exp6 server7:/exp7 server8:/exp8
Creation of test-volume has been successful
Please start the volume to access data.
glusterfsの詳細については、[http://docs.gluster.org/en/latest/Administrator%20Guide/overview/](http://docs.gluster.org/en/latest/Administrator%20Guide/overview/)を参照してください。
Recommended Posts