centos7_1708のインストール
第1章centos7の使用
1.1 セントスの進化##
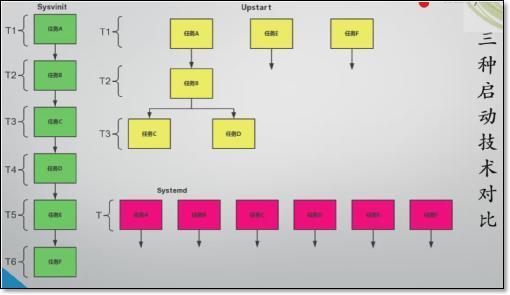
1.1.1 プロセスsysvinit ###を開始します
シリアルブート:一度に1つずつ、1つずつ
パラレルスタート:すべて一緒にスタート
initの利点
それは非常にうまく動作します。主にシェルスクリプトに依存します
初期化の欠点
1、 スロースタート
2、 克服しやすい、fstabおよびnfsの取り付けの問題
1.1.2 upstart technology
使用したバージョン:
centos6
ubuntu14
1.1.3 systemd技|
initの固有の欠点を克服し、システムの起動速度を向上させます
移行コストを削減する
1.1.4 3つのスタートアップテクノロジーの比較###
1.1.5 並列起動の3つの原則:###
1、 ソケットの依存関係/ポートの依存関係を解決する
ソケットネットワークソケットファイル
2、 Dバスを解く
依存関係:D-Busは、[メッセージキュー](https://cloud.tencent.com/product/cmq?from=10680)と同様に、プログラム間の通信ツールとして使用され、情報をキャッシュできます。
3、 autofsメカニズムと同様に、ファイルシステムの依存関係を解決します
1.2 centos7システムをインストールします##
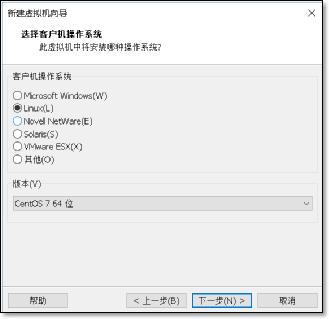
1.2.1 仮想マシンの選択###
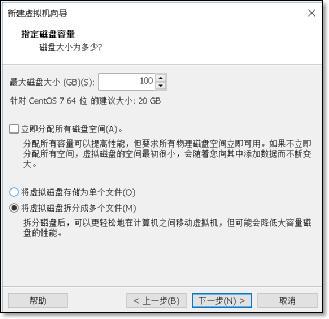
できるだけ多くのディスク容量
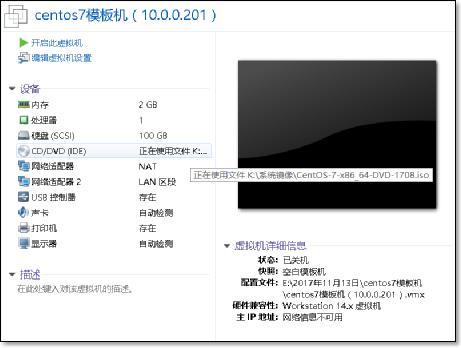
1.2.2 システムのインストール###
1 )インストールを起動します
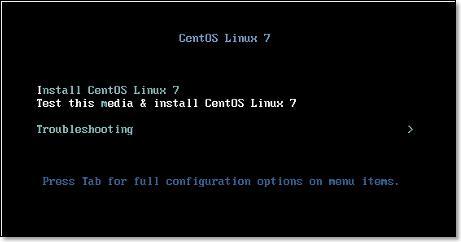
2 )TABを押す
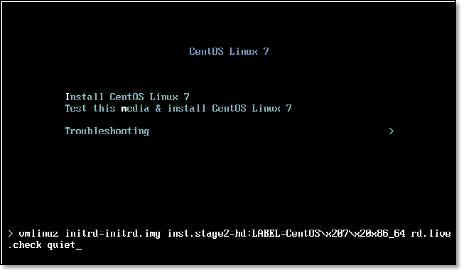
カーネルパラメータを追加して、ネットワークカード名をethにします
スペースにnet.ifnames = 0 biosdevname = 0と入力し、Enterキーを押します
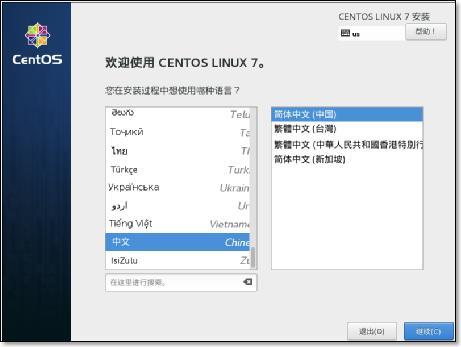
- 言語を選択してください
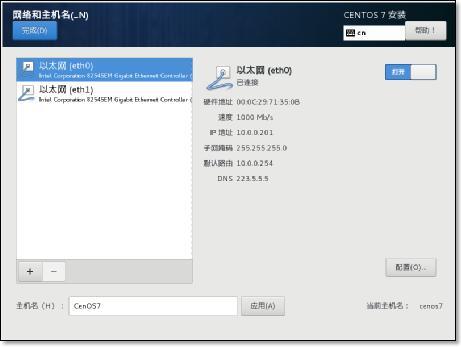
- ネットワーク接続とホスト名を設定する
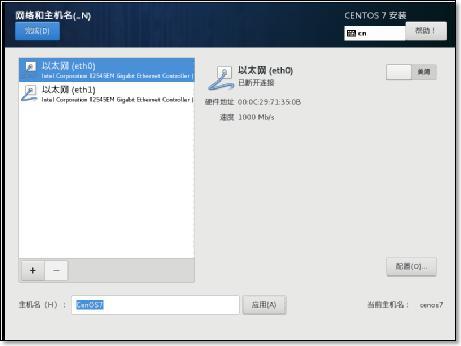
5) 電源投入時の自動起動を確認してください
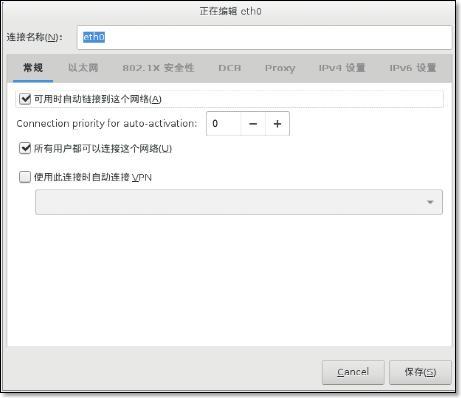
- IPアドレスを設定する

同じ方法で別のネットワークカードを構成します
- ホスト名を変更する
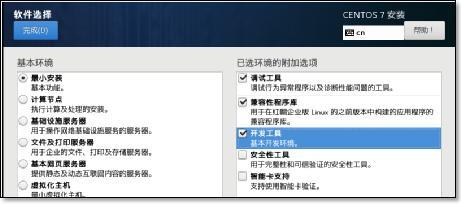
- インストール環境を選択し、最小限のインストールを選択します。
依存パッケージの確認に注意してください
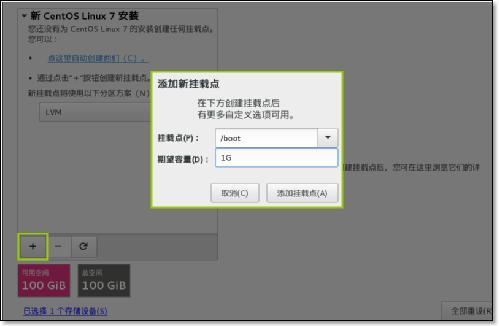
9 )ディスクパーティションはカスタムパーティションです。
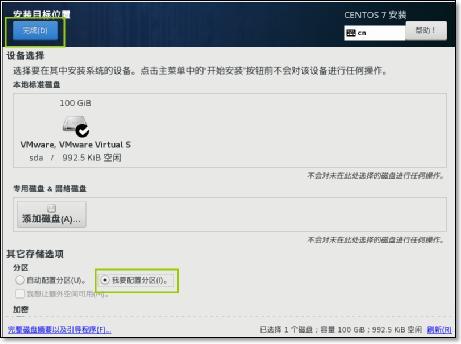
/ bootマウントポイントのサイズを選択します。ここで1gに設定
スワップマウントポイントを追加します
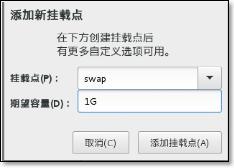
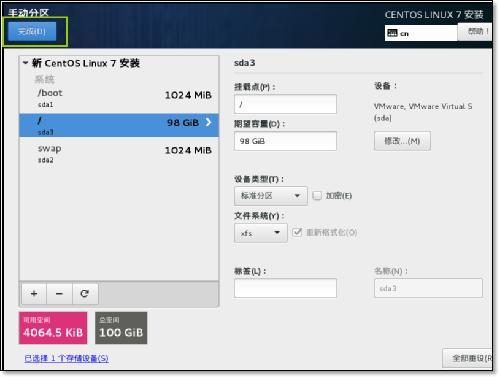
選択はすべて標準のパーティションタイプであり、ディスクに直接書き込むことに注意してください

ルートパーティションを追加すると、選択が完了します。
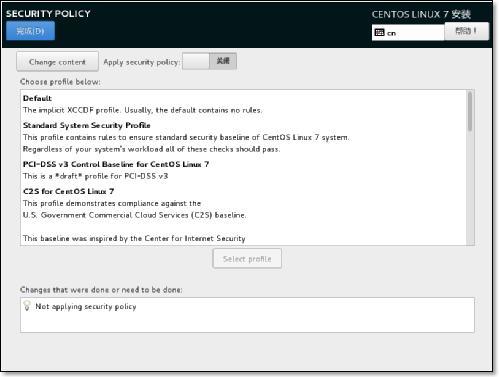
パスワード保護をオフにする
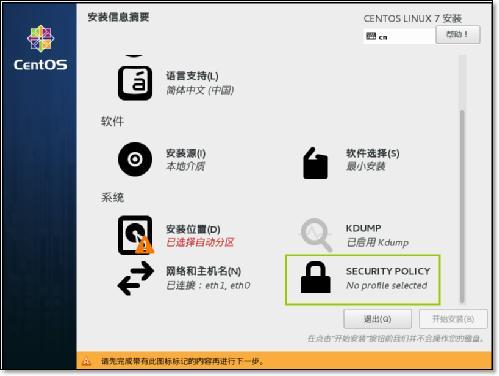
閉じるを選択
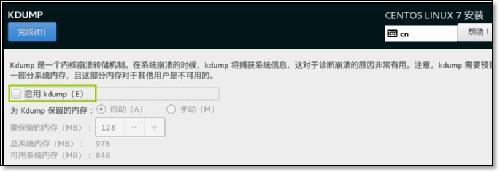
KDUMP機能をオフにする
インストールを開始し、469個のパッケージに注意してください
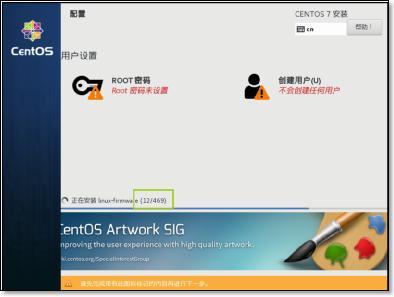
インストール時にrootパスワードを設定します。
1.3 インストール後の最適化##
システムバージョンを表示
[ root@CentOS7 ~]# cat /etc/redhat-release
CentOS Linux release 7.3.1611(Core)
yumソース、ベースソースを変更します
[ root@CentOS7 ~]# curl -o /etc/yum.repos.d/CentOS-Base.repo http://mirrors.aliyun.com/repo/Centos-7.repo
% Total % Received % Xferd Average Speed Time Time Time Current
Dload Upload Total Spent Left Speed
100257310025730029400--:--:----:--:----:--:--2940
epelソース
[ root@CentOS7 ~]# curl -o /etc/yum.repos.d/epel.repo http://mirrors.aliyun.com/repo/epel-7.repo
% Total % Received % Xferd Average Speed Time Time Time Current
Dload Upload Total Spent Left Speed
100108410010840091500:00:010:00:01--:--:--916
ソフトウェアをインストールする
yum install vim wget bash-completion lrzsz nmap nc tree htop iftop net-tools -y
**bash-completion **コマンドパラメータのパッケージを完成させます
1.4 centos7とcentos6 ##の違い
1.4.1 ネットワークカードを交換した後の名前変更の問題を解決する###
名前を変更する方法
CentOS7ネットワークカードの名前を従来の名前eth0形式に変更します
http://oldboy.blog.51cto.com/2561410/1722101
1.4.2 nmtui
centos7でのネットワーク管理のためのグラフィカルツール
1.4.3 ホスト名設定ファイルの違い###
一時的なホスト名
永続的な/ etc / hostname
[ root@CentOS7 ~]# cat /etc/hostname
CentOS7
ワンステップで完了
[ root@CentOS7 ~]# hostnamectl
Static hostname: CentOS7
Icon name: computer-vm
Chassis: vm
Machine ID: 4ab1c20b25f64a38a7197b8453b04b2c
Boot ID: abd0a393540b4788bc1e571b413b33c4
Virtualization: vmware
Operating System: CentOS Linux 7 (Core)
CPE OS Name: cpe:/o:centos:centos:7
Kernel: Linux 3.10.0-514.el7.x86_64
Architecture: x86-64
ホスト名を変更する
[ root@CentOS7 ~]# hostnamectl set-hostname clsn
1.4.4 キャラクターセット###
- 一時的*
[ root@clsn ~]# echo $LANG
zh_CN.UTF-8
- パーマネント*
[ root@clsn ~]# cat /etc/locale.conf
LANG="zh_CN.UTF-8"
ワンステップで完了
[ root@clsn ~]# localectl
System Locale: LANG=zh_CN.UTF-8
VC Keymap: cn
X11 Layout: cn
1.4.5 システムバージョン番号を表示する###
[ root@clsn bin]# cat /etc/os-release
NAME="CentOS Linux"
VERSION="7 (Core)"
ID="centos"
ID_LIKE="rhel fedora"
VERSION_ID="7"
PRETTY_NAME="CentOS Linux 7 (Core)"
ANSI_COLOR="0;31"
CPE_NAME="cpe:/o:centos:centos:7"
HOME_URL="https://www.centos.org/"
BUG_REPORT_URL="https://bugs.centos.org/"
CENTOS_MANTISBT_PROJECT="CentOS-7"
CENTOS_MANTISBT_PROJECT_VERSION="7"
REDHAT_SUPPORT_PRODUCT="centos"
REDHAT_SUPPORT_PRODUCT_VERSION="7"
1.4.6 互換性のあるrc.local
cat /etc/rc.local
Please note that you must run 'chmod +x /etc/rc.d/rc.local' to ensure
that this script will be executed during boot.
rc.localを使用して実行権限を付与したい
[ root@clsn bin]# chmod +x /etc/rc.d/rc.local
[ root@clsn bin]# ll /etc/rc.d/rc.local
- rwxr-xr-x。1ルートルート473 2016年11月7日/etc/rc.d/rc.local
1.4.7 実行レベル###
実行レベルを表示する以前の方法は引き続き使用されます
[ root@clsn init.d]# runlevel
N 3
元の実行レベルファイル
[ root@clsn init.d]# cat /etc/inittab
inittab is no longer used when using systemd.
ADDING CONFIGURATION HERE WILL HAVE NO EFFECT ON YOUR SYSTEM.
Ctrl-Alt-Delete is handled by /usr/lib/systemd/system/ctrl-alt-del.target
systemd uses 'targets' instead of runlevels. By default, there are two main targets:
multi-user.target: analogous to runlevel 3
graphical.target: analogous to runlevel 5
To view current default target, run:
systemctl get-default
To set a default target, run:
systemctl set-default TARGET.target
7 実行レベルを設定する
root@clsn init.d]# systemctl get-default multi-user.target
systemctl get-default#実行レベルを表示
- 例*
[ root@clsn ~]# systemctl get-default
multi-user.target
[ root@clsn ~]# systemctl set-default multi-user.target
Removed symlink /etc/systemd/system/default.target.
Created symlink from /etc/systemd/system/default.target to /usr/lib/systemd/system/multi-user.target.
実行レベルの変更
[ root@clsn ~]# ls -lh /usr/lib/systemd/system/runlevel*.target
lrwxrwxrwx。1ルートルート15November 13 11:16 /usr/lib/systemd/system/runlevel0.target-> poweroff.target
lrwxrwxrwx。1ルートルート1311月13日11:16 / usr / lib / systemd / system / runlevel1.target-> rescue.target
lrwxrwxrwx。1ルートルート1711月13日11:16 / usr / lib / systemd / system / runlevel2.target-> multi-user.target
lrwxrwxrwx。1ルートルート1711月13日11:16 / usr / lib / systemd / system / runlevel3.target-> multi-user.target
lrwxrwxrwx。1ルートルート1711月13日11:16 / usr / lib / systemd / system / runlevel4.target-> multi-user.target
lrwxrwxrwx。1ルートルート1611月13日11:16 / usr / lib / systemd / system / runlevel5.target-> graphical.target
lrwxrwxrwx。1ルートルート1311月13日11:16 / usr / lib / systemd / system / runlevel6.target-> restart.target
1.4.8 systemd一度天下###
システム起動ファイルのディレクトリ
[ root@clsn init.d]# ls /usr/lib/systemd/system
- 開始コマンドの例*
[ root@clsn init.d]# cat /usr/lib/systemd/system/crond.service
[ Unit]
Description=Command Scheduler
After=auditd.service systemd-user-sessions.service time-sync.target
[ Service]
EnvironmentFile=/etc/sysconfig/crond
ExecStart=/usr/sbin/crond -n $CRONDARGS
ExecReload=/bin/kill -HUP $MAINPID
KillMode=process
[ Install]
WantedBy=multi-user.target
文法形式
http://www.jinbuguo.com/systemd/systemd.service.html
1.4.9 管理サービス###
ファイアウォールサービスをオフにして、自動的に開始します
systemctl stop postfix.service
systemctl disable postfix.service
ファイアウォールの詳細なプロセスをオフにします
[ root@clsn ~]# systemctl disable firewalld.service
Removed symlink /etc/systemd/system/multi-user.target.wants/firewalld.service.
Removed symlink /etc/systemd/system/dbus-org.fedoraproject.FirewallD1.service.
[ root@clsn ~]# systemctl stop firewalld.service
[ root@clsn ~]# systemctl status firewalld.service
systemctl:serviceとchkconfigの機能を統合し、SysVおよびLSB起動スクリプトと互換性があり、起動プロセス中にサービスをより効果的にブートロードすることができます。 。
1.4.10 コマンド比較###
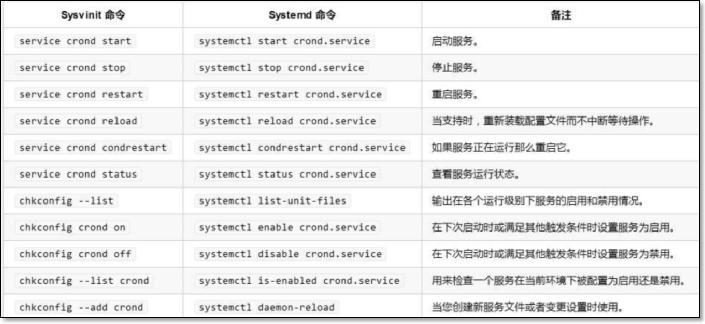
systemctl start crond.serviceには、systemctl startcrondと同じ効果があります。
1.4.11 起動時間の最適化###
systemd-analyze time
systemd-analyze blame
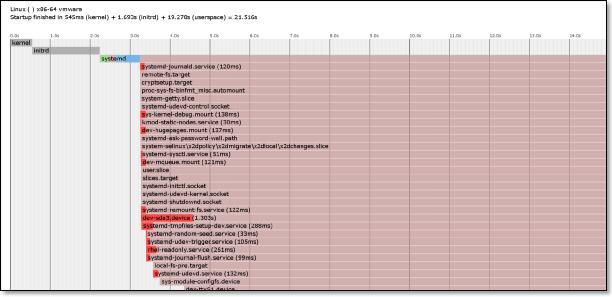
systemd-analyze plot >bootime.avg
起動時間
[ root@clsn system]# systemd-analyze time
Startup finished in 387ms (kernel) + 1.406s (initrd) + 31.831s (userspace) = 33.626s
特定の使用時間を確認してください
[ root@clsn system]# systemd-analyze blame
10.812 s sshd-keygen.service
10.758 s abrt-ccpp.service
6.395 s chronyd.service
……
生産チャート
[ root@clsn tmp]# systemd-analyze plot >bootime.svg
[ root@clsn tmp]# sz bootime.svg
1.4.12 スタートアップアイテムの最適化###
[ root@kickstart ~]# systemctl list-unit-files|egrep "^ab|^aud|^kdump|vm|^md|^mic|^post|lvm" |awk '{print $1}'|sed -r 's#(.*)#systemctl disable &#g'|bash
Removed symlink /etc/systemd/system/multi-user.target.wants/abrt-ccpp.service.
Removed symlink /etc/systemd/system/multi-user.target.wants/abrt-oops.service.
Removed symlink /etc/systemd/system/multi-user.target.wants/abrt-vmcore.service.
Removed symlink /etc/systemd/system/multi-user.target.wants/abrt-xorg.service.
Removed symlink /etc/systemd/system/multi-user.target.wants/abrtd.service.
Removed symlink /etc/systemd/system/multi-user.target.wants/auditd.service.
Removed symlink /etc/systemd/system/basic.target.wants/microcode.service.
Removed symlink /etc/systemd/system/multi-user.target.wants/vmtoolsd.service.
Removed symlink /etc/systemd/system/vmtoolsd.service.requires/vgauthd.service.
1.4.13 中国の参照文書###
https://access.redhat.com/documentation/zh-CN/Red_Hat_Enterprise_Linux/7/index.html
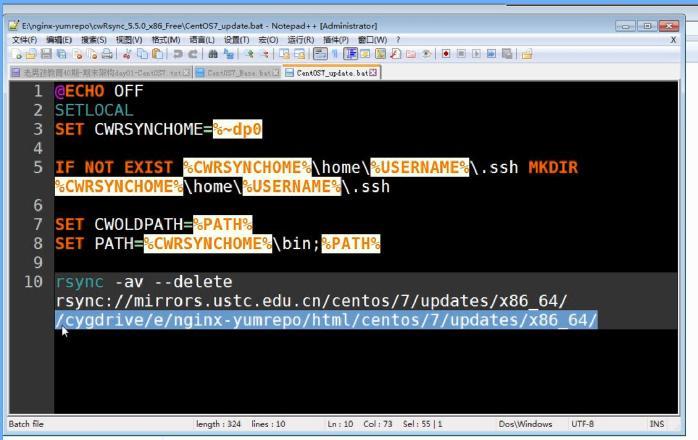
NginxはWindowsの起動時に自動的に起動します
C:\ Users \ Username \ AppData \ Roaming \ Microsoft \ Windows \ Start Menu \ Programs \ Startup
C:\Users\default.DESKTOP-U9D5JP4\AppData\Roaming\Microsoft\Windows\Start Menu\Programs\Startup
Recommended Posts