Deploy front-end projects using centOS 7
Purchase server##
Take Tencent Cloud as an example. If you are under 25, you can avoid student certification and use campus discount packages. Purchase address: Cloud + Campus [1]
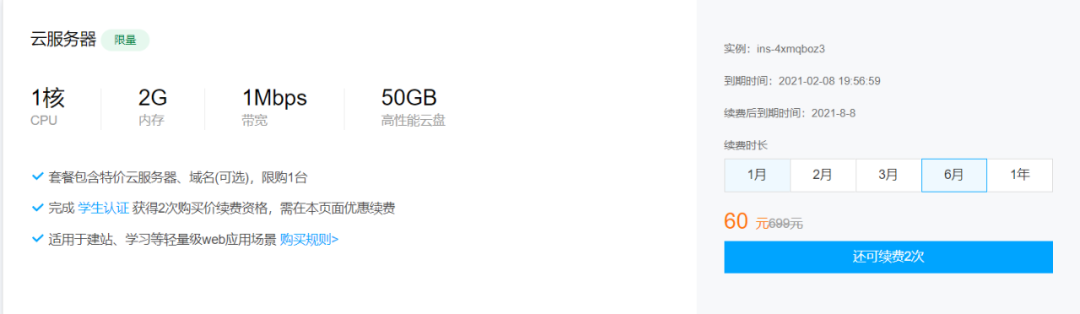
Campus discount package
This article takes centOS as an example. After purchase, the root password will be initialized, and the cloud server can be used!
Configure server##
After purchase, you can log in to the cloud service using the root username and the initial password provided by Tencent Cloud. You can use the official website online terminal command line program to operate, or you can use Xshell or git to log in to the server, and you need to download it before use. This article takes git as an example.
Enter the following command to log in:
ssh root@IP address
Then enter the password to log in to the cloud service. The default root password is very complicated, you can use the following command to change the root super administrator password:
passwd root
Create new user###
After logging in to the cloud server, you can create a user for work, use the following command:
adduser work
Then set the login password for the work user:
passwd work
Set permissions for work, use vi to open the configuration file:
vi /etc/sudoers
Press the i key on the keyboard to add permissions:
work ALL=(ALL) ALL
Press Esc, then Shift + : type wq! to save and exit.
We can check whether the new user is successfully set up, then open a terminal and log in to the server with this user:
ssh work@IP address
Enter the password of the created work user, OK! Login is successful. You can use this user to manage the cloud server in the future instead of using the root user directly.
Change ssh default port###
The default port of ssh is 22, which is known to everyone. If you are worried about security, you can change the default port so that others do not know the port number of your server ssh program.
First, you need to use vi to change the ssh configuration file:
sudo vi /etc/ssh/sshd_config
Change Port to 59999 or other port. After saving, use the following command to restart the ssh service:
sudo systemctl restart sshd
Then configure the firewall to open the port 59999:
sudo firewall-cmd --zone=public--add-port=59999/tcp --permanent
Restart the firewall:
sudo firewall-cmd --reload
For the newly purchased server, the firewall may not be enabled by default. You can use the following command to enable the firewall service first:
sudo systemctl start firewalld
Disable super user login###
The authority of the root user is very large, and everyone knows that the super user of the server is called root. We can prohibit the root user from using ssh to log in to the remote end. Still open the /etc/ssh/sshd_config file and enable or set the following configuration items:
PermitRootLogin no  #Root user is not allowed to log in
AllowUsers work
Password-free login###
You have to enter a password every time you log in to the server. This is a more troublesome thing. You can log in without password by configuring. First, you need to download the git program on the client.
Check the .ssh folder in the C:\User\admin directory of the local computer, and open the git bash program to check:
ls -a ~/.ssh
If there is no such directory, you can use the following command to generate:
ssh-keygen -t rsa -b 4096-C "email address"
Then press enter to generate. After generation, two files will be generated in .ssh, they are public and private keys generated by RSA asymmetric encryption algorithm. Then enter the following two commands to start the ssh proxy:
eval "$(ssh-agent -s)"
ssh-add ~/.ssh/id_rsa
The local computer is configured, and then log in to the cloud server and perform the same operations as the local computer. CentOS does not need to install git, and you can also execute the ssh-keygen command.
After the server generates the public key and private key, create a new file in the .ssh file:
vi authorized_key
Copy the id_rsa.pub public key in the .ssh directory on the local computer to the authorized_key file. Then use the following command to modify the permissions of the file:
chmod 600 authorized_key
Finally, open the /etc/ssh/sshd_config file and set the following configuration items:
PermitEmptyPasswords no
PasswordAuthentication no
Restart the ssh service:
sudo systemctl restart sshd
If your server fails after configuration, for example, you can’t log in, don’t worry, you can go to Tencent Cloud’s instance console, click Login, and log in to the server using VNC, it can use root The user logs in to the server and changes the previous modification back.
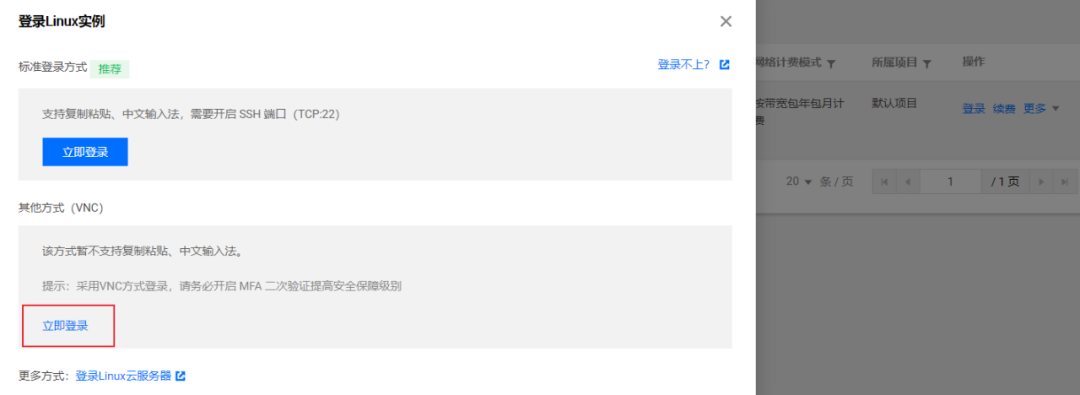
VNC
Project deployment###
Before deployment, you need to download the required software, first update the software package:
yum -y upgrade
Download some software:
yum install git nginx openssl curl wget
Download nvm, it is a version management tool of Node, you can switch between multiple Node versions. You can use curl or wget to install nvm:
curl -o- https://raw.githubusercontent.com/nvm-sh/nvm/v0.35.3/install.sh | bash
or:
wget -qO- https://raw.githubusercontent.com/nvm-sh/nvm/v0.35.3/install.sh | bash
After the download is complete, open a terminal, log in to the cloud server, and enter nvm -v with the newly opened terminal to find that the nvm installation is successful.
Download Node with the following command:
nvm install 8.6.0
Switch Node version:
nvm use v10.22.0
Set a certain version as the system default version:
nvm alias default v10.22.0
After downloading Node, npm is also downloaded. You can use npm to download cnpm to improve the download speed of the module:
npm install -g cnpm --registry=https://registry.npm.taobao.org
Upload the program to the server
To upload local programs to the cloud server, you can use the scp command, or use github or code cloud, or use gitlab to build a private warehouse. This article takes Code Cloud as an example. Using github to download the program source code will be slower.
First create a private warehouse of the project in Code Cloud, upload the project to Code Cloud through git, and don't forget to add the local public key of id_rsa.pub to Code Cloud before uploading. Similarly, copy the public key generated on the server to the code cloud.
Open port
Configure the firewall to open ports 80 and 443 so that the outside can access them.
sudo firewall-cmd --zone=public--add-port=80/tcp --permanent
sudo firewall-cmd --zone=public--add-port=443/tcp --permanent
Restart the firewall:
sudo firewall-cmd --reload
If you want to delete an open port, you can use the following command:
sudo firewall-cmd --zone=public--remove-port=80/tcp --permanent
Set boot up automatically:
sudo systemctl enable firewalld
View all open ports:
sudo firewall-cmd --list-all
- - permanent means permanent effect, and will become invalid after restart without this parameter.
After opening the port, pull the warehouse code on the code cloud:
git clone warehouse address
Then download the npm module:
npm install
The download may be slow, you can use yarn or cnpm to download.
After the download is complete, you can use the node command to run the program!
node server.js
At this time, open the browser, enter the server ip address plus the node server port number, you will find that the page is not loaded. . This is because the firewall does not open the port, and the firewall needs to be configured to allow the port. Enter the URL again and you will find that it is accessible!
Use domain name##
After the domain name is purchased, it cannot be used in the country. If you want to use it, you need to file. The filing is still very fast now. I bought the domain name on Tencent Cloud. On the third day, Tencent customer service called to say that there was a problem, and then he would suggest that you modify the filing information. After submitting it again, he will submit the filing information to the administrative bureau , I received a notice and passed the filing a day later. With the registered domain name, it can be used normally.
After completing the purchase and filing, you can go to the Tencent Cloud console, go to the [domain name resolution] (https://cloud.tencent.com/product/cns?from=10680) list, and click to add a record:

Add record
For web projects, the most basic thing is to add an A record. The A record can divide the purchased domain name into multiple subdomains, for example:
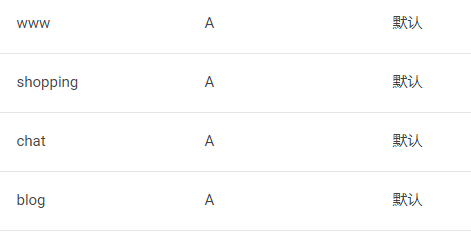
A record
The record value should fill in your server IP address. If your domain name is example.cn, the corresponding urls of the A records above are:
- www.example.cn
- shopping.example.cn
- chat.example.cn
- blog.example.cn
Use Nginx
Nginx is a high-performance HTTP and reverse proxy web server, which can forward requests from clients to the corresponding web server.
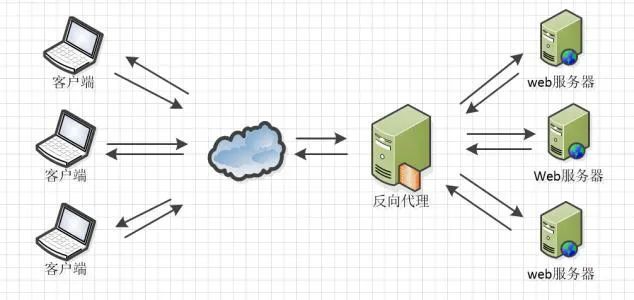
Nginx
There may be several web servers deployed on our server. They have their own ports, but the default port is 80 when accessing on the browser. At this time, you can set Nginx to hold port 80. When the client accesses the server, Nginx recognizes the request, and then forwards the request to the corresponding port program.
For example, if we want to deploy two projects on the server, we can create two new files in the /etc/nginx/conf.d/ directory:
- blog-3001.conf
- other-3002.conf
Open the following configuration items in /etc/nginx/nginx.conf:
include /etc/nginx/conf.d/*.conf;
Nginx will load all configuration files in the /conf.d directory. Each site is split separately for configuration.
The basic configuration is as follows:
# blog-3001.conf
upstream blog {
 server 127.0.0.1:3001;}

server {
 listen 80;
 server_name IP address or domain name;

 location /{
  proxy_set_header X-Real-IP $remote_addr;
  proxy_set_header X-Forward_For $proxy_add_x_forwarded_for;

  proxy_set_header Host $http_host;
  proxy_set_header X-Nginx-Proxy true;

  # The path name should be consistent with the upstream name
  proxy_pass http://blog;
  proxy_redirect off;}}
# other-3002.conf
upstream other {
 server 127.0.0.1:3001;}

server {
 listen 80;
 server_name IP address or domain name;

 location /{
  proxy_set_header X-Real-IP $remote_addr;
  proxy_set_header X-Forward_For $proxy_add_x_forwarded_for;

  proxy_set_header Host $http_host;
  proxy_set_header X-Nginx-Proxy true;

  proxy_pass http://other;
  proxy_redirect off;}}
After the configuration is complete, check whether the nginx configuration items are configured correctly through the following command:
sudo nginx -t
If the words ok and successful are output, the configuration is successful. Then use the following command to restart nginx:
sudo nginx -s reload
You can check the running status of nginx service with the following command:
sudo systemctl status nginx
Turn on or turn off the nginx service with the following two commands:
sudo systemctl stop nginx

suto systemctl start nginx
After restarting, open the browser, enter only the IP address, and find that the page can be accessed normally. If you don’t want others to see the version of Nginx used (in the http request message on the browser network panel), you can open the /etc/nginx/nginx.conf configuration file and write a configuration item:
server_tokens off
Use PM2 to deploy the project##
Although the program is deployed on the server, if the program is updated in the future, you will need to come to the server when you go online again, pull down the new warehouse code, re-run the program, and only use the node to run the program. In the event of an exception, the program is likely Will hang up.
Using PM2 allows us to update remote programs locally. pm2 is also a process manager for Node applications with [Load Balancing] (https://cloud.tencent.com/product/clb?from=10680) function. When you want to use your independent code to use all CPUs on all servers, and ensure that the process is always alive.
Need to download first when using:
npm install -g pm2
The same local computer also needs to install pm2. After installation, it needs to be configured.
First, run the following command in the local project root directory to generate the pm2 configuration file:
pm2 ecosystem init
An ecosystem.config.js configuration file will be generated in the project root directory. Write the following configuration:
module.exports ={
 apps:[{
 name:'my-project',//Entry file for pm2 operation
 script:'./server/index.js',
 env:{
  NODE_ENV:'development'},
 env_production:{
  NODE_ENV:'production'},}],

 deploy :{
 production :{
  user :'ming',//Server administrator name
  host :'Server IP address',
  port:'59999',//ssh service port number
  ref  :'origin/master',
  repo :'git warehouse address',
  path :'/www/blog/production',//Where to put the pulled item//Execute commands before deployment to pull the latest content of the remote host to the local'pre-deploy':'git fetch --all',//Execute after deployment, first download the npm module, and then compile typescript//Package the front-end project, and finally use PM2 to deploy the back-end service'post-deploy':'npm install --registry=https://registry.npm.taobao.org && tsc -p ts_server_config.json && npm run build && pm2 reload ecosystem.config.js --env production',}}};
After the configuration file is written, git push submits the code, and then uses the following command to initialize the deployment:
pm2 deploy production setup
The production in the command refers to the deploy.production in the configuration file. This command is run when the project is deployed for the first time, and every subsequent time (including this time), you only need to run the following command to complete the deployment.
pm2 deploy production
It should be noted that if you are not a root user, you may get an error when you execute the first command because you do not have permission to create directories or files.
Go to the server and create the root directory:
sudo mkdir /www

sudo cd /www

sudo mkdir blog     #The directory where the blog project is located
sudo mkdir demo     #The directory where the demo project is located
Elevate the rights of ordinary administrators so that they can operate files in the directories of blog and demo without using the sudo command without entering a password:
sudo chmod 777-R blog

sudo chmod 777-R demo
It should be successful when the submission is executed again, and an error may be reported when the second command is run. The error message is as follows:
bash: pm2: command not found

 post-deploy hook failed

deploy failed
This is because pm2 uses a non-interactive ssh connection method on the server. Use the whereis pm2 command to find the installation location of pm2, and then use the following command to hang up a soft connection for PM2:
sudo ln -s pm2 installation path
After the command runs, we only need to execute the pm2 deploy command locally to deploy automatically. The server will automatically execute the command to update the project.
PM2 commonly used commands:
pm2 start lsto view the projects managed by pm2;pm2 stop namestop running the corresponding project;pm2 start nameto run the corresponding project;pm2 logs nameView the running log of a project;
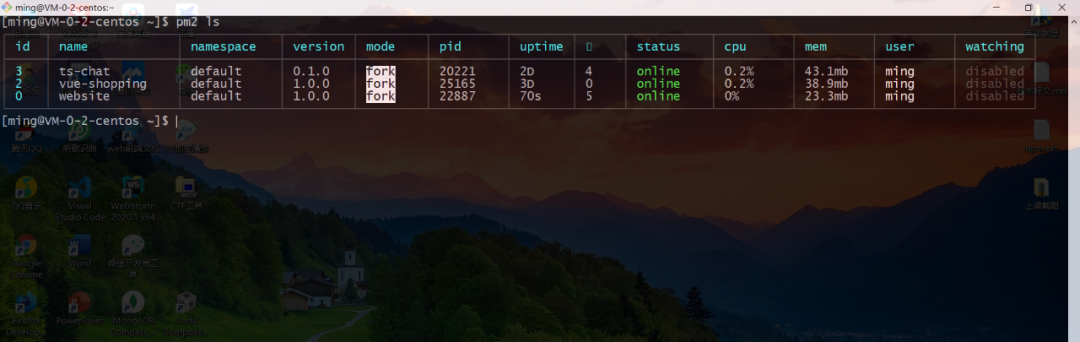
PM2
Apply for SSL certificate
In Tencent Cloud, we can apply for a free SSL certificate. Go to the console, click SSL certificate, and then click Apply for a free certificate.
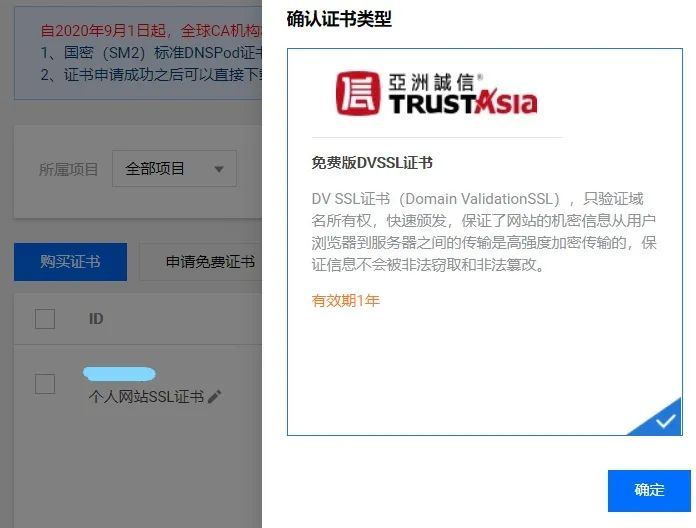
Free SSL certificate
At this time, you will come to the certificate application form page. The first item Common Name should fill in the domain name to be bound, such as www.example.cn or some other secondary domain names.
Then come to domain name authentication. Automatic DNS verification is very simple. You can apply for it with one click. If it is manually verified, a resolution list will be generated. You need to go to the domain name resolution list and find the common name that is consistent with the common name you filled in Record, replace the host record in the resolution list of the certificate with the host record of the domain name resolution list, replace the record value in the resolution list of the certificate with the record value of the domain name resolution list, and change the record type to TXT , for more specific operations, please refer to the official Tencent Cloud document: Domain Name (DV) Free Certificate Application Process**[2]**
After the certificate application is completed, go to the certificate list and download the certificate. After decompression, you will find that there are multiple server type certificates. This article uses Nginx server. We can upload the certificate file in the Nginx folder to the cloud server by using the scp command:
scp -P 59999./www.xxxx.cn/Nginx/2_www.xxxx.cn.key work@IP address:/home/work

scp -P 59999./www.xxxx.cn/Nginx/1_www.xxxx.cn_bundle.crt ming@IP address:/home/work
59999 Represents the server ssh service port number. After uploading, move the certificate to the /www directory:
sudo mkdir ssl

sudo /home/work/1_www.xxxx.cn_bundle.crt ssl/
sudo /home/work/2_www.xxxx.cn.key ssl/

sudo mv ssh /www/
Then configure Nginx:
upstream www {
 server 127.0.0.1:3000;}
server {
 listen 80;
 server_name xxxx.cn;return301 https://xxxx.cn$request_uri;}
server {
 # SSL access port number is 443
 listen 443 ssl;
 # Fill in the domain name of the binding certificate
 server_name xxxx.cn;
 # Certificate file name
 ssl_certificate /www/ssl/1_xxxx.cn_bundle.crt;
 # Private key file name
 ssl_certificate_key /www/ssl/2_xxxx.cn.key;
 ssl_session_timeout 5m;
 # Please configure according to the following protocol
 ssl_protocols TLSv1 TLSv1.1 TLSv1.2;
 # Please configure the encryption suite according to the following package configuration. The writing method follows the openssl standard.
 ssl_ciphers ECDHE-RSA-AES128-GCM-SHA256:HIGH:!aNULL:!MD5:!RC4:!DHE;
 ssl_prefer_server_ciphers on;if($ssl_protocol =""){
  rewrite ^(.*) https://$host$1 permanent;}

 location /{
  proxy_set_header X-Real-IP $remote_addr;
  proxy_set_header X-Forward_For $proxy_add_x_forwarded_for;

  proxy_set_header Host $http_host;
  proxy_set_header X-Nginx-Proxy true;

  proxy_pass http://www;
  proxy_redirect off;}}
After the configuration, restart the Nginx service, open the browser, enter the domain name, and you will find that https is online!
sudo nginx -s reload
For the practice of installing SSL certificates on more servers, please refer to Tencent Cloud official document: Server Certificate Installation**[3]**
Use mongoDB database##
How to install mongoDB can go to the official website, there is a detailed document description: install mongoDB on Redhat/centOS**[4]**
Import mongoDB database###
Usually some locally generated data needs to be uploaded to the server. You can use the following command to export the data. These data use .bson and .json as file suffixes.
mongodump -h 127.0.0.1:27017-d database name-o Exported directory name
After exporting, you can use the tar command to compress the directory, the command is as follows:
tar zcvf compressed file name export directory
Then you can use the scp command to upload the compressed package to the server. After uploading, decompress the file with the following command:
tar xvf compressed package
After decompression, enter the database directory and save the data file in the database:
mongorestore -d The name of the database to be imported into the directory path where the data is stored
The data file is stored in the mongoDB database.
References
[1]
Cloud + campus: https://cloud.tencent.com/act/campus
[2]
Domain name (DV) free certificate application process: https://cloud.tencent.com/document/product/400/6814
[3]
Server certificate installation: https://cloud.tencent.com/document/product/400/35244
[4]
Install mongoDB on Redhat/centOS: https://docs.mongodb.com/v4.2/tutorial/install-mongodb-on-red-hat/
Recommended Posts