CentOS7.7 deploy k8s (1 master + 2 node)
VMware creates three vms, specifications 2cpu 4G mem 200G disk, and a NAT network card
Environmental description:
Host name operating system version ip remarks
master Centos 7.7.1908 192.168.174.156 master host
node01 Centos 7.7.1908 192.168.174.157 node node
node02 Centos 7.7.1908 192.168.174.158 node node
Preliminary preparation (all nodes)
Modify the host name (if it has been modified when installing os, skip it)
# hostnamectl set-hostname <hostname>
Modify the hosts file
# cat << EOF >>/etc/hosts
192.168.174.156 master
192.168.174.157 node01
192.168.174.158 node02
EOF
Install common basic packages vim, wget, yum-utils, device-mapper-persistent-data, lvm2, bash-completion
# yum install -y vim wget yum-utils device-mapper-persistent-data lvm2 bash-completion
# source /etc/profile.d/bash_completion.sh
Turn off the firewall, selinux, swap
# systemctl stop firewalld
# systemctl disable firewalld
# setenforce 0
SELINUX=Enforcing is modified to SELINUX=disabled
# sed -i 's/SELINUX=.*/SELINUX=disabled/g'/etc/selinux/config
# swapoff -a
# sed -i.bak '/swap/s/^/#/'/etc/fstab
Password-free login
First node execution
# ssh-keygen -t rsa
Press enter to end
Secret key is synchronized to other nodes
ssh-copy-id -i /root/.ssh/id_rsa.pub root@<Other nodes>
Password-free login test
First node execution
# ssh <Ip of other nodes>
# ssh <Hostname of other nodes>
Install docker (all nodes)
Set docker source
# yum-config-manager --add-repo https://download.docker.com/linux/centos/docker-ce.repo
Install Docker CE
# yum list docker-ce --showduplicates | sort -r
# yum install -y docker-ce-18.09.6 docker-ce-cli-18.09.6 containerd.io
Start docker
# systemctl start docker
# systemctl enable docker
Configure domestic mirror acceleration
The login address is: https://cr.console.aliyun.com, if you have not registered, you can register an Alibaba Cloud account first
Click Mirror Accelerator of Mirror Center in the lower left corner
# mkdir -p /etc/docker
# sudo tee /etc/docker/daemon.json <<-'EOF'{"registry-mirrors":["https://w6pljua0.mirror.aliyuncs.com"]}
EOF
# systemctl daemon-reload
# systemctl restart docker
Verify docker installation
# docker --version
# docker run hello-world
Preparations before k8s installation (all nodes)
Kernel parameter modification
# cat <<EOF >/etc/sysctl.d/k8s.conf
net.bridge.bridge-nf-call-ip6tables =1
net.bridge.bridge-nf-call-iptables =1
EOF
# sysctl -p /etc/sysctl.d/k8s.conf
Modify Cgroup Driver
# vim /etc/docker/daemon.json
Add'"exec-opts":["native.cgroupdriver=systemd"’
# cat /etc/docker/daemon.json
{" registry-mirrors":["https://v16stybc.mirror.aliyuncs.com"],"exec-opts":["native.cgroupdriver=systemd"]}
Reload docker
# systemctl daemon-reload
# systemctl restart docker
The cgroupdriver is modified to eliminate the warning:
[ WARNING IsDockerSystemdCheck]: detected "cgroupfs"as the Docker cgroup driver. The recommended driver is "systemd". Please follow the guide at https://kubernetes.io/docs/setup/cri/
Set up kubernetes source
# cat <<EOF >/etc/yum.repos.d/kubernetes.repo
[ kubernetes]
name=Kubernetes
baseurl=https://mirrors.aliyun.com/kubernetes/yum/repos/kubernetes-el7-x86_64/
enabled=1
gpgcheck=1
repo_gpgcheck=1
gpgkey=https://mirrors.aliyun.com/kubernetes/yum/doc/yum-key.gpg https://mirrors.aliyun.com/kubernetes/yum/doc/rpm-package-key.gpg
EOF
# yum clean all
# yum -y makecache
Install k8s (Master node)
# yum list kubelet --showduplicates | sort -r
# yum install -y kubelet-1.14.2 kubeadm-1.14.2 kubectl-1.14.2
Start kubelet and set it to boot
# systemctl enable kubelet && systemctl start kubelet
kubelet command completion
# echo "source <(kubectl completion bash)">>~/.bash_profile
# source .bash_profile
Edit the script to download the mirror
# cat image.sh
#! /bin/bash
url=registry.cn-hangzhou.aliyuncs.com/google_containers
version=v1.14.2
images=(`kubeadm config images list --kubernetes-version=$version|awk -F '/' '{print $2}'`)for imagename in ${images[@]};do
 docker pull $url/$imagename
 docker tag $url/$imagename k8s.gcr.io/$imagename
 docker rmi -f $url/$imagename
done
# chmod u+x image.sh
# . /image.sh
# docker images
REPOSITORY                           TAG                 IMAGE ID            CREATED             SIZE
k8s.gcr.io/kube-proxy                v1.14.2             5c24210246bb        10 months ago       82.1MB
k8s.gcr.io/kube-apiserver            v1.14.2             5eeff402b659        10 months ago       210MB
k8s.gcr.io/kube-controller-manager   v1.14.2             8be94bdae139        10 months ago       158MB
k8s.gcr.io/kube-scheduler            v1.14.2             ee18f350636d        10 months ago       81.6MB
k8s.gcr.io/coredns                   1.3.1               eb516548c180        15 months ago       40.3MB
k8s.gcr.io/etcd                      3.3.10              2c4adeb21b4f        16 months ago       258MB
k8s.gcr.io/pause                     3.1                 da86e6ba6ca1        2 years ago         742kB
Initialize the Master
# kubeadm init --apiserver-advertise-address 192.168.174.156--pod-network-cidr=10.244.0.0/16[init] Using Kubernetes version: v1.14.2[preflight] Running pre-flight checks
[ preflight] Pulling images required for setting up a Kubernetes cluster
[ preflight] This might take a minute or two, depending on the speed of your internet connection
[ preflight] You can also perform this action in beforehand using 'kubeadm config images pull'[kubelet-start] Writing kubelet environment file with flags to file "/var/lib/kubelet/kubeadm-flags.env"[kubelet-start] Writing kubelet configuration to file "/var/lib/kubelet/config.yaml"[kubelet-start] Activating the kubelet service
[ certs] Using certificateDir folder "/etc/kubernetes/pki"[certs] Generating "ca" certificate and key
[ certs] Generating "apiserver" certificate and key
[ certs] apiserver serving cert is signed for DNS names [master kubernetes kubernetes.default kubernetes.default.svc kubernetes.default.svc.cluster.local] and IPs [10.96.0.1192.168.174.156][certs] Generating "apiserver-kubelet-client" certificate and key
[ certs] Generating "front-proxy-ca" certificate and key
[ certs] Generating "front-proxy-client" certificate and key
[ certs] Generating "etcd/ca" certificate and key
[ certs] Generating "etcd/server" certificate and key
[ certs] etcd/server serving cert is signed for DNS names [master localhost] and IPs [192.168.174.156127.0.0.1::1][certs] Generating "etcd/peer" certificate and key
[ certs] etcd/peer serving cert is signed for DNS names [master localhost] and IPs [192.168.174.156127.0.0.1::1][certs] Generating "etcd/healthcheck-client" certificate and key
[ certs] Generating "apiserver-etcd-client" certificate and key
[ certs] Generating "sa" key and public key
[ kubeconfig] Using kubeconfig folder "/etc/kubernetes"[kubeconfig] Writing "admin.conf" kubeconfig file
[ kubeconfig] Writing "kubelet.conf" kubeconfig file
[ kubeconfig] Writing "controller-manager.conf" kubeconfig file
[ kubeconfig] Writing "scheduler.conf" kubeconfig file
[ control-plane] Using manifest folder "/etc/kubernetes/manifests"[control-plane] Creating static Pod manifest for"kube-apiserver"[control-plane] Creating static Pod manifest for"kube-controller-manager"[control-plane] Creating static Pod manifest for"kube-scheduler"[etcd] Creating static Pod manifest for local etcd in"/etc/kubernetes/manifests"[wait-control-plane] Waiting for the kubelet to boot up the control plane asstatic Pods from directory "/etc/kubernetes/manifests". This can take up to 4m0s
[ apiclient] All control plane components are healthy after 16.003857 seconds
[ upload-config] storing the configuration used in ConfigMap "kubeadm-config"in the "kube-system" Namespace
[ kubelet] Creating a ConfigMap "kubelet-config-1.14"in namespace kube-system with the configuration for the kubelets in the cluster
[ upload-certs] Skipping phase. Please see --experimental-upload-certs
[ mark-control-plane] Marking the node master as control-plane by adding the label "node-role.kubernetes.io/master=''"[mark-control-plane] Marking the node master as control-plane by adding the taints [node-role.kubernetes.io/master:NoSchedule][bootstrap-token] Using token: zupr44.5ad2wpkkxl3qesko
[ bootstrap-token] Configuring bootstrap tokens, cluster-info ConfigMap, RBAC Roles
[ bootstrap-token] configured RBAC rules to allow Node Bootstrap tokens to post CSRs in order for nodes to get long term certificate credentials
[ bootstrap-token] configured RBAC rules to allow the csrapprover controller automatically approve CSRs from a Node Bootstrap Token
[ bootstrap-token] configured RBAC rules to allow certificate rotation for all node client certificates in the cluster
[ bootstrap-token] creating the "cluster-info" ConfigMap in the "kube-public" namespace
[ addons] Applied essential addon: CoreDNS
[ addons] Applied essential addon: kube-proxy

Your Kubernetes control-plane has initialized successfully!

To start using your cluster, you need to run the following as a regular user:

 mkdir -p $HOME/.kube
 sudo cp -i /etc/kubernetes/admin.conf $HOME/.kube/config
 sudo chown $(id -u):$(id -g) $HOME/.kube/config

You should now deploy a pod network to the cluster.
Run "kubectl apply -f [podnetwork].yaml"with one of the options listed at:
 https://kubernetes.io/docs/concepts/cluster-administration/addons/

Then you can join any number of worker nodes by running the following on each as root:

kubeadm join 192.168.174.156:6443--token zupr44.5ad2wpkkxl3qesko \
 - - discovery-token-ca-cert-hash sha256:d129df5787b082de4f6c5101881b6977e615d65a76cf59d0849a51c339731e12
If the initialization fails, execute kubeadm reset and re-initialize
# kubeadm reset
# rm -rf $HOME/.kube/config
Load environment variables
# echo "export KUBECONFIG=/etc/kubernetes/admin.conf">>~/.bash_profile
# source .bash_profile
Install pod network
# kubectl apply -f https://raw.githubusercontent.com/coreos/flannel/master/Documentation/kube-flannel.yml
podsecuritypolicy.policy/psp.flannel.unprivileged created
clusterrole.rbac.authorization.k8s.io/flannel created
clusterrolebinding.rbac.authorization.k8s.io/flannel created
serviceaccount/flannel created
configmap/kube-flannel-cfg created
daemonset.apps/kube-flannel-ds-amd64 created
daemonset.apps/kube-flannel-ds-arm64 created
daemonset.apps/kube-flannel-ds-arm created
daemonset.apps/kube-flannel-ds-ppc64le created
daemonset.apps/kube-flannel-ds-s390x created
https://raw.githubusercontent.com/coreos/flannel/master/Documentation/kube-flannel.yml
You can also click the link below to download, unzip after downloading
Download kube-flannel.tar.gz
Delete the default taint of the master node (optional)
taint: The meaning of taint. If a node is tainted, the pod is not allowed to run on this node
By default, the cluster does not schedule pods on the master. If you prefer to schedule pods on the master, you can perform the following operations:
View stains:
# kubectl describe node master|grep -i taints
Taints: node-role.kubernetes.io/master:NoSchedule
Delete the default stain:
# kubectl taint nodes master node-role.kubernetes.io/master-
node/master untainted
# kubectl describe node master|grep -i taints
Taints:<none>
grammar:
kubectl taint node [node] key=value[effect]
among them[effect]Possible value:[ NoSchedule | PreferNoSchedule | NoExecute ]
NoSchedule:Must not be scheduled
PreferNoSchedule:Try not to schedule
NoExecute:Not only will not schedule,Will also expel existing Pods on Node
Stain
# kubectl taint node master key1=value1:NoSchedule
node/master tainted
# kubectl describe node master|grep -i taints
Taints: key1=value1:NoSchedule
The key is key1, the value is value1 (value can be empty), and the effect is NoSchedule, which means it must not be scheduled
Remove stains:
kubectl taint nodes master key1-
node/master untainted
# kubectl describe node master|grep -i taints
Taints:<none>
Delete all effects of the specified key,‘-'Means to remove all stains with key1 as the key
k8s installation (Node node)
# yum install -y kubelet-1.14.2 kubeadm-1.14.2 kubectl-1.14.2
Start kubelet and set it to boot
# systemctl enable kubelet && systemctl start kubelet
kubelet command completion
# echo "source <(kubectl completion bash)">>~/.bash_profile
# source .bash_profile
Edit the script to download the mirror
# cat image.sh
#! /bin/bash
url=registry.cn-hangzhou.aliyuncs.com/google_containers
version=v1.14.2
images=(`kubeadm config images list --kubernetes-version=$version|awk -F '/' '{print $2}'`)for imagename in ${images[@]};do
 docker pull $url/$imagename
 docker tag $url/$imagename k8s.gcr.io/$imagename
 docker rmi -f $url/$imagename
done
# chmod u+x image.sh
# . /image.sh
# docker images
The following commands are executed on the master node
View token
# kubeadm token list
Found that the token at the time of initialization has expired
Generate a new token
# kubeadm token create
ns2eo4.3tbeaiji7y1jx4hj
Generate a new encrypted string
# openssl x509 -pubkey -in/etc/kubernetes/pki/ca.crt | openssl rsa -pubin -outform der 2>/dev/null|    openssl dgst -sha256 -hex | sed 's/^.* //'
d129df5787b082de4f6c5101881b6977e615d65a76cf59d0849a51c339731e12
Node node joins the cluster(Perform the following operations on the node node respectively)
# kubeadm join 192.168.174.156:6443--token ns2eo4.3tbeaiji7y1jx4hj --discovery-token-ca-cert-hash sha256:d129df5787b082de4f6c5101881b6977e615d65a76cf59d0849a51c339731e12
[ preflight] Running pre-flight checks
[ preflight] Reading configuration from the cluster...[preflight] FYI: You can look at this config file with'kubectl -n kube-system get cm kubeadm-config -oyaml'[kubelet-start] Downloading configuration for the kubelet from the "kubelet-config-1.14" ConfigMap in the kube-system namespace
[ kubelet-start] Writing kubelet configuration to file "/var/lib/kubelet/config.yaml"[kubelet-start] Writing kubelet environment file with flags to file "/var/lib/kubelet/kubeadm-flags.env"[kubelet-start] Activating the kubelet service
[ kubelet-start] Waiting for the kubelet to perform the TLS Bootstrap...

This node has joined the cluster:* Certificate signing request was sent to apiserver and a response was received.* The Kubelet was informed of the newsecure connection details.

Run 'kubectl get nodes' on the control-plane to see this node join the cluster.
Cluster test
Command deployment application
# kubectl run httpd-app --image=httpd --replicas=3
kubectl run --generator=deployment/apps.v1 is DEPRECATED and will be removed in a future version. Use kubectl run --generator=run-pod/v1 or kubectl create instead.
deployment.apps/httpd-app created
Deploy apache service via command line
Deploy the application in profile mode
cat >> nginx.yml << EOF
apiVersion: extensions/v1beta1
kind: Deployment
metadata:
name: nginx
spec:
replicas:3
template:
metadata:
labels:
app: nginx
spec:
restartPolicy: Always
containers:- name: nginx
image: nginx:latest
EOF
[ root@master ~]# kubectl apply -f nginx.yml
deployment.extensions/nginx created
Deploy nginx service through configuration file
View node status
# kubectl get nodes
View pod status
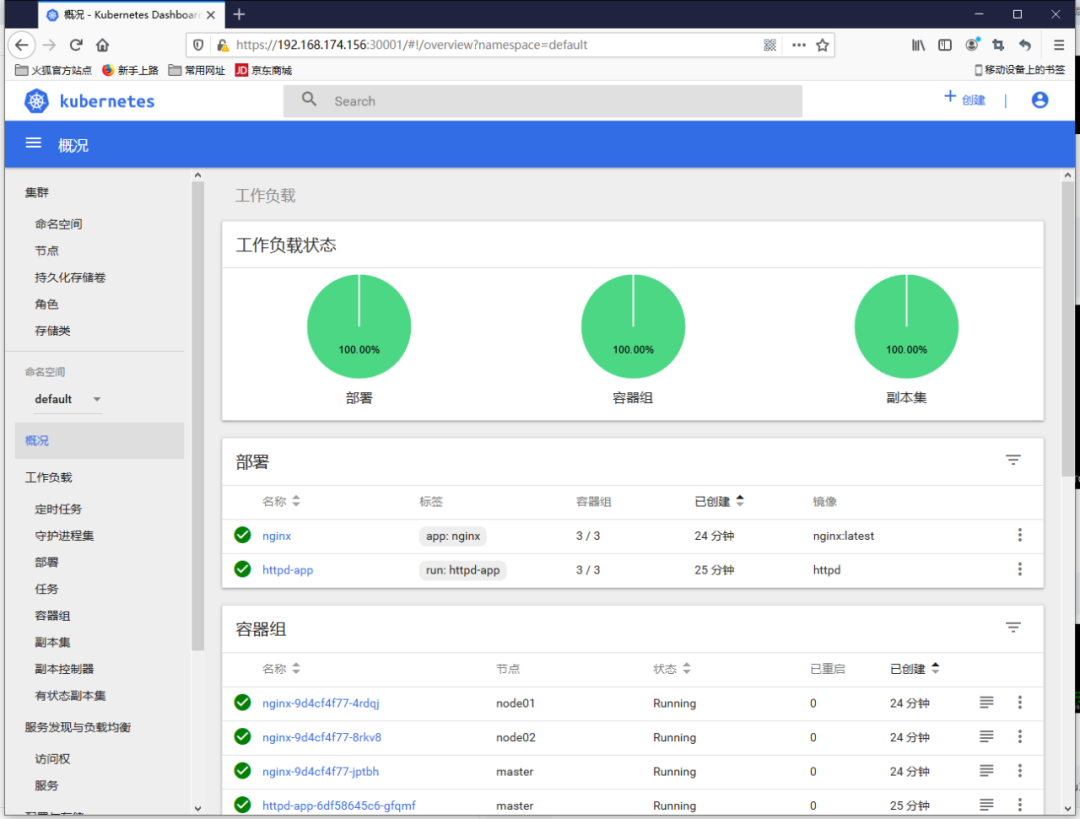
# kubectl get pod --all-namespaces
NAMESPACE NAME READY STATUS RESTARTS AGE
default httpd-app-6df58645c6-gfqmf 1/1 Running 0 48s
default httpd-app-6df58645c6-lsvc5 1/1 Running 0 48s
default httpd-app-6df58645c6-zqv7m 1/1 Running 0 48s
default nginx-9d4cf4f77-4rdqj 1/1 Running 0 17s
default nginx-9d4cf4f77-8rkv8 0/1 ContainerCreating 0 17s
default nginx-9d4cf4f77-jptbh 1/1 Running 0 17s
kube-system coredns-fb8b8dccf-76l4s 1/1 Running 0 81m
kube-system coredns-fb8b8dccf-7tdh6 1/1 Running 0 81m
kube-system etcd-master 1/1 Running 0 80m
kube-system kube-apiserver-master 1/1 Running 0 80m
kube-system kube-controller-manager-master 1/1 Running 0 80m
kube-system kube-flannel-ds-amd64-4gzpb 1/1 Running 0 2m26s
kube-system kube-flannel-ds-amd64-czb96 1/1 Running 0 2m31s
kube-system kube-flannel-ds-amd64-xm4rc 1/1 Running 0 76m
kube-system kube-proxy-46gnt 1/1 Running 0 2m31s
kube-system kube-proxy-lpgks 1/1 Running 0 2m26s
kube-system kube-proxy-vs8ck 1/1 Running 0 81m
kube-system kube-scheduler-master 1/1 Running 0 80m
View the number of copies
# kubectl get deployments
NAME READY UP-TO-DATE AVAILABLE AGE
httpd-app 3/333 72s
nginx 3/333 41s
# kubectl get pod -o wide
NAME READY STATUS RESTARTS AGE IP NODE NOMINATED NODE READINESS GATES
httpd-app-6df58645c6-gfqmf 1/1 Running 0 78s 10.244.0.4 master <none><none>
httpd-app-6df58645c6-lsvc5 1/1 Running 0 78s 10.244.2.2 node02 <none><none>
httpd-app-6df58645c6-zqv7m 1/1 Running 0 78s 10.244.1.2 node01 <none><none>
nginx-9d4cf4f77-4rdqj 1/1 Running 0 47s 10.244.1.3 node01 <none><none>
nginx-9d4cf4f77-8rkv8 1/1 Running 0 47s 10.244.2.3 node02 <none><none>
nginx-9d4cf4f77-jptbh 1/1 Running 0 47s 10.244.0.5 master <none><none>
You can see that the 3 replica pods of nginx and httpd are evenly distributed on 3 nodes
View deployment details
# kubectl describe deployments
Name: httpd-app
Namespace:default
CreationTimestamp: Fri,10 Apr 202017:08:26+0800
Labels: run=httpd-app
Annotations: deployment.kubernetes.io/revision:1
Selector: run=httpd-app
Replicas:3 desired |3 updated |3 total |3 available |0 unavailable
StrategyType: RollingUpdate
MinReadySeconds:0
RollingUpdateStrategy:25% max unavailable,25% max surge
Pod Template:
Labels: run=httpd-app
Containers:
httpd-app:
Image: httpd
Port:<none>
Host Port:<none>
Environment:<none>
Mounts:<none>
Volumes:<none>
Conditions:
Type Status Reason
----------------
Available True MinimumReplicasAvailable
Progressing True NewReplicaSetAvailable
OldReplicaSets:<none>
NewReplicaSet: httpd-app-6df58645c6(3/3 replicas created)
Events:
Type Reason Age From Message
-------------------------
Normal ScalingReplicaSet 107s deployment-controller Scaled up replica set httpd-app-6df58645c6 to 3
Name: nginx
Namespace:default
CreationTimestamp: Fri,10 Apr 202017:08:57+0800
Labels: app=nginx
Annotations: deployment.kubernetes.io/revision:1
kubectl.kubernetes.io/last-applied-configuration:{"apiVersion":"extensions/v1beta1","kind":"Deployment","metadata":{"annotations":{},"name":"nginx","namespace":"default"},"spec":{"replica...
Selector: app=nginx
Replicas:3 desired |3 updated |3 total |3 available |0 unavailable
StrategyType: RollingUpdate
MinReadySeconds:0
RollingUpdateStrategy:1 max unavailable,1 max surge
Pod Template:
Labels: app=nginx
Containers:
nginx:
Image: nginx:latest
Port:<none>
Host Port:<none>
Environment:<none>
Mounts:<none>
Volumes:<none>
Conditions:
Type Status Reason
----------------
Available True MinimumReplicasAvailable
OldReplicaSets:<none>
NewReplicaSet: nginx-9d4cf4f77(3/3 replicas created)
Events:
Type Reason Age From Message
-------------------------
Normal ScalingReplicaSet 76s deployment-controller Scaled up replica set nginx-9d4cf4f77 to 3
View the status of basic cluster components
# kubectl get cs
NAME STATUS MESSAGE ERROR
scheduler Healthy ok
controller-manager Healthy ok
etcd-0 Healthy {"health":"true"}
Dashboard installation
Prepare kubernetes-dashboard.yaml file
# wget  https://raw.githubusercontent.com/kubernetes/dashboard/master/aio/deploy/recommended/kubernetes-dashboard.yaml
Modify the mirror address
# sed -i 's/k8s.gcr.io/registry.cn-hangzhou.aliyuncs.com\/kuberneters/g' kubernetes-dashboard.yaml
Because the default mirror warehouse network is not accessible, it is changed to Ali mirror
# sed -i '/targetPort:/a\ \ \ \ \ \ nodePort: 30001\n\ \ type: NodePort' kubernetes-dashboard.yaml
Configure NodePort, externally through https://NodeIp:NodePort access Dashboard, the port is 30001 at this time
Add an administrator account
# cat >> kubernetes-dashboard.yaml << EOF
---
# - - - - - - - - - - - - - - - - - - - dashboard-admin ------------------- #
apiVersion: v1
kind: ServiceAccount
metadata:
 name: dashboard-admin
 namespace: kube-system

---
apiVersion: rbac.authorization.k8s.io/v1beta1
kind: ClusterRoleBinding
metadata:
 name: dashboard-admin
subjects:- kind: ServiceAccount
 name: dashboard-admin
 namespace: kube-system
roleRef:
 apiGroup: rbac.authorization.k8s.io
 kind: ClusterRole
 name: cluster-admin
 EOF
https://raw.githubusercontent.com/kubernetes/dashboard/master/aio/deploy/recommended/kubernetes-dashboard.yaml
You can also download through the link below, unzip after downloading
Download kubernetes-dashboard.tar.gz
If you download the above link, you do not need to operate the above operation of replacing the content of the kubernetes-dashboard.yml file, and the file in the link has already replaced the relevant content.
Deploy Dashboard
# kubectl apply -f kubernetes-dashboard.yaml
secret/kubernetes-dashboard-certs created
secret/kubernetes-dashboard-csrf created
serviceaccount/kubernetes-dashboard created
role.rbac.authorization.k8s.io/kubernetes-dashboard-minimal created
rolebinding.rbac.authorization.k8s.io/kubernetes-dashboard-minimal created
deployment.apps/kubernetes-dashboard created
service/kubernetes-dashboard created
serviceaccount/dashboard-admin created
clusterrolebinding.rbac.authorization.k8s.io/dashboard-admin created
Status view
[ root@master ~]# kubectl get deployment kubernetes-dashboard -n kube-system
NAME READY UP-TO-DATE AVAILABLE AGE
kubernetes-dashboard 1/111 18m
[ root@master ~]# kubectl get pods -n kube-system -o wide
NAME READY STATUS RESTARTS AGE IP NODE NOMINATED NODE READINESS GATES
coredns-fb8b8dccf-76l4s 1/1 Running 0 117m 10.244.0.3 master <none><none>
coredns-fb8b8dccf-7tdh6 1/1 Running 0 117m 10.244.0.2 master <none><none>
etcd-master 1/1 Running 0 116m 192.168.174.156 master <none><none>
kube-apiserver-master 1/1 Running 0 116m 192.168.174.156 master <none><none>
kube-controller-manager-master 1/1 Running 0 116m 192.168.174.156 master <none><none>
kube-flannel-ds-amd64-4gzpb 1/1 Running 0 38m 192.168.174.158 node02 <none><none>
kube-flannel-ds-amd64-czb96 1/1 Running 0 39m 192.168.174.157 node01 <none><none>
kube-flannel-ds-amd64-xm4rc 1/1 Running 0 113m 192.168.174.156 master <none><none>
kube-proxy-46gnt 1/1 Running 0 39m 192.168.174.157 node01 <none><none>
kube-proxy-lpgks 1/1 Running 0 38m 192.168.174.158 node02 <none><none>
kube-proxy-vs8ck 1/1 Running 0 117m 192.168.174.156 master <none><none>
kube-scheduler-master 1/1 Running 0 116m 192.168.174.156 master <none><none>
kubernetes-dashboard-7b87f5bdd6-z7smh 1/1 Running 0 18m 10.244.1.4 node01 <none><none>[root@master ~]# kubectl get services -n kube-system
NAME TYPE CLUSTER-IP EXTERNAL-IP PORT(S) AGE
kube-dns ClusterIP 10.96.0.10<none>53/UDP,53/TCP,9153/TCP 118m
kubernetes-dashboard NodePort 10.111.109.30<none>443:30001/TCP 18m
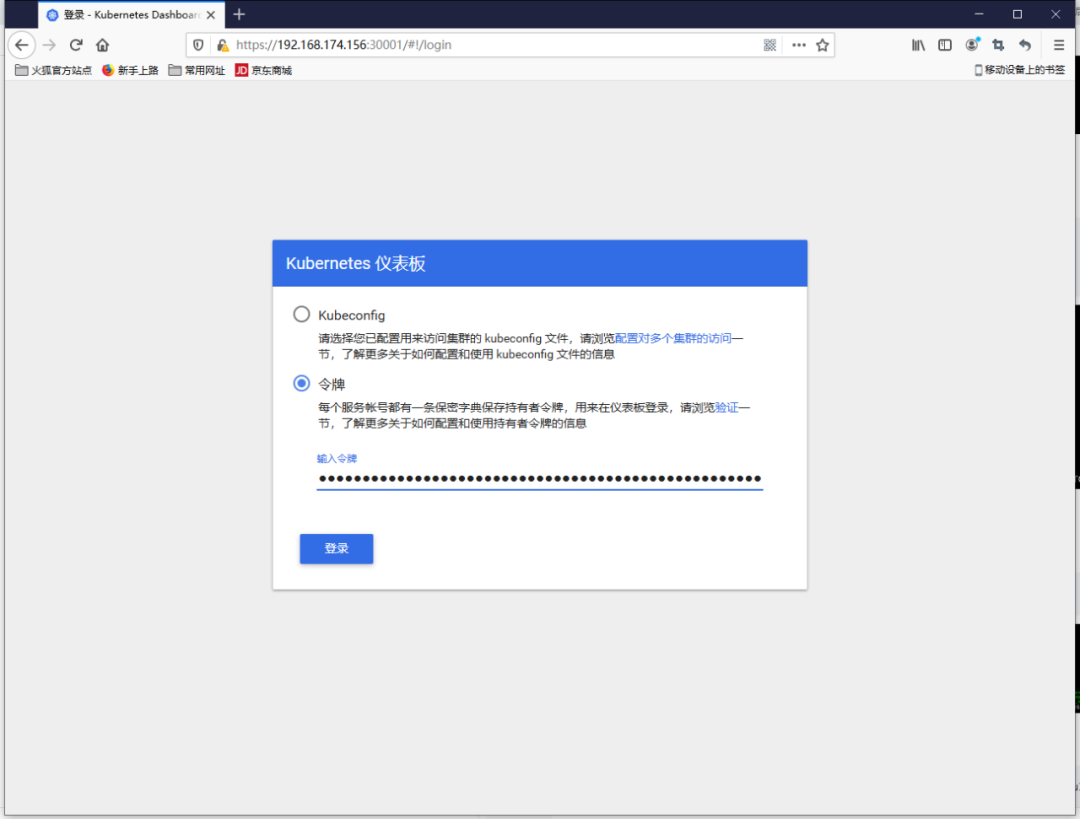
Token view
# kubectl describe secrets -n kube-system dashboard-admin
Name: dashboard-admin-token-j4xtf
Namespace: kube-system
Labels:<none>
Annotations: kubernetes.io/service-account.name: dashboard-admin
kubernetes.io/service-account.uid: 6fd1aa35-7b0d-11ea-ae41-000c29b70c6b
Type: kubernetes.io/service-account-token
Data
====
ca.crt:1025 bytes
namespace:11 bytes
token: eyJhbGciOiJSUzI1NiIsImtpZCI6IiJ9.eyJpc3MiOiJrdWJlcm5ldGVzL3NlcnZpY2VhY2NvdW50Iiwia3ViZXJuZXRlcy5pby9zZXJ2aWNlYWNjb3VudC9uYW1lc3BhY2UiOiJrdWJlLXN5c3RlbSIsImt1YmVybmV0ZXMuaW8vc2VydmljZWFjY291bnQvc2VjcmV0Lm5hbWUiOiJkYXNoYm9hcmQtYWRtaW4tdG9rZW4tajR4dGYiLCJrdWJlcm5ldGVzLmlvL3NlcnZpY2VhY2NvdW50L3NlcnZpY2UtYWNjb3VudC5uYW1lIjoiZGFzaGJvYXJkLWFkbWluIiwia3ViZXJuZXRlcy5pby9zZXJ2aWNlYWNjb3VudC9zZXJ2aWNlLWFjY291bnQudWlkIjoiNmZkMWFhMzUtN2IwZC0xMWVhLWFlNDEtMDAwYzI5YjcwYzZiIiwic3ViIjoic3lzdGVtOnNlcnZpY2VhY2NvdW50Omt1YmUtc3lzdGVtOmRhc2hib2FyZC1hZG1pbiJ9.dP34FDNIndektaXZHpE_vAlXTK7LQLHt255mOsD6jQS87CKhZMrNDmfq_RJmeh4y3fnunWVqP2U_3AxA-Ky384dnpJ5TLEfANRaW_N1loDUbyFiqvh-TU2N5gYt-g0NKd-HNeNID9yakKuXmLNHMQQedB-hY5UaVomtS4rTLTtCvE4Iz8kqbGQCzu3ILUE8P1tZQdfMqT8GblnV6E-ni76zXtqhBITK71Bqge-oNUAaNTZ-nPVYG3WLxkdmwWGR09AtWS9CAuNRkfIwIb93WMvrXW4dQfgTWnd7IsN4vwM8gFTGn2Kb3Y4IIVn1DRc94sA9pb1qDNHAitPo1IQeViQ
The token is: eyJhbGciOiJSUzI1NiIsImtpZCI6IiJ9.eyJpc3MiOiJrdWJlcm5ldGVzL3NlcnZpY2VhY2NvdW50Iiwia3ViZXJuZXRlcy5pby9zZXJ2aWNlYWNjb3VudC9uYW1lc3BhY2UiOiJrdWJlLXN5c3RlbSIsImt1YmVybmV0ZXMuaW8vc2VydmljZWFjY291bnQvc2VjcmV0Lm5hbWUiOiJkYXNoYm9hcmQtYWRtaW4tdG9rZW4tajR4dGYiLCJrdWJlcm5ldGVzLmlvL3NlcnZpY2VhY2NvdW50L3NlcnZpY2UtYWNjb3VudC5uYW1lIjoiZGFzaGJvYXJkLWFkbWluIiwia3ViZXJuZXRlcy5pby9zZXJ2aWNlYWNjb3VudC9zZXJ2aWNlLWFjY291bnQudWlkIjoiNmZkMWFhMzUtN2IwZC0xMWVhLWFlNDEtMDAwYzI5YjcwYzZiIiwic3ViIjoic3lzdGVtOnNlcnZpY2VhY2NvdW50Omt1YmUtc3lzdGVtOmRhc2hib2FyZC1hZG1pbiJ9.dP34FDNIndektaXZHpE_vAlXTK7LQLHt255mOsD6jQS87CKhZMrNDmfq_RJmeh4y3fnunWVqP2U_3AxA-Ky384dnpJ5TLEfANRaW_N1loDUbyFiqvh-TU2N5gYt-g0NKd-HNeNID9yakKuXmLNHMQQedB-hY5UaVomtS4rTLTtCvE4Iz8kqbGQCzu3ILUE8P1tZQdfMqT8GblnV6E-ni76zXtqhBITK71Bqge-oNUAaNTZ-nPVYG3WLxkdmwWGR09AtWS9CAuNRkfIwIb93WMvrXW4dQfgTWnd7IsN4vwM8gFTGn2Kb3Y4IIVn1DRc94sA9pb1qDNHAitPo1IQeViQ
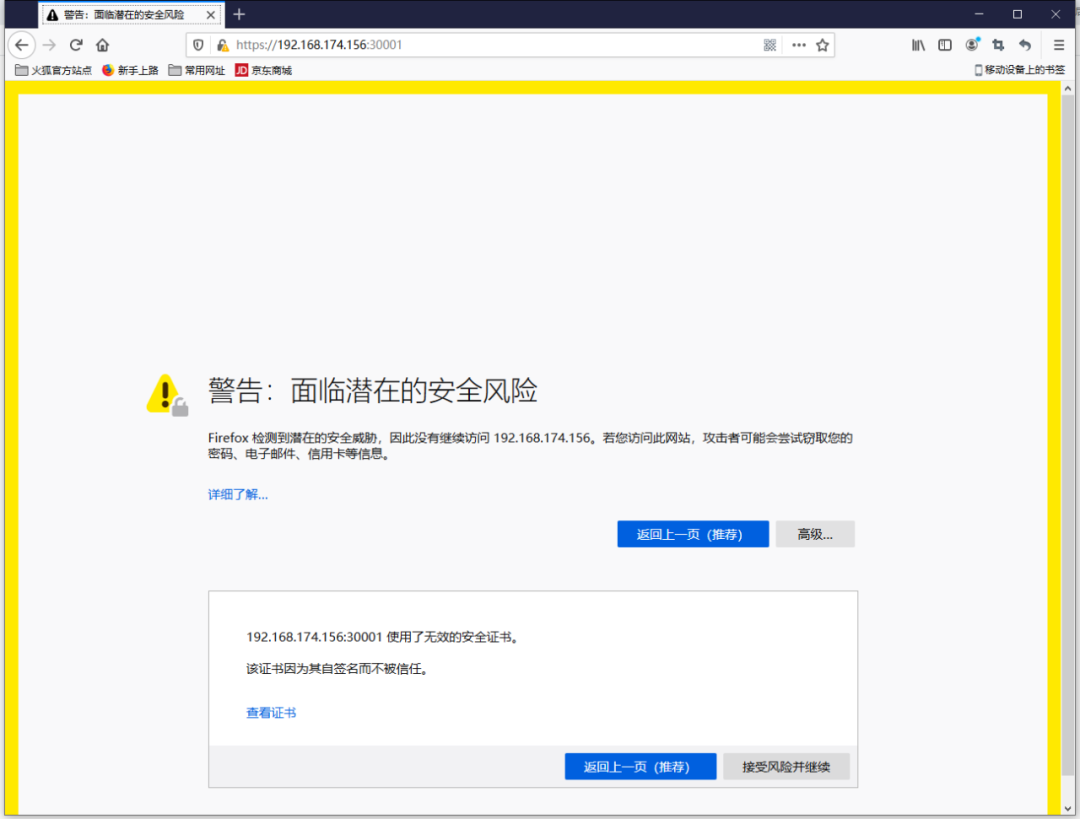
web access
https://192.168.174.156:30001
ie, chrome access cannot be opened, use Firefox browser to log in and access via token
THE
END
Recommended Posts