Python realizes udp transmission picture function
The examples in this article share the specific code of python to realize udp transmission image for your reference, the specific content is as follows
First of all, we must understand the working mode of UDP
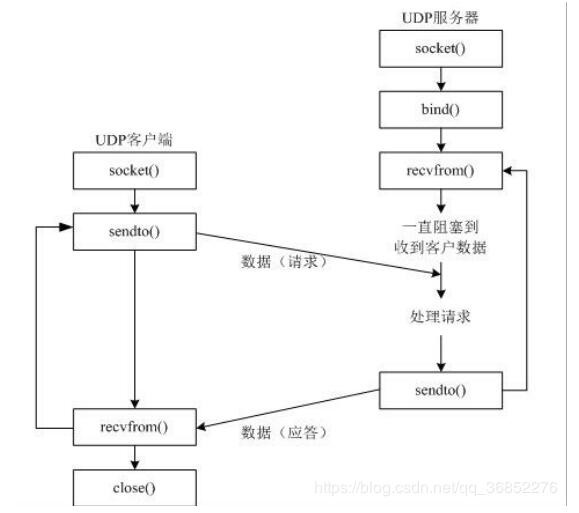
For the server, first bind the IP and port. When testing this machine, you can use 127.0.0.1 which is the private IP of the machine. The port number greater than 1024 is customized, so use a port number greater than 1024, and then receive the client Data, processing, return
For the client, UDP does not need to establish a connection, just send it regardless of whether it is received or not, so you can directly send information to the server's IP address and port number, and then wait for the response.
Note that the transmitted data is binary stream data, so find a way to encode the data that needs to be transmitted into a binary stream, and then decode it after passing it. Here I used opencv to read the picture into a numpy array format, then encode and transmit , And finally decode it after receiving it.
Let’s talk about transferring the entire picture at once. The idea is that the accepted parameter settings are large and the picture is relatively small, so the implementation is relatively simple.
The first is the server script, which realizes receiving, displaying and responding
udp_sever.py
# - *- coding: utf-8-*-import socket
import cv2
import numpy as np

s = socket.socket(socket.AF_INET, socket.SOCK_DGRAM)

# Binding port:
s.bind(('127.0.0.1',9999))print('Bind UDP on 9999...')while True:
 # Receive data:
 data, addr = s.recvfrom(400000)print('Received from %s:%s.'% addr)
 # decoding
 nparr = np.fromstring(data, np.uint8)
 # Decode into picture numpy
 img_decode = cv2.imdecode(nparr, cv2.IMREAD_COLOR)
 cv2.imshow('result',img_decode)
 cv2.waitKey()
 reply ="get message!!!"
 s.sendto(reply.encode('utf-8'), addr)
 cv2.destroyAllWindows()
Client script, realized sending pictures and receiving responses
udp_client.py
# - *- coding: utf-8-*-import socket
import cv2
import numpy as np

s = socket.socket(socket.AF_INET, socket.SOCK_DGRAM)

img = cv2.imread('/home/xbw/jupyter_notebook/0.jpg')
img_encode = cv2.imencode('.jpg', img)[1]
data_encode = np.array(img_encode)
data = data_encode.tostring()

# send data:
s.sendto(data,('127.0.0.1',9999))
# Receive data:print(s.recv(1024).decode('utf-8'))

s.close()
In order to facilitate the understanding of the code to put the picture to binary and then back to the picture
import numpy as np
import cv2
img = cv2.imread('0.jpg')
img_encode = cv2.imencode('.jpg', img)[1]
data_encode = np.array(img_encode)
str_encode = data_encode.tostring()
# print(str_encode)
nparr = np.fromstring(str_encode, np.uint8)
img_decode = cv2.imdecode(nparr, cv2.IMREAD_COLOR)
cv2.imshow('result',img_decode)
cv2.waitKey()
cv2.destroyAllWindows()
Transfer pictures in batches
After working on it for a long time, I finally know how to transfer pictures in batches. First of all, we must know how long the memory is needed for the pictures to be transferred. Otherwise, we don’t know when to stop receiving. Then we need to consider adding a file header to tell the server how long the code should be. flow.
The realization idea is that the client must first send a file header, which contains the length of the code stream. Use a long int number, pack it with struct.pack, send it, and then send the code stream of the picture in a loop.
Then the server first receives the file header, confirms the length of the image stream, then cyclically receives the stream of the determined length, and finally decodes it into a picture.
The implementation code is as follows:
The first is client script
udp_client.py
# - *- coding: utf-8-*-import socket
import cv2
import numpy as np
import struct

s = socket.socket(socket.AF_INET, socket.SOCK_DGRAM)
# Read the picture and encode it into binary bytes format
img = cv2.imread('/home/xbw/jupyter_notebook/0.jpg')
img_encode = cv2.imencode('.jpg', img)[1]
data_encode = np.array(img_encode)
data = data_encode.tostring()
# Define the file header and package it into a structure
fhead = struct.pack('l',len(data))
# Send file header:
s.sendto(fhead,('127.0.0.1',9999))
# Send picture code stream cyclically
for i inrange(len(data)//1024+1):if1024*(i+1)len(data):
 s.sendto(data[1024*i:],('127.0.0.1',9999))else:
 s.sendto(data[1024*i:1024*(i+1)],('127.0.0.1',9999))
# Receive response data:print(s.recv(1024).decode('utf-8'))
# shut down
s.close()
Then the server receives
udp_sever.py
# - *- coding: utf-8-*-import socket
import cv2
import numpy as np
import struct

s = socket.socket(socket.AF_INET, socket.SOCK_DGRAM)

# Binding port:
s.bind(('127.0.0.1',9999))print('Bind UDP on 9999...')while True:
 # Receive the file header. The length of the file header is determined by the calcsize function. Note that here recvfrom is to receive UDP messages, and recv is to receive TCP messages.
 fhead_size = struct.calcsize('l')
 buf,addr = s.recvfrom(fhead_size)if buf:
 # Here the result is a tuple, so take the value out
 data_size = struct.unpack('l',buf)[0]
 # Receive the bitstream of the image bitstream length
 recvd_size =0
 data_total = b''while not recvd_size == data_size:if data_size -recvd_size  1024:
 data,addr = s.recvfrom(1024)
 recvd_size +=len(data)else:
 data,addr = s.recvfrom(1024)
 recvd_size = data_size
 data_total += data
# data, addr = s.recvfrom(400000)print('Received')
# reply ='Hello, %s!'% data.decode('utf-8')
# s.sendto(reply.encode('utf-8'), addr)
 # Decode the received code stream into a numpy array and display the image
 nparr = np.fromstring(data_total, np.uint8)
 img_decode = cv2.imdecode(nparr, cv2.IMREAD_COLOR)
 cv2.imshow('result',img_decode)
 cv2.waitKey()
 # answer
 reply ="get message!!!"
 s.sendto(reply.encode('utf-8'), addr)
 cv2.destroyAllWindows()
-------Dividing line------
The above is the basic implementation. After some learning, I finally mastered the essence of UDP transmission.
The first is to determine the operating mechanism of the client and server
Client: First define a socket object without binding, and then specify the IP address and port to send the message, and then if recvfrom is used, it will always be blocked waiting for the response (this is very useful, the function is to ensure that the other party does receive it, and then send a new one Message, don’t have to consider the issue of sending frequency), add a while True in front to send it in a loop. If it involves a very large message, you can split it and send it. The trick is to send a file header first. How big (the file header is recommended to use the stuct library, see the previous example), and then send the file content, make sure to send it cyclically, because every time you send, the opposite side should be sent once. If 2048 bytes of content are sent, the opposite side is set Each time you receive 1024, the remaining 1024 will be lost instead of waiting for the next time to continue receiving. There is also a binary code stream that is sent. **Currently, the methods I use to convert to code stream are: **The picture is converted to binary using opencv, and then converted to numpy, and then tostring. For the file header, you need to know exactly how much memory it occupies to make it easy for the server to receive. The stuct library is used. The three functions of pack, unpack, and calcsize inside are very easy to use. When sending, pack the data to send. Lists, dictionaries, etc., as file content, use json, which is a bit versatile. First convert json.dumps into json type, and then encode into binary to send it.
**Server: **First define a socket object, bind the IP address and port so that the client can find it, and then wait for the message to be received. After receiving the message, process the message, reply, and cooperate with the client's recvfrom to ensure that the receiving frequency is consistent. The server is to ensure Always receive a message, there must be a while True, the received message is a binary stream, so it must be decoded. Decoding the encoding method mentioned above is actually the reverse operation of the encoding method: pictures are decoded with opencv, first np.fromstring, and then cv2.imdecode(data, cv2.IMREAD_COLOR). For receiving the file header, here is a little trick. Use struct.calcsize to determine the length of the file header, and then only receive the code stream of this length, and then unpack it, where unpack is a tuple. For json, decoding is to decode first, then json.loads, which is the reverse operation of the above encoding.
Then the higher-end operation, the same script works in multiple processes, which requires threading.Thread to create multiple processes. The idea is to create multiple servers and assign them to different processes. Their IP addresses can be the same. The port number is not the same, and then you can work in parallel in the same script, here is different from TCP, because UDP does not need to establish a connection
Then attach the source code I implemented. There are two processes in the server script, one receives the picture of client 1 and the other receives the list of client 2.
server
udp_server.py
# - *- coding: utf-8-*-import socket
import cv2
import numpy as np
import struct
import threading
import json
# Set the IP address, two server port numbers
dest_ip ='127.0.0.1'
img_port =9999
msg_port =6666

# Server 1 processing and response functions, receiving pictures, displaying, and responding
def receive_img(rec_img):while True:
 # Receive data:
 fhead_size = struct.calcsize('l')
 buf,addr = rec_img.recvfrom(fhead_size)if buf:
 data_size = struct.unpack('l',buf)[0]print(data_size)
 recvd_size =0
 data_total = b''while not recvd_size == data_size:if data_size -recvd_size  1024:
 data,addr = rec_img.recvfrom(1024)
 recvd_size +=len(data)else:
 data,addr = rec_img.recvfrom(1024)
 recvd_size = data_size
 data_total += data
# data, addr = rec_img.recvfrom(400000)print('Received')
# reply ='Hello, %s!'% data.decode('utf-8')
# rec_img.sendto(reply.encode('utf-8'), addr)

 nparr = np.fromstring(data_total, np.uint8)
 img_decode = cv2.imdecode(nparr, cv2.IMREAD_COLOR)
 cv2.imshow('result',img_decode)
 cv2.waitKey(100)
 reply ="get message!!!"
 rec_img.sendto(reply.encode('utf-8'), addr)
# cv2.destroyAllWindows()

# Server 2 function, receive message, output, reply
def receive_msg(rec_msg):while True:
 msg_data ,msg_addr = rec_msg.recvfrom(1024)
 msg_str = msg_data.decode('utf-8')
 msg = json.loads(msg_str)print(msg)
 reply ='get the msg'
 rec_msg.sendto(reply.encode('utf-8'),msg_addr)
 rec_msg.close()

# The main function creates a server, binds ports, creates and runs two processes, and calls the above two functions
def main():
 # Create socket
 rec_img = socket.socket(socket.AF_INET, socket.SOCK_DGRAM)
 rec_msg = socket.socket(socket.AF_INET, socket.SOCK_DGRAM)
 # Bind local address port
 rec_img.bind((dest_ip, img_port))
 rec_msg.bind((dest_ip, msg_port))
 # Create process
 t_recimg = threading.Thread(target=receive_img, args=(rec_img,))
 t_recmsg = threading.Thread(target=receive_msg, args=(rec_msg,))
 # Start process
 t_recimg.start()
 t_recmsg.start()print('The program runs normally! ! !')if __name__ =='__main__':main()
Client 1
udp_client_1.py
# - *- coding: utf-8-*-import socket
import cv2
import numpy as np
import struct

s = socket.socket(socket.AF_INET, socket.SOCK_DGRAM)
cap = cv2.VideoCapture(0)
# cap.set(3,320)
# cap.set(4,240)while True:if cap.isOpened():
 flag, img = cap.read()
# img = cv2.imread('/home/xbw/jupyter_notebook/0.jpg')
 img_encode = cv2.imencode('.jpg', img)[1]
 data_encode = np.array(img_encode)
 data = data_encode.tostring()
 # Definition file header
 fhead = struct.pack('l',len(data))
 # Send file header and data:
 s.sendto(fhead,('127.0.0.1',9999))for i inrange(len(data)//1024+1):if1024*(i+1)len(data):
 s.sendto(data[1024*i:],('127.0.0.1',9999))else:
 s.sendto(data[1024*i:1024*(i+1)],('127.0.0.1',9999))
 # Receive reply:
 cv2.waitKey(1)print(s.recv(1024).decode('utf-8'))

s.close()
Client 2
udp_client_2.py
import socket
import cv2
import numpy as np
import struct
import json
import time
# Define socket
send_msg = socket.socket(socket.AF_INET,socket.SOCK_DGRAM)
# Set the target IP address and port number
target_ip ='127.0.0.1'
target_port =6666
# Send data, wait for response
while True:
 data =[0,0,0,1]
 data_str = json.dumps(data)
 send_msg.sendto(data_str.encode(),(target_ip,target_port))
 time.sleep(0.01)print(send_msg.recv(1024).decode('utf-8'))
The above is the whole content of this article, I hope it will be helpful to everyone's study.
Recommended Posts