centos7へのグラファイトの展開
グラファイトインストールノート#
実験環境:CentOS7.5 x64
システムに付属するpythonパッケージの汚染を防ぐために、virtualenvにリストされている仮想環境を使用してpythonプログラムをデプロイすることをお勧めします。
必要なrpmパッケージをいくつかインストールします
yum installcairo-他の2つのパッケージcairo-develpycairoはなしでインストールできます
**virtualenv **をインストールします
yum install python-pip
pip install virtualenv
仮想環境をアクティブ化
virtualenv /opt/graphite
source /opt/graphite/bin/activate
グラファイトの完全なスイートをインストールします
export PYTHONPATH="/opt/graphite/lib/:/opt/graphite/webapp/"
pip install --no-binary=:all: https://github.com/graphite-project/whisper/tarball/master
pip install --no-binary=:all: https://github.com/graphite-project/carbon/tarball/master
pip install --no-binary=:all: https://github.com/graphite-project/graphite-web/tarball/master
この手順で依存パッケージのバージョンが間違っているというプロンプトが表示された場合は、pipを手動で実行して依存パッケージをインストールできます。以下に、通常の実行中のグラファイトで見られるピップパッケージのリストを示します。
attrs==19.1.0
Automat==0.7.0
cachetools==3.1.1
cairocffi==0.9.0
cffi==1.12.3
constantly==15.1.0
Django==1.11.24
django-tagging==0.4.3
gunicorn==19.9.0
hyperlink==19.0.0
idna==2.8
incremental==17.5.0
pycparser==2.19
PyHamcrest==1.9.0
pyparsing==2.4.2
pytz==2019.2
scandir==1.10.0
six==1.12.0
Twisted==19.7.0
txAMQP==0.8.2
urllib3==1.25.3
whisper==1.2.0
zope.interface==4.6.0
初期化
cd /opt/graphite/webapp/graphite
cp local_settings.py.example local_settings.py
vim local_settings.pyは、次の3行のコードを変更します。
CONF_DIR ='/opt/graphite/conf'
STORAGE_DIR ='/opt/graphite/storage'
STATIC_ROOT ='/opt/graphite/webapp/content'
LOG_DIR ='/opt/graphite/storage/log/webapp'
データを初期化すると、グラファイトを起動した後、そのようなユーザーにそのようなエラーは表示されません
cd /opt/graphite/webapp
PYTHONPATH = / opt / graphite / webapp django-admin.py merge --settings = graphite.settings --run-syncdb ##上記の最初のステップでyuminstall cairoがない場合、このステップはエラーを報告します
グラファイト構成ファイルをコピー
cd /opt/graphite/conf/
cp carbon.conf.example carbon.conf
cp storage-schemas.conf.example storage-schemas.confは通常、このファイルの構成を変更して、カスタムキーの保存期間を実現します
cp relay-rules.conf.example relay-rules.conf
cp dashboard.conf.example dashboard.conf
cp graphTemplates.conf.example graphTemplates.conf
cp blacklist.conf.example blacklist.conf
cp aggregation-rules.conf.example aggregation-rules.conf
cp storage-aggregation.conf.example storage-aggregation.conf
グラファイトスイートを開始
/opt/graphite/bin/carbon-relay.py start
/opt/graphite/bin/carbon-cache.py start
ss -lntp | egrep carbon
LISTEN     050*:7002*:*                   users:(("carbon-cache.py",pid=48433,fd=11))
LISTEN     050*:2013*:*                   users:(("carbon-relay.py",pid=37683,fd=13))
LISTEN     050*:2014*:*                   users:(("carbon-relay.py",pid=37683,fd=15))
LISTEN     050*:2003*:*                   users:(("carbon-cache.py",pid=48433,fd=13))
LISTEN     050*:2004*:*                   users:(("carbon-cache.py",pid=48433,fd=14))/opt/graphite/bin/run-graphite-devel-server.py --port=8085--libs=/opt/graphite/webapp /opt/グラファイトフロントデスクスタート
ドットテストプロセスを開始します
python /opt/graphite/examples/example-client.py
**nginx **をインストールします
yum install nginx
cd /etc/nginx/conf.d
cat graphite.confの内容は次のとおりです。
upstream graphite {
 server 127.0.0.1:8085 fail_timeout=0;}
server {
 listen 80 default_server;
 server_name _;
 root /opt/graphite/webapp;
 access_log /var/log/nginx/graphite.access.log;
 error_log  /var/log/nginx/graphite.error.log;
 location =/favicon.ico {return204;}
 # serve static content from the "content" directory
 location /static{
  alias /opt/graphite/webapp/content;
  expires max;}
 location /{
  try_files $uri @graphite;}
 location @graphite {
  proxy_pass_header Server;
  proxy_set_header Host $http_host;
  proxy_redirect off;
  proxy_set_header X-Real-IP $remote_addr;
  proxy_set_header X-Scheme $scheme;
  proxy_connect_timeout 10;
  proxy_read_timeout 10;
  proxy_pass http://graphite;}}
nginx関連ファイルを作成する
touch /var/log/nginx/graphite.access.log
touch /var/log/nginx/graphite.error.log
chmod 640 /var/log/nginx/graphite.*
chown nginx.nginx /var/log/nginx/graphite.*
nginxを開始
nginx -t
systemctl start nginx
以下に示すように192.168.2.4/にアクセスしてください
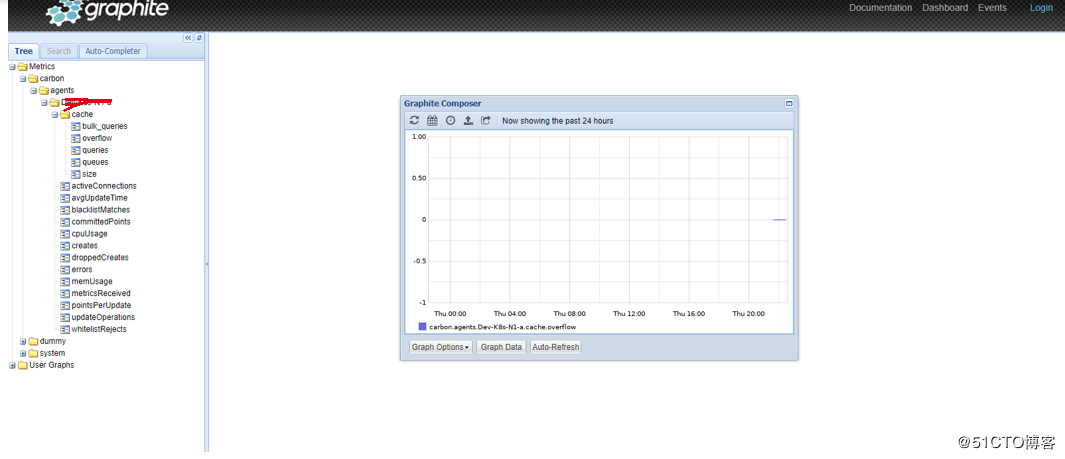
データが収集されたことがわかります。
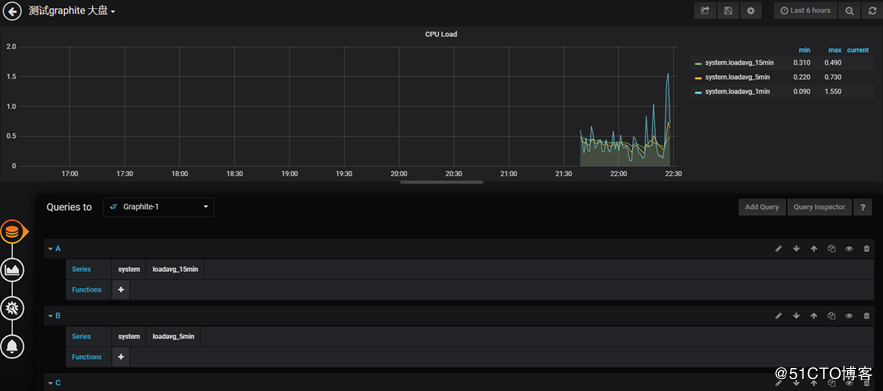
grafanaに移動して、グラファイトデータソースを構成してから、次のようにデータを表示できます。
**brubeck(フォアグラウンド)を開始します[statsdに似たツールですが、nodejs環境はありません] **
yum install jansson jansson-devel
yum install libmicrohttpd libmicrohttpd-devel
git clone https://github.com/github/brubeck.git
cd brubeck/
. /script/bootstrap
mkdir /usr/local/brubeck/
cp brubeck /usr/local/brubeck/
vim / usr / local / brubeck / brubeck.json次のように構成ファイルを追加します。
{" sharding":false,"server_name":"prod-devops-graphite-01","dumpfile":"/var/lib/brubeck.dump","capacity":15,"expire":20,"http":":8000","backends":[{"type":"carbon","address":"localhost","port":2003,"frequency":10}],"samplers":[{"type":"statsd","address":"0.0.0.0","port":8135,"workers":8,"multisock":true,"multimsg":8}]}
[Brubeckはポート8135を監視し、ビジネス側の管理を受け取るために使用されます。 2003ポートはカーボンキャッシュのポートを指します]
. / brubeck --configbrubeck.jsonフォアグラウンド起動プロセス
brubeckへのテスト管理
echo "db.dba.dble2.front_conn:11111|g" | nc -u -w1 127.0.0.1 8135
グラファイト保管データの期間を変更する
cd /opt/graphite/conf
vim storage-schemas.conf
# Schema definitions for Whisper files. Entries are scanned in order,
# and first match wins. This file is scanned for changes every 60 seconds.
# [ name]
# pattern = regex
# retentions = timePerPoint:timeToStore, timePerPoint:timeToStore,...
# Carbon's internal metrics. This entry should match what is specified in
# CARBON_METRIC_PREFIX and CARBON_METRIC_INTERVAL settings
[ carbon]
pattern =^carbon\.
retentions =60:90d
[ service-sla]
pattern =^service.sla-pct.*
retentions = 10s:2d,1min:8d,10min:365d
[ service1-rule]
pattern =^service1\.timers\.Rule.*
retentions = 10s:5min,1min:1h,10min:7d
[ service1-ic]
pattern =^service1\.counters\.IC.*
retentions = 10s:24h,1min:7d
[ logstash]
pattern = service1\.counters\.logstash.*
retentions = 10s:24h,1min:7d
[ service1-timers]
pattern =^service1\.timers\.*
retentions = 10s:5min,1min:1h,10min:1d,1h:365d
[ service]
pattern =^service1.*
retentions = 10s:24h,1min:6d,10min:365d
[ counter]
pattern =^.*\.counters\..*
retentions = 10s:24h,1min:7d,10min:30d
[ timers]
pattern =^.*\.timers\..*
retentions = 10s:5min,1min:1h,10min:1d,1h:30d
[ db]
pattern =^db\.*
retentions = 1min:30d
[ default_10s_for_1hour]
pattern =.*
retentions = 10s:1h
vimstorage-aggregation.confの内容は次のとおりです。
[ min]
pattern = \.min$
xFilesFactor =0.01
aggregationMethod = min
[ max]
pattern = \.max$
xFilesFactor =0.01
aggregationMethod = max
[ all_sum]
pattern = \.sum$
xFilesFactor =0.01
aggregationMethod = sum
[ all_count]
pattern = \.count$
xFilesFactor =0.01
aggregationMethod = sum
[ service1_gauges]
pattern =^service1.gauges
xFilesFactor =0.01
aggregationMethod = last
[ service1_counters]
pattern =^service1\.counters
xFilesFactor =0.01
aggregationMethod = sum
[ service1]
pattern =^service1.*
xFilesFactor =0.01[default_average]
pattern =.*
xFilesFactor =0.01
aggregationMethod = average
上記の2つのファイルを変更した後、有効にするには、カーボンキャッシュプロセスを再起動する必要があることに注意してください。
提案:
1、 グラファイトウェブプロセスの場合、スーパーバイザーを介して開始と停止を制御することをお勧めします。
2、 個人的には、brubeckはstatsdよりも優れていると考えています。たとえば、一部のマシンにnodejs環境をデプロイするのは便利ではない場合があります。
Recommended Posts