2-Kubernetes entry manual installation and deployment
[ TOC]
0 x00 Introduction
Description: Through the previous K8s entry system architecture, we have a preliminary understanding of the work deployment process of the single-node master and worker. However, the installation script provided by kuboard can be used as a tester installation, but in actual Due to the complexity and diversity of the business in the production environment, it is necessary to rely on the cluster to ensure its safety and reliability;
Before installing K8s, we need to prepare from the following aspects of cluster planning:
- Operating System (OS)
- Stable version selection (VERSION)
1. Cluster planning
Operating System (OS)
Description: When using CentOS 7x OS, it is recommended to upgrade the kernel version (stable >= 4.19), otherwise you may encounter some problems when running some java containers. In the early stage, you can deploy some Java application services in the test environment to observe whether you will encounter such problems. If you encounter such problems, you can try to solve them by upgrading the kernel version.
Q: When the Java container is pulled up instantly, the entire cluster will be used up by the CPU. How to solve the CPU resource contention when the Java CPU is started?
A: We have encountered this problem. Later, after upgrading the kernel to 4.19, a lot of memory exhaustion no longer occurred. We have solved the problem of CPU explosion through kernel upgrade.
Stable version selection (VERSION)
As of the time this document is summarized (2020-06-20), the official release and stable versions of Kubernetes that are still being maintained include 1.16.x, 1.17.x, and 1.18.x. The life cycles of 1.14.x and 1.15.x versions are already close to EOL, so it is not recommended to choose an older version. Comprehensive considerations, at present, the 1.17.4 or 1.17.5 version of the minor version 4 <x <10 is the most suitable and 1.18.3.
- For the
docker-ceversion, the latest version in the official yum source can be used by default, namelydocker-ce-19.03.9-3.el7. - For the
harborversion, considering that harbor v2.0.0-rc1 has just been released, it is not recommended to choose to use it. It is recommended to choose the v1.9.4 version. If you encounter problems in the future, you must upgrade it To solve this problem, you can consider upgrading tov2.xxwhich has released stable version.
| pkg | version | release date |
|---|---|---|
| kubernetes | v1.17.5 | 2020-04-16 |
| docker-ce | 19.03.9 | 2020-04-12 |
| harbor | v1.9.4 | 2020-12-31 |
0 x01 Install K8s single node####
Description: We need to customize the required components and plug-ins to install, so we will use kubeadm to manually deploy K8S (single machine|cluster);
0. Basic environment configuration#####
Description: When installing kubeadm, both the worker node and the master node need to be executed;
System environment recommendations:
# OS
CentOS 7.x/8.x(Recommended here Environment 7.8),Ubuntu(18.04)
# Kerner
OS KERNER >=4.18
# Docker Version:19.03.09
# kubernetes 1.18.3
#1. Current node
hostnamectl set-hostname master-01
hostnamectl status

#2. kubeadm will check whether the current host is disabled`swap`,So here temporarily close swap and SELinux
# Temporarily close swap and SELinux
swapoff -a
setenforce 0
# Permanently close swap and SELinux
yes | cp /etc/fstab /etc/fstab_bak
cat /etc/fstab_bak |grep -v swap >/etc/fstab
sed -i 's/^SELINUX=.*$/SELINUX=disabled/'/etc/selinux/config

#3. Host name setting
echo "127.0.0.1 $(hostname)">>/etc/hosts
cat  <<EOF >>/etc/hosts
10.80.172.211 master-01
EOF

#4. Turn off the firewall
systemctl stop firewalld
systemctl disable firewalld
System kernel parameter adjustment:
# /etc/sysctl.conf configures kernel parameters
# /etc/sysctl.d/99-kubernetes-cri.conf
egrep -q "^(#)?net.ipv4.ip_forward.*"/etc/sysctl.conf && sed -ri "s|^(#)?net.ipv4.ip_forward.*|net.ipv4.ip_forward = 1|g"/etc/sysctl.conf || echo "net.ipv4.ip_forward = 1">>/etc/sysctl.conf
egrep -q "^(#)?net.bridge.bridge-nf-call-ip6tables.*"/etc/sysctl.conf && sed -ri "s|^(#)?net.bridge.bridge-nf-call-ip6tables.*|net.bridge.bridge-nf-call-ip6tables = 1|g"/etc/sysctl.conf || echo "net.bridge.bridge-nf-call-ip6tables = 1">>/etc/sysctl.conf
egrep -q "^(#)?net.bridge.bridge-nf-call-iptables.*"/etc/sysctl.conf && sed -ri "s|^(#)?net.bridge.bridge-nf-call-iptables.*|net.bridge.bridge-nf-call-iptables = 1|g"/etc/sysctl.conf || echo "net.bridge.bridge-nf-call-iptables = 1">>/etc/sysctl.conf
egrep -q "^(#)?net.ipv6.conf.all.disable_ipv6.*"/etc/sysctl.conf && sed -ri "s|^(#)?net.ipv6.conf.all.disable_ipv6.*|net.ipv6.conf.all.disable_ipv6 = 1|g"/etc/sysctl.conf || echo "net.ipv6.conf.all.disable_ipv6 = 1">>/etc/sysctl.conf
egrep -q "^(#)?net.ipv6.conf.default.disable_ipv6.*"/etc/sysctl.conf && sed -ri "s|^(#)?net.ipv6.conf.default.disable_ipv6.*|net.ipv6.conf.default.disable_ipv6 = 1|g"/etc/sysctl.conf || echo "net.ipv6.conf.default.disable_ipv6 = 1">>/etc/sysctl.conf
egrep -q "^(#)?net.ipv6.conf.lo.disable_ipv6.*"/etc/sysctl.conf && sed -ri "s|^(#)?net.ipv6.conf.lo.disable_ipv6.*|net.ipv6.conf.lo.disable_ipv6 = 1|g"/etc/sysctl.conf || echo "net.ipv6.conf.lo.disable_ipv6 = 1">>/etc/sysctl.conf
egrep -q "^(#)?net.ipv6.conf.all.forwarding.*"/etc/sysctl.conf && sed -ri "s|^(#)?net.ipv6.conf.all.forwarding.*|net.ipv6.conf.all.forwarding = 1|g"/etc/sysctl.conf || echo "net.ipv6.conf.all.forwarding = 1">>/etc/sysctl.conf

# Execute command to apply
sysctl -p
1. Docker related configuration#####
Description: It is mainly to download the specified Docker-ce version and the download configuration of docker-compose, pay attention to Execute on the master node and worker node;
# Apply to:CentOS
# Docker hub image acceleration source:Execute on both the master node and the worker node
# The last parameter 1.18.2 Used to specify kubenetes version, support all 1.18.x version installation
# Tencent Cloud docker hub image
# export REGISTRY_MIRROR="https://mirror.ccs.tencentyun.com"
# DaoCloud mirror
# export REGISTRY_MIRROR="http://f1361db2.m.daocloud.io"
# Alibaba Cloud docker hub image
export REGISTRY_MIRROR=
# https://registry.cn-hangzhou.aliyuncs.com

# Install docker
# Reference documents are as follows
# https://docs.docker.com/install/linux/docker-ce/centos/
# https://docs.docker.com/install/linux/linux-postinstall/

# Uninstall old version
yum remove -y docker \
docker-client \
docker-client-latest \
docker-common \
docker-latest \
docker-latest-logrotate \
docker-logrotate \
docker-selinux \
docker-engine-selinux \
docker-engine

# Install basic dependencies
yum install -y yum-utils lvm2 wget
# Install nfs-utils 必须先Install nfs-utils can mount nfs network storage
yum install -y nfs-utils
# Add docker mirror warehouse
yum-config-manager --add-repo http://mirrors.aliyun.com/docker-ce/linux/centos/docker-ce.repo

# CentOS8
# dnf -y install https://download.docker.com/linux/centos/7/x86_64/stable/Packages/containerd.io-1.2.6-3.3.el7.x86_64.rpm

# Install docker
yum list docker-ce --showduplicates | sort -r
read -p 'Please enter the Docker to be installed-ce version number(E.g:19.03.9):' VERSION
yum install -y docker-ce-${VERSION} docker-ce-cli-${VERSION} containerd.io

# Install Docker-compose
curl -L https://get.daocloud.io/docker/compose/releases/download/1.25.5/docker-compose-`uname -s`-`uname -m`>/usr/local/bin/docker-compose
chmod +x /usr/local/bin/docker-compose

# Mirror source acceleration configuration
# curl -sSL https://get.daocloud.io/daotools/set_mirror.sh | sh -s ${REGISTRY_MIRROR}
# curl -sSL https://kuboard.cn/install-script/set_mirror.sh | sh -s ${REGISTRY_MIRROR}
#
# General CentOS8
mkdir /etc/docker/
cat >/etc/docker/daemon.json <<EOF
{" registry-mirrors":["REPLACE"]}
EOF
sed -i "s#REPLACE#${REGISTRY_MIRROR}#g"/etc/docker/daemon.json

# Start docker and view the version information after installation
systemctl enable docker
systemctl start docker
docker-compose -v
docker info
2. k8s related configuration#####
Description: The following is the installation of the K8s basic environment and the initialization of the Master and Node nodes respectively;
k8s environment installation settings:
# kubneets version number
export K8SVERSION="1.18.3"

# Uninstall old version
yum remove -y kubelet kubeadm kubectl

# Configure K8S yum source
cat <<'EOF'>/etc/yum.repos.d/kubernetes.repo
[ kubernetes]
name=Kubernetes
baseurl=http://mirrors.aliyun.com/kubernetes/yum/repos/kubernetes-el7-x86_64
enabled=1
gpgcheck=0
repo_gpgcheck=0
gpgkey=http://mirrors.aliyun.com/kubernetes/yum/doc/yum-key.gpg
  http://mirrors.aliyun.com/kubernetes/yum/doc/rpm-package-key.gpg
EOF

# Install kubelet, kubeadm, kubectl
# will${1}Replace with kubernetes version number, such as 1.18.3
yum list kubeadm --showduplicates|sort -r
yum install -y kubelet-${K8SVERSION} kubeadm-${K8SVERSION} kubectl-${K8SVERSION}

# Modify docker Cgroup Driver to systemd
# # will/usr/lib/systemd/system/docker.This line ExecStart in the service file=/usr/bin/dockerd -H fd://--containerd=/run/containerd/containerd.sock
# # Modify to ExecStart=/usr/bin/dockerd -H fd://--containerd=/run/containerd/containerd.sock --exec-opt native.cgroupdriver=systemd
# If you do not modify it, you may encounter the following errors when adding worker nodes
# [ WARNING IsDockerSystemdCheck]: detected "cgroupfs"as the Docker cgroup driver. The recommended driver is "systemd".
# Please follow the guide at https://kubernetes.io/docs/setup/cri/
sed -i "s#^ExecStart=/usr/bin/dockerd.*#ExecStart=/usr/bin/dockerd -H fd:// --containerd=/run/containerd/containerd.sock --exec-opt native.cgroupdriver=systemd#g"/usr/lib/systemd/system/docker.service

# Restart docker and start kubelet
systemctl daemon-reload
systemctl restart docker
systemctl enable kubelet && systemctl start kubelet
master node######
Description: About the environment variables used during initialization
- APISERVER_NAME cannot be the hostname of the master
- APISERVER_NAME must be all lowercase letters, numbers, decimal points, and cannot contain minus signs
- The network segment used by POD_SUBNET cannot overlap with the network segment where the master node/worker node is located. The value of this field is a CIDR value. If you are not familiar with the concept of CIDR, please still execute the export POD_SUBNET=10.100.0.1/16 command without modification
# kubneets version number
export K8SVERSION="1.18.3"
# Replace x.x.x.x is the internal network IP of the master node
# The export command is only valid in the current shell session. After opening a new shell window, if you want to continue the installation process, please re-execute the export command here
export MASTER_IP=${IPADDR}
# Replace apiserver.demo is the dnsName you want
export APISERVER_NAME=apiserver.test
# Alibaba Cloud docker hub image
export REGISTRY_MIRROR=https://registry.cn-hangzhou.aliyuncs.com
# Only executed on the master node
# The network segment where the Kubernetes container group is located. After the installation is complete, the network segment is created by kubernetes and does not exist in your physical network beforehand
export POD_SUBNET=10.100.0.1/16
echo "${MASTER_IP} ${APISERVER_NAME}">>/etc/hosts
if[ ${#POD_SUBNET}-eq 0]||[ ${#APISERVER_NAME}-eq 0]; then
echo -e "\033[31;1m Please make sure you have set the environment variable POD_SUBNET and APISERVER_NAME \033[0m"
echo current POD_SUBNET=$POD_SUBNET
echo current APISERVER_NAME=$APISERVER_NAME
exit 1
fi
# View full configuration options https://godoc.org/k8s.io/kubernetes/cmd/kubeadm/app/apis/kubeadm/v1beta2
rm -f ./kubeadm-config.yaml
cat <<EOF >./kubeadm-config.yaml
apiVersion: kubeadm.k8s.io/v1beta2
kind: ClusterConfiguration
kubernetesVersion: v${K8SVERSION}
imageRepository: registry.cn-hangzhou.aliyuncs.com/google_containers
controlPlaneEndpoint:"${APISERVER_NAME}:6443"
networking:
serviceSubnet:"10.99.0.0/16"
podSubnet:"${POD_SUBNET}"
dnsDomain:"cluster.local"
EOF
# kubeadm init
# According to the speed of your server, you need to wait 3-10 minutes
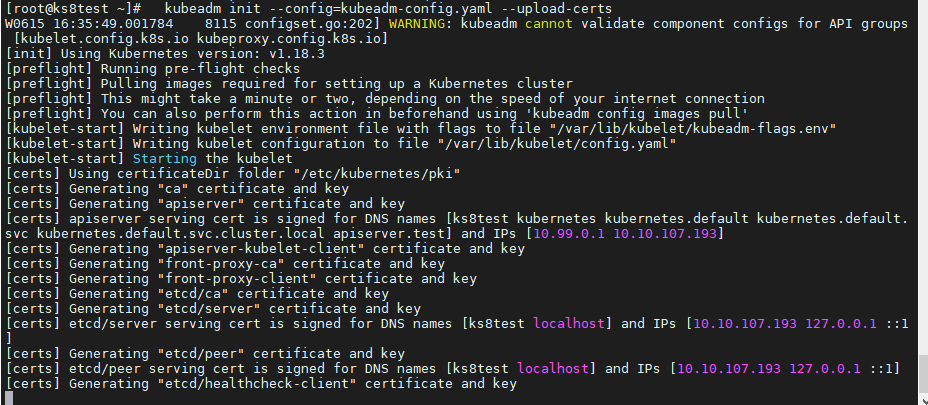
kubeadm init --config=kubeadm-config.yaml --upload-certs
# Configure kubectl
rm -rf /root/.kube/
mkdir /root/.kube/
cp -i /etc/kubernetes/admin.conf /root/.kube/config
sudo chown $(id -u):$(id -g) $HOME/.kube/config
# Install calico network plugin
# Reference document https://docs.projectcalico.org/v3.13/getting-started/kubernetes/self-managed-onprem/onpremises
echo -e "---Install calico-3.13.1---"
rm -f calico-3.13.1.yaml
wget https://kuboard.cn/install-script/calico/calico-3.13.1.yaml
kubectl apply -f calico-3.13.1.yaml
# Only executed on the master node
# Execute the following command and wait for 3-10 minutes, until all container groups are in the Running state
watch kubectl get pod -n kube-system -o wide
echo -e "---Wait for the container group to build---"&& sleep 180
# View the initialization result of the master node
kubectl get nodes -o wide
Results of the:
# Indicates that the initial installation of kubernetes is successful
Your Kubernetes control-plane has initialized successfully!
To start using your cluster, you need to run the following as a regular user:
 mkdir -p $HOME/.kube
 sudo cp -i /etc/kubernetes/admin.conf $HOME/.kube/config
 sudo chown $(id -u):$(id -g) $HOME/.kube/config

You should now deploy a pod network to the cluster.
Run "kubectl apply -f [podnetwork].yaml"with one of the options listed at:

# You can now join any number of control plane nodes(Cluster), Run the following command on each node as the root:
kubeadm join apiserver.test:6443--token hzlzrr.uwuegx4locpu36oc \
 - - discovery-token-ca-cert-hash sha256:4cbe428cb3503277be9fbcf3a99de82a97397a624dd94d4270c4eed1b861f951 \
 - - control-plane --certificate-key 28b178f04afae3770aa92add0206650b2359dd61424f127a6d44142dd15a280d

# Join any number of worker nodes by running the following operations as root on each worker node:
kubeadm join apiserver.test:6443--token hzlzrr.uwuegx4locpu36oc \
 - - discovery-token-ca-cert-hash sha256:4cbe428cb3503277be9fbcf3a99de82a97397a624dd94d4270c4eed1b861f951
WeiyiGeek.
node node######
# Only executed on the worker node
read -p "Please enter the IP address of the K8s Master node:" MASTER_IP
echo "${MASTER_IP}  ${APISERVER_NAME}">>/etc/hosts
echo -e "\e[32m#Only execute the following commands on the master node\n kubeadm token create --print-join-command\n You can get the kubeadm join command and parameters and run it on the Node node\n"
echo -e "[note]:The token is valid for 24 hours. Within 24 hours, you can use this token to initialize any number of worker nodes\e[0m"
# Master
[[ email protected]~]# kubeadm token create --print-join-command
W0616 15:10:45.62270123160 configset.go:202] WARNING: kubeadm cannot validate component configs for API groups [kubelet.config.k8s.io kubeproxy.config.k8s.io]
kubeadm join apiserver.test:6443--token 5q3zl5.4h2xllxhy7gxccx1     --discovery-token-ca-cert-hash sha256:4cbe428cb3503277be9fbcf3a99de82a97397a624dd94d4270c4eed1b861f951

# Nodes
[[ email protected]~]# ./CentOS7-k8s_init.sh node node-1
Please enter the IP address of the K8s Master node:10.10.107.193
# Only execute the following commands on the master node
kubeadm token create --print-join-command
You can get the kubeadm join command and parameters and run it on the Node node

[ note]:The valid time of the token is 2 hours, within 2 hours, you can use this token to initialize any number of worker nodes
[[ email protected]~]# kubeadm join apiserver.test:6443--token 5q3zl5.4h2xllxhy7gxccx1     --discovery-token-ca-cert-hash sha256:4cbe428cb3503277be9fbcf3a99de82a97397a624dd94d4270c4eed1b861f951
[ preflight] Running pre-flight checks
[ preflight] Reading configuration from the cluster...[preflight] FYI: You can look at this config file with'kubectl -n kube-system get cm kubeadm-config -oyaml'[kubelet-start] Downloading configuration for the kubelet from the "kubelet-config-1.18" ConfigMap in the kube-system namespace
[ kubelet-start] Writing kubelet configuration to file "/var/lib/kubelet/config.yaml"[kubelet-start] Writing kubelet environment file with flags to file "/var/lib/kubelet/kubeadm-flags.env"[kubelet-start] Starting the kubelet
[ kubelet-start] Waiting for the kubelet to perform the TLS Bootstrap...
This node has joined the cluster:* Certificate signing request was sent to apiserver and a response was received.* The Kubelet was informed of the newsecure connection details.

# Master runs to view the joined nodes
Run 'kubectl get nodes' on the control-plane to see this node join the cluster.[[email protected]~]# kubectl get nodes
NAME      STATUS   ROLES    AGE   VERSION
ks8test   Ready    master   22h   v1.18.3
node-1    Ready    <none>   67s   v1.18.3
0 x02 Manually install K8s cluster (online)
Description: The installation of K8s high-availability cluster requires at least three Master nodes and an unlimited number of working nodes to be composed, otherwise the phenomenon of split brain will occur;
- The three masters form the master node cluster, which is implemented through the intranet loader balancer load balancing
- Multiple workers form a cluster of worker nodes, and achieve load balancing through external network loader balancer
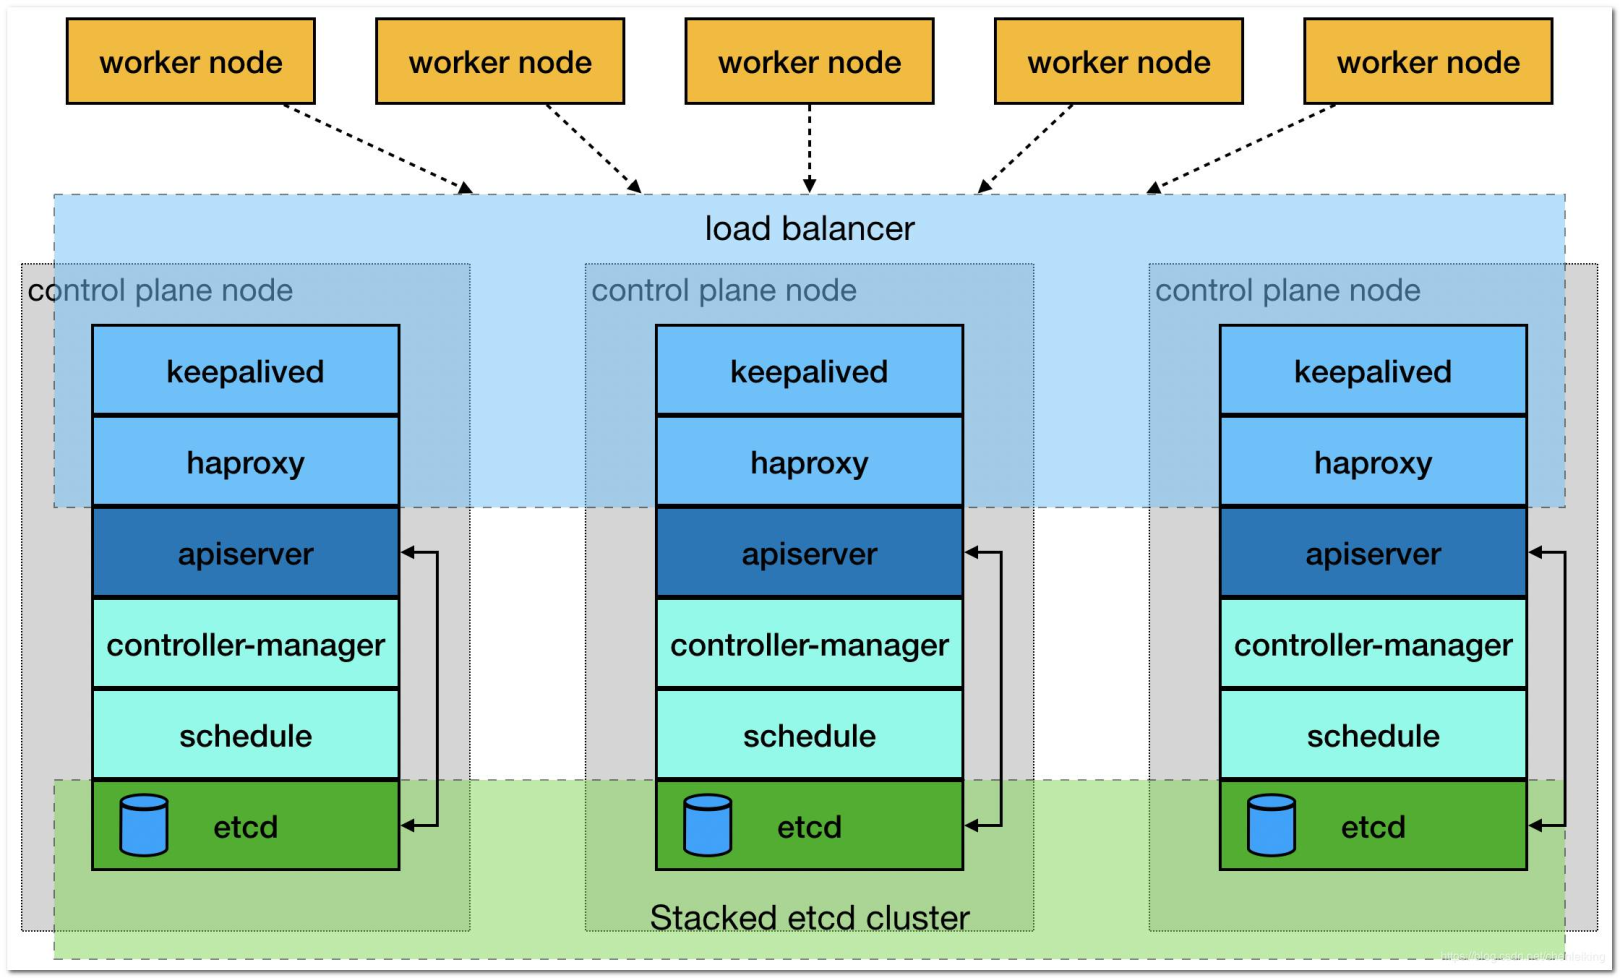
WeiyiGeek. Cluster Architecture
Cluster installation environment description and IP address planning description:
# operating system
CentOS Linux release 7.8.2003(Core)
# Kernel version
5.7.0- 1. el7.elrepo.x86_64

# App version
docker 19.03.9
docker-compose 1.25.5
Kubernetes 1.18.4

# Depend on image and version
# docker images | awk -F ' ''{print $1":"$2}'
# REPOSITORY:TAG
mirrorgcrio/kube-proxy:v1.18.4
mirrorgcrio/kube-apiserver:v1.18.4
mirrorgcrio/kube-controller-manager:v1.18.4
mirrorgcrio/kube-scheduler:v1.18.4
calico/node:v3.13.1
calico/pod2daemon-flexvol:v3.13.1
calico/cni:v3.13.1
calico/kube-controllers:v3.13.1
mirrorgcrio/pause:3.2
mirrorgcrio/coredns:1.6.7
mirrorgcrio/etcd:3.4.3-0
- IP address planning*
| IP | Host Name | Remarks |
|---|---|---|
| 10.10.107.191 | master-01 | Master Master Node |
| 10.10.107.192 | master-02 | Slave Master Node |
| 10.10.107.193 | master-03 | Slave Master Node |
| 10.10.107.194 | worker-01 | Work Node |
| 10.10.107.196 | worker-02 | Work Node |
-
ApiServer Load Balancer (private network) related:*
Monitoring connection port: 6443 / TCP
Back-end resource group: contains master-01, master-02, master-03;
Ways to implement Load Balancer:nginx / haproxy / keepalived / load balancing products provided by cloud providers, we will not cover it here temporarily; -
pay attention:*
-
- Any node is recommended to be greater than or equal to centos version 7.6 or 7.7;
-
- The number of CPU cores on any node is greater than or equal to 2, and the memory is greater than or equal to 4G;
-
- Any node hostname is not localhost, and does not contain underscores, decimal points, uppercase letters and cannot be repeated;
-
- Any node has a fixed intranet IP address and is a single network card
-
- The IP address used by Kubelet on any node can communicate with each other without NAT mapping), and there is no firewall and security group isolation Selinux;
-
- The temporary swap partition on any node will be closed;
-
- The environment variable APISERVER_NAME used during initialization on any node is the same. It cannot be the hostname of the master and must be all lowercase letters, numbers, and decimal points, and cannot contain minus signs;
-
- The network segment used by the environment variable POD_SUBNET used during initialization on any node cannot overlap with the network segment where the master node/worker node is located (usually a class A private address-CIDR value).
-
- When any master node is being initialized, if there is a configuration error in the deployment step in the middle, please perform the
kubeadm resetoperation when you need toreinitialize the master node
- When any master node is being initialized, if there is a configuration error in the deployment step in the middle, please perform the
Operating procedures:
-
- All hosts need to execute the following scripts for
basic environment configuration and (docker/docker-compose/kubernetes) installation, so they need to be customized to modify the configuration (mainly:node host name/APISERVER/APIPORT);
- All hosts need to execute the following scripts for
Basic environment:
export HOSTNAME=worker-02
# Temporarily close swap and SELinux
swapoff -a && setenforce 0
# Permanently close swap and SELinux
yes | cp /etc/fstab /etc/fstab_bak
cat /etc/fstab_bak |grep -v swap >/etc/fstab
sed -i 's/^SELINUX=.*$/SELINUX=disabled/'/etc/selinux/config

# Host name setting(Here the host name installs the host name corresponding to the above IP address plan-Varies according to the installed host)
hostnamectl set-hostname $HOSTNAME
hostnamectl status

# Host name setting
echo "127.0.0.1 $HOSTNAME">>/etc/hosts
cat >>/etc/hosts <<EOF
10.10.107.191 master-0110.10.107.192 master-0210.10.107.193 master-0310.10.107.194 worker-0110.10.107.196 worker-02
EOF

# Command auto-complete
echo "source <(kubectl completion bash)">>~/.bashrc

# DNS settings
echo -e "nameserver 223.6.6.6\nnameserver 192.168.10.254">>/etc/resolv.conf

# Turn off the firewall
systemctl stop firewalld && systemctl disable firewalld

# Docker installation configuration(If you have already installed it, you can skip it)
# Install basic dependencies
yum install -y yum-utils lvm2 wget
# Install nfs-utils 必须先Install nfs-utils can mount nfs network storage
yum install -y nfs-utils
# Add docker mirror warehouse
yum-config-manager --add-repo http://mirrors.aliyun.com/docker-ce/linux/centos/docker-ce.repo

# View available Docker versions and install Docker
yum list docker-ce --showduplicates | sort -r
read -p 'Please enter the Docker to be installed-ce version number(E.g:19.03.9):' VERSION
yum install -y docker-ce-${VERSION} docker-ce-cli-${VERSION} containerd.io

# Install Docker-compose
curl -L https://get.daocloud.io/docker/compose/releases/download/1.25.5/docker-compose-`uname -s`-`uname -m`>/usr/local/bin/docker-compose
chmod +x /usr/local/bin/docker-compose

# Mirror source acceleration configuration
# Create if the folder does not exist/etc/docker/if[[!-d "/etc/docker/"]];then mkdir /etc/docker/;fi
cat >/etc/docker/daemon.json <<EOF
{" registry-mirrors":["REPLACE"]}
EOF
sed -i "s#REPLACE#${REGISTRY_MIRROR}#g"/etc/docker/daemon.json

# Start docker and view the version information after installation
systemctl enable docker && systemctl start docker
docker-compose -v && docker info

# modify/etc/sysctl.conf configures kernel parameters
egrep -q "^(#)?net.ipv4.ip_forward.*"/etc/sysctl.conf && sed -ri "s|^(#)?net.ipv4.ip_forward.*|net.ipv4.ip_forward = 1|g"/etc/sysctl.conf || echo "net.ipv4.ip_forward = 1">>/etc/sysctl.conf
egrep -q "^(#)?net.bridge.bridge-nf-call-ip6tables.*"/etc/sysctl.conf && sed -ri "s|^(#)?net.bridge.bridge-nf-call-ip6tables.*|net.bridge.bridge-nf-call-ip6tables = 1|g"/etc/sysctl.conf || echo "net.bridge.bridge-nf-call-ip6tables = 1">>/etc/sysctl.conf
egrep -q "^(#)?net.bridge.bridge-nf-call-iptables.*"/etc/sysctl.conf && sed -ri "s|^(#)?net.bridge.bridge-nf-call-iptables.*|net.bridge.bridge-nf-call-iptables = 1|g"/etc/sysctl.conf || echo "net.bridge.bridge-nf-call-iptables = 1">>/etc/sysctl.conf
egrep -q "^(#)?net.ipv6.conf.all.disable_ipv6.*"/etc/sysctl.conf && sed -ri "s|^(#)?net.ipv6.conf.all.disable_ipv6.*|net.ipv6.conf.all.disable_ipv6 = 1|g"/etc/sysctl.conf || echo "net.ipv6.conf.all.disable_ipv6 = 1">>/etc/sysctl.conf
egrep -q "^(#)?net.ipv6.conf.default.disable_ipv6.*"/etc/sysctl.conf && sed -ri "s|^(#)?net.ipv6.conf.default.disable_ipv6.*|net.ipv6.conf.default.disable_ipv6 = 1|g"/etc/sysctl.conf || echo "net.ipv6.conf.default.disable_ipv6 = 1">>/etc/sysctl.conf
egrep -q "^(#)?net.ipv6.conf.lo.disable_ipv6.*"/etc/sysctl.conf && sed -ri "s|^(#)?net.ipv6.conf.lo.disable_ipv6.*|net.ipv6.conf.lo.disable_ipv6 = 1|g"/etc/sysctl.conf || echo "net.ipv6.conf.lo.disable_ipv6 = 1">>/etc/sysctl.conf
egrep -q "^(#)?net.ipv6.conf.all.forwarding.*"/etc/sysctl.conf && sed -ri "s|^(#)?net.ipv6.conf.all.forwarding.*|net.ipv6.conf.all.forwarding = 1|g"/etc/sysctl.conf || echo "net.ipv6.conf.all.forwarding = 1">>/etc/sysctl.conf
# Make the modified kernel parameters take effect immediately
sysctl -p

# Configure K8S yum source
 cat <<'EOF'>/etc/yum.repos.d/kubernetes.repo
[ kubernetes]
name=Kubernetes
baseurl=http://mirrors.aliyun.com/kubernetes/yum/repos/kubernetes-el7-x86_64
enabled=1
gpgcheck=0
repo_gpgcheck=0
gpgkey=http://mirrors.aliyun.com/kubernetes/yum/doc/yum-key.gpg
  http://mirrors.aliyun.com/kubernetes/yum/doc/rpm-package-key.gpg
EOF

# View and install kubelet, kubeadm, kubectl and specify a unified kubernetes version number, such as 1.18.4
yum list kubelet --showduplicates | tail -n 10
yum install -y kubelet-1.18.4 kubeadm-1.18.4 kubectl-1.18.4

# Modify docker Cgroup Driver to systemd
# # will/usr/lib/systemd/system/docker.This line ExecStart in the service file=/usr/bin/dockerd -H fd://--containerd=/run/containerd/containerd.sock
# # Modify to ExecStart=/usr/bin/dockerd -H fd://--containerd=/run/containerd/containerd.sock --exec-opt native.cgroupdriver=systemd
# If you do not modify it, you may encounter the following errors when adding worker nodes
# [ WARNING IsDockerSystemdCheck]: detected "cgroupfs"as the Docker cgroup driver. The recommended driver is "systemd".
# Please follow the guide at https://kubernetes.io/docs/setup/cri/
sed -i "s#^ExecStart=/usr/bin/dockerd.*#ExecStart=/usr/bin/dockerd -H fd:// --containerd=/run/containerd/containerd.sock --exec-opt native.cgroupdriver=systemd#g"/usr/lib/systemd/system/docker.service

# Restart docker and start kubelet
systemctl daemon-reload
systemctl enable kubelet
systemctl restart docker && systemctl restart kubelet
-
- Only perform the Master node initialization operation on the master Master node (10.10.107.191) (this node is also the ip used to access the cluster);
APISERVER_IP=10.10.107.191
APISERVER_NAME=k8s.weiyigeek.top
APISERVER_PORT=6443
SERVICE_SUBNET=10.99.0.0/16
POD_SUBNET=10.100.0.1/16
echo "${APISERVER_IP} ${APISERVER_NAME}">>/etc/hosts

# Initial configuration(It is recommended that the version of each component is consistent with the version of k8s)
rm -f ./kubeadm-config.yaml
 cat <<EOF >./kubeadm-config.yaml
apiVersion: kubeadm.k8s.io/v1beta2
kind: ClusterConfiguration
kubernetesVersion: v${K8SVERSION}
imageRepository: mirrorgcrio
# imageRepository: registry.aliyuncs.com/google_containers
# imageRepository: registry.cn-hangzhou.aliyuncs.com/google_containers
# imageRepository: gcr.azk8s.cn/google_containers
controlPlaneEndpoint:"${APISERVER_NAME}:${APISERVER_PORT}"
networking:
 serviceSubnet:"${SERVICE_SUBNET}"
 podSubnet:"${POD_SUBNET}"
 dnsDomain:"cluster.local"
EOF

# kubeadm init According to the speed of your server, you need to wait 3-10 minutes
kubeadm init --config=kubeadm-config.yaml --upload-certs

# Configure kubectl otherwise you cannot execute kubectl get pods-A
mkdir -p $HOME/.kube
sudo cp -i /etc/kubernetes/admin.conf $HOME/.kube/config
sudo chown $(id -u):$(id -g) $HOME/.kube/config

# Install calico network plugin
# Reference document https://docs.projectcalico.org/v3.13/getting-started/kubernetes/self-managed-onprem/onpremises
rm -f calico-3.13.1.yaml
wget -L https://kuboard.cn/install-script/calico/calico-3.13.1.yaml
kubectl apply -f calico-3.13.1.yaml
Results of the:
# (1) Execute the following command and wait for 3-10 minutes, until all container groups are in the Running state
watch kubectl get pod -n kube-system -o wide
# NAME                                       READY   STATUS    RESTARTS   AGE   IP              NODE        NOMINATED NODE   READINESS GATES
# calico-kube-controllers-5b8b769fcd-ns9r4   1/1     Running   0          6m   10.100.184.65   master-01<none><none>
# calico-node-bg2g9                          1/1     Running   0          6m   10.10.107.191   master-01<none><none>
# coredns-54f99b968c-2tqc4                   1/1     Running   0          6m   10.100.184.67   master-01<none><none>
# coredns-54f99b968c-672zn                   1/1     Running   0          6m   10.100.184.66   master-01<none><none>
# etcd-master-011/1     Running   0          6m   10.10.107.191   master-01<none><none>
# kube-apiserver-master-011/1     Running   0          6m   10.10.107.191   master-01<none><none>
# kube-controller-manager-master-011/1     Running   0          6m   10.10.107.191   master-01<none><none>
# kube-proxy-trg7v                           1/1     Running   0          6m   10.10.107.191   master-01<none><none>
# kube-scheduler-master-011/1     Running   0          6m   10.10.107.191   master-01<none><none>

# (2) At this time, the status of the master node should be Ready
kubectl get node -o wide
# NAME        STATUS   ROLES    AGE   VERSION   INTERNAL-IP     EXTERNAL-IP   OS-IMAGE                KERNEL-VERSION              CONTAINER-RUNTIME
# master-01   Ready    master   7m   v1.18.410.10.107.191<none>        CentOS Linux 7(Core)5.7.0-1.el7.elrepo.x86_64   docker://19.3.9

# (3) Downloaded image information
docker images
# REPOSITORY                            TAG                 IMAGE ID            CREATED             SIZE
# mirrorgcrio/kube-proxy                v1.18.4             718fa77019f2        5 days ago          117MB
# mirrorgcrio/kube-apiserver            v1.18.4             408913fc18eb        5 days ago          173MB
# mirrorgcrio/kube-scheduler            v1.18.4             c663567f869e        5 days ago          95.3MB
# mirrorgcrio/kube-controller-manager   v1.18.4             e8f1690127c4        5 days ago          162MB
# calico/node                           v3.13.1             2e5029b93d4a        3 months ago        260MB
# calico/pod2daemon-flexvol             v3.13.1             e8c600448aae        3 months ago        111MB
# calico/cni                            v3.13.1             6912ec2cfae6        3 months ago        207MB
# calico/kube-controllers               v3.13.1             3971f13f2c6c        3 months ago        56.6MB
# mirrorgcrio/pause                     3.2                 80d28bedfe5d        4 months ago        683kB
# mirrorgcrio/coredns                   1.6.7               67da37a9a360        4 months ago        43.8MB
# mirrorgcrio/etcd                      3.4.3-0             303ce5db0e90        8 months ago        288MB

# (4) The pod network should now be deployed to the cluster to deploy the calico plugin(Install cluster network)
kubectl apply -f calico-3.13.1.yaml
# configmap/calico-config created
# customresourcedefinition.apiextensions.k8s.io/bgpconfigurations.crd.projectcalico.org created
# customresourcedefinition.apiextensions.k8s.io/bgppeers.crd.projectcalico.org created
# customresourcedefinition.apiextensions.k8s.io/blockaffinities.crd.projectcalico.org created
# customresourcedefinition.apiextensions.k8s.io/clusterinformations.crd.projectcalico.org created
# customresourcedefinition.apiextensions.k8s.io/felixconfigurations.crd.projectcalico.org created
# customresourcedefinition.apiextensions.k8s.io/globalnetworkpolicies.crd.projectcalico.org created
# customresourcedefinition.apiextensions.k8s.io/globalnetworksets.crd.projectcalico.org created
# customresourcedefinition.apiextensions.k8s.io/hostendpoints.crd.projectcalico.org created
# customresourcedefinition.apiextensions.k8s.io/ipamblocks.crd.projectcalico.org created
# customresourcedefinition.apiextensions.k8s.io/ipamconfigs.crd.projectcalico.org created
# customresourcedefinition.apiextensions.k8s.io/ipamhandles.crd.projectcalico.org created
# customresourcedefinition.apiextensions.k8s.io/ippools.crd.projectcalico.org created
# customresourcedefinition.apiextensions.k8s.io/networkpolicies.crd.projectcalico.org created
# customresourcedefinition.apiextensions.k8s.io/networksets.crd.projectcalico.org created
# clusterrole.rbac.authorization.k8s.io/calico-kube-controllers created
# clusterrolebinding.rbac.authorization.k8s.io/calico-kube-controllers created
# clusterrole.rbac.authorization.k8s.io/calico-node created
# clusterrolebinding.rbac.authorization.k8s.io/calico-node created
# daemonset.apps/calico-node created
# serviceaccount/calico-node created
# deployment.apps/calico-kube-controllers created
# serviceaccount/calico-kube-controllers Created
Note: Please wait until all container groups (about 9) are in the Running state before proceeding to the next step
-
- Running the second command on the remaining two slave master nodes will join the master cluster, but we need to download the image used before executing the following
(1) (2);
- Running the second command on the remaining two slave master nodes will join the master cluster, but we need to download the image used before executing the following
# (0) K8s cannot be accessed in China.gcr.io will be stuck after adding the control plane node command when initializing from the master node until the timeout period;
# Solution:Pull the image from the Docker official default mirroring platform and re-tag it to bypass the k8s.gcr.io access.
kubeadm config images pull --image-repository mirrorgcrio
# [ config/images] Pulled mirrorgcrio/kube-apiserver:v1.18.4
# [ config/images] Pulled mirrorgcrio/kube-controller-manager:v1.18.4
# [ config/images] Pulled mirrorgcrio/kube-scheduler:v1.18.4
# [ config/images] Pulled mirrorgcrio/kube-proxy:v1.18.4
# [ config/images] Pulled mirrorgcrio/pause:3.2
# [ config/images] Pulled mirrorgcrio/etcd:3.4.3-0
# [ config/images] Pulled mirrorgcrio/coredns:1.6.7

kubeadm config images list --image-repository mirrorgcrio > gcr.io.log
# Re-tag the image as k8s.gcr.io\Image name:version
sed -e "s#\\(/.*$\\)#\1 k8s.gcr.io\1#g" gcr.io.log > gcr.io.log1
while read k8sgcrio;do
 docker tag ${k8sgcrio}
done < gcr.io.log1

# Delete the tag with mirrorgcrio
while read k8s;do
 docker rmi ${k8s}
done < gcr.io.log

# Final effect
$docker images
# REPOSITORY                           TAG                 IMAGE ID            CREATED             SIZE
# k8s.gcr.io/kube-proxy                v1.18.4             718fa77019f2        6 days ago          117MB
# k8s.gcr.io/kube-scheduler            v1.18.4             c663567f869e        6 days ago          95.3MB
# k8s.gcr.io/kube-apiserver            v1.18.4             408913fc18eb        6 days ago          173MB
# k8s.gcr.io/kube-controller-manager   v1.18.4             e8f1690127c4        6 days ago          162MB
# k8s.gcr.io/pause                     3.2                 80d28bedfe5d        4 months ago        683kB
# k8s.gcr.io/coredns                   1.6.7               67da37a9a360        4 months ago        43.8MB
# k8s.gcr.io/etcd                      3.4.3-0             303ce5db0e90        8 months ago        288MB

# (1) APIServer performs master IP and server name configuration
APISERVER_IP=10.10.107.191
APISERVER_NAME=k8s.weiyigeek.top
echo "${APISERVER_IP} ${APISERVER_NAME}">>/etc/hosts

# (2) Join the control plane node from the Master node(certificate-key)Expires after two hours
kubeadm join k8s.weiyigeek.top:6443--token opcpye.79zeofy6eo4h9ag6 \
 - - discovery-token-ca-cert-hash sha256:0795075090d621285dbaa4a76b9b320150f5ae3c37f5d7b92fc1c4f8942d9243 \
 - - control-plane --certificate-key 6dbee003011ac1dae15ae1fad3014ac8b568d154387aa0c43663d5fc47a109c4

# (3) Copy kubernetes configuration file to user home directory(If it is not executed, the kubectl get resource will error)
mkdir -p $HOME/.kube
sudo cp -i /etc/kubernetes/admin.conf $HOME/.kube/config
sudo chown $(id -u):$(id -g) $HOME/.kube/config
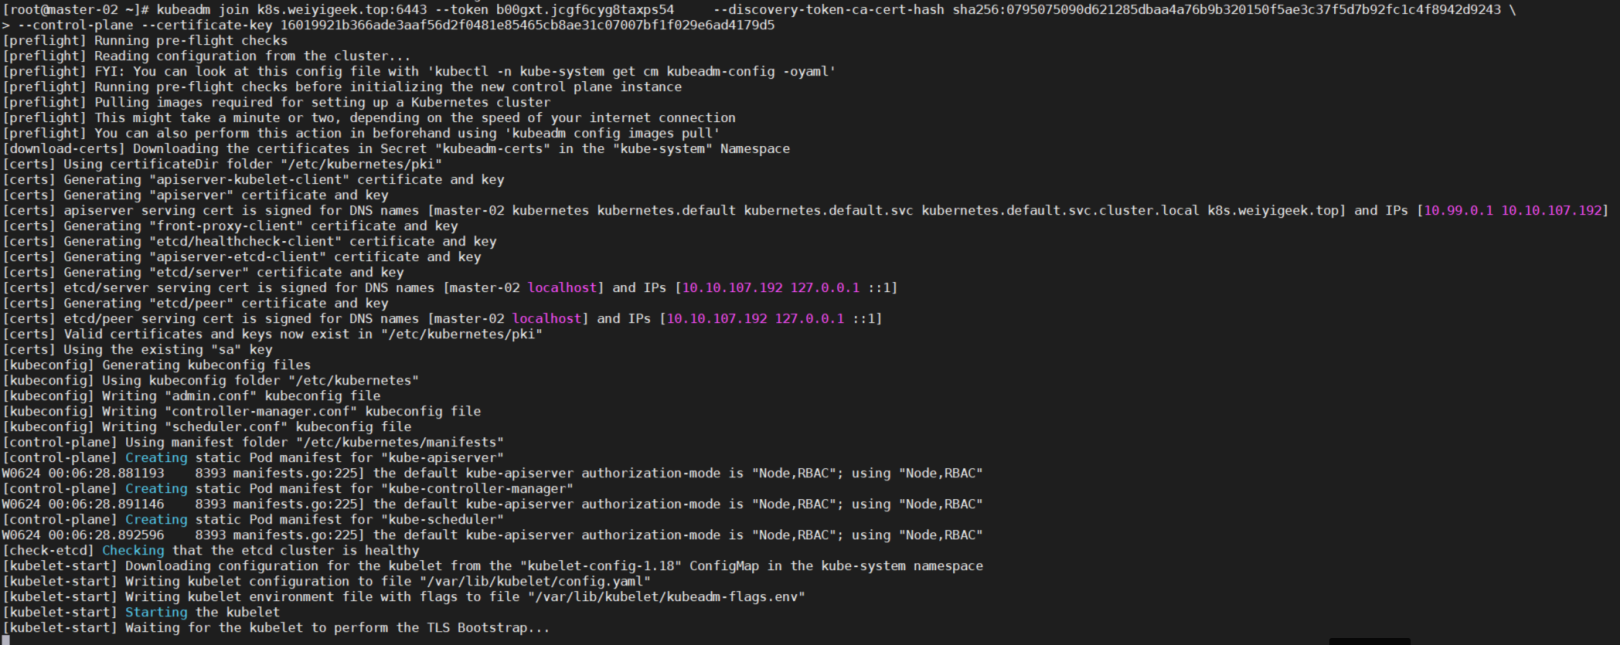
WeiyiGeek. From the Master node
- Run the
kubeadm joincommand on the remaining two Node nodes;
# (1) APIServer performs master IP and server name configuration
APISERVER_IP=10.10.107.191
APISERVER_NAME=k8s.weiyigeek.top
echo "${APISERVER_IP} ${APISERVER_NAME}">>/etc/hosts

# (2) Add the worker node to the cluster managed by the Master node;
kubeadm join k8s.weiyigeek.top:6443--token opcpye.79zeofy6eo4h9ag6 \
 - - discovery-token-ca-cert-hash sha256:0795075090d621285dbaa4a76b9b320150f5ae3c37f5d7b92fc1c4f8942d9243
- Configure the etcd cluster in the K8s cluster, modify the –initial-cluster parameter in the etcd.yaml file to ensure that all three Master node machines are added to the etcd cluster;
# All Master node machines are configured as follows:[root@master-01~]$ grep -n "initial-cluster"/etc/kubernetes/manifests/etcd.yaml
21:- - - initial-cluster=master-01=https://10.10.107.191:2380,master-03=https://10.10.107.193:2380,master-02=https://10.10.107.192:2380[root@master-02~]$ grep -n "initial-cluster"/etc/kubernetes/manifests/etcd.yaml
21:- - - initial-cluster=master-01=https://10.10.107.191:2380,master-02=https://10.10.107.192:2380,master-03=https://10.10.107.193:238022:---initial-cluster-state=existing

[ root@master-03~]$ grep -n "initial-cluster"/etc/kubernetes/manifests/etcd.yaml
21:- - - initial-cluster=master-01=https://10.10.107.191:2380,master-03=https://10.10.107.193:2380,master-02=https://10.10.107.192:238022:---initial-cluster-state=existing

# Modify kube later-apiserver etcd is connected to the ip of each node in the cluster
[ root@master-01~]$ grep -n "etcd-servers"/etc/kubernetes/manifests/kube-apiserver.yaml
25:- - - etcd-servers=https://10.10.107.191:2379,https://10.10.107.192:2379,https://10.10.107.193:2379[root@master-02~]$ grep -n "etcd-servers"/etc/kubernetes/manifests/kube-apiserver.yaml
25:- - - etcd-servers=https://10.10.107.191:2379,https://10.10.107.192:2379,https://10.10.107.193:2379[root@master-03~]$ grep -n "etcd-servers"/etc/kubernetes/manifests/kube-apiserver.yaml
25:- - - etcd-servers=https://10.10.107.191:2379,https://10.10.107.192:2379,https://10.10.107.193:2379
- Verify that the master cluster is deployed normally
kubectl get nodes -o wide
# NAME        STATUS   ROLES    AGE     VERSION   INTERNAL-IP     EXTERNAL-IP   OS-IMAGE                KERNEL-VERSION              CONTAINER-RUNTIME
# master-01   Ready    master   5d1h    v1.18.410.10.107.191<none>        CentOS Linux 7(Core)5.7.0-1.el7.elrepo.x86_64   docker://19.3.9
# master-02   Ready    master   4d13h   v1.18.410.10.107.192<none>        CentOS Linux 7(Core)5.7.0-1.el7.elrepo.x86_64   docker://19.3.9
# master-03   Ready    master   4d4h    v1.18.410.10.107.193<none>        CentOS Linux 7(Core)5.7.0-1.el7.elrepo.x86_64   docker://19.3.9
# worker-01   Ready    <none>   5d1h    v1.18.410.10.107.194<none>        CentOS Linux 7(Core)5.7.0-1.el7.elrepo.x86_64   docker://19.3.9
# worker-02   Ready    <none>   4d14h   v1.18.410.10.107.196<none>        CentOS Linux 7(Core)5.7.0-1.el7.elrepo.x86_64   docker://19.3.9

kubectl get pods -A -o wide
# NAMESPACE     NAME                                       READY   STATUS             RESTARTS   AGE     IP              NODE        NOMINATED NODE   READINESS GATES
# default       helloworld                                 0/1     CrashLoopBackOff   1089       3d21h   10.100.37.193   worker-02<none><none>
# kube-system   calico-kube-controllers-5b8b769fcd-ns9r4   1/1     Running            0          5d1h    10.100.184.65   master-01<none><none>
# kube-system   calico-node-8rn2s                          1/1     Running            0          4d4h    10.10.107.193   master-03<none><none>
# kube-system   calico-node-bg2g9                          1/1     Running            0          5d1h    10.10.107.191   master-01<none><none>
# kube-system   calico-node-d2vqd                          1/1     Running            0          4d13h   10.10.107.196   worker-02<none><none>
# kube-system   calico-node-n48dt                          1/1     Running            0          4d13h   10.10.107.192   master-02<none><none>
# kube-system   calico-node-whznq                          1/1     Running            1          5d1h    10.10.107.194   worker-01<none><none>
# kube-system   coredns-54f99b968c-2tqc4                   1/1     Running            0          5d1h    10.100.184.67   master-01<none><none>
# kube-system   coredns-54f99b968c-672zn                   1/1     Running            0          5d1h    10.100.184.66   master-01<none><none>
# kube-system   etcd-master-011/1     Running            0          4d2h    10.10.107.191   master-01<none><none>
# kube-system   etcd-master-021/1     Running            0          4d2h    10.10.107.192   master-02<none><none>
# kube-system   etcd-master-031/1     Running            0          4d4h    10.10.107.193   master-03<none><none>
# kube-system   kube-apiserver-master-011/1     Running            0          4d2h    10.10.107.191   master-01<none><none>
# kube-system   kube-apiserver-master-021/1     Running            0          4d2h    10.10.107.192   master-02<none><none>
# kube-system   kube-apiserver-master-031/1     Running            0          4d2h    10.10.107.193   master-03<none><none>
# kube-system   kube-controller-manager-master-011/1     Running            3          5d1h    10.10.107.191   master-01<none><none>
# kube-system   kube-controller-manager-master-021/1     Running            2          4d13h   10.10.107.192   master-02<none><none>
# kube-system   kube-controller-manager-master-031/1     Running            1          4d4h    10.10.107.193   master-03<none><none>
# kube-system   kube-proxy-5jjql                           1/1     Running            0          4d13h   10.10.107.196   worker-02<none><none>
# kube-system   kube-proxy-7ln9t                           1/1     Running            1          5d1h    10.10.107.194   worker-01<none><none>
# kube-system   kube-proxy-8x257                           1/1     Running            0          4d4h    10.10.107.193   master-03<none><none>
# kube-system   kube-proxy-gbm52                           1/1     Running            0          4d13h   10.10.107.192   master-02<none><none>
# kube-system   kube-proxy-trg7v                           1/1     Running            0          5d1h    10.10.107.191   master-01<none><none>
# kube-system   kube-scheduler-master-011/1     Running            1          5d1h    10.10.107.191   master-01<none><none>
# kube-system   kube-scheduler-master-021/1     Running            3          4d13h   10.10.107.192   master-02<none><none>
# kube-system   kube-scheduler-master-031/1     Running            2          4d4h    10.10.107.193   master-03<none><none>

# View component health information
[ root@master-01~]$ kubectl get cs
NAME                 STATUS    MESSAGE             ERROR
scheduler            Healthy   ok
controller-manager   Healthy   ok
etcd-1               Healthy   {"health":"true"}
etcd-2               Healthy   {"health":"true"}
etcd-0               Healthy   {"health":"true"}[root@master-02~]$ kubectl get cs
NAME                 STATUS    MESSAGE             ERROR
scheduler            Healthy   ok
controller-manager   Healthy   ok
etcd-2               Healthy   {"health":"true"}
etcd-0               Healthy   {"health":"true"}
etcd-1               Healthy   {"health":"true"}[root@master-03~]$ kubectl get cs
NAME                 STATUS    MESSAGE             ERROR
controller-manager   Healthy   ok
scheduler            Healthy   ok
etcd-2               Healthy   {"health":"true"}
etcd-1               Healthy   {"health":"true"}
etcd-0               Healthy   {"health":"true"}

# Configuration information view
kubectl get cm kubeadm-config -n kube-system -o yaml

# Election Information View
kubectl get ep kube-controller-manager -n kube-system -o yaml
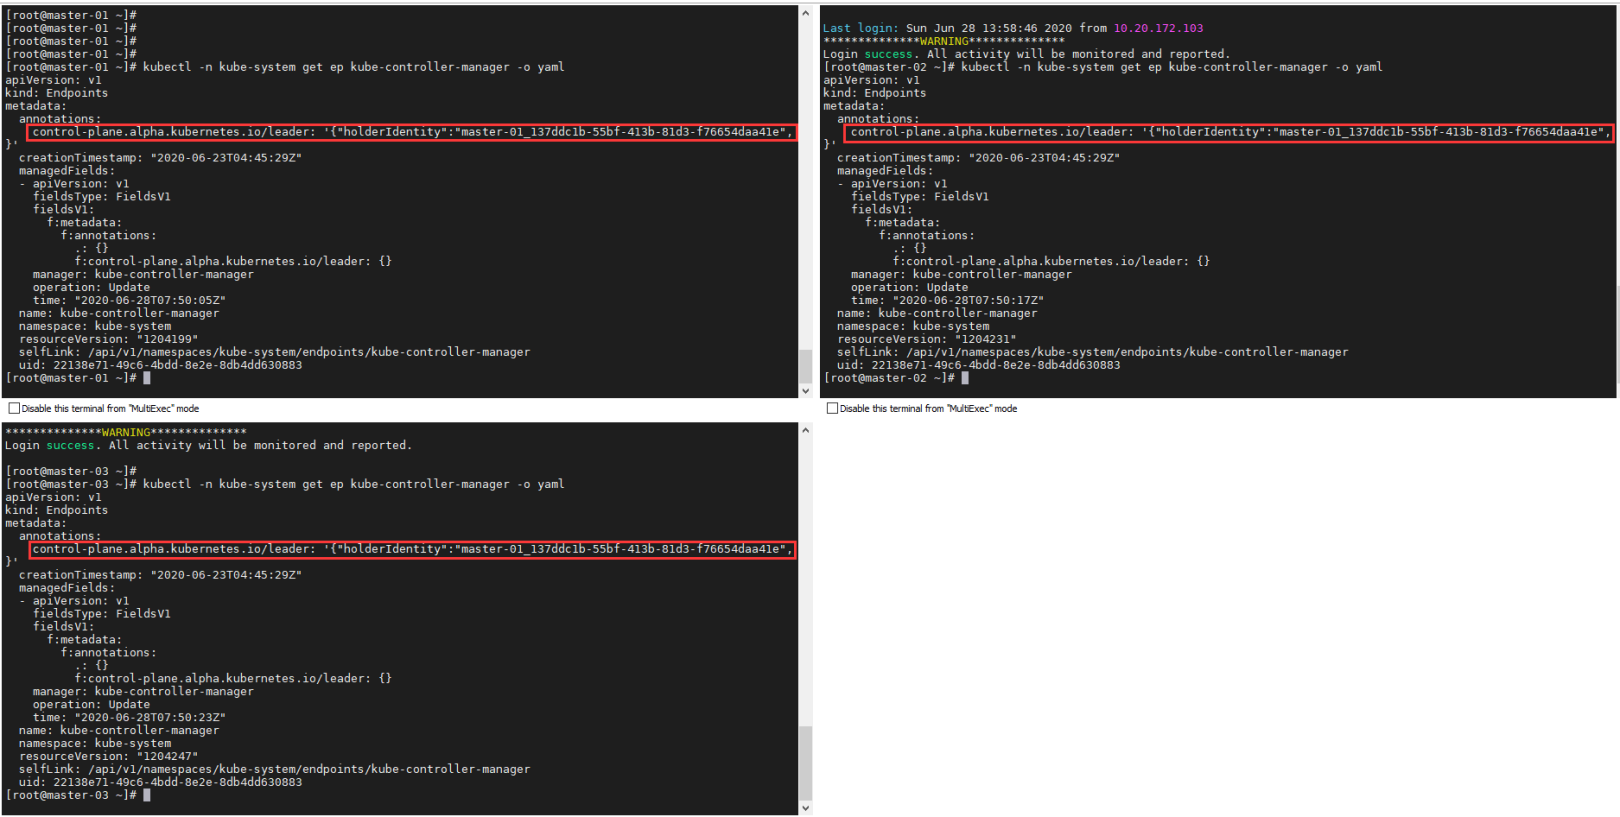
WeiyiGeek. Election View
- Remove worker node
#(1) Execute on the worker node to be removed
kubeadm reset

# On the first master node master-01 execution,The name of the worker node can be obtained by executing the kubectl get nodes command;
kubectl delete node worker-02
- At this point, a simple K8s cluster has been set up, and finally add one more point about the issue of token failure using the following command to solve it,
You need to run the command on the master master node;
# (1) Check whether the token is invalid, the default is 24H
kubeadm token list
# TOKEN                     TTL         EXPIRES                     USAGES                   DESCRIPTION                                                EXTRA GROUPS
# opcpye.79zeofy6eo4h9ag6   13h         2020-06-24T12:45:29+08:00   authentication,signing   <none>                                                     system:bootstrappers:kubeadm:default-node-token

## the way(1) ##
# (2) Join the kubeadm of the node to the k8s cluster(recommend), Use this command to call a single stage of the init workflow
kubeadm init phase upload-certs --upload-certs
# [ upload-certs] Using certificate key:
# 70 eb87e62f052d2d5de759969d5b42f372d0ad798f98df38f7fe73efdf63a13c
kubeadm token create --print-join-command
# kubeadm join apiserver.demo:6443--token bl80xo.hfewon9l5jlpmjft --discovery-token-ca-cert-hash sha256:b4d2bed371fe4603b83e7504051dcfcdebcbdcacd8be27884223c4ccc13059a4
# Then the join commands of the second and third master nodes after the combination are as follows:
kubeadm join apiserver.demo:6443--token ejwx62.vqwog6il5p83uk7y \
- - discovery-token-ca-cert-hash sha256:6f7a8e40a810323672de5eee6f4d19aa2dbdb38411845a1bf5dd63485c43d303 \
- - control-plane --certificate-key 70eb87e62f052d2d5de759969d5b42f372d0ad798f98df38f7fe73efdf63a13c
# (3) Worker nodes join and directly execute the token printed above
 kubeadm join apiserver.demo:6443--token bl80xo.hfewon9l5jlpmjft --discovery-token-ca-cert-hash sha256:b4d2bed371fe4603b83e7504051dcfcdebcbdcacd8be27884223c4ccc13059a4

## the way(2) ##
# 1) If it fails, you can regenerate it after the token expires
kubeadm token create
# 2 q41vx.w73xe9nrlqdujawu     ##Here is the new token
# 2) Get the hash value of the CA (certificate) public key
openssl x509 -pubkey -in/etc/kubernetes/pki/ca.crt | openssl rsa -pubin -outform der 2>/dev/null| openssl dgst -sha256 -hex | sed 's/^ .* //'
# ( stdin)= 43c8b7186efa9c68002aca3d4eed56fbc9e200c8550071a3dd1db99a10445713  ###Here is the public key hash value(The certificate on a machine remains the same as the sha256 value)
# (3) Node joins the cluster
kubeadm join 192.168.80.137:6443--token Fill in the newly generated Token here--discovery-token-ca-cert-hash sha256:Fill in the obtained public key hash value here
# kubeadm join apiserver.demo:6443--token 2q41vx.w73xe9nrlqdujawu  --discovery-token-ca-cert-hash sha256:43c8b7186efa9c68002aca3d4eed56fbc9e200c8550071a3dd1db99a10445713
- Precautions:*
- Only the Master node can execute to view node and pod related information; 2) If the master master node has an error during initialization and needs to be reconfigured, please execute the following command to reset;
systemctl stop kubelet
docker stop $(docker ps -aq)
docker rm -f $(docker ps -aq)
systemctl stop docker
kubeadm reset
rm -rf $HOME/.kube /etc/kubernetes
rm -rf /var/lib/cni//etc/cni//var/lib/kubelet/*
iptables -F && iptables -t nat -F && iptables -t mangle -F && iptables -X
systemctl start docker
systemctl start kubelet
- If you stay in the pre-flight state when you join the master node, please check the command on the second and third nodes:
curl -ik https://setting APISERVER:6443/version
# normal status
$curl -ik https://k8s.weiyigeek.top:6443/version
HTTP/1.1200 OK
Cache-Control: no-cache,private
Content-Type: application/json
Date: Wed,24 Jun 202002:16:23 GMT
Content-Length:263{"major":"1","minor":"18","gitVersion":"v1.18.4","gitCommit":"c96aede7b5205121079932896c4ad89bb93260af","gitTreeState":"clean","buildDate":"2020-06-17T11:33:59Z","goVersion":"go1.13.9","compiler":"gc","platform":"linux/amd64"}
0 x03 Manually install K8s cluster (offline)
Description: Offline installation of K8s means to install the K8S cluster when the machine is not connected to the external network;
Two installation methods:
-
- The offline installation tool
sealosis developed in pure golang. It only needs a binary, does not rely on the local load of the kernel, does not rely on haproxy keepalived, etc. Does not rely on ansible 99-year certificate Support custom configuration The installation tool is separated from the resource package, offline installation, install different versions Only need to replace different resource packages to support the installation of APP (addons) such as ingress kuboard prometheus
- The offline installation tool
-
- Build a software warehouse of system template and docker mirror warehouse harbor;
Basic requirements:
-
- The system recommends CentOS7.6 or higher, the kernel recommends 4.14 or higher, and the CPU node configuration is not less than 2 cores 4G;
-
- The machine root user password is consistent (if inconsistent, you can also use the ssh key)
1. Semi-automatic offline installation
Description: For the semi-automatic offline installation of kubernetes, we use offline download mirrors and build a local internal Yum warehouse server, we need to make the following preparations;
- (1) Basic operating system installation image: CentOS Linux release 7.8.2003 (Core)-5.7.0-1.el7.elrepo.x86_64
- (2) Intranet yum warehouse is established to download Kubernetes-related installation packages:
kubelet-1.18.4 kubeadm-1.18.4 kubectl-1.18.4 - (3) Docker related environment downloads kubernetes related functional components for packaging (harbor mirror warehouse is recommended later): k8s.gcr.io/kube-apiserver:v1.18.4 k8s.gcr.io/kube-controller-manager:v1.18.4 k8s.gcr .io/kube-scheduler:v1.18.4 k8s.gcr.io/kube-proxy:v1.18.4 k8s.gcr.io/pause:3.2 k8s.gcr.io/etcd:3.4.3-0 k8s.gcr.io /coredns:1.6.7
- (4) Simple web application: Nginx or httpd environment
- (5) Prepare several related configuration machines and set different machine names;
k8s.gcr.io mirror download method:
-
- If the machine cannot access k8s.gcr.io, 12345678910111213141516## Mirror download method (1)# Method 1: kubeadm config images list> gcr.io.log && sed -i's#k8s.gcr.io#mirrorgcrio#g' gcr.io.log# Method 2: kubeadm config images list --image-repository mirrorgcrio> gcr.io.log# Note that the for reading line defaults to a space as the end separator# for k8s in You can't use'macro parameter character #'in math mode(catgcr.io.log);dodockerrmi{k8s}; done## Image download and tag packaging method (2)-recommended K8SVERSION=1.18.5kubeadm config images list --kubernetes-version=K8SVERSION2> /dev/null|sed′s/k8s.gcr.io/dockerpullmirrorgcrio/g′|sudoshkubeadmconfigimageslist−−kubernetes−version=K8SVERSION2>/dev/null|sed′s/k8s.gcr.io/dockerimagermmirrorgcrio/g′|sudoshdockersavemirrorgcrio/g′|sudoshdockers −ov(dockerimages|grep−vTAG|cut−d′′−f1)gzipv{K8SVERSION}.tar v
-
- When the machine can access k8s.gcr.io, it is recommended to pull the required version of the image and then save it as a tar package and send it back to the local or harbor. 12345678910111213141516171819#!/bin/bash# for: use kubeadm pull kubernetes images# date: 2019-08-15set -xueapt-get update && apt-get install -y apt-transport-https curlcurl -s https://packages.cloud .google.com/apt/doc/apt-key.gpg | apt-key add -cat <
/etc/apt/sources.list.d/kubernetes.listdeb https://apt.kubernetes.io/ kubernetes-xenial mainEOFapt-get updatefor version in 1.17.4 do apt install kubeadm=versiondockersave−ov{version}.tar (dockerimages |grep−vTAG|grepk8s.gcr.io|cut−d′′−f1)gzipv{version}.tar v
- When the machine can access k8s.gcr.io, it is recommended to pull the required version of the image and then save it as a tar package and send it back to the local or harbor. 12345678910111213141516171819#!/bin/bash# for: use kubeadm pull kubernetes images# date: 2019-08-15set -xueapt-get update && apt-get install -y apt-transport-https curlcurl -s https://packages.cloud .google.com/apt/doc/apt-key.gpg | apt-key add -cat <
Basic process:
Step1. Build the local internal yum warehouse (download dependency package of related environment)
## Global variable
export K8SVERSION="1.18.5"export REGISTRY_MIRROR="https://xlx9erfu.mirror.aliyuncs.com"

## Basic system settings
hostnamectl set-hostname k8s-yum-server && echo "127.0.0.1 k8s-yum-server">>/etc/hosts
setenforce 0&& getenforce && hostnamectl status

## Application basic settings
sed -i "s#keepcache=0#keepcache=1#g"/etc/yum.conf && echo -e "Cache directory:"&& grep "cachedir"/etc/yum.conf
if[[!-d "/etc/docker/"]];then mkdir /etc/docker/;fi
cat >/etc/docker/daemon.json <<EOF
{" registry-mirrors":["REPLACE"]}
EOF
sed -i "s#REPLACE#${REGISTRY_MIRROR}#g"/etc/docker/daemon.json
systemctl daemon-reload
systemctl restart docker kubelet

## App installation settings
# Install basic dependencies
yum install -y yum-utils lvm2 wget nfs-utils
# Add docker mirror warehouse
yum-config-manager --add-repo http://mirrors.aliyun.com/docker-ce/linux/centos/docker-ce.repo

cat <<'EOF'>/etc/yum.repos.d/kubernetes.repo
[ kubernetes]
name=Kubernetes
baseurl=http://mirrors.aliyun.com/kubernetes/yum/repos/kubernetes-el7-x86_64
enabled=1
gpgcheck=0
repo_gpgcheck=0
gpgkey=http://mirrors.aliyun.com/kubernetes/yum/doc/yum-key.gpg
  http://mirrors.aliyun.com/kubernetes/yum/doc/rpm-package-key.gpg
EOF

yum list docker-ce --showduplicates | sort -r
read -p 'Please enter the Docker to be installed-ce version number(E.g:19.03.9):' VERSION
yum install -y docker-ce-${VERSION} docker-ce-cli-${VERSION} containerd.io

yum list kubeadm --showduplicates | sort -r
# createrepo and httpd are necessary software to build an internal warehouse
yum install -y kubelet-${K8SVERSION} kubeadm-${K8SVERSION} kubectl-${K8SVERSION} httpd createrepo
# Install the specified version of docker-ce and kubelet, kubeadm
# yum install docker-ce-19.03.3-3.el7 kubelet-1.17.4-0 kubeadm-1.17.4-0 kubectl-1.17.4-0--disableexcludes=kubernetes
Step2. Download the mirror in K8s.gcr.io to the local and package it
## Docker download K8s.gcr.io mirror
kubeadm config images list --kubernetes-version=${K8SVERSION}2>/dev/null| sed 's/k8s.gcr.io/docker pull mirrorgcrio/g'| sudo sh
kubeadm config images list --kubernetes-version=${K8SVERSION}2>/dev/null| sed 's/k8s.gcr.io\(.*\)/docker tag mirrorgcrio\1 k8s.gcr.io\1/g'| sudo sh
kubeadm config images list --kubernetes-version=${K8SVERSION}2>/dev/null| sed 's/k8s.gcr.io/docker image rm mirrorgcrio/g'| sudo sh
docker save -o v${K8SVERSION}.tar $(docker images | grep -v TAG | cut -d ' '-f1)
# Reduce the volume of image packaging
gzip v${K8SVERSION}.tar v${K8SVERSION}.tar.gz
Step3. Put the rpm downloaded by yum cache and the packaged image of k8s in the httpd application service access directory, namely /var/www/html/, and then generate internal yum database and information index files;
mv /etc/httpd/conf.d/welcome.conf{,.bak}
mkdir /var/www/html/yum/
find /var/cache/yum -name *.rpm -exec cp -a {}/var/www/html/yum/ \;
# Permission is very important, otherwise the download will prompt insufficient permissions
cp v${K8SVERSION}.tar.gz /var/www/html/yum/&& chmod +644/var/www/html/yum/v${K8SVERSION}.tar.gz

# Generate internal yum database and information index file
createrepo -pdo /var/www/html/yum//var/www/html/yum/
createrepo --update /var/www/html/yum/
Step4. The httpd service startup and firewall settings of the internal yum warehouse
firewall-cmd --add-port=80/tcp --permanent
firewall-cmd --reload
systemctl start httpd
Step5. Use a template to clone a machine to verify whether the internal warehouse is successfully configured and the software can be installed normally
echo "10.10.107.201 yum.weiyigeek.top">>/etc/hosts
cat >/etc/yum.repos.d/localyumserver.repo <<END
[ localyumserver]
name=localyumserver
baseurl=http://yum.weiyigeek.top/yum/
enabled=1
gpgcheck=0
END
yum --enablerepo=localyumserver --disablerepo=base,extras,updates,epel,elrepo,docker-ce-stable list
If the following is displayed normally, the creation is successful, otherwise, please refer to the error message to make corresponding adjustments;
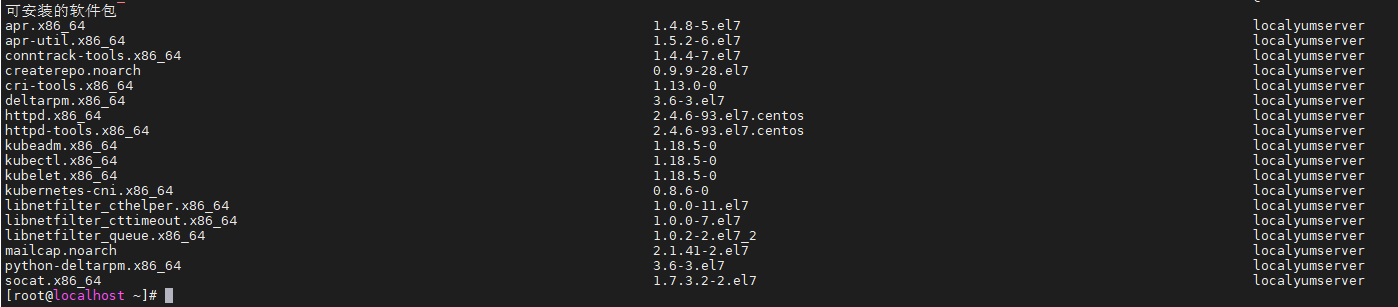
WeiyiGeek.localyumserver
- Step6. Install K8s basic environment settings on this clone machine
export HOSTNAME=worker-03
# Temporarily close swap and SELinux
swapoff -a && setenforce 0
# Permanently close swap and SELinux
yes | cp /etc/fstab /etc/fstab_bak
cat /etc/fstab_bak |grep -v swap >/etc/fstab
sed -i "s/^SELINUX=.*$/SELINUX=disabled/"/etc/selinux/config

# Host name setting(Here the host name installs the host name corresponding to the above IP address plan-Varies according to the installed host)
hostnamectl set-hostname $HOSTNAME
hostnamectl status

# Host name setting
echo "127.0.0.1 $HOSTNAME">>/etc/hosts
cat >>/etc/hosts <<EOF
10.10.107.191 master-0110.10.107.192 master-0210.10.107.193 master-0310.10.107.194 worker-0110.10.107.196 worker-0210.20.172.200 worker-03
EOF

# modify/etc/sysctl.conf configures kernel parameters
egrep -q "^(#)?net.ipv4.ip_forward.*"/etc/sysctl.conf && sed -ri "s|^(#)?net.ipv4.ip_forward.*|net.ipv4.ip_forward = 1|g"/etc/sysctl.conf || echo "net.ipv4.ip_forward = 1">>/etc/sysctl.conf
egrep -q "^(#)?net.bridge.bridge-nf-call-ip6tables.*"/etc/sysctl.conf && sed -ri "s|^(#)?net.bridge.bridge-nf-call-ip6tables.*|net.bridge.bridge-nf-call-ip6tables = 1|g"/etc/sysctl.conf || echo "net.bridge.bridge-nf-call-ip6tables = 1">>/etc/sysctl.conf
egrep -q "^(#)?net.bridge.bridge-nf-call-iptables.*"/etc/sysctl.conf && sed -ri "s|^(#)?net.bridge.bridge-nf-call-iptables.*|net.bridge.bridge-nf-call-iptables = 1|g"/etc/sysctl.conf || echo "net.bridge.bridge-nf-call-iptables = 1">>/etc/sysctl.conf
egrep -q "^(#)?net.ipv6.conf.all.disable_ipv6.*"/etc/sysctl.conf && sed -ri "s|^(#)?net.ipv6.conf.all.disable_ipv6.*|net.ipv6.conf.all.disable_ipv6 = 1|g"/etc/sysctl.conf || echo "net.ipv6.conf.all.disable_ipv6 = 1">>/etc/sysctl.conf
egrep -q "^(#)?net.ipv6.conf.default.disable_ipv6.*"/etc/sysctl.conf && sed -ri "s|^(#)?net.ipv6.conf.default.disable_ipv6.*|net.ipv6.conf.default.disable_ipv6 = 1|g"/etc/sysctl.conf || echo "net.ipv6.conf.default.disable_ipv6 = 1">>/etc/sysctl.conf
egrep -q "^(#)?net.ipv6.conf.lo.disable_ipv6.*"/etc/sysctl.conf && sed -ri "s|^(#)?net.ipv6.conf.lo.disable_ipv6.*|net.ipv6.conf.lo.disable_ipv6 = 1|g"/etc/sysctl.conf || echo "net.ipv6.conf.lo.disable_ipv6 = 1">>/etc/sysctl.conf
egrep -q "^(#)?net.ipv6.conf.all.forwarding.*"/etc/sysctl.conf && sed -ri "s|^(#)?net.ipv6.conf.all.forwarding.*|net.ipv6.conf.all.forwarding = 1|g"/etc/sysctl.conf || echo "net.ipv6.conf.all.forwarding = 1">>/etc/sysctl.conf
# Make the modified kernel parameters take effect immediately
sysctl -p

# Mirror acceleration
export REGISTRY_MIRROR="https://xlx9erfu.mirror.aliyuncs.com"if[[!-d "/etc/docker/"]];then mkdir /etc/docker/;fi
cat >/etc/docker/daemon.json <<EOF
{" registry-mirrors":["REPLACE"]}
EOF
sed -i "s#REPLACE#${REGISTRY_MIRROR}#g"/etc/docker/daemon.json
- Step7. Use internal yum source to install Kuberntes environment
yum install -y --enablerepo=localyumserver --disablerepo=base,extras,updates,epel,elrepo,docker-ce-stable kubelet kubeadm kubectl
# Docker startup settings
sed -i "s#^ExecStart=/usr/bin/dockerd.*#ExecStart=/usr/bin/dockerd -H fd:// --containerd=/run/containerd/containerd.sock --exec-opt native.cgroupdriver=systemd#g"/usr/lib/systemd/system/docker.service
# Restart docker and start kubelet
systemctl daemon-reload && systemctl enable kubelet
systemctl restart docker kubelet
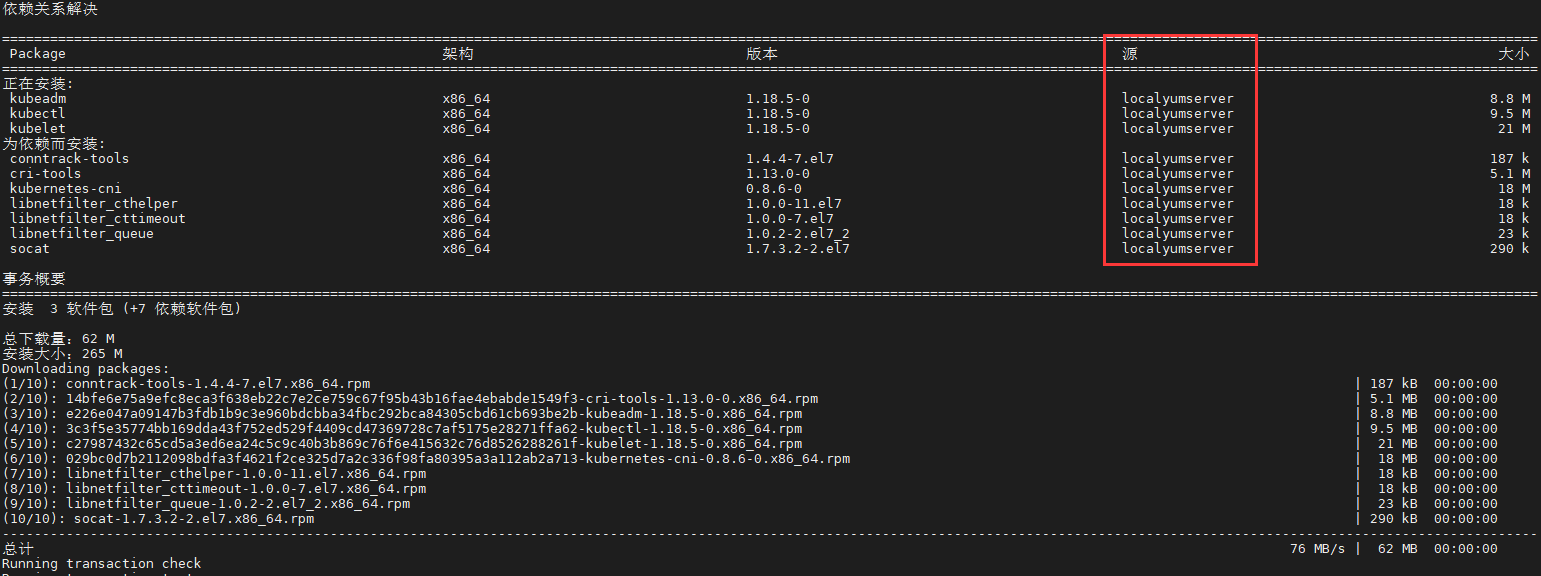
WeiyiGeek.kube related command installation routine
Step8. After pulling the image in the yum warehouse to the local deployment machine, use the docker load command to import the image into the Host docker image storage.
wget -c http://10.10.107.201/yum/v1.18.5.tar.gz
gzip -dv v1.18.5.tar.gz && docker load < v1.18.5.tar
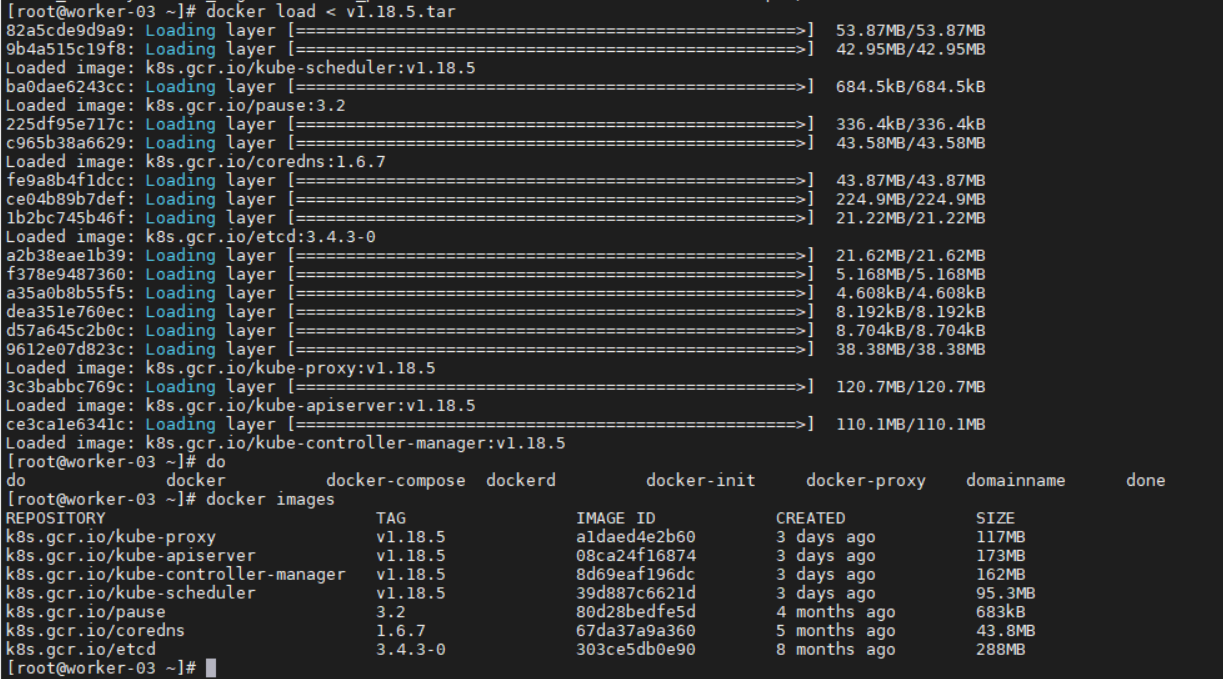
WeiyiGeek. Mirror import result
Step9. Add worker nodes to the cluster
# (1) The main master node is running
[[ email protected]~]$kubeadm token create --print-join-command 2>/dev/null
kubeadm join k8s.weiyigeek.top:6443--token fvu5ei.akiiuhywibwxvdwh     --discovery-token-ca-cert-hash sha256:0795075090d621285dbaa4a76b9b320150f5ae3c37f5d7b92fc1c4f8942d9243

# (2) Work node execution is added to the k8s cluster
APISERVER_IP=10.10.107.191
APISERVER_NAME=k8s.weiyigeek.top
echo "${APISERVER_IP} ${APISERVER_NAME}">>/etc/hosts

[[ email protected]~]$kubeadm join k8s.weiyigeek.top:6443--token fvu5ei.akiiuhywibwxvdwh     --discovery-token-ca-cert-hash sha256:0795075090d621285dbaa4a76b9b320150f5ae3c37f5d7b92fc1c4f8942d9243

# (3) The master node verifies the worker node added
$kubectl get nodes
NAME        STATUS   ROLES    AGE     VERSION
master-01   Ready    master   6d8h    v1.18.4
master-02   Ready    master   5d20h   v1.18.4
master-03   Ready    master   5d11h   v1.18.4
worker-01   Ready    <none>   6d8h    v1.18.4
worker-02   Ready    <none>   5d21h   v1.18.4
worker-03   Ready    <none>   11m     v1.18.5  #Since kubelet is v1.18.Version 5, the stable version is generally used in the actual production environment

$kubectl get pods -A -n kube-system  -o wide | grep "worker-03"
kube-system   calico-node-f2vwk                          1/1     Running   0          2m14s   10.20.172.200   worker-03<none><none>
kube-system   kube-proxy-mwml4                           1/1     Running   0          2m5s    10.20.172.200   worker-03<none><none>
Precautions:
-
- When using
kubeadm pullrelated mirrors, the version ofkubeadmshould be the same as the version ofkubernetes-version=${version}. If they are inconsistent, some versions of the mirror cannot be pulled down. The corresponding version of kubernetes should be used. The mirror image can be.
- When using
-
- Generally speaking, except for the command version that comes with k8s, the major version will usually not change the functional components that depend on it, such as
pause:3.2/etcd:3.4.3-0/coredns:1.6.7
- Generally speaking, except for the command version that comes with k8s, the major version will usually not change the functional components that depend on it, such as
-
- After successfully importing the docker image, you can use the kubeadm init command to initialize the master node or initialize the work node;
2. Offline package installation (sealos)
Description: For the production environment, you need to consider the high availability of the control plane. Here, in order to facilitate deployment, use the kubeadm-based deployment tool sealos to install, including all the binary files, mirror files, systemd configuration, yaml needed for installation. Configuration and some simple startup scripts; For the production environment, there is no need for some preparations in the test environment. Using sealoswill automatically help us complete the node initialization related work, only need to download thesealos binary filesandon a master node You can deploy the offline installation package.
Use resources:
Basic description:
-
- For the offline installation package of
1.17.0~1.17.5or1.18.0~1.18.5, only the version of kubenetets has a different mirror image and the rest of the plug-in versions are consistent, so you can choose to use1.17.0/1.18 .0version is based on making the version that meets your needs. For example: 1.18.0 base version
- For the offline installation package of
Cluster deployment:
- Step1. Download the latest version of sealos binary file wget -c https://sealyun.oss-cn-beijing.aliyuncs.com/latest/sealos -O /usr/bin/ && chmod +x /usr/bin/sealos
- Step2. Sealos parameter description and use
| Parameter name | Meaning | Example | Is it necessary |
|---|---|---|---|
| passwd | Server password | 123456 | Choose one from the private key |
| master | k8s master node IP address | 192.168.0.2 | Required |
| node | k8s node node IP address | 192.168.0.3 | optional |
| pkg-url | Offline resource package address, support downloading to local or a remote address | /root/kube1.16.0.tar.gz | Required |
| version | The version corresponding to the resource package | v1.16.0 | Required |
| kubeadm-config | Custom kubeadm configuration file | kubeadm.yaml.temp | Optional |
| pk | ssh private key address, use when no key is required | /root/.ssh/id_rsa | and passwd choose one |
| user | ssh username | root | optional |
| interface | Machine network card name, CNI network card discovery use | eth.* | Optional |
| network | CNI type such as calico flannel | calico | optional |
| podcidr | pod network segment | 100.64.0.0/10 | optional |
| repo | Mirror warehouse, offline packages usually do not need to be configured, unless you import the mirror into your own private warehouse | k8s.gcr.io | Optional |
| svccidr | clusterip network segment | 10.96.0.0/22 | optional |
| without-cni | Do not install cni plug-in, for the user to install other CNI | optional |
Put the made offline installation package scp to the /opt directory of the master node.
sealos init --master 10.10.107.109 \
 - - master 10.10.107.119 \
 - - master 10.10.107.121 \
 - - node 10.10.107.123 \
 - - node 10.10.107.124 \
 - - user root \
 - - passwd weiyigeek_test \
 - - version v1.17.4 \
 - - network calico \
 - - pkg-url /opt/kube1.17.4.tar.gz
After successful deployment, the following prompt will appear:
15:37:35[ INFO][ssh.go:60][ssh][10.10.107.124:22]:15:37:35[INFO][ssh.go:11][ssh][10.10.107.124:22]exec cmd is : mkdir -p /etc/kubernetes/manifests
15:37:36[ DEBG][ssh.go:23][ssh][10.10.107.124:22]command result is:15:37:36[ALRT][scp.go:156][ssh][10.10.107.124:22]transfer total size is: 0MB
15:37:36[ INFO][ssh.go:36][ssh][10.10.107.124:22]exec cmd is : rm -rf /root/kube
15:37:36[ DEBG][print.go:20]==>SendPackage==>KubeadmConfigInstall==>InstallMaster0==>JoinMasters==>JoinNodes
15:37:36[ INFO][print.go:25] sealos install success.
Precautions:
- (1) Note that you need to modify the hostname of each node to be different, otherwise the error
duplicate hostnames is not allowedwill be reported during deployment.
Recommended Posts