Centos7 elk7.1.1 installation and use
The official documents are all in English, which seems very strenuous. I can only check other blogs and read it in conjunction with official documents.
My system is centos7. First, turn off the firewall and selinux.
Install Elasticsearch first according to the instructions in the official documentation
- Install java environment
1.1 Add environment variables under /etc/profile. My environment scalar is as follows:
export JAVA_HOME=/home/jdk1.8.0_181
export CLASSPATH=:
export PATH=
1.2 Let environment variables take effect source /etc/profile
- Install Elasticsearch
Because the official requirement is that Elasticsearch must be run under a non-root account, you need to create an account in advance.
2.1 Download Elasticsearch and md5 verification code
wget https://artifacts.elastic.co/downloads/elasticsearch/elasticsearch-7.1.1-linux-x86_64.tar.gz #My unity is placed in the /home directory
wget https://artifacts.elastic.co/downloads/elasticsearch/elasticsearch-7.1.1-linux-x86_64.tar.gz.sha512 #Officially downloaded installation packages are generally okay, you don’t need to download this
- 2.1.1 Verify the integrity of the installation package*
shasum -a 512 -c elasticsearch-7.1.1-linux-x86_64.tar.gz.sha512 # prompt without changing the command directly yum install yum install perl-Digest-SHA
2.2 Change the file directory owner and related configuration before startup
2.2.1 Need to change the owner of the /home/elasticsearch-7.1.1 directory to a non-root user chown -R wangsu elasticsearch-7.1.1/
2.2.2 Modify /home/elasticsearch-7.1.1/config/elasticsearch.yml My configuration file is as follows:
2.2.3 Because there is no data directory and logs directory (don’t care if you have) you need to create it manually.
2.2.4 Add vm.max_map_count=655360 under /etc/sysctl.conf, otherwise when starting elasticsearch-7.1.1, an error will be reported that this value is greater than 262144; add under /etc/security/limits.conf As follows
* soft      nofile        65536* hard     nofile       131072* soft      nproc       2048* hard     nproc      4096
# Note: the asterisk needs to be added
2.3 start elasticsearch
Go to the elasticsearch directory and execute it./bin/elasticsearch After startup, the port number of the web login interface defaults to 9200
3、 Install the head plugin
Because the json structure returned by ES is the string we saw above. The head plugin provides a friendly web interface
3.1head download https://github.com/mobz/elasticsearch-head/archive/master.zip download and upload it to the same level directory of elasticsearch.
3.2 install node.js
sudo curl -sL https://rpm.nodesource.com/setup_8.x | sudo bash -
sudo yum install nodejs
Modify the configuration file, cd into the elasticsearch-head-master folder, execute the command sudo vim Gruntfile.js file: add the hostname attribute and set it to *. After opening the js file here, I couldn't understand how to add it, so I asked my colleagues who are engaged in the front-end. Tell it to try loading into initConfig, as shown below (note: add a comma after true):

Modify the sudo vim _site/app.js file: modify the connection address of the head: http://10.3.190.25:9200. There is too much content in this app.js file. I found a http://localhost:9200, so I changed it to my host ip, which is about line 4360.
3.3, grunt server & background startup
When starting, it prompts that the command is not found ----- "bash: grunt: command not found". Okay, find a solution through the prompts. sudo npm install -g grunt-cli can execute grunt server &
Can be executed but can be executed, but an error was reported during execution, the information is as follows, continue to find a solution. .

sudo npm install grunt --save-dev continues to report errors after executing the command
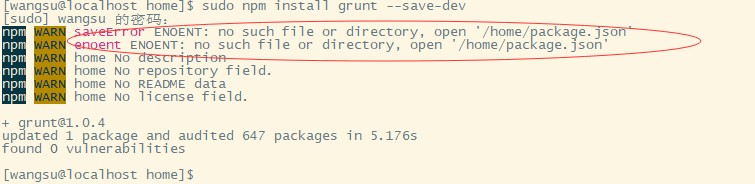
The following error is not posted
Continue to install the following packages
npm install node_modules
npm install grunt-contrib-clean
npm install grunt-contrib-concat
npm install grunt-contrib-watch
npm install grunt-contrib-connect
npm install grunt-contrib-copy
npm install grunt-contrib-jasmine
Enter 10.3.190.25:9100 on the browser side and the display is as follows, that is, the installation is successful (the screenshot is because kibana was installed later and it shows two, originally 0 of 0).

4、 Install kibana
4.1. Download the installation package to the /home directory and decompress it: wget https://artifacts.elastic.co/downloads/kibana/kibana-7.1.1-linux-x86_64.tar.gz
4.2. Modify the kibana configuration file and the environment variable export KIBANA_HOME=/home/kibana-7.1.1-linux-x86_64, my configuration file is as follows:

4.3. Start kibana----./bin/kibana and test http://10.3.190.25:5601 in the browser. The page displayed after the installation is successful is as follows:

5、 Install logstash
5.1. Download the installation package sudo wget https://artifacts.elastic.co/downloads/logstash/logstash-7.1.1.tar.gz (The speed is too slow, I downloaded it with Thunder and then uploaded it)
5.2, start logstash sudo ./bin/logstash
5.2.1 It's okay to keep reporting errors in java environment variables during startup. After looking for the information for a whole afternoon, I couldn’t find it. Later I was told that I wanted to add a soft connection. For example, mine was ln -s /home/jdk-12.0.1/bin/java /bin/java
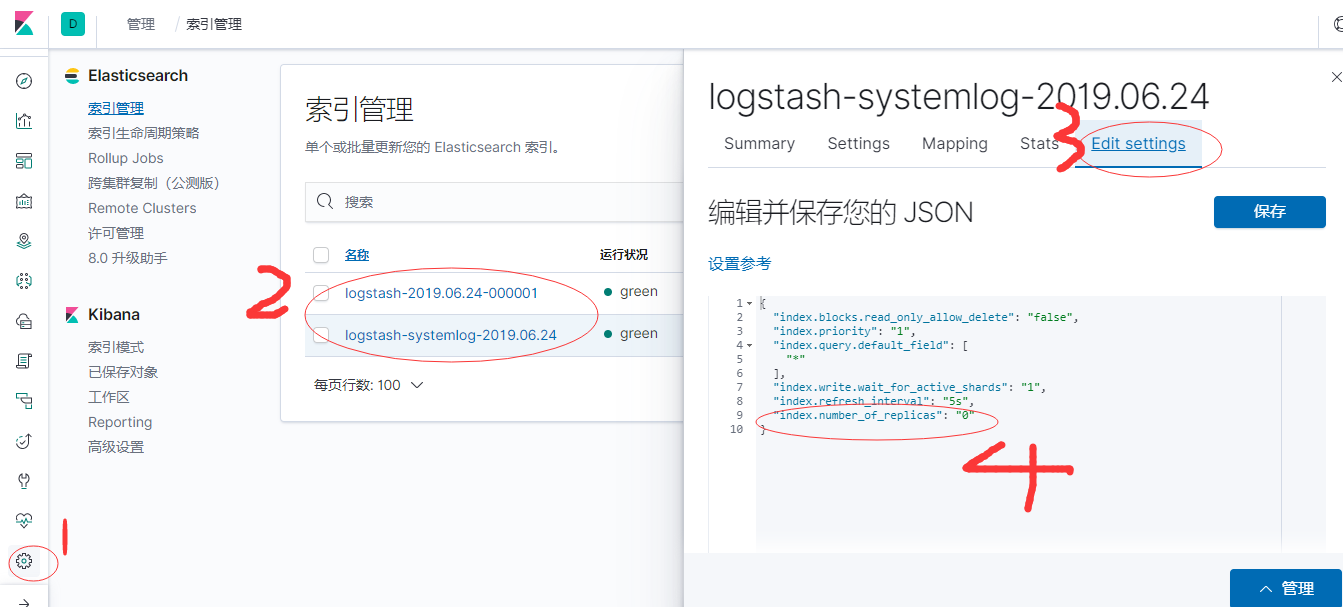
- 5.3. After startup*, it shows yellow in es head. After searching for information, set it in kibana. Pskibana is set to Chinese interface: add i18n.locale: "zh-CN" to the configuration file and restart it to take effect.
6、 Add log
6.1 Add a log
Create a systemlog.conf file in the logstash/conf directory and write the following content. Note: Need to modify the /var/log/messages permission, for example, to 644.
input {
file {
 path =>"/var/log/messages"
 type =>"systemlog"
 start_position =>"beginning"
 stat_interval =>"2"}}

output {
 elasticsearch {
 hosts =>["10.3.190.25:9200"]
 index =>"logstash-systemlog-%{+YYYY.MM.dd}"}}
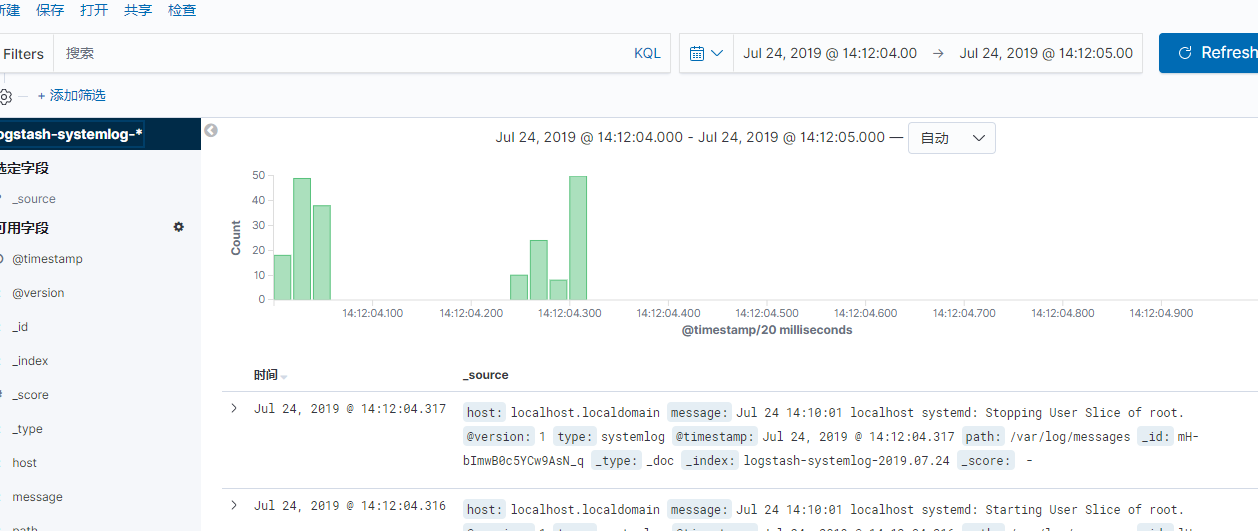
Use ./logstash/bin/logstash -f ./logstash/config/systemlog.conf -t (-f specifies the file, -t test) to test whether the configuration file is normal. Start by pressing the file normally, and then add an index in kibana to view it.
6.2 Add switch inspection results
Combined with python's automatic inspection of the switch, and the inspection content is added to elk, the logstash configuration is as follows.
input {
 file {
 path =>"/home/wangsu/szns-kjy4f-acs-05.txt"
 type =>"4f_05"
 start_position =>"beginning"
 stat_interval =>"2"}
 file {
 path =>"/home/wangsu/szns-kjy4f-acs-06.txt"
 type =>"4f_06"
 start_position =>"beginning"
 stat_interval =>"2"}}

output {if[type]=="4f_05"{
 elasticsearch {
 hosts =>["10.3.190.25:9200"]
 index =>"szns-kjy4f-acs-05-%{+YYYY.MM.dd}"}}if[type]=="4f_06"{
 elasticsearch{
 hosts =>["10.3.190.25:9200"]
 index =>"szns-kjy4f-acs-06-%{+YYYY.MM.dd}"}}}
Recommended Posts