Install and use Git and GitHub on Ubuntu Linux
Introduction to Git
Git is an open source version control software developed by Linus Torvalds in 2005 to help manage the development of the Linux(R) kernel, as stated in the provided documentation:
Git is a fast and extensible distributed version control system. It has a very rich command set and provides advanced operations and full access to the internal system.
Github is a treasure trove of some of the best software projects in the world, which are selflessly contributed by developers all over the world. This seemingly simple, but very powerful platform is praised by the open source community because it greatly helps developers who are interested in developing large-scale software.
This guide is a quick instruction for installing and using GitHub. This article will also cover things like creating a local repository and how to link this local repository to the remote repository that contains your project (so that everyone can see your project) , And how to submit changes and finally push all local content to Github.
Please note that this guide assumes that you have a basic understanding of Git terminology, such as push, pull request (PR), commit, warehouse, etc. And hope that you have successfully registered on GitHub and noted your GitHub username, then let’s get to the topic:
1、 Install Git on Linux
Download and install Git:
sudo apt-get install git
The above commands are for Ubuntu and should work on all the latest versions of Ubuntu. They have been tested on Ubuntu 16.04 and Ubuntu 18.04 LTS (Bionic Beaver) and should work on future versions.
2、 Configure GitHub
Once the installation is complete, the next step is to configure the detailed configuration information of the GitHub user.
Git has a tool called git config, which allows you to get and set configuration variables; these variables can control all aspects of Git's appearance and operation. These variables can be stored in three different locations:
- /etc/gitconfig file: Contains the values applicable to all users and all libraries of the system. If you pass the parameter option'–system' to git config, it will explicitly read and write this file.
2.~ /.gitconfig file: specific to your user. You can make Git read or write this particular file by passing the --global option.
- The config file located in the git directory (that is, .git/config): no matter what library you are currently using, it specifically points to that single library. Each level rewrites the value of the previous level. Therefore, the value in .git/config overwrites the same value in /etc/gitconfig.
In Windows systems, Git is under Undefined control sequence \DocumentsUSER). It will also look for /etc/gitconfig, even though it is relative to the Msys root directory. This could be wherever you decide to install Git while running the installer in Windows.
Please use the two commands below, and make sure to replace user_name with your own GitHub username and email_id with the email you created your GitHub account.
git config --global user.name "user_name"
git config --global user.email "email_id"
The image below shows an example of how to use my GitHub username: "akshaypai" and my email address "[email protected]" to configure the above commands.

3、 Create a local warehouse
Create a directory on your system. It will be used as a local repository, and later it will be pushed to a remote repository on GitHub. Please use the following command:
git init Mytest
If the directory is successfully created, you will see the following message:
Initialized empty Git repository in/home/akshay/Mytest/.git/
This line of information may vary with your system.
Here, Mytest is the created directory, and init converts it into a GitHub repository. Change the current directory to this newly created directory.
cd Mytest
4、 Create a new README file to describe the warehouse
Now create a README file and enter some text, such as "this is git setup on linux". The README file is generally used to describe what the repository is used for or what the project is about. E.g:
gedit README
You can use any text editor. I like to use gedit. The content of the README file can be:
This is a git repo
5、 Add files in the warehouse to an index
This is an important step. Here we will add all the content that needs to be pushed to GitHub into an index. This content may include the text file or application you added to the warehouse for the first time, or it may be some editing of an existing file (an updated version of the file).
Now that we have the README file, let us create another file, such as a simple C program, we call it sample.c. The content of the file is:
# include<stdio.h>
int main(){printf("hello world");return0;}
Now we have two files. README and sample.c.
Add them to the index with the following command:
git add README
git add smaple.c
Please note that the git add command can add any number of files and directories to the index. Here, when I say "index", I mean a buffer with a certain amount of space. This buffer stores all the files or directories that have been added to the Git repository.
6、 Add the changes made to the index
After all the files are added, you can submit them. This means that you have confirmed the final file changes (or additions), and they are now ready to be uploaded to our own warehouse. Please use the command:
git commit -m "some_message"
"Some_message" in the above command can be some simple messages such as "my first submission" or "edited readme file", etc.
7、 Create a repository on GitHub
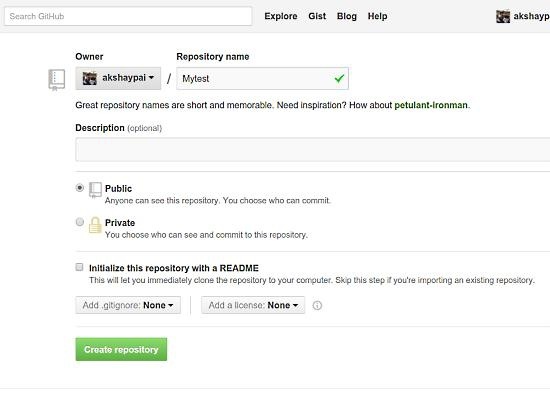
Create a repository on GitHub. Please note that the name of the warehouse must be exactly the same as the name of the warehouse you created locally. In this example it is "Mytest". Please log in to your GitHub account first. Click the "+" symbol in the upper right corner of the page and select "create nw repository". Fill in the detailed information as shown in the figure below and click "create repository".
Once the creation is complete, we can push the local warehouse to the GitHub warehouse under your name, and use the following command to connect to the warehouse on GitHub:
Please note: Please make sure to replace "user_name" and "Mytest" in the path with your GitHub username and directory name before running the following commands!
git remote add origin https://github.com/user_name/Mytest.git>
8、 Push the files in the local warehouse to the GitHub warehouse
The last step is to push the contents of the local repository to the remote repository (GitHub) with the following command:
git push origin master
Type the login name and password when prompted for the login name and password
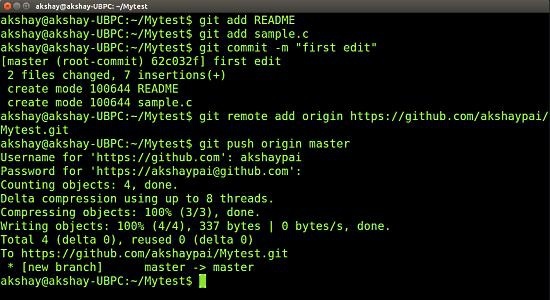
The picture below shows the flow from step 5 to step 8
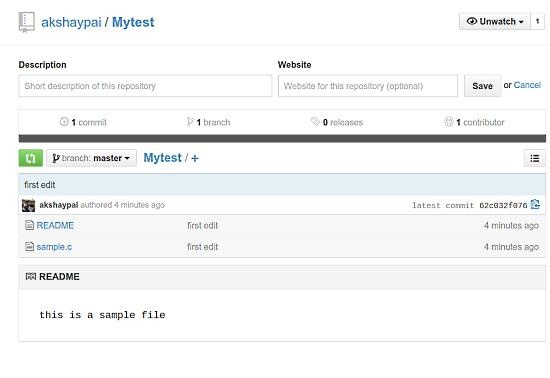
The above pushed all the contents (files) in the Mytest directory to GitHub. For future projects or to create a new warehouse, you can start directly from step 3. Finally, if you log in to your GitHub account and click on your Mytest repository, you will see these two files: README and sample.c have been uploaded and displayed like the following picture:
to sum up
The above is the entire content of this article. I hope that the content of this article has a certain reference value for your study or work. Thank you for your support to ZaLou.Cn.
Recommended Posts