How to install and secure phpMyAdmin on Ubuntu 16.04
Introduction
Although many users need the functions of a database management system like MySQL, they may not only interact with the system through MySQL prompts.
PhpMyAdmin was created so that users can interact with MySQL through the web interface. In this guide, we will discuss how to install and secure phpMyAdmin so that you can safely use it to manage databases from Ubuntu 16.04 systems.
Preparation
Before you start using this guide, you need to complete some basic steps.
An Ubuntu** server** with a non-root account that can use the sudo command has been set up, and the firewall has been turned on. Students who don’t have a server can buy it from here, but I personally recommend you to use the free Tencent Cloud Developer Lab for experimentation, and then buy server.
We also assume that you have completed the LAMP (Linux, Apache, MySQL and PHP) installation on the Ubuntu 16.04 server.
Finally, there are some important security considerations when using software like phpMyAdmin, because it:
- Direct communication with MySQL installation
- Use MySQL credentials to handle authentication
- Execute and return the results of any SQL query
For these reasons, and because it is a widely deployed PHP application that often targets attacks, phpMyAdmin should not be run on a remote system via a normal HTTP connection. If you have a domain name, the easiest way to protect your website is to use Tencent Cloud SSL Certificate Service, which provides free trusted certificates. [Tencent Cloud SSL Certificate Installation and Operation Guide] (https://cloud.tencent.com/document/product/400/6814?from=10680) for setting. If you don't have a domain name, it is recommended that you go here first register a domain name. If you only use this configuration for testing or personal use, you can use a self-signed certificate without purchasing a domain name. The self-signed certificate provides the same type of encryption, but there is no domain name verification announcement. For self-signed certificates, you can refer to the two articles Create a self-signed SSL certificate for Apache and How to create a self-signed SSL certificate for Nginx.
After completing these steps, you can start using this guide.
Step one-install phpMyAdmin
First, we will install phpMyAdmin from the default Ubuntu repository.
We can do this by updating the local package index and then using the apt packaging system to drop down the files and install them on our system:
sudo apt-get update
sudo apt-get install phpmyadmin php-mbstring php-gettext
This will ask you some questions in order to properly configure your installation.
**Warning: When the first prompt appears, apache2 will be highlighted, but ** will not be selected. If you did not press the Space key to select Apache, the installer will not move the necessary files during the installation. Hit Space, tab, then Enter, select Apache.
- For server selection, please select apache2.
- When asked if it is used to set up the database, please select "Yes"
dbconfig-common - You will be prompted to enter the password of the database administrator
- Then, you will be asked to select and confirm the password of the
phpMyAdminapplication itself
The installation process actually adds the phpMyAdmin Apache configuration file to the /etc/apache2/conf-enabled/ directory and automatically reads the directory.
The only thing we need to do is to explicitly enable the PHP mcrypt and mbstring extensions, which we can execute by entering the following command:
sudo phpenmod mcrypt
sudo phpenmod mbstring
After that, you need to restart Apache to recognize your changes:
sudo systemctl restart apache2
You can now access the web interface by accessing the server's domain name or the public IP address ending in /phpmyadmin, and then do the following:
https://domain_name_or_IP/phpmyadmin
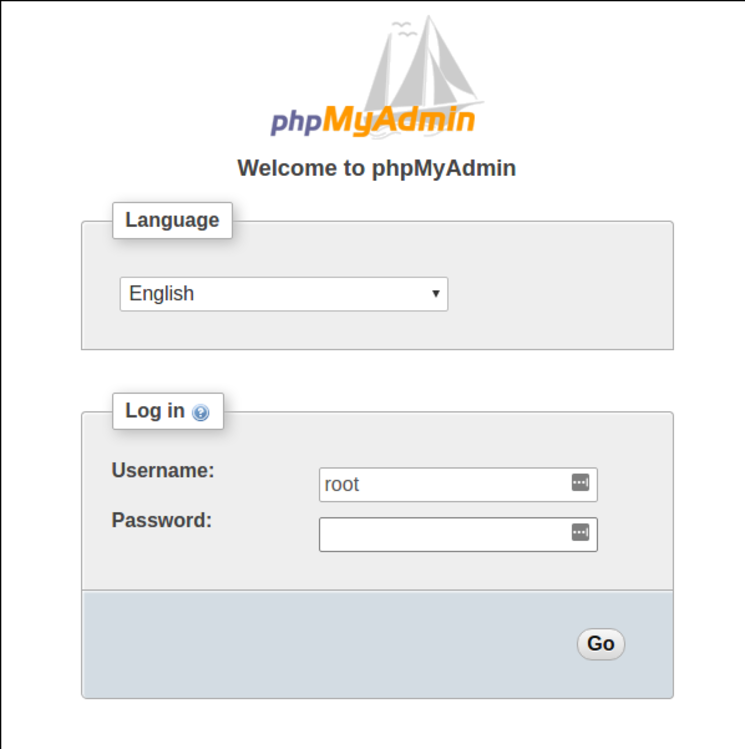
You can now log in to the interface using the root username and administrative password set during the MySQL installation.
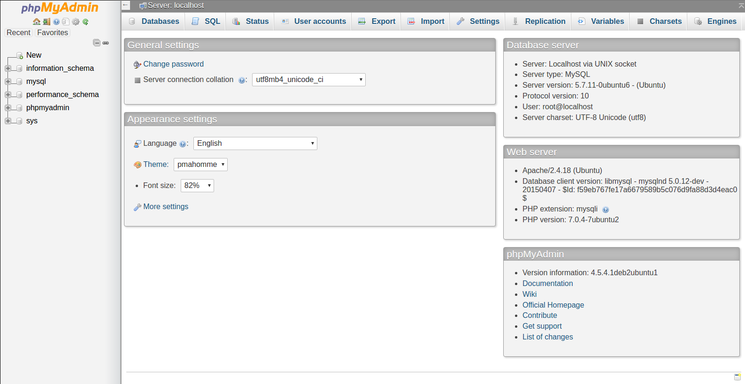
When you log in, you will see the user interface as shown below:
Step 2-Protect your phpMyAdmin instance
We can easily start and run the phpMyAdmin interface. However, we are not done yet. Because of its ubiquity, phpMyAdmin is a popular target for attackers. We should take additional measures to prevent unauthorized access.
One of the easiest ways is to put the gateway in front of the entire application. We can use Apache's built-in .htaccess authentication and authorization functions to achieve this.
Configure Apache to allow .htaccess override
First, we need to enable .htaccess file override by editing the Apache configuration file.
We will edit the link file that has been placed in the Apache configuration directory:
sudo nano /etc/apache2/conf-available/phpmyadmin.conf
We need in the configuration file<Directory /usr/share/phpmyadmin> Add an AllowOverride All directive to the `section, as shown below:
< Directory /usr/share/phpmyadmin>
 Options FollowSymLinks
 DirectoryIndex index.php
 AllowOverride All
    ...
After adding this line, save and close the file.
To implement the changes you made, restart Apache:
sudo systemctl restart apache2
Create .htaccess file
Now that our application has enabled .htaccess, we need to create one to actually implement some security.
In order for it to succeed, the file must be created in the application directory. We can create the necessary file and open it in our text editor with root privileges by typing:
sudo nano /usr/share/phpmyadmin/.htaccess
In this file, we need to enter the following information:
AuthType Basic
AuthName "Restricted Files"
AuthUserFile /etc/phpmyadmin/.htpasswd
Require valid-user
Let's review the meaning of these lines:
AuthType Basic: This line specifies the type of authentication we are implementing. This type will use a password file to achieve password authentication.AuthName: This will set the message of the authentication dialog. You should maintain this universality so that unauthorized users do not obtain any information about protected content.AuthUserFile: This will set the location of the password file that will be used for authentication. This should be outside the directory being provided. We will create this file soon.Require valid-user: This specifies that only authenticated users should be granted access to this resource. This effectively prevents unauthorized users from entering.
When finished, save and close the file.
Create .htpasswd file for authentication
The location we chose for the password file is "/etc/phpmyadmin/.htpasswd". We can now create this file and use the htpasswd utility to pass the initial user to it:
sudo htpasswd -c /etc/phpmyadmin/.htpasswd username
You will be prompted to select and confirm a password for the user you are creating. Then, create a file with the hashed password you entered.
If you want to enter other users, you need to do this without the **-c flag **, as shown below:
sudo htpasswd /etc/phpmyadmin/.htpasswd additionaluser
Now, when you visit the phpMyAdmin subdirectory, you will be prompted to enter the other account name and password you just configured:
https://domain_name_or_IP/phpmyadmin
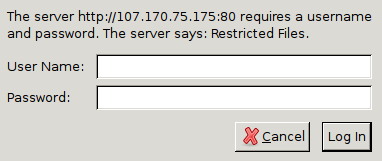
After entering Apache authentication, you will enter the regular phpMyAdmin authentication page to enter other credentials. This will add an extra layer of security because phpMyAdmin has been vulnerable to vulnerabilities in the past.
in conclusion
You should now have phpMyAdmin configured and ready to be used on your Ubuntu 16.04 server. Using this interface, you can easily create databases, users, tables, etc., and perform routine operations such as deleting and modifying structures and data.
For more Ubuntu tutorials, please go to [Tencent Cloud + Community] (https://cloud.tencent.com/developer?from=10680) to learn more.
Reference: "How To Install and Secure phpMyAdmin on Ubuntu 16.04"
Recommended Posts