How to install and use BaasBox on Ubuntu 14.04
Introduction
BaasBox is an application that acts as a database server and application server. Out of the box, BaasBox provides user registration, user management, role management, content management, file management and database management functions through backup. Since all these functions are exposed through the standard HTTP REST API, developers of web and mobile applications can use BaasBox as a backend to store data. Developers can also create BaasBox-based microservices, which are used by other parts of their applications.
This article will guide you to install BaasBox when creating a simple application backend, create users, use the management console, and explore the REST API.
Preparation
- You have a CVM running Ubuntu 14.04. Those who don’t have a server can buy it from here, but I personally recommend you to use the free Tencent Cloud Developer Lab to experiment, learn to install and then buy server.
- You have logged in to the server as a non-root user with administrative rights.
- You have installed the official Java 8 JRE from Oracle. [This tutorial] (https://cloud.tencent.com/developer/article/1339744?from=10680) will introduce how to do this.
Step 1-Install and run BaasBox
To install BaasBox, we download the latest stable version of BaasBox from the official website. You can use the wget command to do this:
wget http://www.baasbox.com/download/baasbox-stable.zip
We will use the unzip command to extract BaasBox from the downloaded zip file. If you don't have unzip, use the following command to install it:
sudo apt-get install unzip
Now extract the contents of the zip file:
unzip baasbox-stable.zip
For example, this command extracts the contents of the zip file to a directory named baasbox-XYZ, the XYZ directory will be the latest version, such as 0.9.5. Enter the newly created directory.
cd baasbox-X.Y.Z
This directory contains a file named start, which needs to be executed to start BaasBox. To do this, we first need to use the following command to make it executable:
chmod +x ./start
Then start BaasBox and execute the following command:
. /start
You will see some output, which should end in something like:
2016- 06- 2814:32:14,554- [ info]- BaasBox is Ready.2016-06-2814:32:14,558-[info]- Application started(Prod)2016-06-2814:32:14,733-[info]- Listening for HTTP on /0:0:0:0:0:0:0:0:90002016-06-2814:32:15,261-[info]- Session Cleaner: started
2016- 06- 2814:32:15,263- [ info]- Session cleaner: tokens:0- removed:02016-06-2814:32:15,263-[info]- Session cleaner: finished
The third line of the above output indicates that BaasBox is now running and can be accessed on the 9000 port on the machine. The default BaasBox configuration listens on this port on all network interfaces. BaasBox can now be accessed via:
http://localhost:9000andhttp://127.0.0.1:9000, from a server that is installed (or through an SSH tunnel)http://your_internal_server_ip:9000from the internal network where your server is located (if it is on the internal network)http://your_ip_address:9000comes from the Internet, ifyour_ip_addressis a publicly accessible IP address.
If needed, you can let BaasBox listen to a specific network interface and different ports. To do this, use the following command:
. /start -Dhttp.port=target_port -Dhttp.address=target_interface
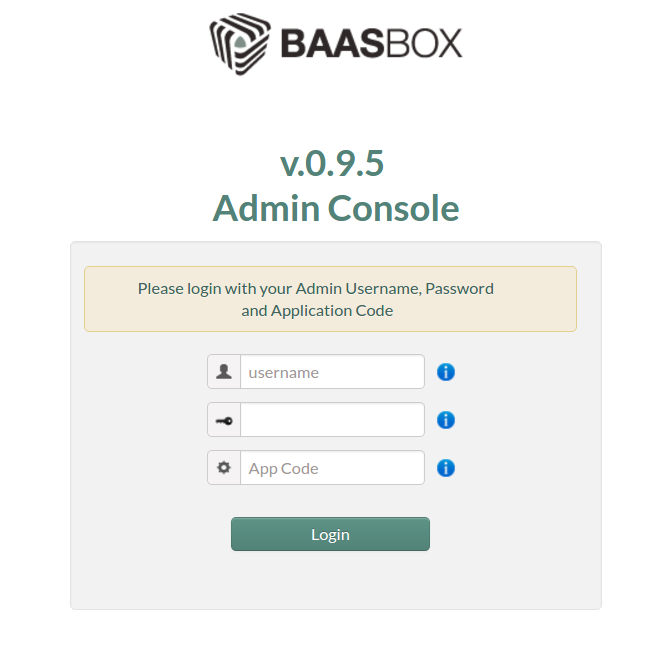
Visit http://your_ip_address:9000/console in your browser to access the BaasBox management console, you will see the interface as shown below:
After running BaasBox, let's set up an application and some users.
Step 2-Create an application with BaasBox
In this article, we will create a simple Todo List Manager, which should:
- Allow users to register
- Allow users to log in
- Allow users to create multiple to-do lists
- Allow users to retrieve their to-do list
- Allow users to modify their to-do list
- Allow users to delete their to-do list
- Allow users to share their to-do list with other users
Please continue to pay attention to the following:
- We will create user
user1and useruser2 - The passwords of these users are
user1_passwordanduser2_password - The session IDs of these users are
user1_session_idanduser2_session_id.
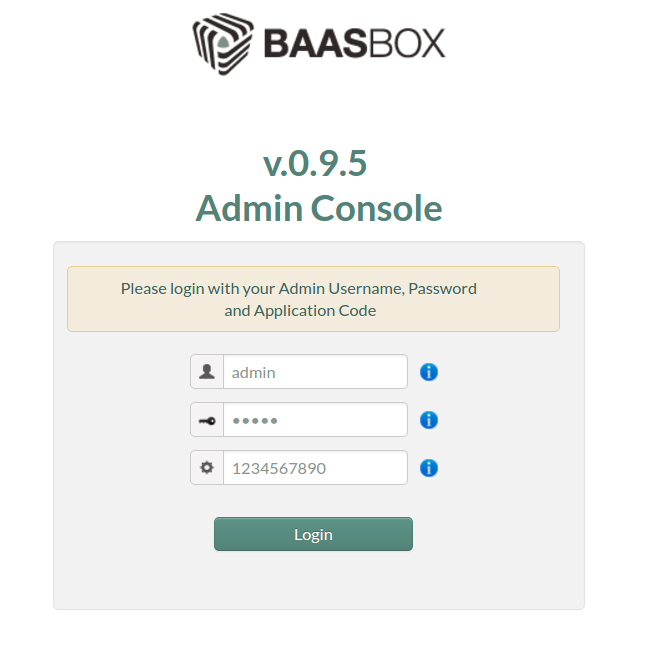
Although you can manage BaasBox through the REST API, it is sometimes more convenient to use the management console. As you can see in the second step, the management console is in this state. Visit the http://your_ip_address:9000/console link in the browser. Since this is your first time using it, please log in with default credentials:
- Default username:
admin - Default password:
admin - Default application code:
1234567890
After logging in, you will see the BaasBox dashboard:

Let's use the management console to create users for our application.
Step Three-Create User
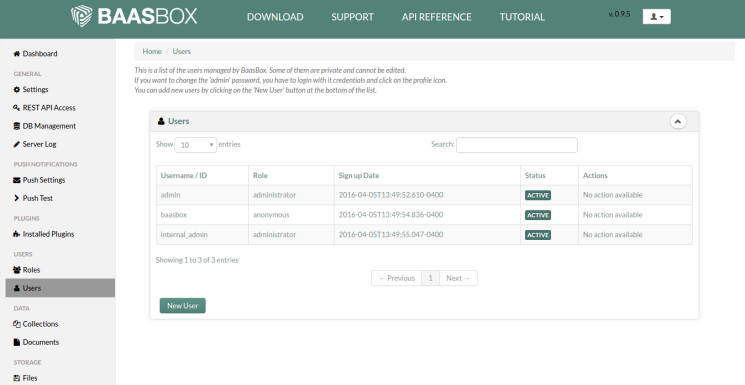
User management is one of the most useful functions of BaasBox. BaasBox has some private built-in users that cannot be edited. This includes admin the user you used to log in to the management console.
BaasBox also allows you to define roles and assign them to users for fine-grained access control. By default, BaasBox has the following 3 roles:
administrator-this role has full, unrestricted accessbackoffice-this role grants access to content created by registered usersregistered-this is the default role for newly registered users
In addition to these pre-configured roles, you can also add your own roles. When a new role is created, it has the same permissions as the aforementioned registered role.
You can create users in BaasBox through the management console or REST API. Typically, you will use the REST API to create users programmatically, for example through the user registration process of the application.
When adding users through the management console, you can set custom roles for them. However, when registering using the built-in REST API, the newly created user will be assigned the registered role.
To create a new user from the management console of BaasBox, please open the USERS> Users menu in the management console and click the New User button.
This will open a form where you can fill in the details of the user you are creating:
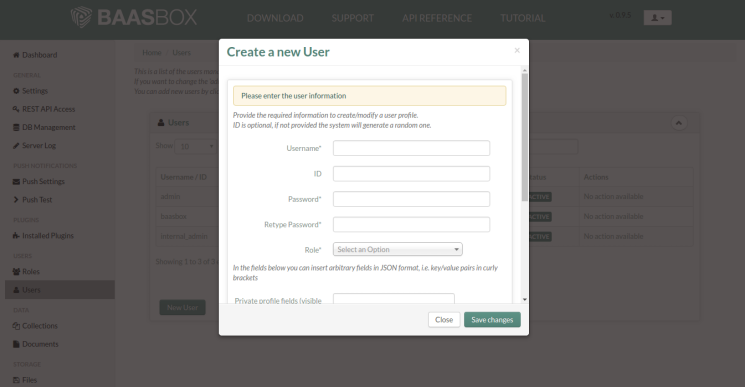
The username, password, re-enter password and role, while all other fields are optional fields are required. Please note that you can scroll down in this form to fill in other details if needed.
Set the username of this user to user1. You can choose any role, but the most commonly used role is registered. After entering all the details, click the "Save Changes" button to complete the user creation process.
We will use the REST API to create users in the subsequent sections. Now let's configure a location for the content of the application.
Step Four-Create Collection
BaasBox organizes your content into collections, similar to the collections provided by NoSQL databases such as MongoDB. Collections are of the same type as documents. Users familiar with SQL databases can think of a collection and a table roughly similar. Similarly, document is a bit like record.
Collections can only be created by administrators. Although the most common way to create a collection is from the management console, you can also use the REST API to do this. In this section, we will describe how to create a collection from the management console.
All content management functions can be found in the "Collections" and "Documents" menus of the management console DATA.
Open the DATA> Collections menu. You will see a page listing all current collections in the application.
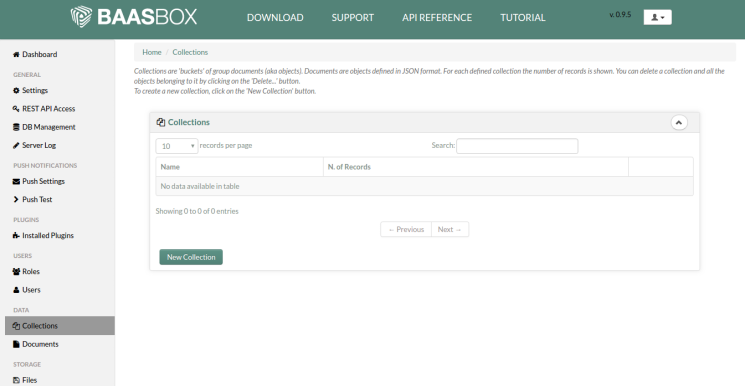
To create a new collection, click the "New Collection" button. This will display a form prompting you to enter the collection name.
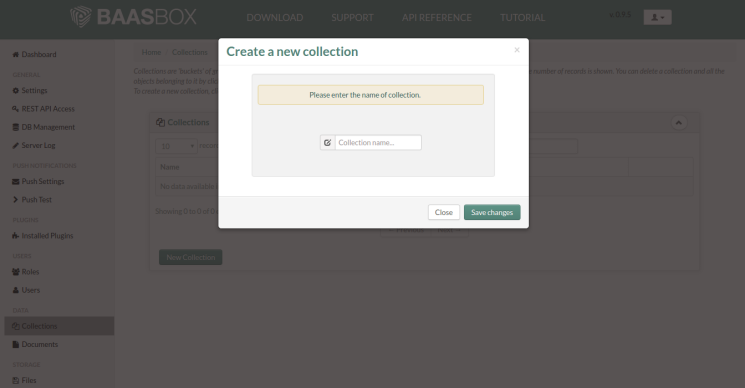
Enter the name of the todos collection and click "Save Changes" to complete the collection creation process. Users of the application can now access this collection and the documents in this collection using the REST API. Let's see how it works.
Step 5-Use REST API
Now that we know how to perform various tasks using the management console, let's see how to perform the same tasks using BaasBox's REST API.
REST API can be used by various types of applications, from web and mobile applications to console applications, we will use curl to simulate the requests in the following examples. You can adjust these examples according to your needs, depending on your front-end platform.
Create user using REST API
The general format of curl command to create a user is as follows:
curl http://your_ip_address:9000/user \
 - d '{"username" : "username", "password" : "password"}' \
 - H Content-type:application/json \
 - H X-BAASBOX-APPCODE:baasbox_appcode
In our example, we will create the user user2 with the username. Choose any password you like. We will use the default value 1234567890 of the X-BAASBOX-APPCODE header. Using these values, our command becomes:
curl http://your_ip_address:9000/user \
 - d '{"username" : "user2", "password" : "user2_password"}' \
 - H Content-type:application/json \
 - H X-BAASBOX-APPCODE:1234567890
The output of executing this command should be similar to:
{" result":"ok","data":{"user":{"name":"user2","status":"ACTIVE","roles":[{"name":"registered","isrole":true}]},"id":"a4353548-501a-4c55-8acd-989590b2393c","visibleByAnonymousUsers":{},"visibleByTheUser":{},"visibleByFriends":{},"visibleByRegisteredUsers":{"_social":{}},"signUpDate":"2016-04-05T13:12:17.452-0400","generated_username":false,"X-BB-SESSION":"992330a3-4e2c-450c-8d83-8eaf2903188b"},"http_code":201}
This is the formatted version of the output above:
{" result":"ok","data":{"user":{"name":"user2","status":"ACTIVE","roles":[{"name":"registered","isrole":true}]},"id":"a4353548-501a-4c55-8acd-989590b2393c","visibleByAnonymousUsers":{},"visibleByTheUser":{},"visibleByFriends":{},"visibleByRegisteredUsers":{"_social":{}},"signUpDate":"2016-04-05T13:12:17.452-0400","generated_username":false,"X-BB-SESSION":"992330a3-4e2c-450c-8d83-8eaf2903188b"},"http_code":201}
Note the id in the output above. BaasBox id generates a unique one for each user. You will use this ID when you want to get, modify or delete this specific user's document through the REST API.
The second value to pay attention to is X-BB-SESSION, which requires the session ID user2 to appear in all future queries. We will refer to this user2_session_id value in subsequent chapters.
Use REST API to record users
Now that we have the session ID user2, let us get a user1 for the user created in the management console before. We will do this by logging in with the REST API through user1. The general format of the command used by curl to log in is:
curl http://your_ip_address:9000/login \
 - d "username=username" \
 - d "password=password" \
 - d "appcode=baasbox_appcode"
In our example, the user name is user1, the password is the password user1 used when creating, and the BaasBox application code 1234567890. Using these values, our command becomes:
curl http://your_ip_address:9000/login \
 - d "username=user1" \
 - d "password=user1_password" \
 - d "appcode=1234567890"
The output of executing this command should be similar to:
{" result":"ok","data":{"user":{"name":"user1","status":"ACTIVE","roles":[{"name":"registered","isrole":true}]},"id":"84191e4c-2471-48a7-98bb-ecdaf118285c","visibleByAnonymousUsers":{},"visibleByTheUser":{},"visibleByFriends":{},"visibleByRegisteredUsers":{"_social":{}},"signUpDate":"2016-04-05T13:06:35.750-0400","generated_username":false,"X-BB-SESSION":"74400b4b-d16c-45a2-ada3-1cd51cc202bb"},"http_code":200}
This is the formatted version of the output above:
{" result":"ok","data":{"user":{"name":"user1","status":"ACTIVE","roles":[{"name":"registered","isrole":true}]},"id":"84191e4c-2471-48a7-98bb-ecdaf118285c","visibleByAnonymousUsers":{},"visibleByTheUser":{},"visibleByFriends":{},"visibleByRegisteredUsers":{}},"signUpDate":"2016-04-05T13:06:35.750-0400","generated_username":false,"X-BB-SESSION":"74400b4b-d16c-45a2-ada3-1cd51cc202bb"},"http_code":200}
The response above shows the X-BB-SESSION of user1, and we will use the session ID user1 in all future queries. We will refer to this user1_session_id value from now on.
Use REST API to create documents
Let's create two documents in our application. We assign a document to the user user1 that we created using the management console, and then we assign another document to the user user2 that we created through the REST API. The structure of the document we will create is as follows:
Sample Document Contents{"list_name":"Task List Name","tasks":[{"task":"Task Details","done":false},{"task":"Task Details","done":false}]}
Looking at the structure, we can see that the document will have two attributes. One is the name of the task list, and the other is the task list in the list.
The general format of curl command to create a new document is:
curl -X POST http://your_ip_address:9000/document/collection_name \
  - d 'json_formatted_document' \
  - H Content-type:application/json \
  - H X-BB-SESSION:session_id
Let's start by creating a document by user1. In our example, the name of the collection is todos, and the document we want to insert is as follows:
Document Contents{"list_name":"User 1 - List 1","tasks":[{"task":"User1 List1 task 1","done":false},{"task":"User1 List1 task 2","done":false}]}
To ensure that the document is associated with user1, we use the session ID obtained by user1 when the user logged into the system.
Enter the following command to create document content for user1:
curl -X POST http://your_ip_address:9000/document/todos \
  - d '{"list_name":"User 1 - List 1","tasks":[{"task":"User1 List1 task 1","done":false},{"task":"User1 List1 task 2","done":false}]}' \
  - H Content-type:application/json \
  - H X-BB-SESSION:user1_session_id
Executing this command produces output similar to the following:
{" result":"ok","data":{"@rid":"#24:1","@version":2,"@class":"todos","list_name":"User 1 - List 1","tasks":[{"task":"User1 List1 task 1","done":false},{"task":"User1 List1 task 2","done":false}],"id":"c83309e7-cbbd-49c8-a76b-9e8fadc72d6f","_creation_date":"2016-04-05T20:34:30.132-0400","_author":"user1"},"http_code":200}
This is the formatted version of the output above:
{" result":"ok","data":{"@rid":"#24:1","@version":2,"@class":"todos","list_name":"User 1 - List 1","tasks":[{"task":"User1 List1 task 1","done":false},{"task":"User1 List1 task 2","done":false}],"id":"c83309e7-cbbd-49c8-a76b-9e8fadc72d6f","_creation_date":"2016-04-05T20:34:30.132-0400","_author":"user1"},"http_code":200}
Just like it does for new users, BaasBox creates an id for all new documents. Make a note of this id, we will use it later when user2 accesses this list. In the following sections, we will refer to the ID of this document as user1_list1_id.
Now you yourself use the same method to do the following:
- Create another list for
user1 - Create two lists for
user2
After completing these steps, you will have a total of 4 documents in the todos collection. In subsequent chapters, we will refer to the IDs of these documents as:
- user1 list1 id
- user1 list2 id
- user2 list1 id
- user2 list2 id
Now we can use some data so that we can study how to query data using REST API.
Use REST API to retrieve a single document
The general format of curl to get documents with id is:
curl http://your_ip_address:9000/document/collection_name/document_id \
  - H X-BB-SESSION:session_id
If we want to get the first document created by user1 (user1 credential), the command should be:
curl http://your_ip_address:9000/document/todos/user1_list1_id \
  - H X-BB-SESSION:user1_session_id
Executing this command will give us output similar to the following:
{" result":"ok","data":{"@rid":"#24:1","@version":2,"@class":"todos","list_name":"User 1 - List 1","tasks":[{"task":"User1 List1 task 1","done":false},{"task":"User1 List1 task 2","done":false}],"id":"c83309e7-cbbd-49c8-a76b-9e8fadc72d6f","_creation_date":"2016-04-05T20:34:30.132-0400","_author":"user1"},"http_code":200}
This is the formatted version of the response:
{" result":"ok","data":{"@rid":"#24:1","@version":2,"@class":"todos","list_name":"User 1 - List 1","tasks":[{"task":"User1 List1 task 1","done":false},{"task":"User1 List1 task 2","done":false}],"id":"c83309e7-cbbd-49c8-a76b-9e8fadc72d6f","_creation_date":"2016-04-05T20:34:30.132-0400","_author":"user1"},"http_code":200}
Now that you know how to retrieve a single document, try to do the same operation again, unless you use the user2 session ID to retrieve the document this time:
curl -X POST http://your_ip_address:9000/document/todos/user1_list1_id \
  - H X-BB-SESSION:user2_session_id
Executing this command will display output similar to the following:
{" result":"error","message":"c83309e7-cbbd-49c8-a76b-9e8fadc72d6f not found","resource":"/document/todos/c83309e7-cbbd-49c8-a76b-9e8fadc72d6f","method":"GET","request_header":{"Accept":["*/*"],"Host":["localhost:9000"],"User-Agent":["curl/7.35.0"],"X-BB-SESSION":["8f5a2e48-0f42-4478-bd1b-d28699158c4b"]},"API_version":"0.9.5","http_code":404}
This is the same output, formatted for readability:
{" result":"error","message":"c83309e7-cbbd-49c8-a76b-9e8fadc72d6f not found","resource":"\/document\/todos\/c83309e7-cbbd-49c8-a76b-9e8fadc72d6f","method":"GET","request_header":{"Accept":["*\/*"],"Host":["localhost:9000"],"User-Agent":["curl\/7.35.0"],"X-BB-SESSION":["8f5a2e48-0f42-4478-bd1b-d28699158c4b"]},"API_version":"0.9.5","http_code":404}
As you can see, because user2 did not create this document and cannot access it, the get operation failed. If you try to execute the user2 command and it is a document created with user2``id, you will be able to get the document.
Use REST API to retrieve all documents
The general format of the command curl used to get all accessible documents from the collection is:
curl http://your_ip_address:9000/document/collection_name \
  - H X-BB-SESSION:session_id
Remember that this command only returns documents that the user has access to. For example, let us try to execute the following command with user1:
curl http://your_ip_address:9000/document/todos \
  - H X-BB-SESSION:user1_session_id
Executing this command will give us output similar to the following:
{" result":"ok","data":[{"@rid":"#24:1","@version":2,"@class":"todos","list_name":"User 1 - List 1","tasks":[{"task":"User1 List1 task 1","done":false},{"task":"User1 List1 task 2","done":false}],"id":"c83309e7-cbbd-49c8-a76b-9e8fadc72d6f","_creation_date":"2016-04-05T20:34:30.132-0400","_author":"user1"},{"@rid":"#24:2","@version":1,"@class":"todos","list_name":"User 1 - List 2","tasks":[{"task":"User1 List2 task 1","done":false},{"task":"User1 List2 task 2","done":false}],"id":"7c99c877-d269-4281-8a22-ef72175085f4","_creation_date":"2016-04-05T20:46:14.338-0400","_author":"user1"}],"http_code":200}
This is a formatted version of this output:
{" result":"ok","data":[{"@rid":"#24:1","@version":2,"@class":"todos","list_name":"User 1 - List 1","tasks":[{"task":"User1 List1 task 1","done":false},{"task":"User1 List1 task 2","done":false}],"id":"c83309e7-cbbd-49c8-a76b-9e8fadc72d6f","_creation_date":"2016-04-05T20:34:30.132-0400","_author":"user1"},{"@rid":"#24:2","@version":1,"@class":"todos","list_name":"User 1 - List 2","tasks":[{"task":"User1 List2 task 1","done":false},{"task":"User1 List2 task 2","done":false}],"id":"7c99c877-d269-4281-8a22-ef72175085f4","_creation_date":"2016-04-05T20:46:14.338-0400","_author":"user1"}],"http_code":200}
As you can see from the output, only user1 returned documents that it has access to. If you execute the same query with the session ID belonging to user2, you will see a different set of documents.
Update documentation using REST API
The general format of curl command to update the document is:
curl -X PUT http://your_ip_address:9000/document/collection_name/document_id \
  - d 'new_json_formatted_document' \
  - H Content-type:application/json \
  - H X-BB-SESSION:session_id
There are two things to keep in mind when trying to update the document:
- Only the document owner can modify the document
- Update Does not merge old and new documents. It replaces old documents with new documents. This means that if the update command contains a document that lacks certain fields in the original version, these fields will be lost.
Let's use this user1_list1_id command to update the id document with the following content:
{" list_name":"User 1 - List 1 Updated","tasks":[{"task":"New User1 List1 task 1","done":false}]}
The command to make this update is:
curl -X PUT http://your_ip_address:9000/document/todos/user1_list1_id \
  - d '{"list_name":"User 1 - List 1 Updated","tasks":[{"task":"New User1 List1 task 1","done":false}]}' \
  - H Content-type:application/json \
  - H X-BB-SESSION:user1_session_id
Executing this command will give us output similar to the following:
{" result":"ok","data":{"@rid":"#24:1","@version":4,"@class":"todos","list_name":"User 1 - List 1 Updated","tasks":[{"task":"New User1 List1 task 1","done":false}],"id":"c83309e7-cbbd-49c8-a76b-9e8fadc72d6f","_creation_date":"2016-04-05T20:34:30.132-0400","_author":"user1"},"http_code":200}
This is the same output, formatted:
{" result":"ok","data":{"@rid":"#24:1","@version":4,"@class":"todos","list_name":"User 1 - List 1 Updated","tasks":[{"task":"New User1 List1 task 1","done":false}],"id":"c83309e7-cbbd-49c8-a76b-9e8fadc72d6f","_creation_date":"2016-04-05T20:34:30.132-0400","_author":"user1"},"http_code":200}
As you can see, the document has been updated with new information.
Delete documents using REST API
The general format of curl command to delete a document is:
curl -X DELETE http://your_ip_address:9000/document/collection_name/document_id \
  - H X-BB-SESSION:session_id
Only the document owner and the user with the delete permission on the document can delete the document.
Let's delete the document using the command with id user1_list1_id as follows:
curl -X DELETE http://your_ip_address:9000/document/todos/user1_list1_id \
  - H X-BB-SESSION:user1_session_id
Executing this command will provide the following output:
{" result":"ok","data":"","http_code":200}
This means that the document has been deleted successfully. Any future attempts to access this document by id will fail.
Use REST API to grant access to other users
We have seen that, by default, BaasBox prevents users from accessing documents that were not created by them. However, sometimes it is necessary to provide multiple users with access to a document. Let's grant user2 access to the document with id user1_list1_id.
The general format of the command used by curl to grant access to documents is:
curl -X PUT http://your_ip_address:9000/document/collection_name/document_id/access_type/user/username \
  - H X-BB-SESSION:session_id
This command only works when executed by a user who has full access to this document. The access_type placeholder can have one of the following 4 values:
- read
- Update
- delete
- all
To grant user2 read access to the document with iduser1_list1_id, execute the following command with the user1 session ID:
curl -X PUT http://your_ip_address:9000/document/todos/user1_list1_id/read/user/user2 \
  - H X-BB-SESSION:user1_session_id
Executing this command will provide the following output:
{" result":"ok","data":"","http_code":200}
This shows that user2 can now access the document user1_list1_id. If you try to access this document user2, you will now see the document details instead of the error response
Step 6-Use Supervisor to keep the application running
Whenever you have a long-running application, there is always the risk that it may stop running. This can happen due to various reasons (such as application errors, system restarts, etc.). It is a good habit to configure an application to restart when it closes unexpectedly. This minimizes the administrative overhead of maintaining the application.
For this application, we will use Supervisor, which can easily manage long-running applications. If you are not familiar with Supervisor, you can refer to [Supervisor installation and simple use in ubuntu16.04 (reproduced)] (https://cloud.tencent.com/developer/article/1185747?from=10680).
First, the installation supervisor:
sudo apt-get install supervisor
In order for Supervisor to manage our application, we need to create a configuration file. We named this file baasbox.conf and placed it in the /etc/supervisor/conf.d directory.
sudo nano /etc/supervisor/conf.d/baasbox.conf
Enter the following in the file.
[ program:Baasbox]
directory =/home/sammy/baasbox-0.9.5
command =/home/sammy/baasbox-0.9.5/start
autostart =true
autorestart =true
startsecs =5
user = sammy
stdout_logfile =/var/log/supervisor/baasbox.log
We now need to notify Supervisor of these changes and let it use these changes. Execute the following commands:
supervisorctl reread
Then run the following command:
supervisorctl update
Now, whenever your application shuts down for any reason, Supervisor will ensure that it restarts without any manual intervention.
in conclusion
In this article, we learned how to use BaasBox to use the management console and use the REST API to manage content, users and permissions. In addition to the topics introduced in this article, BaasBox also provides more features. You can further browse the BaasBox management console to familiarize yourself with the parts that allow you to manage files, obtain and restore database backups, and configure API endpoint availability. More importantly, you can now start using BaasBox in the next application.
To learn more about Linux open source information tutorial, please go to [Tencent Cloud + Community] (https://cloud.tencent.com/developer?from=10680) to learn more.
Reference: "How To Install and Use BaasBox on Ubuntu 14.04"
Recommended Posts