Centos7 system commonly used commands
This article has listed most of the commonly used commands, the remaining commands can refer to the link:
https://blog.csdn.net/weixin_39951988/article/details/87613816#2.5%C2%A0which%E5%91%BD%E4%BB%A4
1. Modify the host name##
[ root@localhost ~]# hostnamectl set-hostname name#Edit name
[ root@localhost ~]# reboot -f   #Restart the virtual machine
Two, detailed explanation of linux system directory structure##
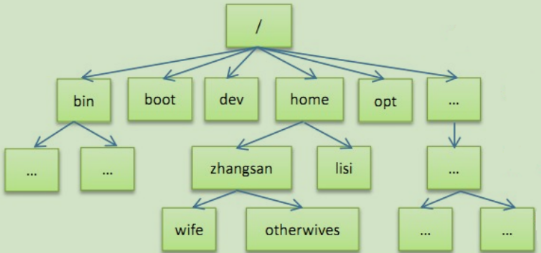
2.1 /bin
Store frequently used instructions, such as ls, cp, rm
2.2 /sbin
System management commands used by system administrators
2.3 /home
Store the home directory of ordinary users. In Linux, each user has its own directory. Generally, the directory is named after the user’s account name.
2.4 /root
System administrator's user home directory
2.5 /boot
Stored is the core file that starts linux
2.6 /lib
The directory where the library files are stored
2.7 /etc
Store all configuration files needed for system management, if our network card
2.8 /usr
Many applications and files of the user are placed in this directory, a bit like the program files directory in windows
2.9 /proc 别动###
This is the mapping of system memory
2.10 /srv ,别动###
The abbreviation of service, which stores the data needed after some services are started
2.11 /sys 别动###
System related files
2.12 /tmp
Used to store temporary files
2.13 /dev
Type and Windows Device Manager to store all hardware in the form of files
2.14 /media
Linux will recognize some devices, such as USB flash drives, CD-ROM drives, and Linux will mount this device under this directory
2.15 /mnt
Used to allow users to temporarily mount other file systems, we can mount external storage on /mnt, we enter the directory to view
2.16 /opt
This is generally used to put the installation package
2,17 /var
Store files that often need to be modified, such as log files
2,18 /usr/local
Where to store the program after installation
Three, file system commonly used commands##
3.1 pwd displays the current path###
pwd -->print working directory displays the current directory for printing
[ root@test1 sysconfig]# pwd
/etc/sysconfig
[ root@test1 sysconfig]#
3.2 cd switch directory structure###
Explanation: cd-->change directory change directory information
Usage: cd the path you want to go to

Absolute path:
[ root@test1 network-scripts]# cd /etc/sysconfig/network-scripts/[root@test1 network-scripts]# pwd
/etc/sysconfig/network-scripts
[ root@test1 network-scripts]# cd /tmp
[ root@test1 tmp]# pwd
/tmp

The usage of relative path:
[ root@test1 tmp]# cd /etc/sysconfig/[root@test1 sysconfig]# pwd
/etc/sysconfig
[ root@test1 sysconfig]# cd network-scripts/[root@test1 network-scripts]# pwd
/etc/sysconfig/network-scripts
[ root@test1 network-scripts]#

Quickly go back to the directory you entered:
[ root@test1 sysconfig]# cd /etc/sysconfig/[root@test1 sysconfig]# pwd
/etc/sysconfig
[ root@test1 sysconfig]# cd /tmp
[ root@test1 tmp]# pwd
/tmp
[ root@test1 tmp]# cd -/etc/sysconfig
[ root@test1 sysconfig]# pwd
/etc/sysconfig

Return to the upper level directory of the current path:
[ root@test1 sysconfig]# cd /etc/sysconfig/network-scripts/[root@test1 network-scripts]# pwd
/etc/sysconfig/network-scripts
[ root@test1 network-scripts]# cd ../[root@test1 sysconfig]# pwd
/etc/sysconfig
[ root@test1 sysconfig]# cd /etc/sysconfig/network-scripts/[root@test1 network-scripts]# pwd
/etc/sysconfig/network-scripts
[ root@test1 network-scripts]# cd ../..[root@test1 etc]# pwd
/etc
[ root@test1 etc]# cd /etc/sysconfig/network-scripts/[root@test1 network-scripts]# cd ../../[root@test1 etc]# pwd
/etc
[ root@test1 etc]# cd /etc/sysconfig/network-scripts/[root@test1 network-scripts]# cd ../../../../../../../../../[root@test1 /]# pwd
/

If you return to the home directory of the currently logged in user
[ root@test1 /]# cd /etc/sysconfig/network-scripts/[root@test1 network-scripts]# pwd
/etc/sysconfig/network-scripts
[ root@test1 network-scripts]# cd ~[root@test1 ~]# pwd
/root
[ root@test1 ~]# cd /etc/sysconfig/network-scripts/[root@test1 network-scripts]# pwd
/etc/sysconfig/network-scripts
[ root@test1 network-scripts]# cd
[ root@test1 ~]# pwd
/root
3.3 mkdir create directory information###
mkdir ---> make directory
[ root@zgh1 movie]# mkdir file2
[ root@zgh1 movie]# pwd
/movie

use-p parameter to create a multi-level directory
[ root@zgh1 movie]# mkdir -p file3/file3.1[root@zgh1 movie]# cd file3/file3.1/[root@zgh1 file3.1]# pwd
/movie/file3/file3.1[root@zgh1 file3.1]#

When we create the directory, we do it well to create an absolute path
3.4 Create file touch
[ root@zgh1 movie]# touch abc.txt
[ root@zgh1 movie]# ls
abc.txt  file2  file3  movies
[ root@zgh1 movie]# touch /test1/test.txt
touch: cannot touch ‘/test1/test.txt’: No such file or directory
[ root@zgh1 movie]# ls
abc.txt  file2  file3  movies
[ root@zgh1 movie]# touch /file2/file.txt
touch: cannot touch ‘/file2/file.txt’: No such file or directory
[ root@zgh1 movie]# touch /movie/file2/file.txt
3.5 ls checks whether the file or directory exists, and lists the files in the directory###
[ root@zgh1 /]# ls
bin   etc   lib64  movie   proc  sbin  tmp
boot  home  media  movie1  root  srv   usr
dev   lib   mnt    opt     run   sys   var[root@zgh1 /]# ls -l

# ls -l By default, the creation time is sorted from newest to oldest
lrwxrwxrwx.1 root root    7 Mar  514:15 bin -> usr/bin
dr-xr-xr-x.5 root root 4096 Mar  514:23 boot
drwxr-xr-x.20 root root 3220 Mar  615:17 dev
drwxr-xr-x.80 root root 8192 Mar  710:29 etc
drwxr-xr-x.3 root root   20 Mar  615:37 home
lrwxrwxrwx.1 root root    7 Mar  514:15 lib -> usr/lib
lrwxrwxrwx.1 root root    9 Mar  514:15 lib64 -> usr/li

# How to reverse the order of creation in time
ls -ltr
drwxr-xr-x.2 root root    6 Apr 112018 srv
drwxr-xr-x.2 root root    6 Apr 112018 opt
drwxr-xr-x.2 root root    6 Apr 112018 mnt
drwxr-xr-x.2 root root    6 Apr 112018 media
lrwxrwxrwx.1 root root    7 Mar  514:15 bin -> usr/bin
lrwxrwxrwx.1 root root    9 Mar  514:15 lib64 -> usr/lib64
3.6 cat command to view file information###
concatenate
# cat view file content
[ root@zgh1 movie]# cat abc.txt
hello

# View the contents of multiple files and output at the same time
[ root@zgh1 movie]# cat abc.txt  abc1.txt
hello
world

# After reading the contents of multiple files, put them into one file

[ root@zgh1 movie]# cat abc.txt  abc1.txt > abc2.txt
[ root@zgh1 movie]# cat abc2.txt
hello
world
3.7 Echo will output information
# Output information directly
[ root@zgh1 movie]# echo "hai girl"
hai girl

# Write the contents of echo to a file,>Is the meaning of covering,>>Is append
# Format: echo content>file
# Format: echo content>>file

[ root@zgh1 movie]# echo hai girl > abc1.txt
> It means overwriting, which will overwrite the contents of the original file
[ root@zgh1 movie]# cat abc1.txt
hai girl

>> Is append
[ root@zgh1 movie]# echo you are so pretty >> abc1.txt
[ root@zgh1 movie]# cat abc1.txt
hai girl
you are so pretty
3.8 cpcopy###
cp ---> cope
Syntax format: cp parameter (optional) where to copy the information to be copied

# Copy files

When copying files, do not add/,Generally, it can only be added after the directory/[root@zgh1 movie]# cp abc.txt abc3.txt
[ root@zgh1 movie]# cat abc3.txt
hello
[ root@zgh1 movie]# ls
abc1.txt  abc3.txt  file2  movies
abc2.txt  abc.txt   file3

[ root@zgh1 movie]# cp abc.txt movies/[root@zgh1 movie]# cp abc.txt movies/test.txt
[ root@zgh1 movie]# cd movies/[root@zgh1 movies]# ls
abc.txt  loveyou  test.txt

# Will ask you if it exists
[ root@zgh1 movies]# cp test.txt abc.txt
cp: overwrite ‘abc.txt’? y

# Copy folder

[ root@zgh1 movies]# cp loveyou/ loveyou1/
cp: omitting directory ‘loveyou/’
[ root@zgh1 movies]# cp -r loveyou/ loveyou1/

cp parameters:
- d Documents related to links
- r performs recursive copy
- p keep the property unchanged
- a ==-drp

# Use cp for backup
[ root@zgh1 movie]# cp abc.txt test1.txt
[ root@zgh1 movie]# ls
abc1.txt  abc3.txt  file2  file4  movies
abc2.txt  abc.txt   file3  file5  test1.txt

[ root@zgh1 movie]# rm -rf abc3.txt
[ root@zgh1 movie]# ls
abc1.txt  abc.txt  file3  file5   test1.txt
abc2.txt  file2    file4  movies

# The information of multiple files is repeated, and the prompt will be confirmed multiple times. How to avoid it
# Solution
[ root@zgh1 file4]# \cp -r /movie1/movies/loveyou/one/abc//movie/file4/[root@zgh1 file4]# ls
abc
3.9 mv cut command###
mv -->move
Cut (move) files or folders
Syntax format: mv parameter (optional) where to move the file or folder to be moved
It can be an absolute path or a relative path (absolute path is the path starting from the root directory)
# We have to create this file first

Move files
[ root@zgh1 movie1]# mkdir test
[ root@zgh1 movie1]# ls
file2.txt  test
[ root@zgh1 movie1]# mv file2.txt test
[ root@zgh1 movie1]# ls
test
[ root@zgh1 movie1]# cd test
[ root@zgh1 test]# ls
file2.txt
Move folder
[ root@zgh1 movie1]# mkdir dir1
[ root@zgh1 movie1]# ls
dir1  test
[ root@zgh1 movie1]# mv test/ dir1/[root@zgh1 movie1]# ls
dir1
[ root@zgh1 movie1]# cd dir1/[root@zgh1 dir1]# ls
test

# Use the mv command to rename the file
[ root@zgh1 test]# ls
file2.txt
[ root@zgh1 test]# mv file2.txt file.txt
[ root@zgh1 test]# ls
file.txt
3.10 rm command (delete)
rm --->remove
Syntax: rm parameter to delete data information

# Delete Files
[ root@zgh1 test]# ls
file.txt
[ root@zgh1 test]# rm file.txt
rm: remove regular file ‘file.txt’? y
[ root@zgh1 test]# ls
[ root@zgh1 test]#

# Delete folder
[ root@zgh1 abc]# rm -f /movie/
rm: cannot remove ‘/movie/’: Is a directory
[ root@zgh1 abc]# rm -r /movie/
rm: descend into directory ‘/movie/’? y

# Force delete rm-rf, the command will not ask to delete directly
[ root@zgh1 abc]# rm -rf /movie/[root@zgh1 abc]# cd /[root@zgh1 /]# ls
bin   dev  home  lib64  mnt     opt   root  sbin  sys  usr
boot  etc  lib   media  movie1  proc  run   srv   tmp  var
Description centos6.7 After the deletion of the root directory is protected,But deleting the root directory will still damage the system
rm -rf /
3.11 vim editor###
Change source to Ali source https://developer.aliyun.com/mirror/centos?spm=a2c6h.13651102.0.0.3e221b11q17Xub switch our yum source
yum install software-y No need to ask for consent

Install vim
Command: yum-y install vim

vim has a state
1 Normal mode (we open the file with vim to enter the normal mode)
 Such as copy, paste, etc.

2 Insert mode
 In insert mode, we enter content and edit content
 How to switch insert mode from normal mode: i,o,a,I,O,A,R any key can be restored to normal mode and enter insert mode
 Normal habit press i,Because it's easy to remember, i-->insert

3 Command mode
 In this mode, we can enter related commands, such as exit, save, and other operations
End: the three modes of vim can be switched at will

Commands in normal mode:
 Copy: yy Paste: p

 Copy the current line 2 lines down, and paste
 Copy 2 lines: 2yy
 Just copy a few lines of numbers
 Paste: p

 Delete current line
 Delete: dd
 Delete 2 rows down
 Delete: 2dd

 Move the cursor to the last line: G
 The cursor has moved the first line: gg
 Move the cursor 2 lines: 2gg

 Cancel: u

In edit mode: you can edit after entering

Command mode:
 1 Find content
 :/Keyword
 2 Cancel highlight
 :nohl
 3 Display line number
 :set nu
 4 Cancel line number
 :set nonu
 5 Launch without modification
 :q
 6 If we change, but we don’t want him to save
 : q!7 If we change it and want to save and exit,
 :wq
3.12 stat command###
View file access time, modification time, etc.
[ root@zgh1 test]# stat file.txt
 File: ‘file.txt’
 Size:40          Blocks:8          IO Block:4096   regular file
Device: fd00h/64768d    Inode:8420599     Links:1
Access:(0644/-rw-r--r--)  Uid:(0/    root)   Gid:(0/    root)
Context: unconfined_u:object_r:default_t:s0
Access:2020-03-0717:30:27.457540495+0800
Modify:2020-03-0717:29:21.243544671+0800
Change:2020-03-0717:29:21.265544669+0800
 Birth:-
Four, shutdown and restart commands##
shutdown command:
 shutdown -h now   #Shut down immediately
 shutdown -h 1     #Shut down after 1 minute
 shutdown -r now   #Restart now
 shutdown -r 1     #Restart in 1 minute

halt shutdown
reboot reboot
sync synchronizes the data in the memory to the hard disk

Note: When shutting down or restarting, be sure to execute the sync command first to prevent data loss.
Five, users and user master##
5.1 Why users
The server of a normal company will not give you the root user. Even if you give you the root user, you do not want it. The greater the authority, the greater the risk. Normal user login is used. Of course you can switch users
5.2 How to check the currently logged in user###
command:
[ root@localhost ~]# whoami
root
5.3 How to add users###
useradd option username
E.g:
useradd lxx
Note: After successful creation, it will be automatically created in the home directory with the same user name

Customize the home directory for users
useradd -d Directory path username

Specify user group
useradd -g User principal name username
5.4 Add or modify password for specified user###
passwd username
Password must be at least 8 characters
5.5 How to delete a user###
userdel user name delete user, keep home directory
userdel -r Username delete user, do not keep home directory

# Generally does not delete the user's home directory
5.6 How to check if a user exists###
id username

How to switch users: su-username
Back to the original user: exit
5.7 Edit user group
Because we need to manage permissions, operation and maintenance, development, and convenient permissions management
1 How to add a group
groupadd group name

2 Delete group
groupdel group name

groupdel If there is a user in the group, it cannot be deleted unless the user is deleted

3 How to switch groups for users
usermod -g group name user name
Six, file permissions##
View file permissions ls-lhi /The most used for etc is ll
The results are as follows:
 4261971- rw-r--r--.1 root root  111 Oct 312018 magic
 4657110- rw-r--r--.1 root root 2.0K Apr 112018 mail.rc
 4790595- rw-r--r--.1 root root 5.1K Aug  82019 makedumpfile.conf.sample
 4916208- rw-r--r--.1 root root 5.1K Oct 312018 man_db.conf
 4937598- rw-r--r--.1 root root  936 Aug  92019 mke2fs.conf
010203040506070801 File inode information inode
02 File type and file permission information
03 Number of hard links
04 User to whom the file belongs
05 User group to which the file belongs
06 File size
07 Last modified time
08 file name

*******Explanation 02***********
d    rwx    r-x    ---1234

Above*******Explanation 02***********1, indicating the type of file
d directory directory type file
- file ordinary file
l softlint link type

Above*******Explanation 02***********Of 2, which means the current user's authority to the current file
Above*******Explanation 02***********3, which means that the current user group has permissions to the current file
Above*******Explanation 02***********4, which means that other users have permissions to the current file
to sum up:
File (your toy): above*******Explanation 02***********2. What permissions do you have for your toys
File (your toy): above*******Explanation 02***********3. What permissions does your family have over your toys
File (your toy): above*******Explanation 02***********4. Next door Pharaoh, what authority do strangers have to your toys

The permission of a file consists of 3 bits:
rwx --->Represents read, write, and execute these three permissions respectively
r -->read-->Read permission value 4
w --->write--->Write permission value 2
x ---> exwcute-->Execute value 1---->No permission value 0

rwx  r-x  r-x What permissions does the owner have, what permissions does the owner group have, what permissions do other users have
755 Read and write execution

############
04 The user root to which the file belongs-->The owner of the file is root
05 The user group root to which the file belongs---》The owner group of the file is the root group
6.1 How to modify file permissions###
Syntax: chmod parameter permission value file path
[ root@zgh1 movie1]# ls -lhi dir1/
total 08420595 drwxr-xr-x.2 root root 6 Mar  716:47 test
[ root@zgh1 movie1]# chmod 777 dir1/[root@zgh1 movie1]# ls -lhi dir1/
total 08420595 drwxr-xr-x.2 root root 6 Mar  716:47 test

Let folders and subfiles recursively become the permissions we specify
Implementation: chomd-R 777/dir1
6.2 How to modify the owner and owner group of a file###
chown parameter username.Group name file/folder

Let folders and sub-files recursively become the users we specify.group
Implementation: chown-R jj.sb a.txt
Seven, change yum source##
Change the source to Ali source and copy the source link below to execute directly
https://developer.aliyun.com/mirror/centos?spm=a2c6h.13651102.0.0.3e221b11q17Xub
How to install software in yum: yum install software-y No need to ask for consent
Recommended Posts