Centos6 system boot loading process
Understanding the startup process of a system is very important for a system administrator and operation and maintenance. Understanding the system startup method is very important for effective troubleshooting when the system fails. When the system starts and a few minutes later, we know that we have reached the login prompt stage. Are we trying to find out that all stages of the startup sequence have passed normally, and what happened behind these scenes during system startup. Let's get familiar with the startup process of Centos6 system.
The overall process is roughly as follows:
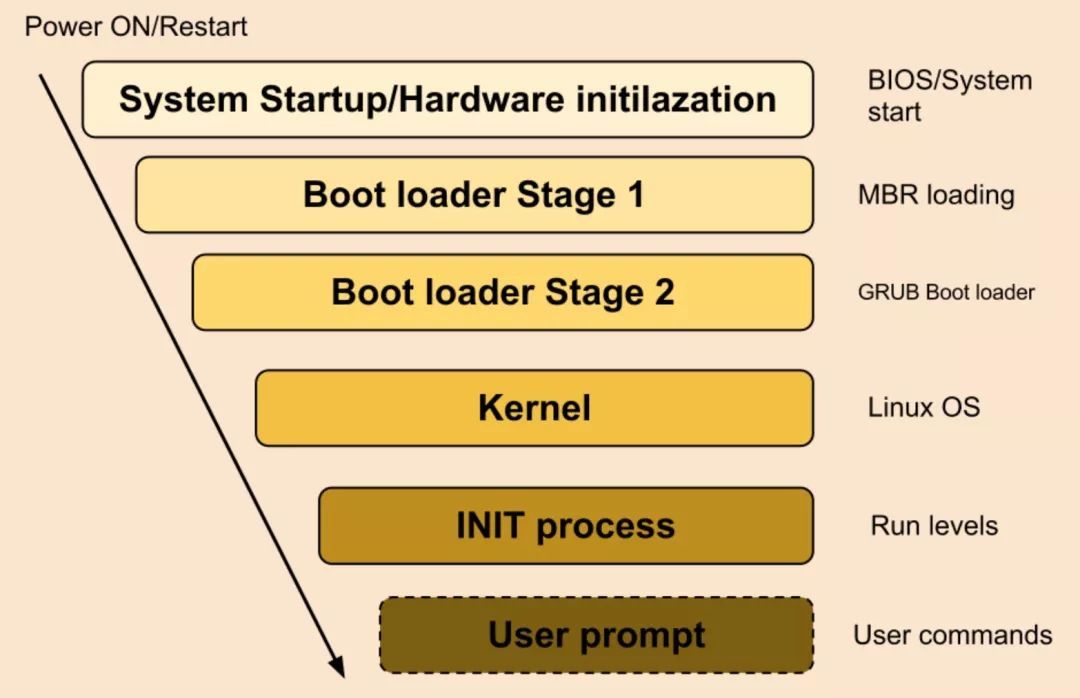
The first stage hardware boot
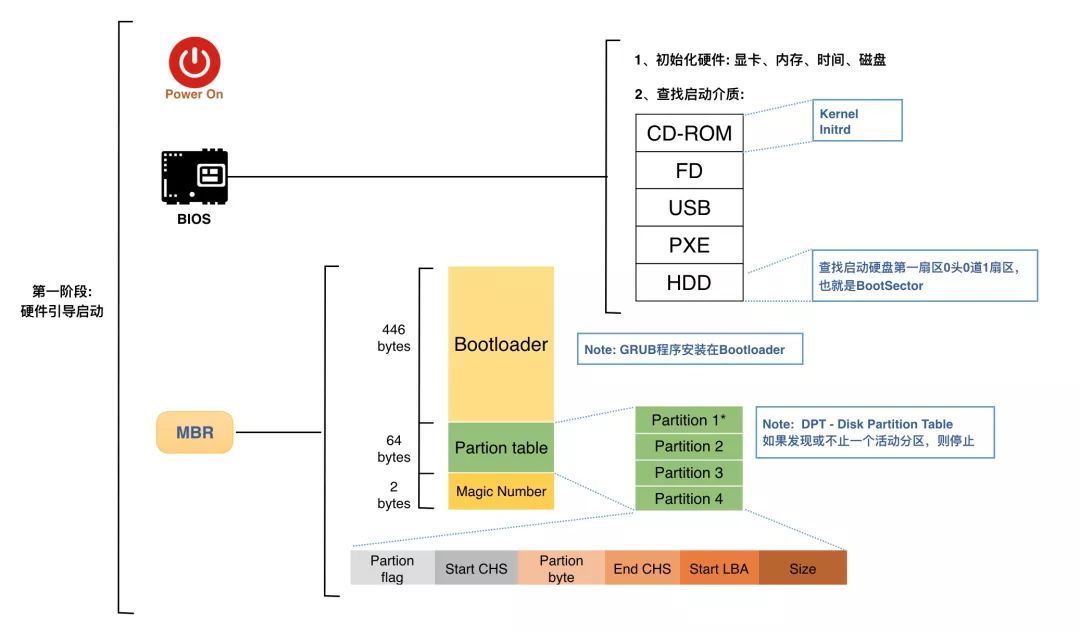
After the system is powered on, the motherboard BIOS (Basic Input / Output System) runs POST (Power on self test) code to detect key peripheral devices of the system (such as: CPU, memory, graphics card, I/O, keyboard and mouse, etc.). The hardware configuration information and some user configuration parameters are stored on the CMOS (Complementary Metal Oxide Semiconductor) of the motherboard (generally 64 bytes), which is actually a readable and writable RAM chip on the motherboard, powered by the battery on the motherboard, and the system is powered off After that, the information will not be lost.
After executing the POST code to detect the key peripheral equipment of the system, the system starts the self-check program, and searches for the boot drive (such as hard disk, CD-ROM, network server, etc.) according to the boot sequence set in the BIOS. Choose a suitable initiator, such as a hard disk device under normal circumstances. The BIOS will read the first sector (MBR, 512 bytes) of the hard disk device and execute the code in it. In fact, the BIOS here does not care about what is in the first sector of the boot device. It is only responsible for reading and executing the content of the sector, and the BIOS's task is completed. After that, the control of system startup is transferred to the code of the MBR part.
BIOS
- BIOS stands for Basic Input/Output System
- Perform some system integrity checks
- Search, load and execute bootloader
- It looks for the boot loader in a floppy disk, CD-ROM or hard drive (prompts to select a bootable device, which can be a hard disk, CD/DVD-ROM, floppy drive, USB flash drive). You can press a key (usually F2's F12, but this depends on your system) during BIOS boot to change the boot sequence.
- Once the bootloader is detected and loaded into memory, the BIOS will provide control for it.
- The operating system attempts to boot from the hard disk containing the master boot loader in the MBR.
MBR:
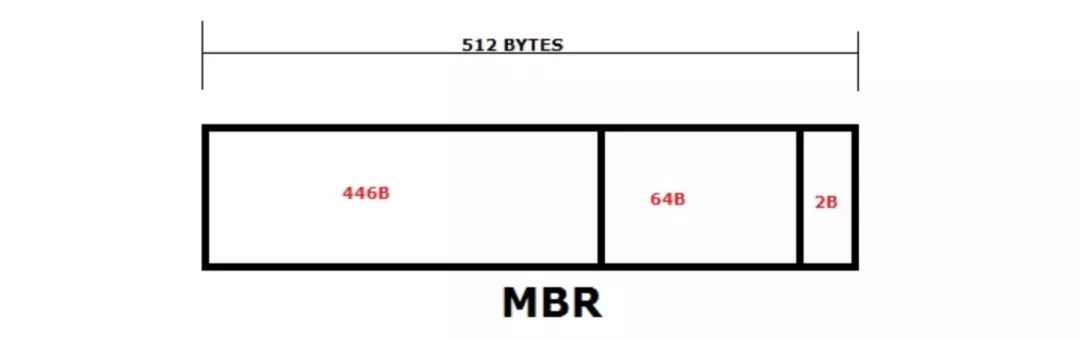
The size of MBR is 512Bytes and is located in the first or last sector of the HDD (depending on the manufacturer).
- MBR stands for Master Boot Record;
- It is located in the first sector of the bootable disk, usually /dev/hda or /dev/sda;
- The size of MBR is 512 bytes, and it consists of three parts:
Main bootloader code (446Bytes): This code provides the bootloader information and the location details of the actual bootloader code on the hard disk. This helps the CPU to load the second stage of the Boot loader;
Partition table information (64Bytes): MBR contains 64 bytes of data, used to store partition table information, such as the start and end of each partition, partition size, partition type (whether it is a primary partition or an extended partition, etc.);
Magic Number(2Bytes): As a verification check of MBR.
Bootloader:
We know that the file system formats of different operating systems are different? We also know that one disk can install multiple operating systems. How can boot loader achieve the operating system we want? A 446-byte boot loader is not enough for so many different functions. Therefore, a corresponding program must be made to process the core files of the corresponding operating system. This program is the loader of the operating system (note that it is not the boot loader in the MBR). In this way, bootloader only needs to transfer the control to the corresponding operation The loader of the system, let it be responsible for starting the operating system.
The following figure can better explain the role of Bootloader:
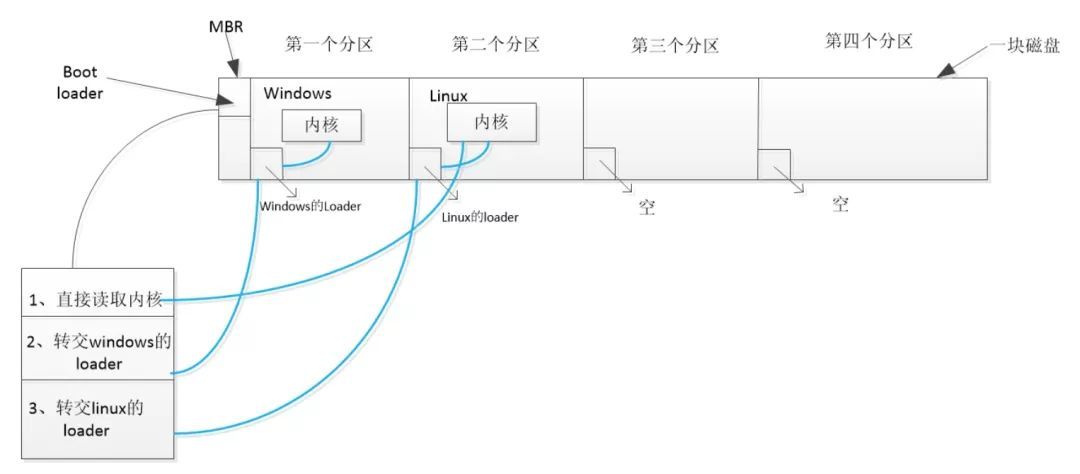
Interpreting the content of the above picture, we know that the first sector of each partition of a hard disk is called bootsector, this sector stores the loader of the operating system, so we often say that only one operating system can be installed on a partition, as shown in the figure above , The boot sector of the first partition stores the loader of windows, the second partition stores the loader of Linux, the third and the fourth are empty because the operating system is not installed. As for what MBR's bootloader does, bootloader has three functions: Provide menus, read kernel files, and transfer them to other loader.
To provide a menu is to provide the user with a menu to let the user choose which operating system to enter;
Reading the kernel file, we know that the system will have an operating system that starts by default. The loader of this operating system has a copy in the boot sector of the partition where it is located. In addition, a copy of the loader of the operating system that starts by default will also be copied. In the boot loader of MBR, MBR will directly read the loader in the boot loader, and then start the default operating system;
Transfer to another loader, when the user selects other operating systems to start, the bootloader will transfer the control to the corresponding loader, and let it be responsible for the start of the operating system.
MBR uses 16Bytes to store the information of a single partition, which is why the number of partitions in the MBR concept is limited to 4 (4×16 = 64).
64 Each byte contains the partition information of 4 partitions (16x4). This is why the hard disk can only have 4 primary partitions, because the MBR can only store the information of 4 partitions. Therefore, if you need more than 4 partitions on the hard disk, you must expand one of the primary partitions and create logical partitions outside of these extended partitions.
It also contains information about GRUB (or LILO in old systems), so, in simple terms, MBR loads and executes the GRUB boot loader.
**Note: ** Now MBR cannot directly load the kernel, because it does not know the concept of file system and needs to provide a boot loader with file system driver for each supported file system so that the boot loader itself can understand and access them .
To overcome this situation, GRUB is used with /boot/grub.conf and the file system details in the file system driver.
The second stage GRUB boot boot
Once the Bootloader stage 1 is completed and the actual bootloader location can be found, the first stage bootloader starts the second stage by loading the Bootloader into memory.
At this stage, GRUB (Grand Unified Bootloader) in the first 30KB hard disk after the MBR is loaded into RAM to read its configuration and display the GRUB boot menu (the user can manually specify the boot parameters) to the user.
GRUB loads the user-selected (or default) kernel into memory and passes control to the kernel. If the user does not select an operating system, after a defined timeout, GRUB will load the default kernel in memory to start it.
According to gnu.org, "The boot loader is the first software program that runs when the computer starts." GRUB or GRand Unified Bootloader is the boot loader of the Linux operating system. There are two major versions of Grub (Grub version 1 and 2). At present, most linux ditros have started to use grub version 2. One of the main features of grub is that it can be installed using a linux image and does not need to run an operating system.
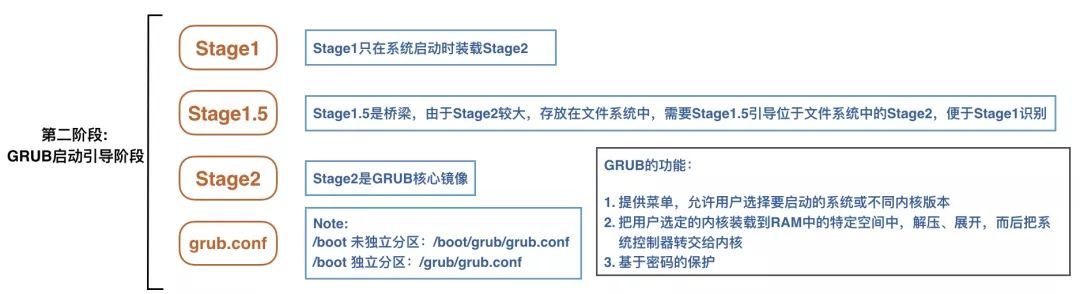
Grub is a multi-stage boot program (Stage1, Stage1.5 and Stage2). The three stages of grub version 1 and version 2 are explained as follows.
**GRUB Phase 1: **
- The master boot loader occupies less than 512 bytes of disk space in the MBR-the space is too small to contain the instructions required to load a complex operating system;
- Instead, the master boot loader performs the function of loading stage 1.5 or stage 2 boot loader.
**GRUB stage 1.5: **
- Stage 1 can directly load stage 2, but it is usually set to load stage 1.5;
- This may happen when the /boot partition is located above the 1024 column head of the hard drive;
- After the MBR and before the first partition, GRUB Stage 1.5 is located in the first 30KB of the hard disk;
- This space is used to store file system drivers and modules;
- This enables stage 1.5 to load stage 2 to load from any known location on the file system, namely /boot/grub.
**GRUB Phase 2: **
- Responsible for loading the kernel from /boot/grub/grub.conf and any other modules required;
- Load the GUI interface, which is the boot image located at /grub/splash.xpm.gz, which contains a list of available kernels, you can manually select the kernel in it, or after the default timeout value, the selected kernel will start
The original file is /etc/grub.conf, you can view the symbolic link file in /boot/grub/grub.conf:
# grub.conf generated by anaconda## Note that you do not have to rerun grub after making changes to this file# NOTICE:  You have a /boot partition.  This means that#          all kernel and initrd paths are relative to /boot/, eg.#          root(hd0,0)#          kernel /vmlinuz-version ro root=/dev/sda3#          initrd /initrd-[generic-]version.img#boot=/dev/sdadefault=0
timeout=5
splashimage=(hd0,0)/grub/splash.xpm.gz
hiddenmenu
title CentOS(2.6.32-431.el6.x86_64)root(hd0,0)
 kernel /vmlinuz-2.6.32-431.el6.x86_64 ro root=UUID=73f96693-ed87-4953-9b51-d6f2cca370eb rd_NO_LUKS rd_NO_LVM LANG=en_US.UTF-8 rd_NO_MD SYSFONT=latarcyrheb-sun16 crashkernel=auto  KEYBOARDTYPE=pc KEYTABLE=us rd_NO_DM rhgb quiet
 initrd /initramfs-2.6.32-431.el6.x86_64.img
As you noticed from the information above, it contains the kernel and initrd images, so in simple terms, GRUB just loads and executes the kernel and initrd images.
grub> root (hd0,0) ---> The root command specifies a root partition for grub
grub> kernel /vmlinuz-2.6.32-431.el6.x86_64 ro root=UUID=73f96693-ed87-4953-9b51-d6f2cca370eb .... ---> Load the specified module
grub> initrd /initramfs-2.6.32-431.el6.x86_64.img ---> Specify the initrd file
The third stage kernel boot
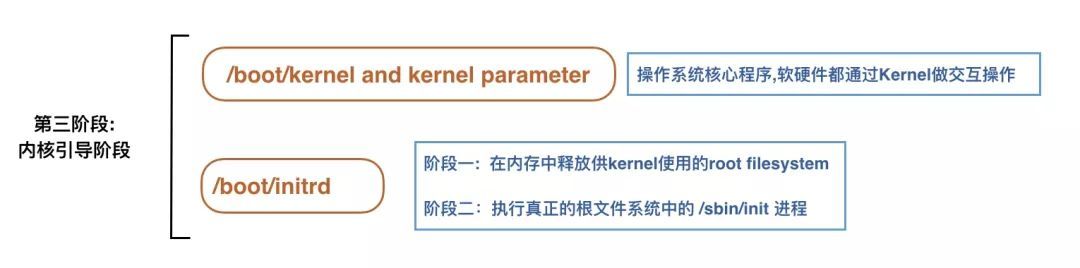
As mentioned in Phase 2, after the grub>boot command, the control of system startup is transferred to the kernel. Kernel will immediately initialize all devices in the system and do related configuration work, including CPU, I/O, storage devices, etc.
Regarding device driver loading, there are two parts:
- Part of * device drivers are compiled into Linux Kernel, Kernel will call this part of the drivers to initialize related devices, and at the same time output logs to the kernel message buffer. After the system is started, dmesg can view this part of the output information;
- The other part of * device drivers are not programmed into Kernel, but placed in initrd (ramdisk) as a module.
initrd is a memory-based file system. During startup, when the system accesses the real root file system, it will first access the initrd file system. Open the contents of initrd and you will find files (including directories) such as bin, devetc, lib, procsys, sysroot, and init. It contains some device driver modules, such as scsi ata and other device driver modules, as well as several basic executable programs insmod, modprobe, lvm, nash. The main purpose is to load some storage media drive modules, such as the aforementioned scsi ideusb and other device drive modules, initialize LVM, and mount the root file system in read-only mode.
After the content in initrd is released to rootfs, Kernel will execute the init file, where init is a script, executed by the nash interpreter. At this time, the control of the kernel is transferred to the init file for processing. We check the content of the init file, mainly to load device drivers related to various storage media.
After the driver is loaded, a root device is created, and then the root file system is mounted as read-only. After this step, release unused memory and execute switchroot to switch to the real root. At the same time, run the /sbin/init program to start the system's No. 1 process, and then transfer the control of system startup to the init process. About switchroot is a program defined in nash.
Linux Kernel needs to adapt to a variety of different hardware architectures, but it is impractical to compile all hardware drivers into the Kernel, and it is impossible for Kernel to write the device drivers of the hardware into the kernel every time a new hardware structure is developed. . In fact, Linux Kernel only contains basic hardware drivers. During system installation, system hardware information will be detected, and part of the device drivers will be written to initrd based on the installation information and system hardware information. In this way, when the system is started later, part of the device drivers will be loaded in the initrd.
The summary process is as follows:
- Install the root file system as specified in "root=" in grub.conf
- The kernel executes the /sbin/init program
- Since init is the first program executed by the Linux kernel, its process ID (PID) is 1. Execute'ps -ef | grep init' and check the pid
- initrd stands for initial RAM disk
- The initrd is used by the kernel as a temporary root file system until the kernel is booted and the real root file system is mounted. It also contains the necessary drivers compiled internally, which helps it access hard drive partitions and other hardware.
Four-stage init initialization####
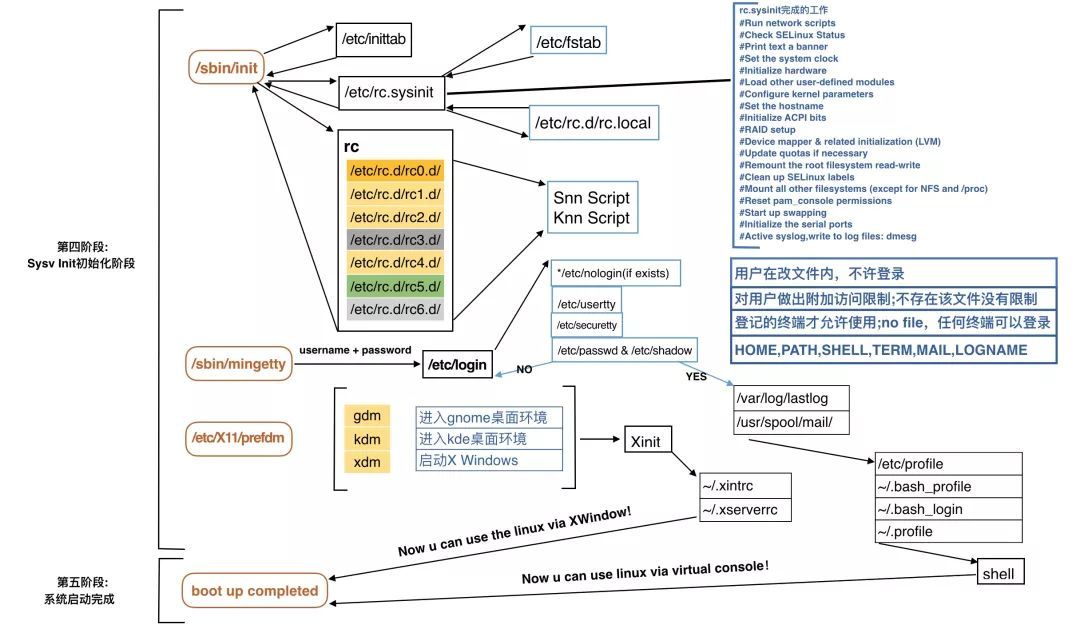
After the init process is up, the control of system startup is transferred to the init process. The /sbin/init process is the parent process of all processes. When the init process is up, it will first read the configuration file /etc/inittab and perform the following jobs:
- Execute the system initialization script (/etc/rc.d/rc.sysinit), perform basic configuration of the system, mount the root file system and other file systems in read-write mode, the system is basically up and running, and it needs to be performed later Determining the operating level and starting the corresponding service
- Determine the run level entered after startup
- Execute
/etc/rc.d/rc, this file defines the order of service startup is K first, then S, and the specific service status of each run level is placed in/etc/rc.d/rcn.d (n=0~6)Under the directory, all files are linked to the corresponding files under /etc/init.d; - /etc/rc.d/rc You can't use'macro parameter character #'in math modeRUNLEVEL is the default operating mode
- /etc/rc.d/rc.local
- Start the virtual terminal /sbin/mingetty
- Run X on runlevel 5
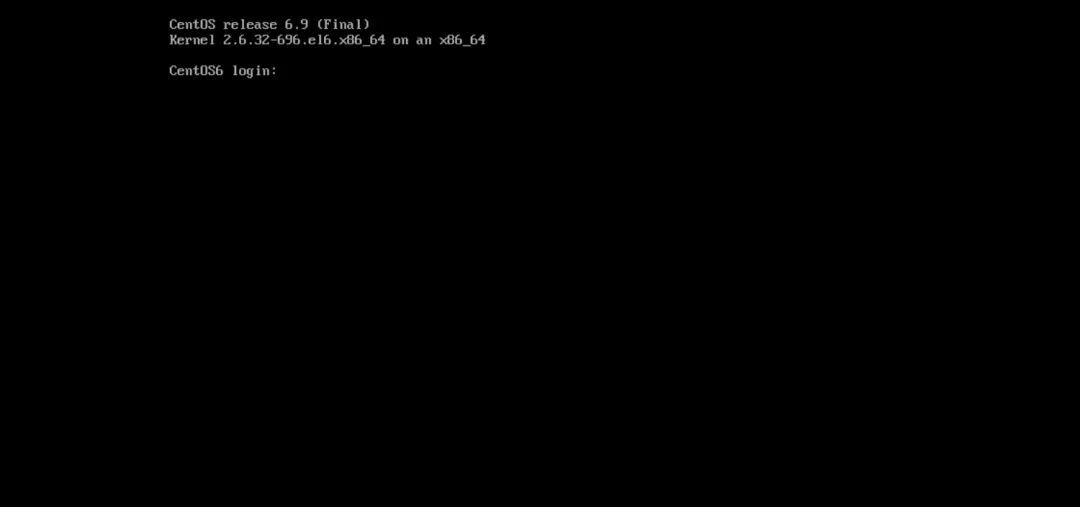
At this time, what is presented to the user is the final login interface. At this point, the system startup process is complete.
Explain the concept of the system startup run level and the customization method of the service:
When initrd can be detected and loaded normally, the final work is basically carried out by the operating system. When the init process of the system is up, the control of system startup is transferred to the init process.
The /sbin/init process is the parent process of all processes. When init is up, it will first read the configuration file /etc/inittab to determine the run level.
id:3:initdefault:
id:runlevel:action:process
id: is a unique sequence of characters used to identify entries in this file
runlevels: is the run level applicable to this entry
action: is the action taken on the run level
process: specify the process to be executed
runleve: A total of 7 levels are 0-6, the default level is 3
| runlevel | meaning |
|---|---|
| 0 | Shutdown |
| 1 | Single user mode (root, no login required), single, maintenance mode; |
| 2 | Multi-user mode, will start the network function, but will not start NFS; maintenance mode; |
| 3 | Multi-user mode, normal mode; text interface; |
| 4 | Reserved level; can be the same as 3 levels; |
| 5 | Multi-user mode, normal mode; graphical interface; |
| 6 | Restart |
There are some additional run levels that are rarely used, such as:
s,S or single: single user mode
emergency: bypass rc.sysinit
To summarize the run level:
Run level 1 is used for maintenance purposes, as this is a very limited run level. Only minimal scripts run in this run level. Only the root user can log in. No other users can log in to this run level. Run level 2 is more lenient than run level 1. Here, all users can log in, but the network service is not running. Runlevel 3 provides a complete working environment. All users can log in and enable the network. Run level 4 is for experimental purposes only. In run level 5, you can use the graphical console. Run level '0' is the paused state of the system, switching to run level 6 will restart the system.
| action | meaning |
|---|---|
| wait | Switch to this level and run once |
| respawn | This process terminates, restart it |
| initdefault | Set init default run level |
| sysinit | Set the system initialization mode, /etc/rc.d/rc.sysinit |
| .... | The above are common actions |
Then init will execute the /etc/rc.d/rc.sysinit script, which is the first script executed by init during the boot process.
The script is only executed once during boot, and it will perform the following actions:
- Set the hostname (by referencing /sbin/hostname)
- Mount the /proc and /sys virtual file systems
- It will load the USB module
- Enable SWAP
- Set up SELinux (by referencing /etc/sysconfig/selinux)
- Provide splash screen messages and graphical splash screen
- Initialize all hardware
- Load all user-defined modules (by referencing /etc/sysconfig/modules and /etc/rc.modules)
- Configure all kernel parameters (by referencing /etc/sysctl.conf)
- Scan and load storage devices and multipath device modules
- Load mdraid and lvm modules
- Refer to /etc/fstab and execute fsck where applicable. (The system will execute fsck at startup by referencing /etc/fstab, which is why it initially mounts the root "/" file system as read-only)
- Mount Filesystem by referencing /etc/fstab
- Finally it remounts the root file system as read/write (r/w)
After completing rc.sysinit, the kernel will look at the /etc/rc.d/rcx.d/ directory (X is the run level obtained from /etc/inittab).
There are directories corresponding to each run level in the /etc/rc.d directory. According to this line, run the script in the /etc/rc.d/rc3.d directory. We list the files in this directory. (There are similar files in other directories such as rc1.d, rc2.d...).
[ [email protected]~]# ls -l /etc/rc.d/rc3.d/Total amount 0
lrwxrwxrwx.1 root root 199 May 19 2016 K10saslauthd->../init.d/saslauthd
lrwxrwxrwx.1 root root 22 November 17 2016 K14zabbix-agent ->../init.d/zabbix-agent
lrwxrwxrwx 1 root root 225 September 2018 K15htcacheclean->../init.d/htcacheclean
lrwxrwxrwx 1 root root 155 May 92018 K15httpd->../init.d/httpd
lrwxrwxrwx.1 root root 18 November 15 2016 K15svnserve->../init.d/svnserve
lrwxrwxrwx.1 root root 209 Feb 19 2016 K50netconsole->../init.d/netconsole
lrwxrwxrwx.1 root root 15 November 15 2016 K50snmpd->../init.d/snmpd
lrwxrwxrwx.1 root root 19 November 15 2016 K50snmptrapd->../init.d/snmptrapd
lrwxrwxrwx.1 root root 14 November 15 2016 K74ntpd->../init.d/ntpd
lrwxrwxrwx.1 root root 17 November 15 2016 K75ntpdate->../init.d/ntpdate
lrwxrwxrwx.1 root root 219 Feb 19 2016 K87restorecond->../init.d/restorecond
lrwxrwxrwx.1 root root 159 May 19 2016 K89rdisc->../init.d/rdisc
lrwxrwxrwx 1 root root 182月232018 K92iptables->../init.d/iptables
lrwxrwxrwx.1 root root September 19, 2016 S08ip6tables->../init.d/ip6tables
lrwxrwxrwx.1 root root 179 Feb 19 2016 S10network->../init.d/network
lrwxrwxrwx.1 root root 169 Mar 19 2016 S11auditd->../init.d/auditd
lrwxrwxrwx.1 root root 179 Dec 19 2016 S12rsyslog->../init.d/rsyslog
lrwxrwxrwx.1 root root 159 May 19 2016 S25netfs->../init.d/netfs
lrwxrwxrwx.1 root root September 19, 2016 S26udev-post ->../init.d/udev-post
lrwxrwxrwx 1 root root 145 2102:16 S55sshd ->../init.d/sshd
lrwxrwxrwx 1 root root 155 May 92018 S59Redis->../init.d/Redis
lrwxrwxrwx 1 root root 175 Nov 112018 S69Tengine->../init.d/Tengine
lrwxrwxrwx 1 root root 147 months 2306:09 S80exim ->../init.d/exim
lrwxrwxrwx 1 root root 157 month 2306:09 S90crond ->../init.d/crond
lrwxrwxrwx.1 root root 119 December 19 2016 S99local->../rc.local
Some files in this directory start with S, others start with K. Files beginning with S correspond to scripts that must be started in that particular run level, and files with K correspond to scripts to be killed. These files are just soft links to scripts in the /etc/rc.d/init/d directory (a soft link points to /etc/rc.local, which itself is /etc/rc.d/rc/local Soft link.). The scripts in /etc/rc.d/init.d/ are daemons. A daemon is a process that runs in the background and provides a certain service. For example, the http daemon (httpd) provides web services.
After executing all these scripts, the /etc/rc.local script will be run, and init will run whatever it finds in /etc/rc.d/rc.local (regardless of the run level). rc.local is very special, it will be executed every time the run level is changed. It is the last script to run during the initialization process or even the startup process. After everything is complete, control will return to the kernel.
Note:
rc.localis not used in all distributions, for example, Debian does not have this file.
If you want to execute a command or script when the system starts, you can put it in this script:
[ [email protected]~]# cat /etc/rc.local #!/bin/sh## This script will be executed *after* all the other init scripts.# You can put your own initialization stuff in here if you don't# want to do the full Sys V style init stuff.touch /var/lock/subsys/local# start solution service/data/app/data-solution-service/solution-start.sh
Now all these scripts have been executed successfully.
Launch terminal
Next, the terminal will be started by the /sbin/mingetty command. Because the system is set to start tty1-tty6, 6 command line terminals will be started. What we finally presented to us is such a picture:
Five-stage user login
/bin/login By reading the /etc/passwd file, the interactive login shell is started after successful login. This shell call usually reads /etc/profile and its private configuration items ~/.bash_profile, ~/.bash_login, ~/.profile at startup.
Usually a shell program (such as [prompt]$/bin/bash) or the /bin/su command is used to start an interactive non-login shell on the command line. You can also use a terminal program such as xterm or konsole to start an interactive non-login shell in a graphical environment. This type of shell call usually copies the parent environment, and then reads the user's ~/.bashrc file to obtain other startup configuration instructions.
When a shell script is running, a non-interactive shell usually appears. It is non-interactive because it is processing scripts rather than waiting for user input between commands. For these shell calls, only the environment inherited from the parent shell is used.
The file ~/.bash_logout is not used for calling the shell. When the user exits the interactive login shell, it will be read and executed.
Many distributions /etc/bashrc are used for system-wide initialization of non-login shells. This file is usually called from the user's ~/.bashrc file, not directly built into bash itself. This section follows this convention.
/etc/profile:
The file first sets up some auxiliary functions and some basic parameters. It specifies some bash history parameters, and for security reasons, it is forbidden to keep permanent history files for root users. It also sets the default user prompt. Then it calls the small single-purpose script /etc/profile.d in the directory to provide most of the initialization
Recommended Posts