CentOS 7.X system installation and optimization
Evolution of centos##
Start process sysvinit
Serial boot: one at a time, one by one
Parallel start: start all together
Advantages of init
It runs very well. Mainly rely on shell script
Init disadvantages
1、 Slow start
2、 Easy to conquer, fstab and nfs mounting problems
- upstart technology
Version used:
centos6
ubuntu14
- systemd technology
Overcome the inherent shortcomings of init and improve the startup speed of the system
Reduce migration costs
- Comparison of three startup technologies

- Three principles of parallel startup:
1、 Solve socket dependency/port dependency
socket network socket file
2、 Solve D-Bus
Dependence: D-Bus is used as a communication tool between programs, similar to Message Queue, which can cache information
3、 Solve file system dependencies, similar to autofs mechanism
-
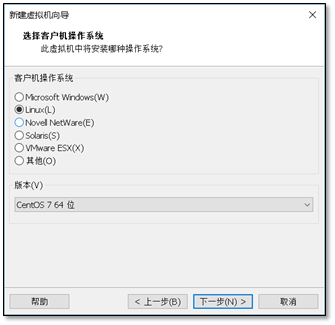
Install centos7 system
-
Virtual machine selection
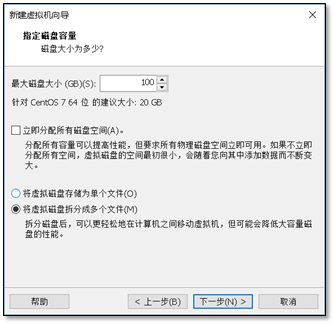
As much disk space as possible

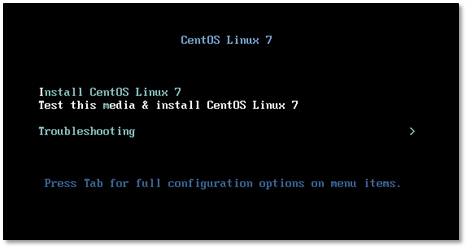
- System installation
1 ) Boot into installation
2 ) Press TAB

Add kernel parameters to make the network card name become eth
Enter net.ifnames=0 biosdevname=0 in the space and press Enter
- Choose a language

- Set up network connection and hostname

** 5) Pay attention to check the power-on auto start **
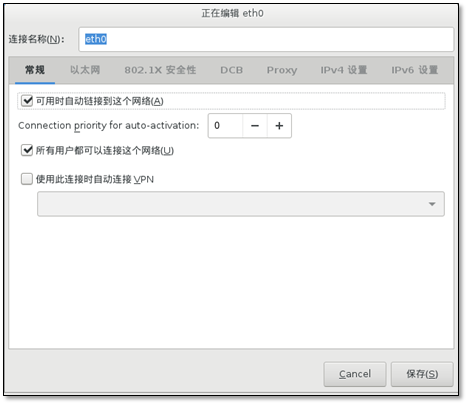
- Set ip address

Configure another network card in the same way
- Modify hostname

- Choose the installation environment, choose the minimal installation.
Pay attention to check dependent packages

9 ) The disk partition is a custom partition.

Choose the size of the /boot mount point. Set here to 1g

Add swap mount point

Note that the selections are all standard partition types and write directly to disk

After adding the root partition, the selection is complete

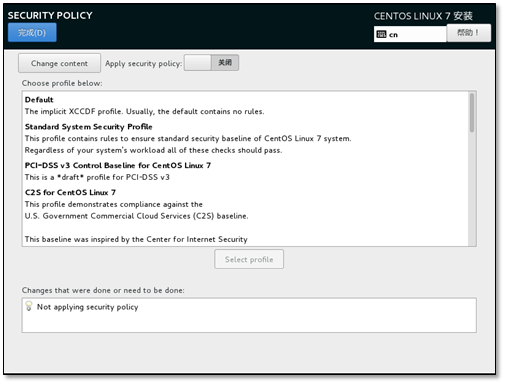
Turn off password protection

Select close
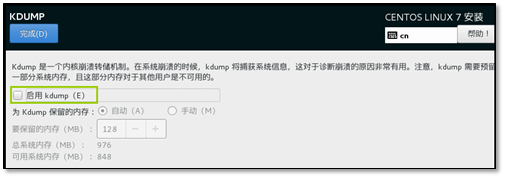
Turn off KDUMP function
Start the installation, pay attention to 469 packages

Set the root password during installation.
- Optimization after installation
View system version
[ root@CentOS7 ~]# cat /etc/redhat-release
CentOS Linux release 7.3.1611(Core)
Modify yum source, base source
[ root@CentOS7 ~]# curl -o /etc/yum.repos.d/CentOS-Base.repo http://mirrors.aliyun.com/repo/Centos-7.repo
 % Total    % Received % Xferd  Average Speed   Time    Time     Time  Current
         Dload  Upload   Total   Spent    Left  Speed
100257310025730029400--:--:----:--:----:--:--2940
** epel source**
[ root@CentOS7 ~]# curl -o /etc/yum.repos.d/epel.repo http://mirrors.aliyun.com/repo/epel-7.repo
 % Total    % Received % Xferd  Average Speed   Time    Time     Time  Current
         Dload  Upload   Total   Spent    Left  Speed
100108410010840091500:00:010:00:01--:--:--916
install software
yum install vim wget bash-completion lrzsz nmap nc tree htop iftop net-tools -y
bash-completion package to complete command parameters
-
The difference between centos7 and centos 6
-
Solve the problem of name change after replacing the network card
How to change the name
Modify the name of the CentOS7 network card to the traditional name eth0 format http://oldboy.blog.51cto.com/2561410/1722101
- nmtui
Graphical tool for network management on centos7
- The difference in hostname configuration files
Temporary hostname
Permanent /etc/hostname
[ root@CentOS7 ~]# cat /etc/hostname
CentOS7
complete in one step
[ root@CentOS7 ~]# hostnamectl
 Static hostname: CentOS7
   Icon name: computer-vm
   Chassis: vm
  Machine ID: 4ab1c20b25f64a38a7197b8453b04b2c
   Boot ID: abd0a393540b4788bc1e571b413b33c4
 Virtualization: vmware
 Operating System: CentOS Linux 7(Core)
  CPE OS Name: cpe:/o:centos:centos:7
   Kernel: Linux 3.10.0-514.el7.x86_64
  Architecture: x86-64
Modify hostname
[ root@CentOS7 ~]# hostnamectl set-hostname clsn
- character set
- temporary*
[ root@clsn ~]# echo $LANG
zh_CN.UTF-
- permanent*
[ root@clsn ~]# cat /etc/locale.conf
LANG="zh_CN.UTF-8"
complete in one step
[ root@clsn ~]# localectl
 System Locale: LANG=zh_CN.UTF-8
  VC Keymap: cn
  X11 Layout: cn
- View the system version number
[ root@clsn bin]# cat /etc/os-release
NAME="CentOS Linux"
VERSION="7 (Core)"
ID="centos"
ID_LIKE="rhel fedora"
VERSION_ID="7"
PRETTY_NAME="CentOS Linux 7 (Core)"
ANSI_COLOR="0;31"
CPE_NAME="cpe:/o:centos:centos:7"
HOME_URL="https://www.centos.org/"
BUG_REPORT_URL="https://bugs.centos.org/"

CENTOS_MANTISBT_PROJECT="CentOS-7"
CENTOS_MANTISBT_PROJECT_VERSION="7"
REDHAT_SUPPORT_PRODUCT="centos"
REDHAT_SUPPORT_PRODUCT_VERSION="7"
- Compatible rc.local
cat /etc/rc.local
# Please note that you must run 'chmod +x /etc/rc.d/rc.local' to ensure
# that this script will be executed during boot.
Want to use rc.local to give him executable permission
[ root@clsn bin]# chmod +x /etc/rc.d/rc.local
[ root@clsn bin]# ll /etc/rc.d/rc.local
- rwxr-xr-x.1 root root 47311 July 72016/etc/rc.d/rc.local
- Runlevel
The previous method of viewing the run level is still used
[ root@clsn init.d]# runlevel
N 3
Original runlevel file
[ root@clsn ~]# ls -lh /usr/lib/systemd/system/runlevel*.target
lrwxrwxrwx.1 root root 15 November 1311:16/usr/lib/systemd/system/runlevel0.target -> poweroff.target
lrwxrwxrwx.1 root root 13 November 1311:16/usr/lib/systemd/system/runlevel1.target -> rescue.target
lrwxrwxrwx.1 root root 17 November 1311:16/usr/lib/systemd/system/runlevel2.target -> multi-user.target
lrwxrwxrwx.1 root root 17 November 1311:16/usr/lib/systemd/system/runlevel3.target -> multi-user.target
lrwxrwxrwx.1 root root 17 November 1311:16/usr/lib/systemd/system/runlevel4.target -> multi-user.target
lrwxrwxrwx.1 root root 16 November 1311:16/usr/lib/systemd/system/runlevel5.target -> graphical.target
lrwxrwxrwx.1 root root 13 November 1311:16/usr/lib/systemd/system/runlevel6.target -> reboot.target
7 Set run level
root@clsn init.d]#  systemctl get-default multi-user.target
systemctl get-default  #View run level
- Example*
[ root@clsn ~]# systemctl get-default
multi-user.target
[ root@clsn ~]# systemctl set-default multi-user.target
Removed symlink /etc/systemd/system/default.target.
Created symlink from/etc/systemd/system/default.target to /usr/lib/systemd/system/multi-user.target.
Run level changes
[ root@clsn ~]# ls -lh /usr/lib/systemd/system/runlevel*.target
lrwxrwxrwx.1 root root 15 November 1311:16/usr/lib/systemd/system/runlevel0.target -> poweroff.target
lrwxrwxrwx.1 root root 13 November 1311:16/usr/lib/systemd/system/runlevel1.target -> rescue.target
lrwxrwxrwx.1 root root 17 November 1311:16/usr/lib/systemd/system/runlevel2.target -> multi-user.target
lrwxrwxrwx.1 root root 17 November 1311:16/usr/lib/systemd/system/runlevel3.target -> multi-user.target
lrwxrwxrwx.1 root root 17 November 1311:16/usr/lib/systemd/system/runlevel4.target -> multi-user.target
lrwxrwxrwx.1 root root 16 November 1311:16/usr/lib/systemd/system/runlevel5.target -> graphical.target
lrwxrwxrwx.1 root root 13 November 1311:16/usr/lib/systemd/system/runlevel6.target -> reboot.target
- systemd rules the world
Directory of system startup files
[ root@clsn init.d]# ls /usr/lib/systemd/system
- Start command example*
[ root@clsn init.d]# cat  /usr/lib/systemd/system/crond.service
[ Unit]
Description=Command Scheduler
After=auditd.service systemd-user-sessions.service time-sync.target

[ Service]
EnvironmentFile=/etc/sysconfig/crond
ExecStart=/usr/sbin/crond -n $CRONDARGS
ExecReload=/bin/kill -HUP $MAINPID
KillMode=process

[ Install]
WantedBy=multi-user.target
Syntax format http://www.jinbuguo.com/systemd/systemd.service.html
- Management Service
Turn off the firewall service and start automatically
systemctl stop postfix.service
systemctl disable postfix.service
Turn off the firewall detailed process
[ root@clsn ~]# systemctl  disable  firewalld.service
Removed symlink /etc/systemd/system/multi-user.target.wants/firewalld.service.
Removed symlink /etc/systemd/system/dbus-org.fedoraproject.FirewallD1.service.[root@clsn ~]# systemctl  stop  firewalld.service
[ root@clsn ~]# systemctl  status  firewalld.service
systemctl: integrates the functions of service and chkconfig, is compatible with SysV and LSB startup scripts, and is capable of bootloading services more effectively during process startup. .
- Command comparison
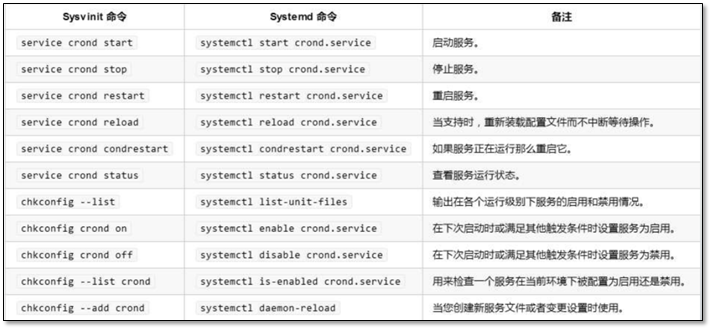
systemctl start crond.service has the same effect as systemctl start crond.
- Boot time optimization
systemd-analyze time
systemd-analyze blame
systemd-analyze plot  >bootime.avg
Boot time
[ root@clsn system]# systemd-analyze time
Startup finished in387ms(kernel)+1.406s(initrd)+31.831s(userspace)=33.626s
Check the specific usage time
[ root@clsn system]# systemd-analyze blame
   10.812 s sshd-keygen.service
   10.758 s abrt-ccpp.service
   6.395 s chronyd.service
……
Production chart
[ root@clsn tmp]# systemd-analyze plot  >bootime.svg
[ root@clsn tmp]# sz bootime.svg

- Startup item optimization
[ root@kickstart ~]# systemctl list-unit-files|egrep "^ab|^aud|^kdump|vm|^md|^mic|^post|lvm"|awk '{print $1}'|sed -r 's#(.*)#systemctl disable &#g'|bash
Removed symlink /etc/systemd/system/multi-user.target.wants/abrt-ccpp.service.
Removed symlink /etc/systemd/system/multi-user.target.wants/abrt-oops.service.
Removed symlink /etc/systemd/system/multi-user.target.wants/abrt-vmcore.service.
Removed symlink /etc/systemd/system/multi-user.target.wants/abrt-xorg.service.
Removed symlink /etc/systemd/system/multi-user.target.wants/abrtd.service.
Removed symlink /etc/systemd/system/multi-user.target.wants/auditd.service.
Removed symlink /etc/systemd/system/basic.target.wants/microcode.service.
Removed symlink /etc/systemd/system/multi-user.target.wants/vmtoolsd.service.
Removed symlink /etc/systemd/system/vmtoolsd.service.requires/vgauthd.service.
-
OpenStack deployment optimization environment
-
Modify the network card configuration file
The first milestone: After the restart is complete, log in to the system#
[ root@localhost ~]# vi /etc/sysconfig/network-scripts/ifcfg-eth0
TYPE=Ethernet
BOOTPROTO=dhcp
DEFROUTE=yes
PEERDNS=yes
PEERROUTES=yes
IPV4_FAILURE_FATAL=no
IPV6INIT=yes
IPV6_AUTOCONF=yes
IPV6_DEFROUTE=yes
IPV6_PEERDNS=yes
IPV6_PEERROUTES=yes
IPV6_FAILURE_FATAL=no
NAME=eth0
UUID=4bf2af89-5f6d-4979-83e9-df6ce1c3cc41
DEVICE=eth0
ONBOOT=no
The second milestone: Delete the extra lines and leave only the following content#
TYPE=Ethernet
BOOTPROTO=dhcp
NAME=eth0
DEVICE=eth0
ONBOOT=no
The third milestone: On the basis of the above, continue to configure#
Red is the modified and added part
The following code is the optimized network card configuration#
TYPE=Ethernet
BOOTPROTO=none        #Cancel dhcp
NAME=eth0
DEVICE=eth0
ONBOOT=yes                #Set boot up
IPADDR=10.0.0.11            #IP address
NETMASK=255.255.255.0    #Subnet mask
GATEWAY=10.0.0.254        #Gateway
DNS1=223.5.5.5            #DNS
Description: Same effect as /etc/init.d/network restart
The fifth milestone: check the ping, test the network connectivity of the gateway 10.0.0.254#
ping 10.0.0.254-c2
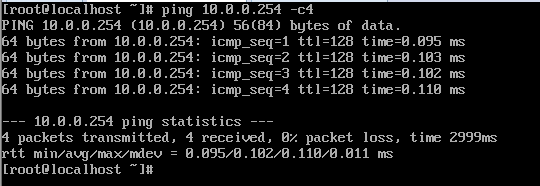
Here, ok, you can use xshell happily
- System optimization
Login xshell to start optimization#
- Firewall optimization
systemctl disable firewalld.service
systemctl stop firewalld
- Selinux optimization
sed -i 's#SELINUX=enforcing#SELINUX=disabled#g' /etc/selinux/config
- ssh optimization
The red part after the modification is completed#
vi /etc/ssh/sshd_config
93 Line: GSSAPIAuthentication no
129 Line: UseDNS no
sed -i '93s@GSSAPIAuthentication yes@GSSAPIAuthentication no@;129s@#UseDNS yes@UseDNS no@' /etc/ssh/sshd_config
Restart ssh
systemctl restart sshd
- Optimization of hosts
vi /etc/hosts
# Add 2 lines
10.0.0.11 controller
10.0.0.31 compute1
10.0.0.32 compute2
- Modify hostname
hostnamectl set-hostname controller
- Yum source optimization
Use CD to build local yum source
umount /mnt
cd /etc/yum.repos.d/
mkdir test -p
\ mv *.repo test
echo '[local]
name=local
baseurl=file:///mnt
gpgcheck=0' >local.repo
mount /dev/cdrom /mnt
yum makecache
- Other optimization
# Turn off the graphical setting mode of the network card#
systemctl stop NetworkManager.service
systemctl disable NetworkManager.service
# Turn off mail service
systemctl stop postfix.service
systemctl disable postfix.service
# Download tab completion command#
yum install -y bash-completion.noarch
# Download common commands#
yum install -y net-tools vim lrzsz wget tree screen lsof tcpdump
# At this point; template machine optimization is completed; shut down and start cloning#
shutdown -h now
- references
https://access.redhat.com/documentation/zh-CN/Red_Hat_Enterprise_Linux/7/index.html
Recommended Posts