How to install Tomcat 9 on CentOS 8
Apache Tomcat is an open source implementation of Java Servlet, JavaServer Pages, Java Expression Language, and Java WebSocket technologies. It is a widely used application and web server in the world. Tomcat is very simple and easy to use, and has a strong ecosystem.
This guide explains how to install Tomcat 9.0 on CentOS 8.
One, install Java
Tomcat 9 requires Java SE 8 or later. We will install OpenJDK 11, an open source implementation of the Java platform.
Run the following command as root or another user with sudo privileges to install Java:
sudo dnf install java-11-openjdk-devel
Once the installation is complete, verify by checking the Java version:
java -version
The output should look like this:
openjdk version "11.0.5"2019-10-15 LTS
OpenJDK Runtime Environment 18.9(build 11.0.5+10-LTS)
OpenJDK 64-Bit Server VM 18.9(build 11.0.5+10-LTS, mixed mode, sharing)
Two, create a system user##
Running Tomcat as the root user has security risks. We will create a system user and group, and create a home directory /opt/tomcat (we will run the Tomcat service here). To do this, enter the following command:
sudo useradd -m -U -d /opt/tomcat -s /bin/false tomcat
Three, download Tomcat
The Tomcat binary installation package can be downloaded from Tomcat download page.
At the time of writing, the latest Tomcat version is 9.0.30. Before proceeding to the next step, please go to the Tomcat 9 download page to see if a newer version is available.
Use the wget command to download the Tomcat zip file to the /tmp folder:
VERSION=9.0.30
wget https://www-eu.apache.org/dist/tomcat/tomcat-9/v${VERSION}/bin/apache-tomcat-${VERSION}.tar.gz -P /tmp
Once the download is complete, unzip the tar file to the /opt/tomcat folder:
sudo tar -xf /tmp/apache-tomcat-${VERSION}.tar.gz -C /opt/tomcat/
Tomcat releases updates according to the normal process. To better control the Tomcat version and upgrade, we will create a soft link named latest pointing to the Tomcat installation directory:
sudo ln -s /opt/tomcat/apache-tomcat-${VERSION}/opt/tomcat/latest
The system user has been created earlier, and this user must be able to access the Tomcat installation directory. Modify the directory attribution to make the user and user group tomcat:
sudo chown -R tomcat:/opt/tomcat
Make all directories under bin executable:
sudo sh -c 'chmod +x /opt/tomcat/latest/bin/*.sh'
These scripts are used to start and stop Tomcat.
Fourth, create a Systemd Unit file##
Used to replace manually starting and stopping Tomcat, we set it as a service. Open your text editor and create a tomcat.service unit file in the /etc/systemd/system/ directory.
sudo nano /etc/systemd/system/tomcat.service
Paste the following content:
[ Unit]
Description=Tomcat 9 servlet container
After=network.target

[ Service]
Type=forking

User=tomcat
Group=tomcat

Environment="JAVA_HOME=/usr/lib/jvm/jre"
Environment="JAVA_OPTS=-Djava.security.egd=file:///dev/urandom"

Environment="CATALINA_BASE=/opt/tomcat/latest"
Environment="CATALINA_HOME=/opt/tomcat/latest"
Environment="CATALINA_PID=/opt/tomcat/latest/temp/tomcat.pid"
Environment="CATALINA_OPTS=-Xms512M -Xmx1024M -server -XX:+UseParallelGC"

ExecStart=/opt/tomcat/latest/bin/startup.sh
ExecStop=/opt/tomcat/latest/bin/shutdown.sh

[ Install]
WantedBy=multi-user.target
Save and close the file.
To inform systemd that a new service has been created, enter:
sudo systemctl daemon-reload
Enable and start the Tomcat service:
sudo systemctl enable --now tomcat
Check service status:
sudo systemctl status tomcat
The output will show that the Tomcat service is enabled and running:
 tomcat.service - Tomcat 9 servlet container
 Loaded:loaded(/etc/systemd/system/tomcat.service; enabled; vendor preset: disabled)
 Active:active(running) since Wed 2020-01-1520:38:07 UTC; 30s ago
 Process:3957 ExecStart=/opt/tomcat/latest/bin/startup.sh(code=exited, status=0/SUCCESS)...
Five, configure firewall##
If your server is behind a firewall and you want to access tomcat from the external network, you need to open port 8080: Use the following command to open the necessary ports:
sudo firewall-cmd --permanent --zone=public--add-port=8080/tcp
sudo firewall-cmd --reload
Six, configure the Tomcat web management interface##
At this point, you should be able to access Tomcat on the browser's port 8080. The web management interface is currently not accessible because we have not yet created a user.
Tomcat users and roles are defined in the tomcat-users.xml file.
If you open the file, you can notice that it is filled with comments and examples on how to configure this file.
sudo nano /opt/tomcat/latest/conf/tomcat-users.xml

Tomcat users are defined in the tomcat-users.xml file. Want to create a new user to access the tomcat web interface (manager-gui and admin-gui), follow the prompts to edit the question. Make sure you change your username and password to ensure safety:
< tomcat-users><!--
 Comments
- - >< role rolename="admin-gui"/><role rolename="manager-gui"/><user username="admin" password="admin_password" roles="admin-gui,manager-gui"/></tomcat-users>
By default, the Tomcat web management interface is configured to only allow access from the local localhost.
If you need to access the web interface from anywhere, you can open the following file and comment or remove these lines: /opt/tomcat/latest/webapps/manager/META-INF/context.xml
< Context antiResourceLocking="false" privileged="true"><!--<Valve className="org.apache.catalina.valves.RemoteAddrValve"
   allow="127\.\d+\.\d+\.\d+|::1|0:0:0:0:0:0:0:1"/>--></Context>
/opt/tomcat/latest/webapps/host-manager/META-INF/context.xml
< Context antiResourceLocking="false" privileged="true"><!--<Valve className="org.apache.catalina.valves.RemoteAddrValve"
   allow="127\.\d+\.\d+\.\d+|::1|0:0:0:0:0:0:0:1"/>--></Context>
Please note that allowing access from anywhere is not recommended, as this may pose a security risk.
If you want to access the web interface from a specified IP, instead of commenting out the code block, you can add your public IP to the list.
If your public network IP is 41.41.41.41, you want to allow access from this IP: /opt/tomcat/latest/webapps/manager/META-INF/context.xml
< Context antiResourceLocking="false" privileged="true"><Valve className="org.apache.catalina.valves.RemoteAddrValve"
   allow="127\.\d+\.\d+\.\d+|::1|0:0:0:0:0:0:0:1|41.41.41.41"/></Context>
/opt/tomcat/latest/webapps/host-manager/META-INF/context.xml
< Context antiResourceLocking="false" privileged="true"><Valve className="org.apache.catalina.valves.RemoteAddrValve"
   allow="127\.\d+\.\d+\.\d+|::1|0:0:0:0:0:0:0:1|41.41.41.41"/></Context>
The allowed IP addresses are separated by vertical bars |. You can add a separate IP address or use a regular expression.
Once completed, restart the Tomcat service for the changes to take effect:
sudo systemctl restart tomcat
Seven, test installation##
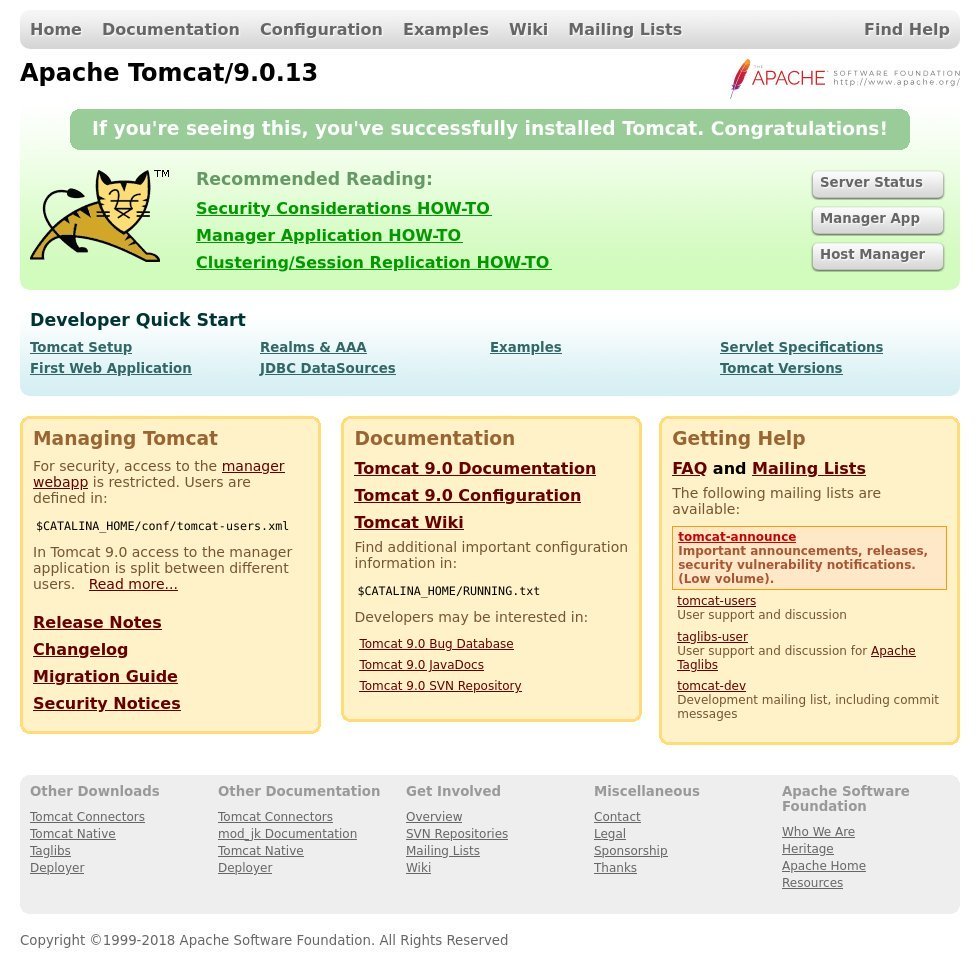
Open your web browser and type: http://<your_domain_or_IP_address> :8080
Upon successful installation, a screen similar to the following should be displayed:
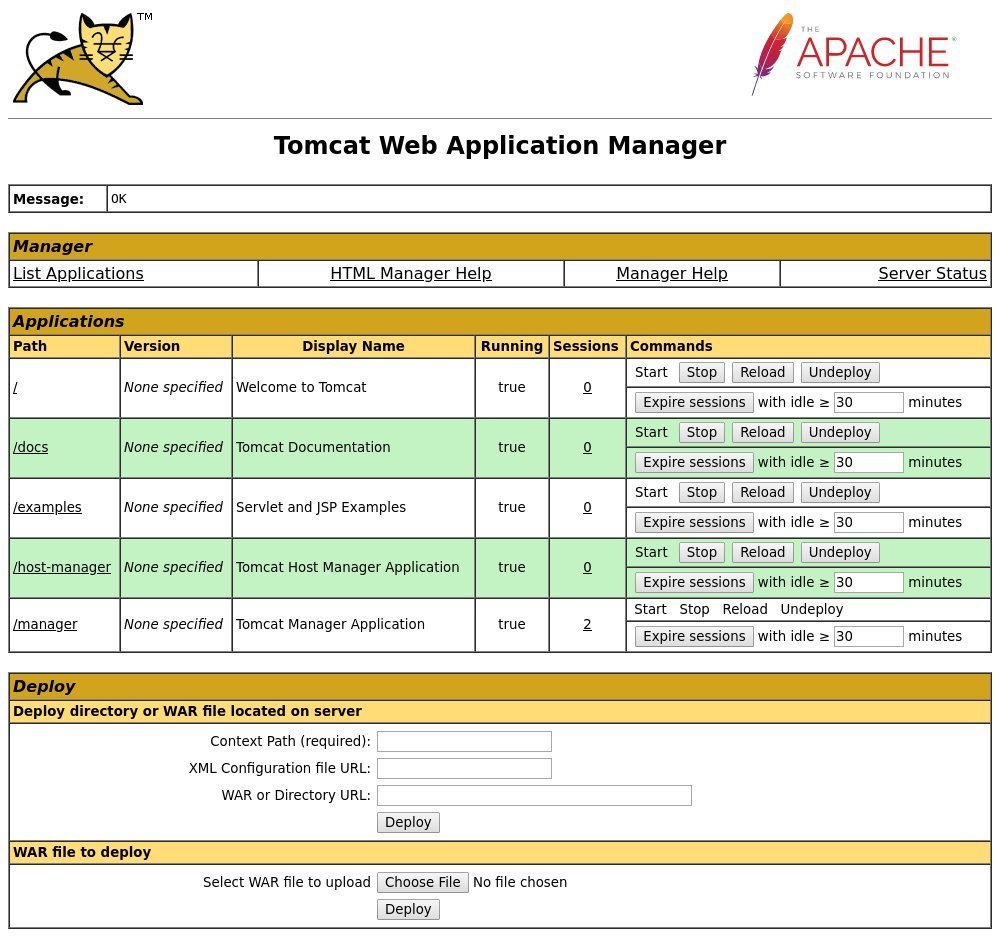
The Tomcat web management background allows you to deploy, undeploy, start, stop and reload your application. Access through the following address:
http://<your_domain_or_IP_address>:8080/manager/html
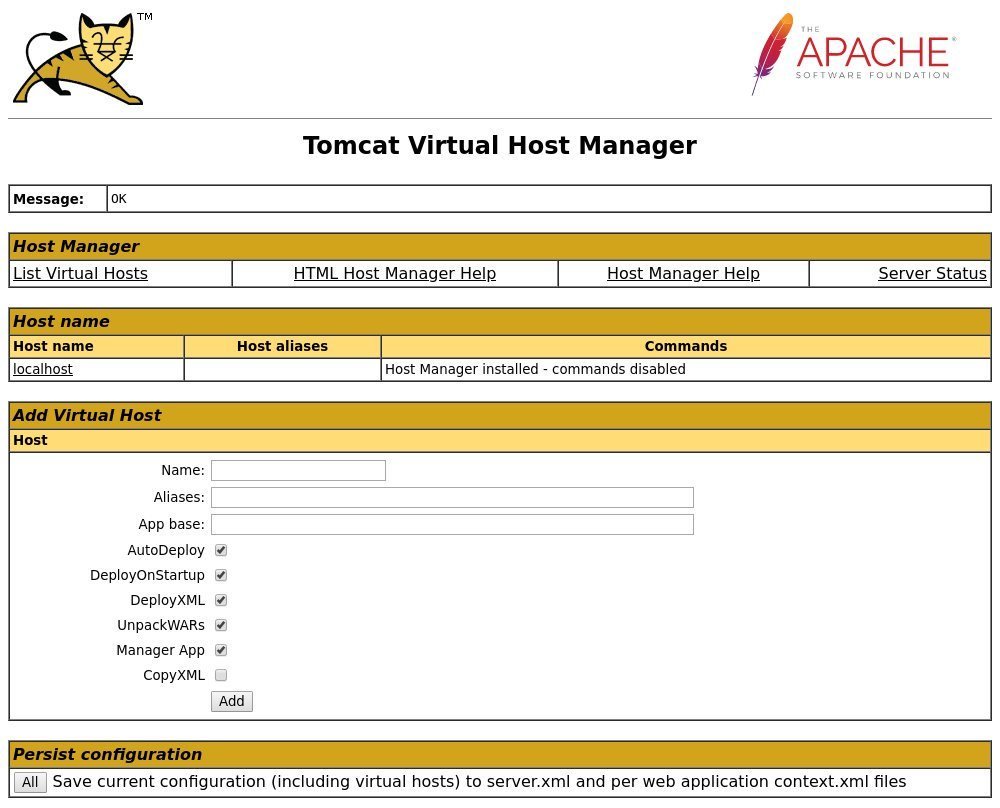
The Tomcat virtual host management background allows you to create, delete and manage Tomcat virtual hosts. Access through the following address:
http://<your_domain_or_IP_address>:8080/host-manager/html
Eight, summary##
We show you how to install Tomcat 9.0 on CentOS 8 and how to access the Tomcat management interface.
To learn more about Apache Tomcat, please visit Official Document Page.
Recommended Posts