How to configure NTP to join the NTP pool project in CentOS
Introduction
Accurate timing is essential for almost any service or software. Emails, recorders, event systems and schedulers, user authentication mechanisms and services running on distributed platforms all require accurate time stamps to record events in chronological order. These services use the Network Time Protocol (NTP) to synchronize the system clock with a trusted external source. The source can be an atomic clock, GPS receiver or other time server that already uses NTP.
This is where the NTP Pool Project project comes into play. It is a huge global time server cluster, providing convenient "good times" for tens of millions of customers around the world. It is the default time server for Ubuntu and most other major Linux distributions, as well as many networked devices and software applications.
In this tutorial, you will set up NTP on the server and configure it as part of the NTP pool project in order to provide accurate time to other users of the NTP pool project. Providing spare CPU cycles and unused bandwidth is the perfect way to provide feedback to the community.
The required bandwidth is relatively low and can be adjusted according to the number you provide and the location of the server. Each client only sends a few UDP packets every 20 minutes, so most servers only receive about 12 NTP packets per second, sending up to a peak of hundreds of packets per second once a day. This means that the bandwidth usage is 10-15Kb/sec, and the peak value is 50-120Kb/sec.
Before joining the NTP pool project, you must meet three basic requirements:
- Your server must have a static IP address.
- Your server must have a permanent and stable Internet connection.
- At best, your IP address will not change, or it will only change infrequently (once a year or less).
For most cloud-based servers, the first two requirements are usually met automatically. The third requirement emphasizes that joining the NTP pool project is a long-term commitment. Of course, if your situation changes, you can remove the server from the pool, but it will take a long time before the traffic completely disappears (mostly weeks, but sometimes months or even years).
ready
To complete this tutorial, you need:
- One Centos 7 server configured with IPv6 network.
- A non-root user with sudo permissions and a firewall.
If you use an Ubuntu server, you can refer to the configuration tutorial of Tencent Cloud + Community [Helping the public welfare, build your own NTP server pool] (https://cloud.tencent.com/developer/article/1175079?from=10680).
Step 1-Install NTP
The NTP package is not installed by default, so you will use the package manager to install it. First, update your package:
$ sudo yum update
Then install NTP:
$ sudo yum install ntp
After the installation is complete, start the service and configure it so that it starts automatically every time the server starts:
$ sudo systemctl start ntpd
$ sudo systemctl enable ntpd
If you have configured the firewall as specified in the preparation, you must allow the UDP communication of the NTP service to communicate with the NTP pool:
$ sudo firewall-cmd --permanent --add-service=ntp
$ sudo firewall-cmd --reload
NTP is now installed but configured to use the default NTP pool time server. Let's choose some specific time servers.
Step 2-Choose a suitable upstream server
The NTP pool project requires operators who wish to join the pool to choose a good network local time server instead of using the default pool.ntp.org server. This ensures that the NTP pool project remains reliable, fast and healthy. When choosing a time source, you need a stable network connection, no packet loss, and as few hops between servers as possible.
The multi-layer and hierarchical NTP protocol divides the parties involved into a primary server, a secondary server, and a client. The main server is called Stratum1, directly connected to the time source, called Stratum 0. The source can be an atomic clock, GPS receiver or radio navigation system. The secondary servers in the chain are called Stratum2, Stratum 3, etc.
Each server is also a client. The Stratum 2 client receives the time from the upstream Stratum1 server and provides time to the downstream Stratum3 server or other clients. To make the NTP pool project members work properly, the NTP daemon needs to configure at least three servers. The project recommends at least four and no more than seven sources.
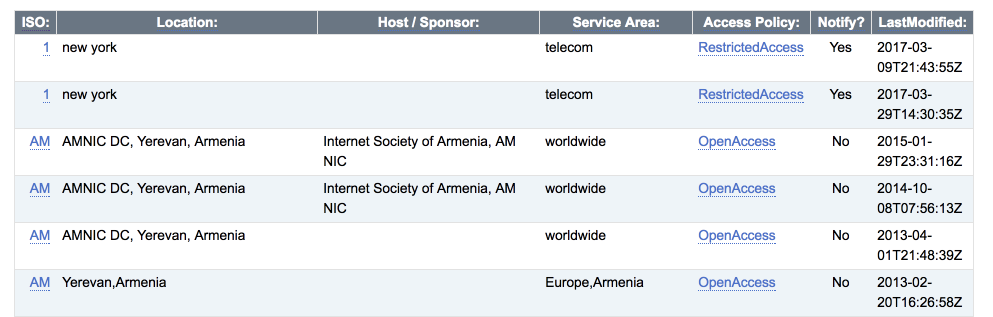
The NTP pool project provides a list of public Stratum 1 and Startum 2 time servers. These lists specify NTP time servers that can be used for public access under specified restrictions. You will find three types:
- OpenAccess: This time server is open to any client that conforms to the NTP pool.
- RestrictedAccess: This time server has some access restrictions in addition to the NTP pool usage.
- ClosedAccess: This time server has been closed or shut down.
Warning: Unless you have been approved, do not use a server that is not listed as OpenAccess.
Access the Stratum 1 Time Servers list. You will see the following list:
 list
list
Sort the list by the ISO Code column and find one or two servers that are geographically close to the server data center. When the Access Policy column of the server states OpenAccess, you can use it without any problems. If "RestrictedAccess" is displayed, click to open the entry and read the instructions indicated in the AccessDetails field. Usually, you will find that NotificationMessage is set to Yes, which means that you must make an informal email pointing to the address provided in ServerContact to notify the server operator that you want this time The server is used as the time source for the members of the NTP pool project.
After deciding which server to use, click the link of each server in the ISO column and copy its host name or IP address. You will use these addresses in step 3.
Next, follow the same process to select three or four servers from the Stratum2 list.
After selecting the time servers, you can configure the NTP client to use them.
Step 3-Configure NTP to join the pool
To use the server with the NTP pool and configure a new time server, you need to make some modifications to the configuration of the NTP daemon. To do this, edit the /etc/ntp.conf file:
$ sudo vi /etc/ntp.conf
First, make sure that the frequency file is configured. Frequency [File Storage] (https://cloud.tencent.com/product/cfs?from=10680) The frequency offset between the system clock running at its nominal frequency and the frequency required to maintain synchronization with the correct time. It helps to achieve stable and accurate time. You should find it at the top of the configuration file installed by default:
/etc/ntp.conf
# For more information about this file, see the man pages
# ntp.conf(5),ntp_acc(5),ntp_auth(5),ntp_clock(5),ntp_misc(5),ntp_mon(5).

driftfile /var/lib/ntp/drift

...
Next, delete the default time source entry from the configuration. You are looking for the line server 0.centos.pool.ntp.org iburst for all modes. If you are using the default configuration, delete the highlighted lines, as shown in the following example:
/etc/ntp.conf
...
# Use public servers from the pool.ntp.org project.
# Please consider joining the pool(http://www.pool.ntp.org/join.html).
server 0.centos.pool.ntp.org iburst
server 1.centos.pool.ntp.org iburst
server 2.centos.pool.ntp.org iburst
server 3.centos.pool.ntp.org iburst
Replace the rows you deleted with the manually selected server you selected in the previous step.
/etc/ntp.conf
...
server ntp_server_hostname_1 iburst
server ntp_server_hostname_2 iburst
server ntp_server_hostname_3 iburst
server ntp_server_hostname_4 iburst
server ntp_server_hostname_5 iburst
...
It is recommended to use the iburst option for each server based on the NTP pool. This way, if the server is inaccessible, this will send 8 packets instead of the usual one. Using the burst option in the NTP pool project will be considered abuse, because it will send these 8 packets in each polling interval, and iburst will only send 8 packets the first time.
Next, make sure that the default configuration does not allow management queries. If you don't do this, your server can reflect attacks in NTP, or ntpq and ntpdc queries may try to modify the server status. Check if the noquery option has been added to the default restrict line. Also make sure to add the options kod and limited because they are too eager to ask the client and enforce rate limits.
/etc/ntp.conf
...
# Permit time synchronization with our time source, but do not
# permit the source to query or modify the service on this system.
restrict default nomodify notrap nopeer noquery kod limited

# Permit all access over the loopback interface.  This could
# be tightened as well, but to do so would effect some of
# the administrative functions.
restrict 127.0.0.1
restrict ::1
You can find more information about other options in the official documentation.
Your NTP daemon configuration file should now look like this, although your file may have other comments, you can safely ignore them:
/etc/ntp.conf
driftfile /var/lib/ntp/ntp.drift

restrict default nomodify notrap nopeer noquery kod limited

restrict 127.0.0.1
restrict ::1

server ntp_server_hostname_1 iburst
server ntp_server_hostname_2 iburst
server ntp_server_hostname_3 iburst
server ntp_server_hostname_4 iburst
server ntp_server_hostname_5 iburst
Save the file and exit the editor.
Now restart the NTP service and let the time server synchronize its clock to the upstream server.
$ sudo systemctl restart ntpd
After a few minutes, use the following ntpq command to check the health of the time server:
The output should be similar to:
  remote           refid      st t when poll reach   delay   offset  jitter
==============================================================================
 mizbeaver.udel..INIT.16 u    -6400.0000.0000.000
 montpelier.ilan .GPS.1 u   2564755.1902.121130.492+nist1-lnk.binar .ACTS.1 u   2864752.72823.8603.247*ntp.okstate.edu .GPS.1 u   3164719.708-8.3446.853+ntp.colby.edu   .GPS.1 u   3464751.518-5.9146.669
The remote column tells you the hostname of the server that the NTP daemon is using, and the refid column tells you the source code used by your server. Therefore, for the Stratum 1 server, the refid field should display GPS, PPS, ACTS or PTB, while Stratum 2 And more other auxiliary servers will display the IP address of the upstream server. The level is displayed in the ST column, and delay, offset and jitter tell you the quality of the time source. The lower the value of these three fields, the better.
Your time server is now available for public service. You can verify this by entering the ntpdate call from another host:
$ ntpdate -q your_server_ip
The output should be similar to this, it tells you that it adjusted the time server and offset:
server your_server_ip, stratum 2, offset 0.001172, delay 0.164282 Mar 23:06:44 ntpdate[18427]: adjust time server your_server_ip offset 0.001172 sec
You can now use the NTP pool project to register an NTP server so that others can use it.
Step 4-Add the server to the NTP pool
To add your server so that others can use it, you can visit manage.ntppool.org and register for an account. You will receive an email from NTP Pool[email protected] asking you to verify your account. Follow the instructions in the email to confirm your account and log in to manage.ntppool.org. After logging in, you will see the interface for adding a server:
After logging in, you will see a simple interface for adding a server:
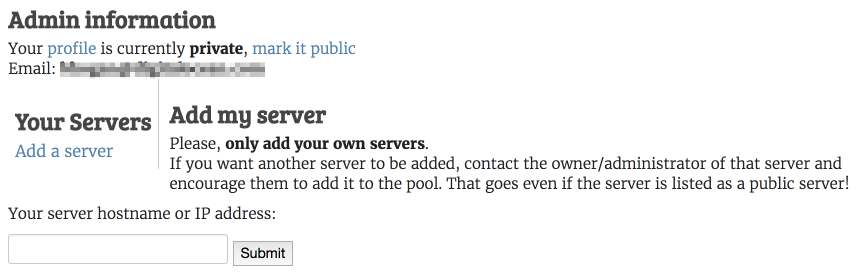 Add server interface
Enter the IP address of the server and click "Submit".
The next screen will ask you to verify that it has identified the server's zone. If it shows your server in a different area than you expected, use the "Comment" box to let them know.
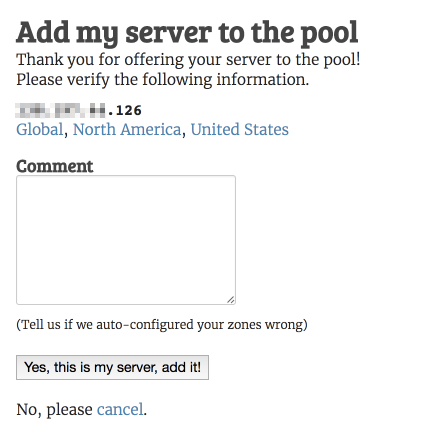 confirmation interface
If you are satisfied, please click **Yes, this is my server, add it! **. Your server is now part of the NTP pool project. Visit http://www.pool.ntp.org/scores/your_server_ip to view the information about your server collected by the monitoring system of NTP Pool. It checks your server several times per hour and displays the offset data, corresponding to the system's score. As long as your server is maintained for a good time and accessible, the score will rise until it reaches 20 points. Only servers with a score higher than 10 are used in the pool.
Troubleshooting connection issues
If you are having trouble synchronizing the server, there may be a packet firewall that can drop your outgoing packets on port 123.
If the monitoring station of the NTP pool project cannot access your NTP server and your server score drops, or you cannot use the server to synchronize other clocks, there may be a packet firewall that can drop your incoming traffic to the port上123. Check the firewall status.
If you are sure that there is no firewall, or you have opened port 123 for incoming and outgoing traffic, your server provider or other transport provider may drop your data packets in the process.
in conclusion
In this tutorial, you successfully set up your own time server and made it a member of the NTP pool project.
Reference: "How to Configure NTP for Use in the NTP Pool Project on CentOS 7"
Recommended Posts