How to install HDP2.6 in Centos7.2
Reminder: To see the high-definition uncoded set of pictures, please use your mobile phone to open and click the picture to enlarge it.
Fayson's github: https://github.com/fayson/cdhproject
Tip: You can swipe left and right to view the code block
1. Document writing purpose
This document mainly describes the process of deploying HDP on the CENTOS7.2 operating system.
- Content overview
-
Cluster server configuration, including installing the operating system, turning off the firewall, synchronizing the server clock, etc.;
-
External database installation
-
Install Ambari manager;
-
Install HDP cluster;
-
Cluster integrity check, including whether the HDFS file system, MapReduce, Hive, etc. can operate normally.
- test environment
-
Operating system version: CENTOS7.2
-
Ambari version: ambari-2.6.1.5
-
HDP version: HDP2.6.4
-
Deploy the cluster with root
2. Preparation
2.1. hostname and hosts configuration
Each node in the cluster can communicate with each other using static IP addresses. The IP address and host name are configured through /etc/hosts, and the host name is configured through /etc/hostname.
Take the ambari node (192.168.0.234) as an example:
- The hostname configuration, the /etc/hostname file is as follows:
ip-192-168-0-234
(Can slide left and right)
Or you can modify the command to take effect immediately
[ root@ip-192-168-0-234~]# hostnamectl set-hostname ip-192-168-0-234
(Can slide left and right)
Note: modify the difference between hostname and REDHAT6 here
- The hosts configuration, the /etc/hosts file is as follows:
127.0.0.1 localhost localhost.localdomain localhost4 localhost4.localdomain4
192.168.0.234 ip-192-168-0-234192.168.0.235 ip-192-168-0-235192.168.0.236 ip-192-168-0-236192.168.0.237 ip-192-168-0-237
(Can slide left and right)
For the above two steps, configure the other nodes in the cluster accordingly.
2.2. Disable SELinux
Execute the setenforce command on all nodes, here use batch shell execution:
[ root@ip-192-168-0-234~]$ sh batch_cmd.sh node.list "setenforce 0"
(Can slide left and right)
All nodes in the cluster modify the /etc/selinux/config file as follows:
SELINUX=disabled
SELINUXTYPE=targeted
(Can slide left and right)
2.3. Disable firewall
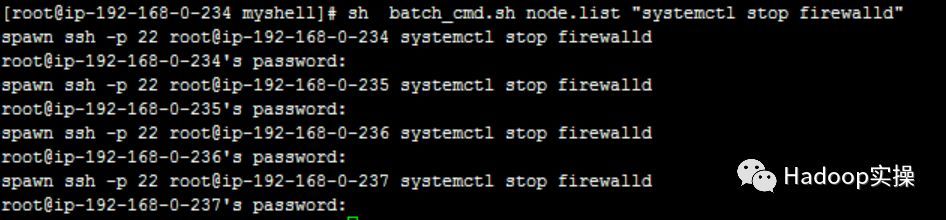
All nodes in the cluster execute the sudo systemctl stop command, where the commands are executed in batches through the shell as follows:
[ root@ip-192-168-0-234~]$ sh batch_cmd.sh node.list "systemctl stop firewalld"[root@ip-192-168-0-234~]$ sh batch_cmd.sh node.list "systemctl disable firewalld"[root@ip-192-168-0-234~]$ sh batch_cmd.sh node.list "systemctl status firewalld"
(Can slide left and right)
**2.4. Password-free login of the configuration server
- Generate a key pair on each node of the cluster and execute the command
ssh-keygen -t rsa -P ""-f /root/.ssh/id_rsa
(Can slide left and right)
Here is a batch execution script:

- Configure the password-free login of 192.168.0.234 to all other nodes in the cluster, import the public key of the 192.168.0.234 node into the authorized_keys file, and use the batch script to execute:
First copy the public key of 192.168.0.234 to the /root directory of all other nodes:
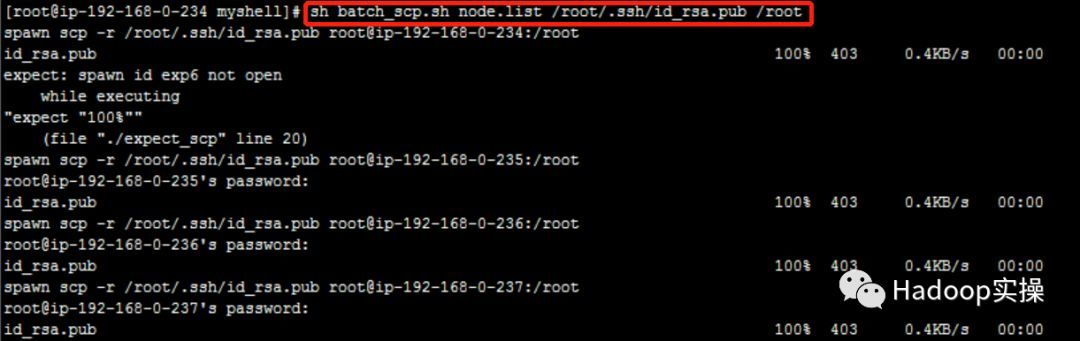
Then import /root/id_rsa.pub into the authorized_keys file:

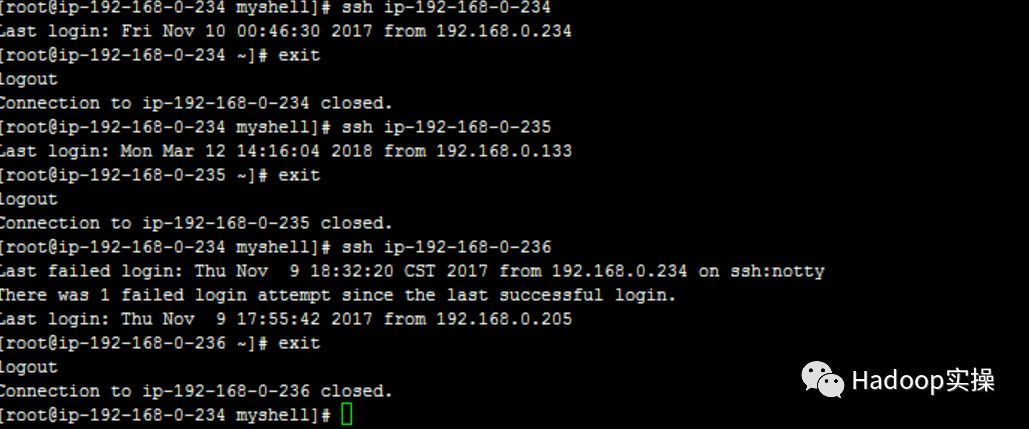
Verify password-free login:
2.5. Cluster clock synchronization
Configure ntp time synchronization, use the 192.168.0.234 machine as the local ntp server, and keep the other 3 machines synchronized with it, the configuration fragment:
1.192.168.0.234 Use the following configuration
[ root@ip-192-268-0-234~]$ sudo vim /etc/ntp.conf
server 127.127.1.0
fudge 127.127.1.0 stratum 10
(Can slide left and right)
- Other nodes of the cluster: Add the following configuration under the comment:
[ root@ip-192-268-0-234~]$ sudo vim /etc/ntp.conf
server 192.168.0.234
(Can slide left and right)
- Restart the ntp service of all machines
[ root@ip-192-268-0-234~]$ sh batch_cmd.sh node.list "systemctl restart ntpd”
(Can slide left and right)
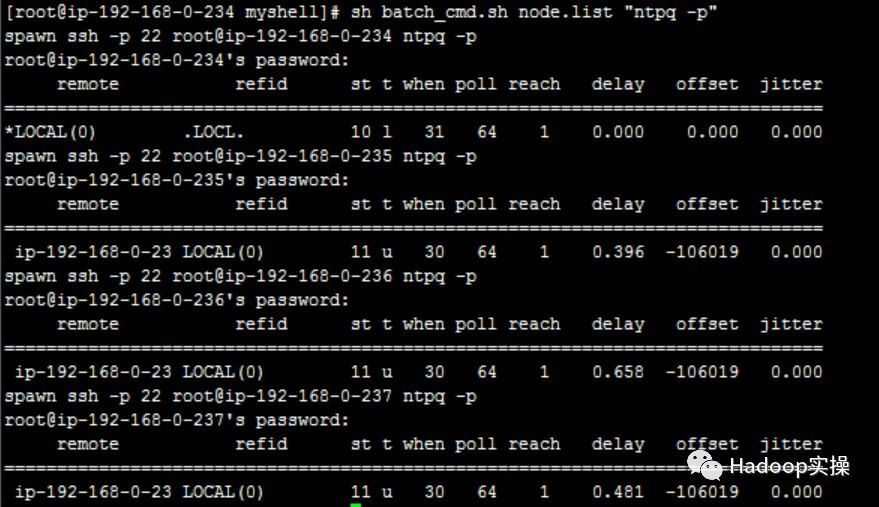
- To verify clock synchronization, execute the ntpq -p command on all nodes, and execute the script in batches as follows:
2.6. Configure operating system repo
- Mount the operating system iso file
[ root@ip-192-168-0-234~]$ mkdir /media/DVD1
[ root@ip-192-168-0-234~]$ mount -o loop CentOS-7-x86_64-DVD-1611.iso /media/DVD1/
(Can slide left and right)
- Configure operating system repo
[ root@ip-192-168-0-234~]$ vim /etc/yum.repos.d/local_os.repo
[ local_iso]
name=CentOS-$releasever - Media
baseurl=file:///media/DVD1
gpgcheck=0
enabled=1
(Can slide left and right)
2.7. Install httpd service
- Install httpd service
[ root@ip-192-168-0-234~]$ yum -y install httpd
(Can slide left and right)
- Start httpd service
[ root@ip-192-168-0-234~]$ systemctl start httpd
(Can slide left and right)
- After installing httpd, remake the operating system repo and replace it with http to facilitate other servers to access
[ root@ip-192-168-0-234~]$ mkdir /var/www/html/iso
[ root@ip-192-168-0-234~]$ scp -r /media/DVD1/* /var/www/html/iso/
(Can slide left and right)

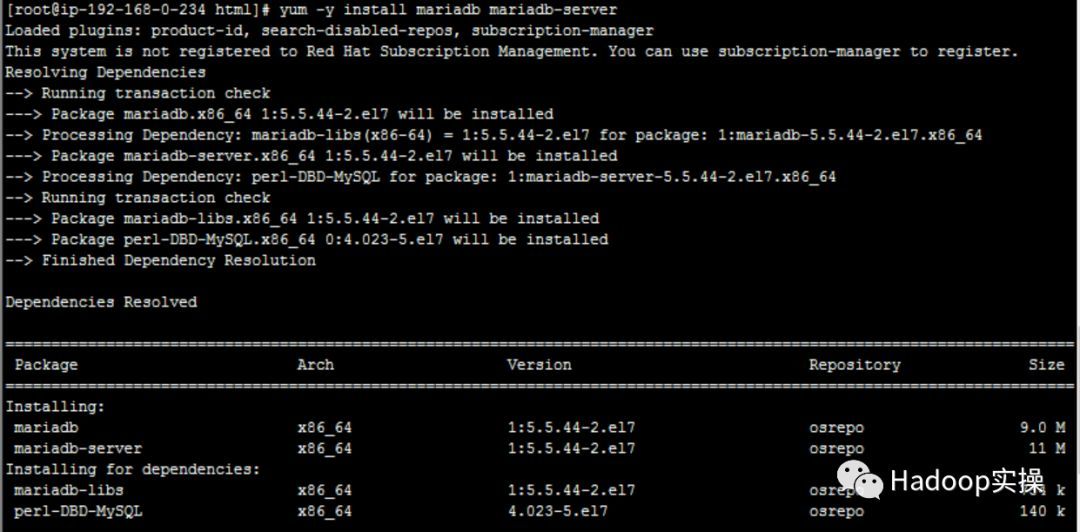
**2.8. Install **MySQLDatabase
- Install the mysql database on the 192.168.0.234 node:
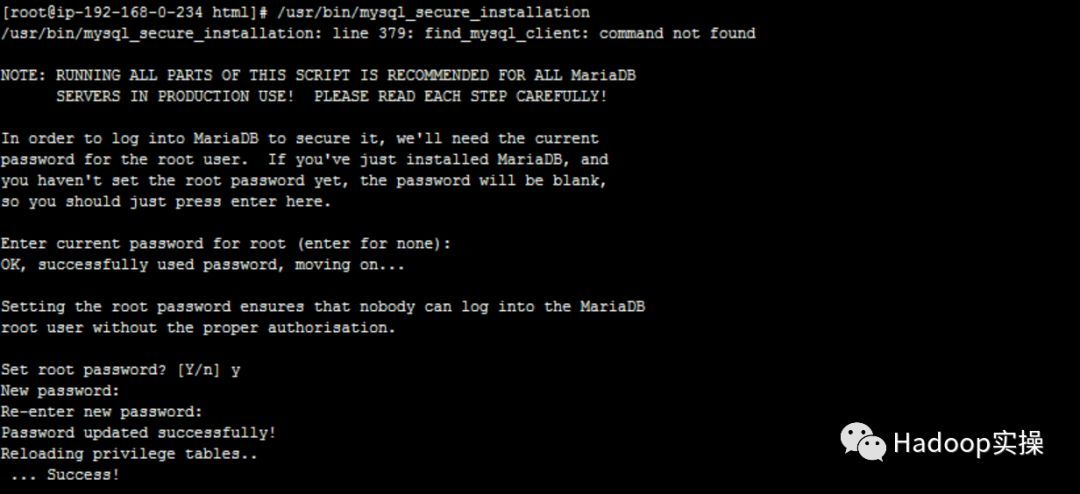
- Start and configure the database:
Start mariadb, execute systemctl start mariadb

Configure mariadb, execute the /usr/bin/mysql_secure_installation command, and set the root password:
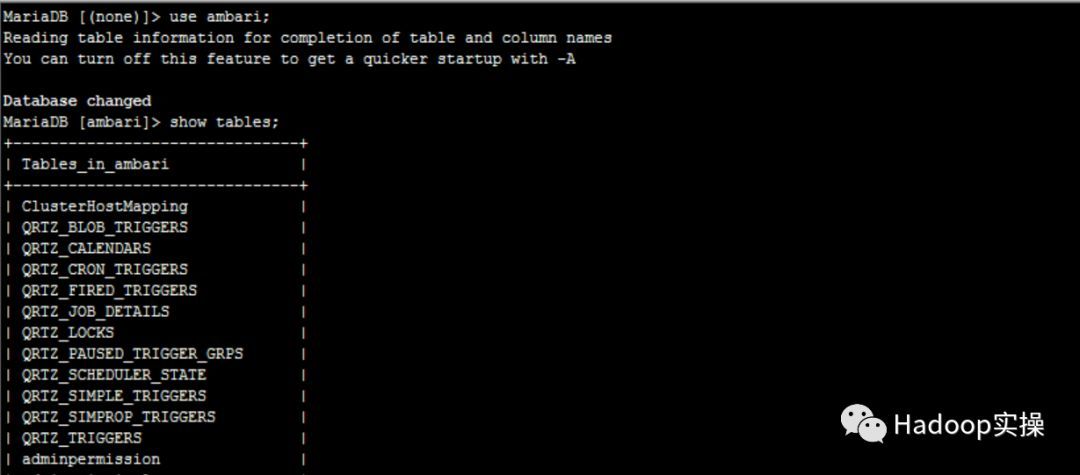
Create the ambari database, execute the command create database ambari

Create ambari user and set password and permissions
MariaDB [ambari]> CREATE USER 'ambari'@'%' IDENTIFIED BY 'bigdata';
Query OK,0 rows affected(0.01 sec)
MariaDB [ambari]> GRANT ALL PRIVILEGES ON ambari.* TO 'ambari'@'%';
Query OK,0 rows affected(0.00 sec)
MariaDB [ambari]> FLUSH PRIVILEGES;
Query OK,0 rows affected(0.00 sec)
(Can slide left and right)

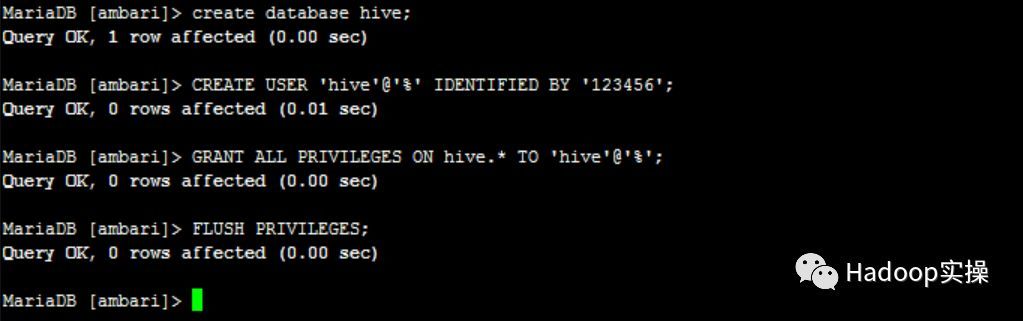
- Create Hive database and user
3. Install Ambari
3.1. Configure Ambari and HDP local yum source
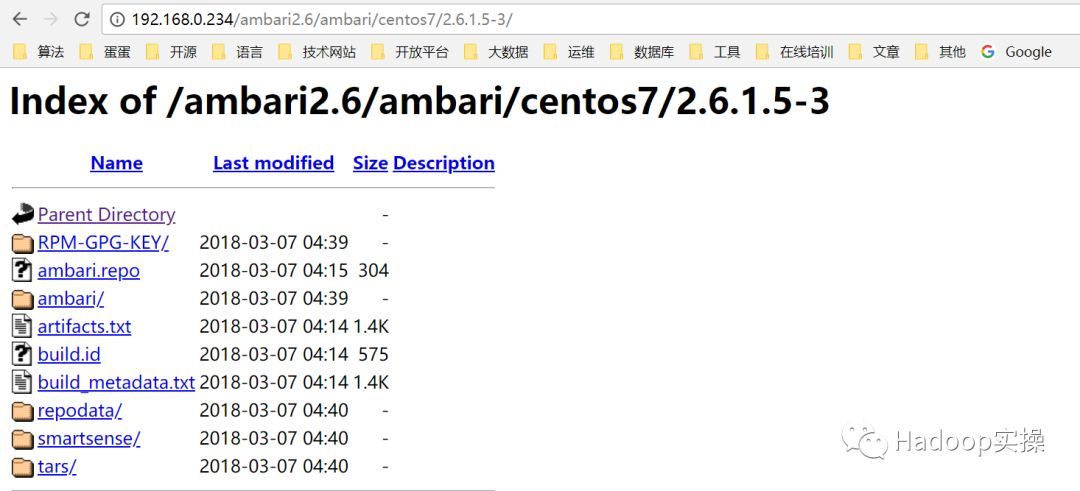
- Prepare the ambari and HDP installation packages, and unzip them to the /var/www/html directory:


- Configure repo file
Ambari's repo:

HDP repo:

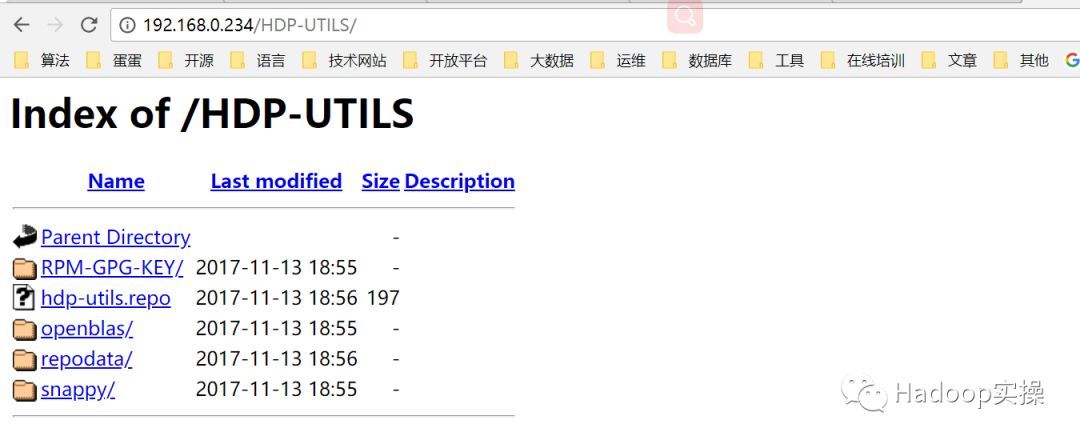
HDP-UTILS repo:

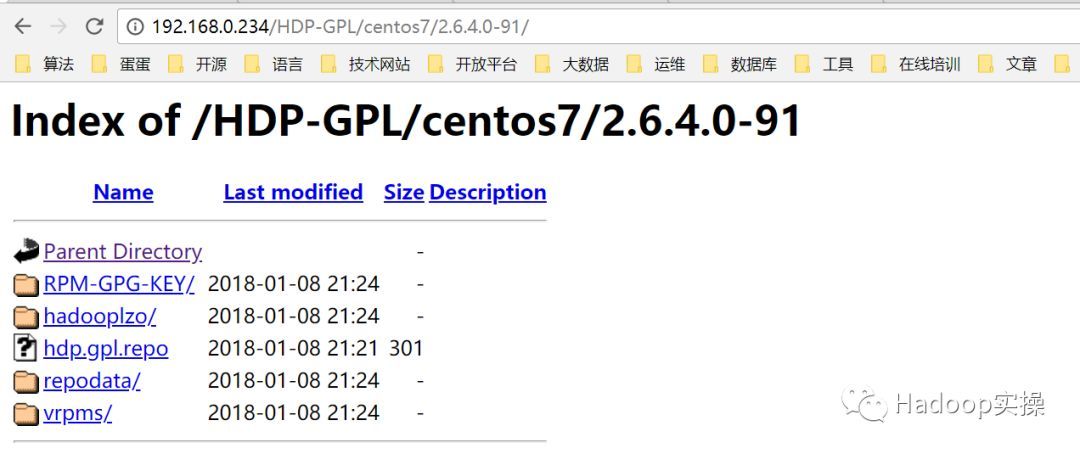
HDP-GPL repo

- Use the browser to check if the yum source is available

3.2. Install Ambari
- Execute the yum install ambari-server -y command on the 192.168.0.234 node:

3.3. Install jdk
If you choose to install the JDK on the client side, you need to perform the following steps. If the server can access the outside world and choose to automatically install the JDK, you can skip the following steps.
- Upload the jdk to the /usr/java/ directory of the 192.168.0.234 node and unzip it

- Execute the tar -zxvf jdk-8u111-linux-x64.tar.gz command to decompress:

- Copy the decompressed jdk to other nodes, use batch execution script

3.4. Install mysql driver
- Upload the mysql driver package to the /usr/share/java directory
[ root@ip-192-168-0-234~]# ll /usr/share/java/
total 940-rw-r--r--.1 root root 960372 Nov  923:37 mysql-connector-java-5.1.34.jar
[ root@ip-192-168-0-234~]# cd /usr/share/java/[root@ip-192-168-0-234 java]# ll
total 940-rw-r--r--.1 root root 960372 Nov  923:37 mysql-connector-java-5.1.34.jar
(Can slide left and right)
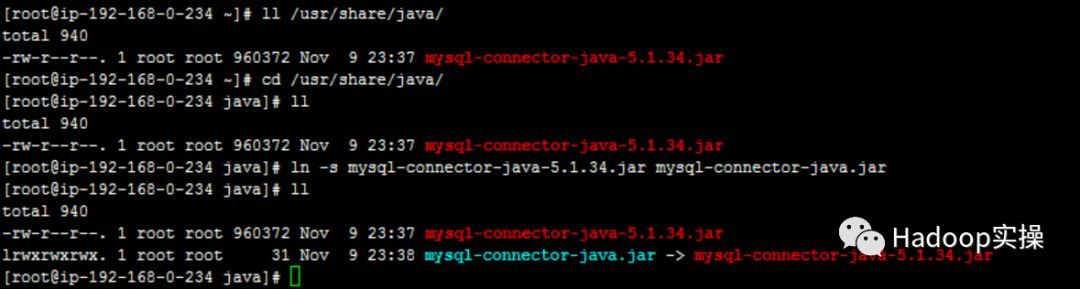
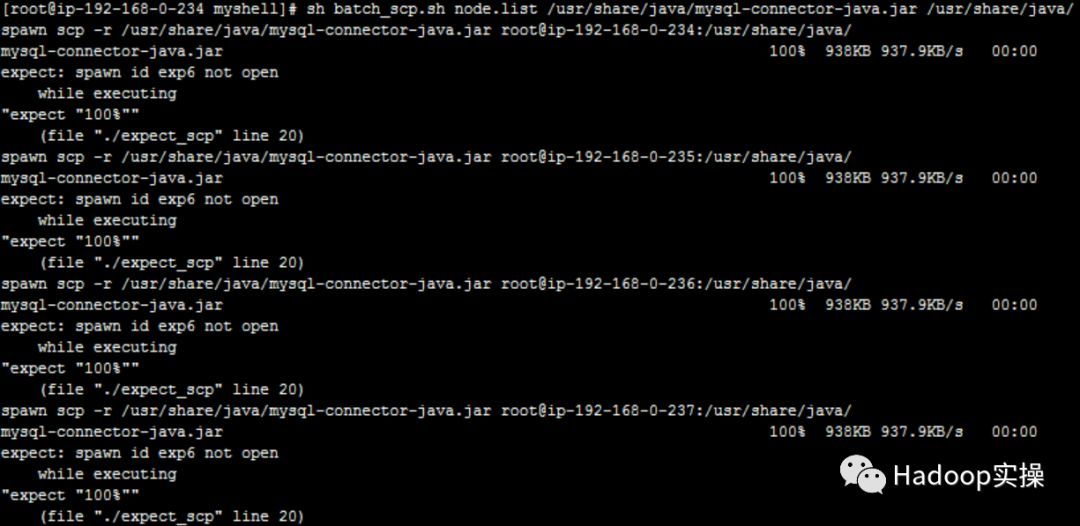
- For convenience, copy the mysql driver to the same directory on other nodes
- Set the mysql driver, execute the command:
ambari-server setup --jdbc-db=mysql --jdbc-driver=/usr/share/java/mysql-connector-java.jar
(Can slide left and right)

3.5. Initialize Ambari
Execute the command ambari-server setup


The yellow marks in the interface are the steps that need to be operated:
1 : Press Enter to continue
2 : Press Enter to continue
4 : Enter the number 3, choose the client to install jdk, if the server can access the external network, you can choose 1, and automatically download jdk1.8, the default download installation directory is /usr/java/default
5 : Enter the installed java directory, all servers are consistent
6 : Enter "y" for advanced database configuration
7 : Enter "3", select mysql/mariadb database
8 : Set the configuration parameters of the database: host, port, database, username, password
9 : Press Enter to continue
After performing the above operations, you can see the ambari-server setup is complete.
3.6. Initialize the ambari database
- To initialize the ambari database, execute the following command on the 192.168.0.234 server:
[ root@ip-192-168-0-234~]# mysql -uroot -p -Dambari </var/lib/ambari-server/resources/Ambari-DDL-MySQL-CREATE.sql
(Can slide left and right)
- Check whether the initialization is complete:
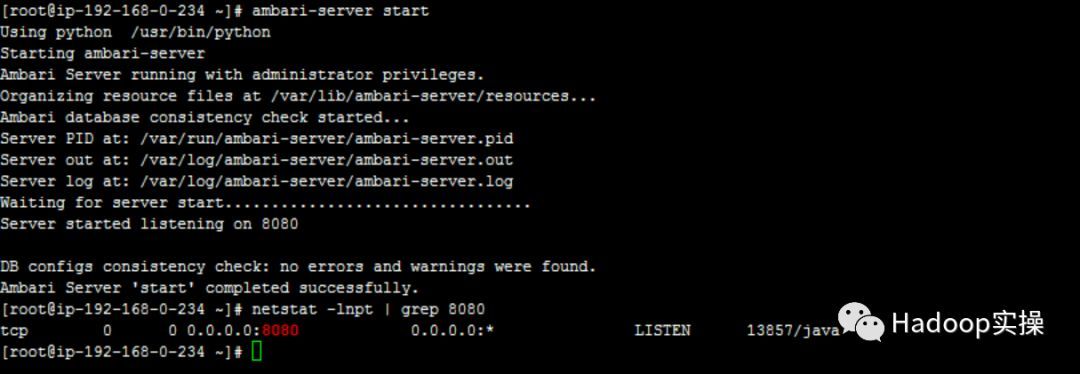
3.7. Start ambari-server
- Execute the ambari-server start command:
3.8. Visit ambari's web interface
Use a browser to access http://192.168.0.234:8080, the user name and password are both admin by default


4. Install HDP
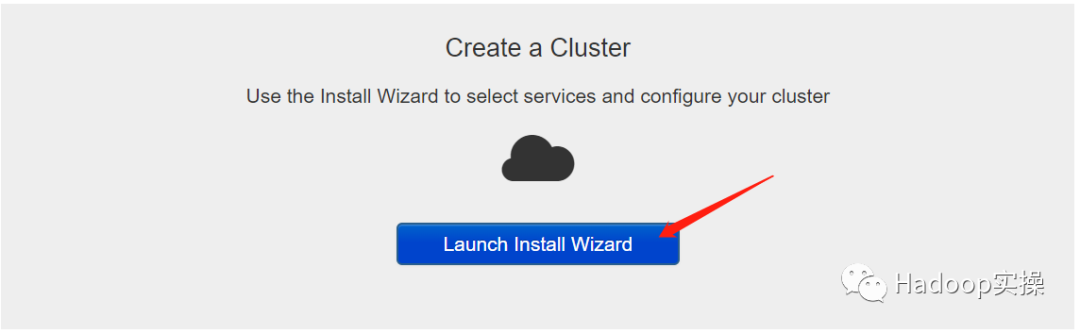
4.1. Click "Launch Install Wizard"
4.2. Enter the cluster name, then click "Next"

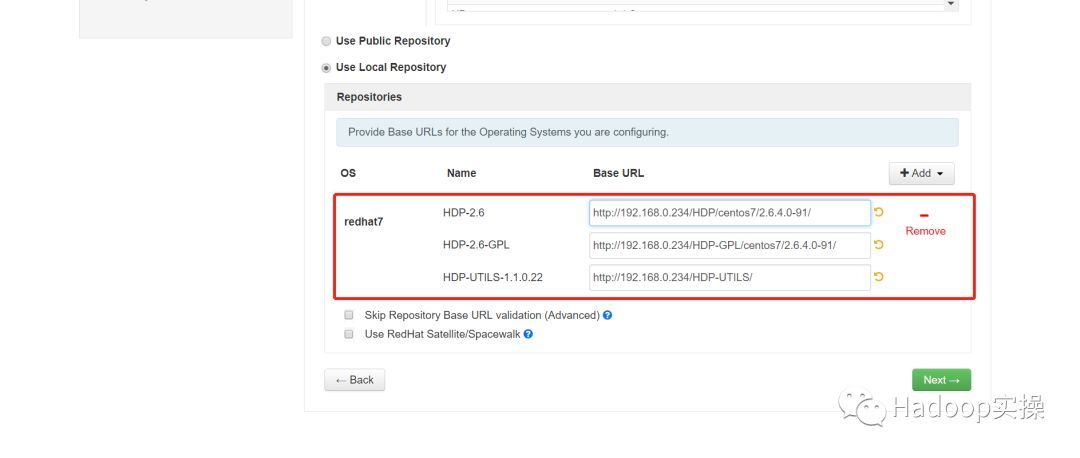
4.3. Select HDP version
HDP2.6 is used here, and HDP Repository is configured, the Local Repository used here:
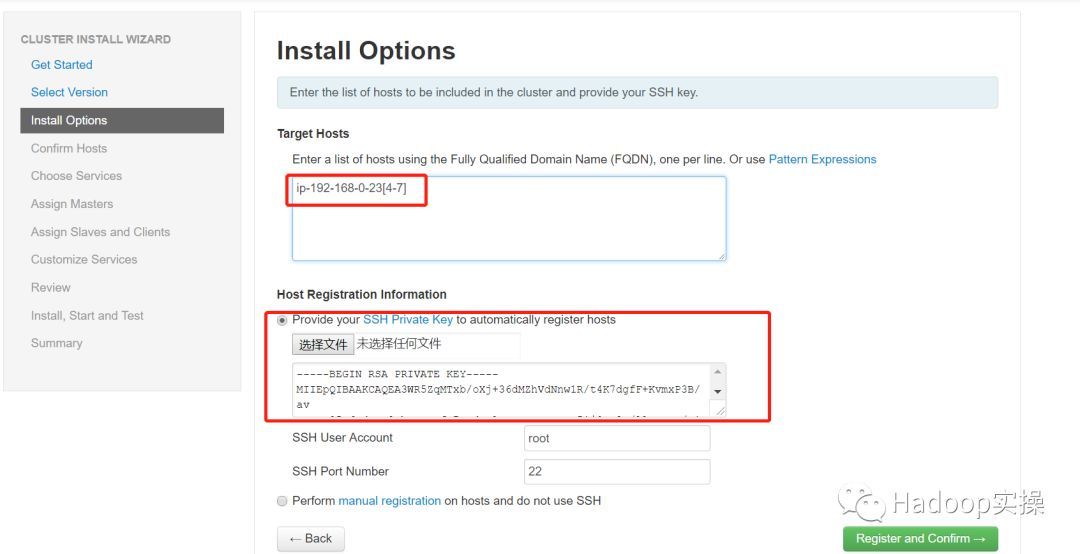
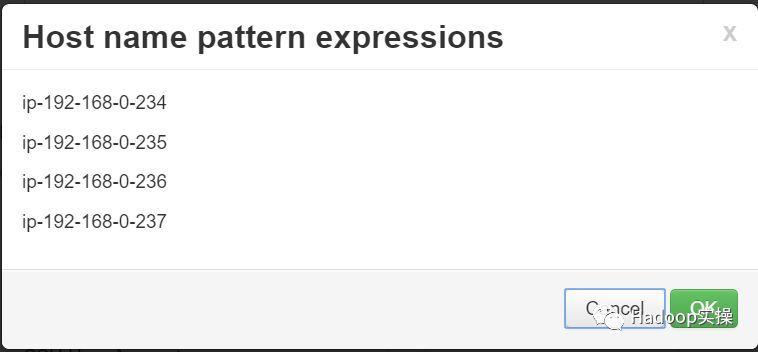
4.4. Enter the installed host, and enter the Ambari node SSH private key
4.5. Confirm host
4.6. Wait for the installation to complete, then click "Next"
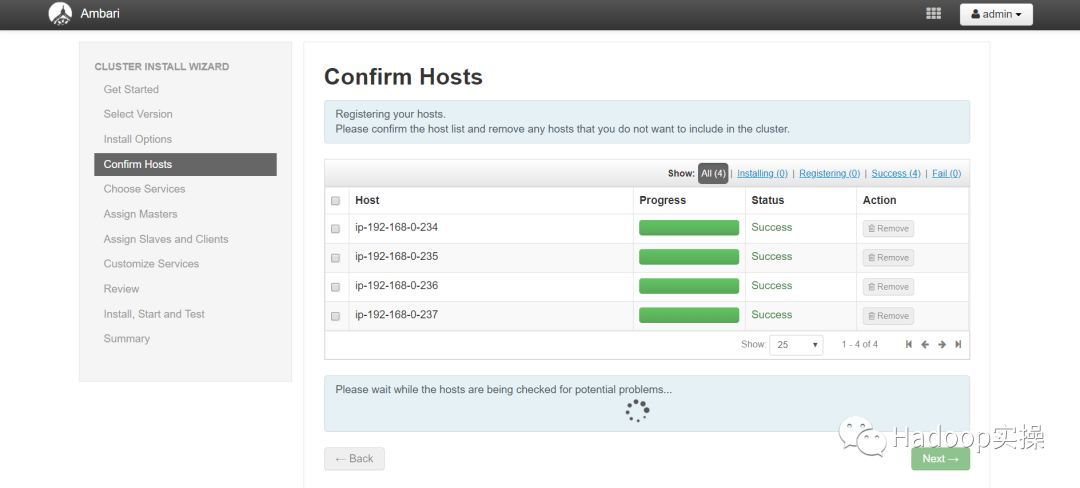
It should be noted here that after the host is successfully registered, the host will be pre-checked. If there is a warning, it needs to be checked and modified accordingly as required.
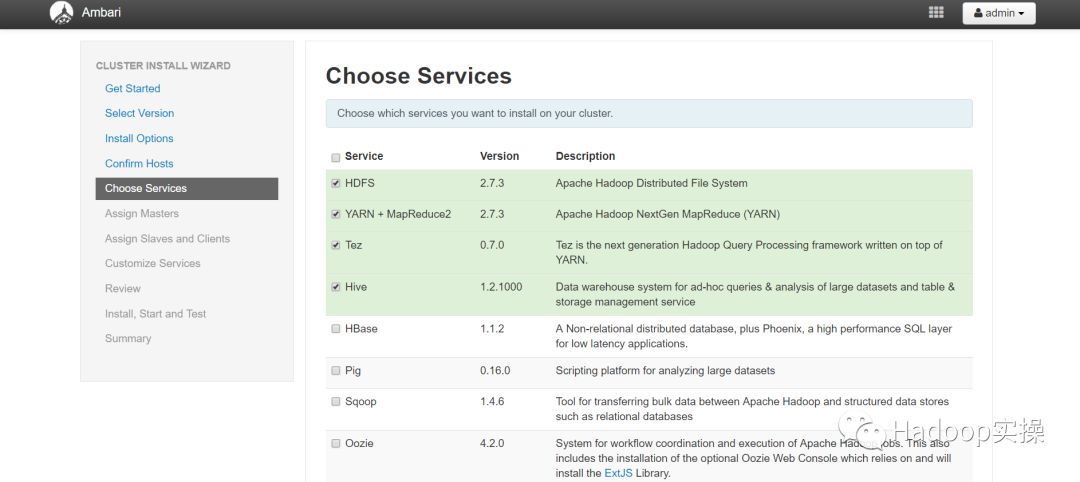
4.7. Select the service to install
In order to speed up the installation, only a few commonly used services are selected:
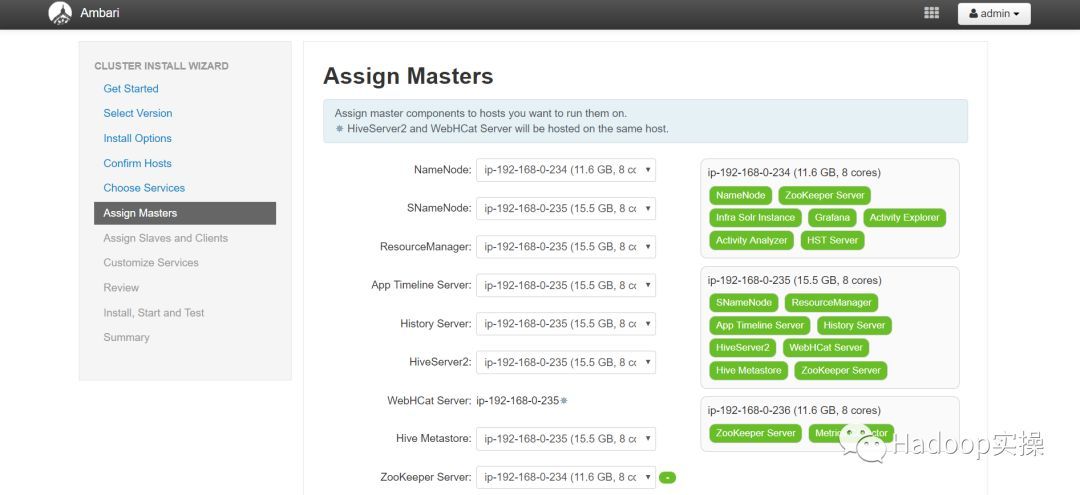
4.8. Assign service master role
The actual deployment needs to be allocated according to the planning and design:
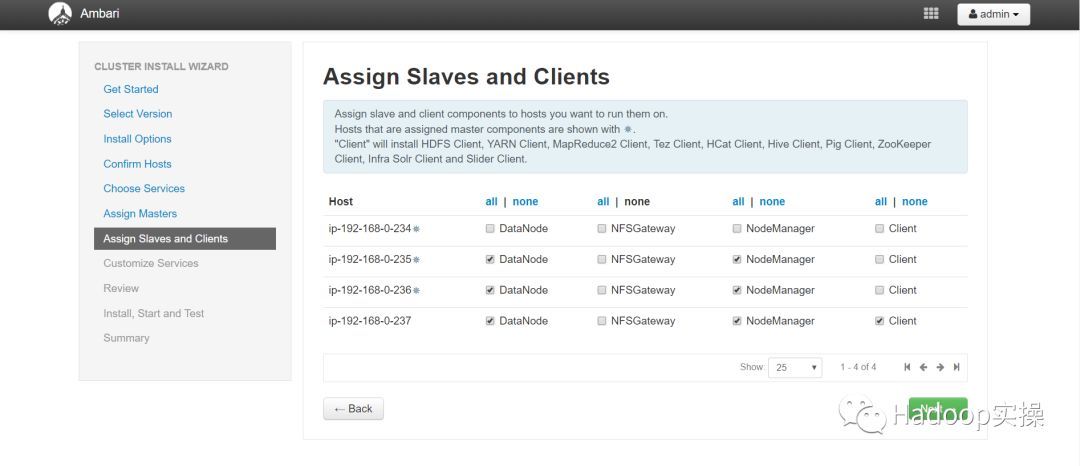
4.9. Job node role assignment
4.10. Modify the default configuration of the service

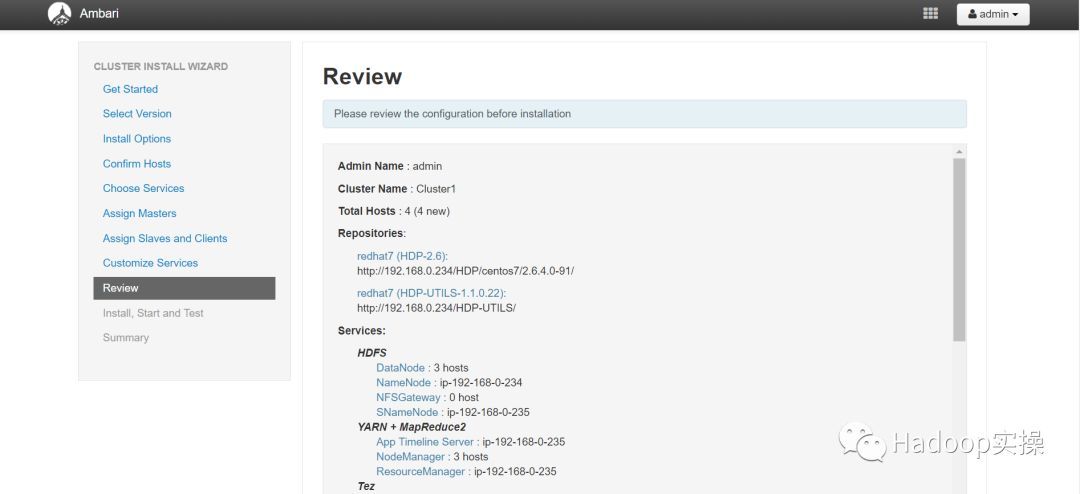
4.11. View service installation
4.12. Enter service installation


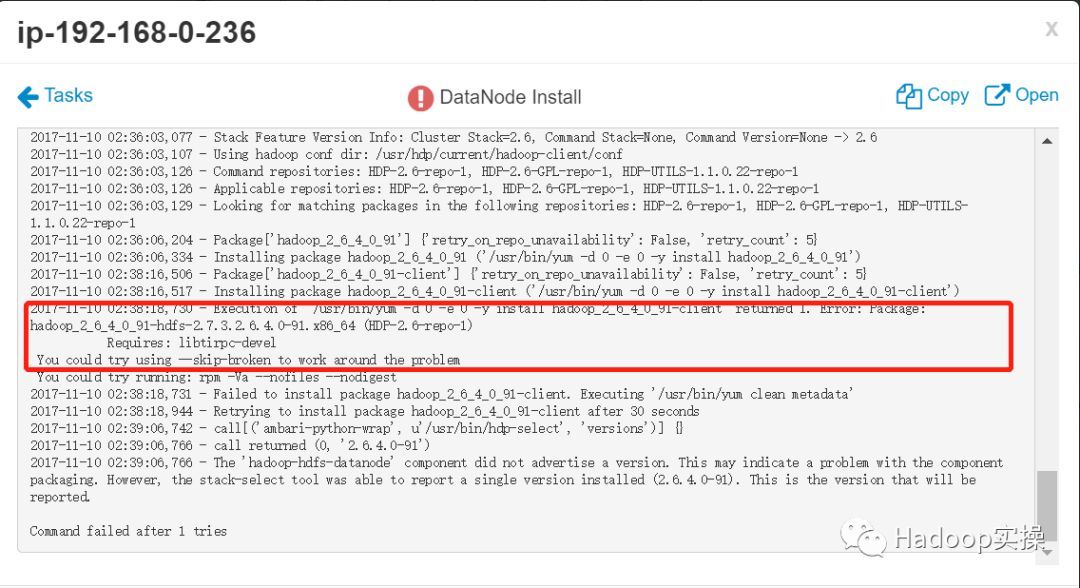
If the libtirpc-devel package is missing during the installation process, please refer to "5 Installation Problems -> Problem One" to solve it.
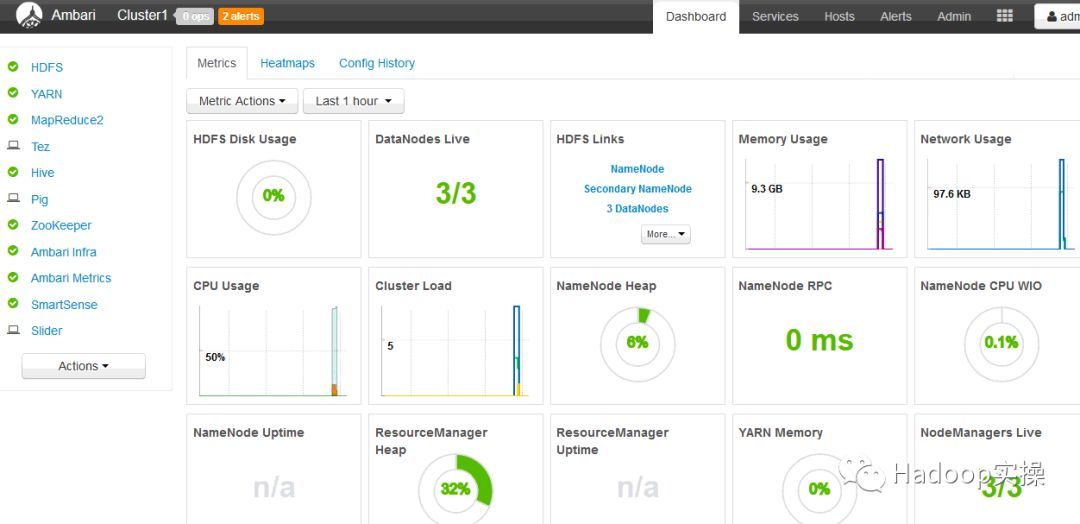
4.13. The installation is complete
Click "Complete" to enter the homepage:
5. Component function verification
5.1. HDFS functional verification
[ root@ip-192-168-0-234 test]# hdfs dfs -mkdir /test
mkdir: Permission denied: user=root, access=WRITE, inode="/test":hdfs:hdfs:drwxr-xr-x
[ root@ip-192-168-0-234 test]# sudo -u hdfs hdfs dfs -mkdir /test
[ root@ip-192-168-0-234 test]# sudo -u hdfs hdfs dfs -chown root:root /test
[ root@ip-192-168-0-234 test]# hdfs dfs -put a.txt /test
[ root@ip-192-168-0-234 test]# hdfs dfs -cat /test/a.txt
(Can slide left and right)

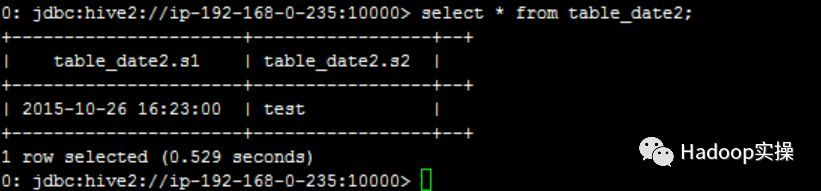
5.2. Hive function verification
To create a Hive table and insert test data, execute the following command:
CREATE TABLE table_date2(s1 STRING, s2 STRING) ROW FORMAT DELIMITED FIELDS TERMINATED BY ",";
INSERT INTO TABLE table_date2 values('2015-10-26 16:23:00','test');
(Can slide left and right)

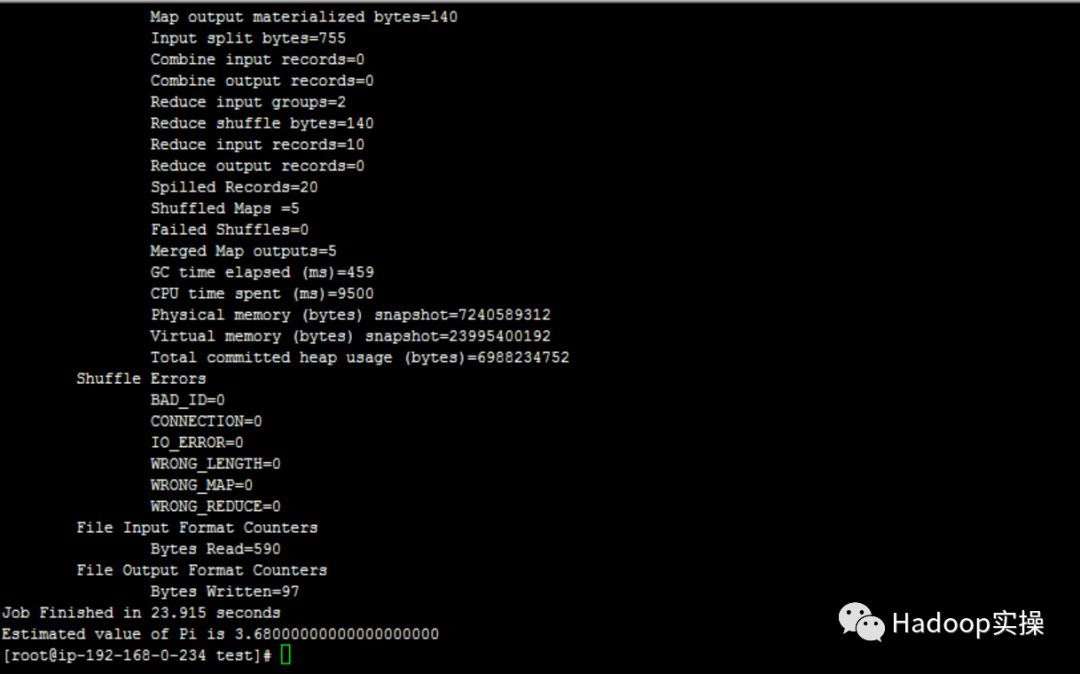
5.3. MapReduce task verification
hadoop jar /usr/hdp/2.6.4.0-91/hadoop-mapreduce/hadoop-mapreduce-examples.jar pi 55
(Can slide left and right)

6. Installation issues
Problem 1: The libtirpc-devel package is missing, which results in the inability to install the service:
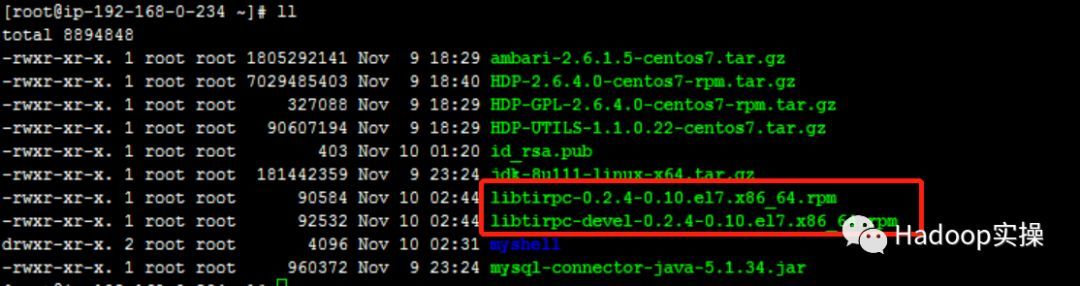
- Download libtirpc-devel and libtirpc two packages, download link:
http://mirror.centos.org/centos/7/os/x86_64/Packages/libtirpc-0.2.4-0.10.el7.x86_64.rpm
http://mirror.centos.org/centos/7/os/x86_64/Packages/libtirpc-devel-0.2.4-0.10.el7.x86_64.rpm
- Then make a yum source, upgrade and install two packages

- Execute the createrepo command:

- Create repo file and distribute to other nodes


- Upgrade libtirpc

- Install libtirpc-devel

Tip: You can swipe left and right to view the code block
Set up a heart for the heaven and the earth, set up a life for the people, for the sacred and inherit the best knowledge, and open peace for all ages.
Reminder: To see the high-definition uncoded set of pictures, please use your mobile phone to open and click the picture to enlarge it.
It is recommended to pay attention to the actual operation of Hadoop, and share more Hadoop dry goods at the first time. Welcome to forward and share.
Original article, welcome to reprint, please indicate: Reprinted from WeChat public account Hadoop practical operation

Recommended Posts