Detailed tutorial for installing phpMyAdmin on Ubuntu 18.04
We will install phpMyAdmin to work with Apache on Ubuntu 18.04.
Before installing phpMyAdmin, you need to have installed the LAMP stack and provided a web page.
If it is not installed, you can refer to the installation of Apache on Ubuntu 18.04, MySQL, PHP to install first.
1. Install phpMyAdmin
Let's start with the update package list and install phpMyAdmin on Ubuntu 18.04. Below we have two commands separated by &&. The first command will update the package list to ensure that you get the latest version and dependencies of phpMyAdmin. The second command will download and install phpMyAdmin. When asked to continue, press y and press Enter.
$ sudo apt update && sudo apt install phpmyadmin
Depending on your settings, the order of the following screens in the phpMyAdmin package configuration may be different.
If you are prompted to select a web server, press the SPACE key to place an asterisk [*] next to apache2, then press the TAB key to highlight OK and press the ENTER key. As shown below:
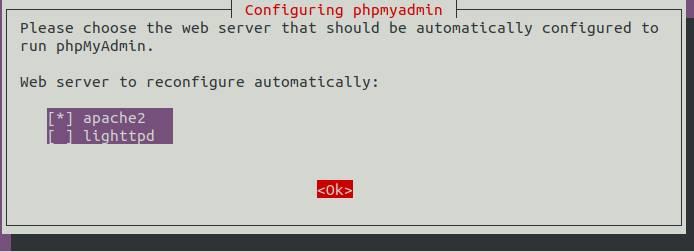
After the carriage return, it is as follows:
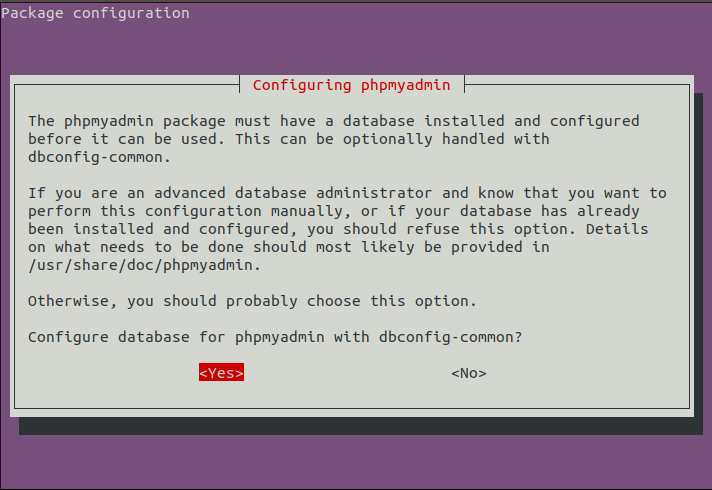
Select Yes and press ENTER to install and configure the database.
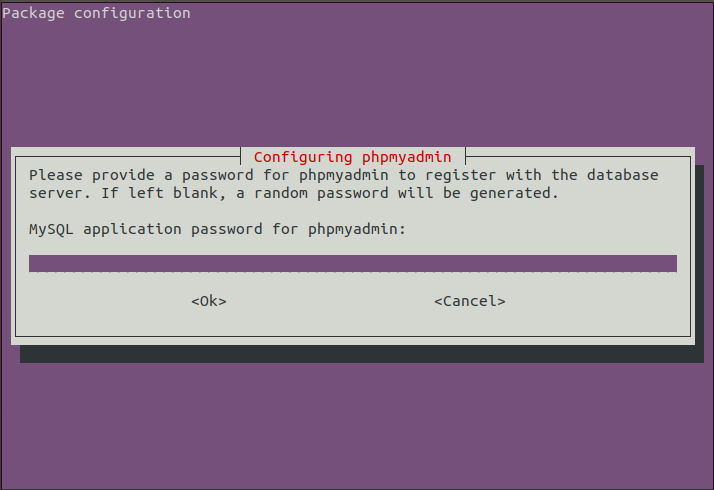
The MySQL application password is only used inside phpMyAdmin to communicate with MySQL. You can leave this blank and the password will be automatically generated. Press Enter to continue.
2. Test phpMyAdmin
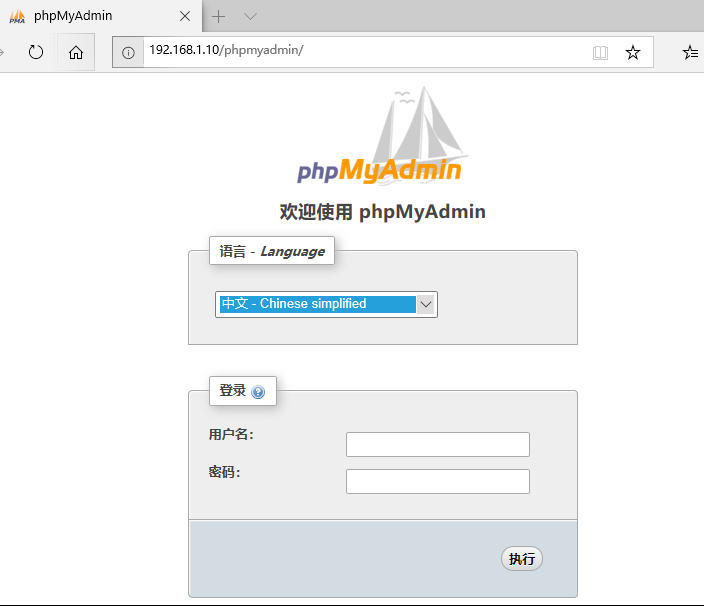
You should now be able to access the phpMyAdmin web interface by accessing the server's domain name or public IP address and /phpMyAdmin. For example: http://example.com/phpmyadmin or http://192.168.1.10 phpmyadmin
If you do not have a domain name or do not know your IP, you can find it by the following command:
$ sudo service apache2 status
When installing MySQL for the first time, you need to set the root user and password. However, the root user may disable remote login.
If you get an error "Access to user 'root' @'localhost' is denied", you should proceed to step 3 to create a super user for phpMyAdmin.
3. Create MySQL user
If you cannot log in as the root user above, you can now create a super user account for phpMyAdmin.
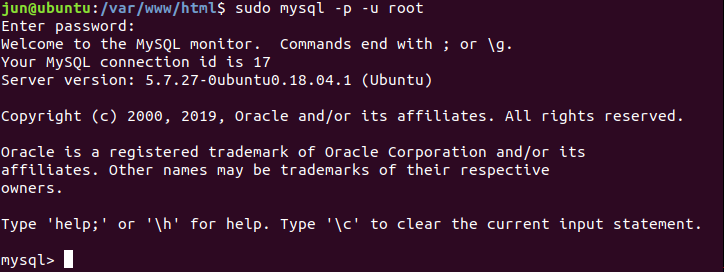
At the terminal, log in to MySQL as the root user. You may have created a root password when you first installed MySQL,
Or the password is blank, in this case, you can press ENTER when prompted to enter the password.
$ sudo mysql -p -u root
Now add a new MySQL user with the username of your choice. In this example, we will call it pmauser (php my admin user).
Make sure to replace password_here with your own password (make a password yourself).
The% symbol tells MySQL to allow the user to log in from anywhere remotely. If you want to improve security, you can replace it with an IP address.
CREATE USER 'pmauser'@'%' IDENTIFIED BY 'password_here';

The password I set here is 123456, which is a weak password (it is easy to guess), and it is not recommended that you use this password.
Now, we will grant superuser privileges to the new user pmauser.
GRANT ALL PRIVILEGES ON *.* TO 'pmauser'@'%' WITH GRANT OPTION;
Now exit MySQL.
exit
You should now be able to access phpMyAdmin using this new user account.
If you want to set up some additional security for phpMyAdmin, please proceed to the next step.
- Obscure phpMyAdmin URL
Robots and attackers constantly scan the web server for the default phpMyAdmin login page, so it is recommended that you change the URL to something else.
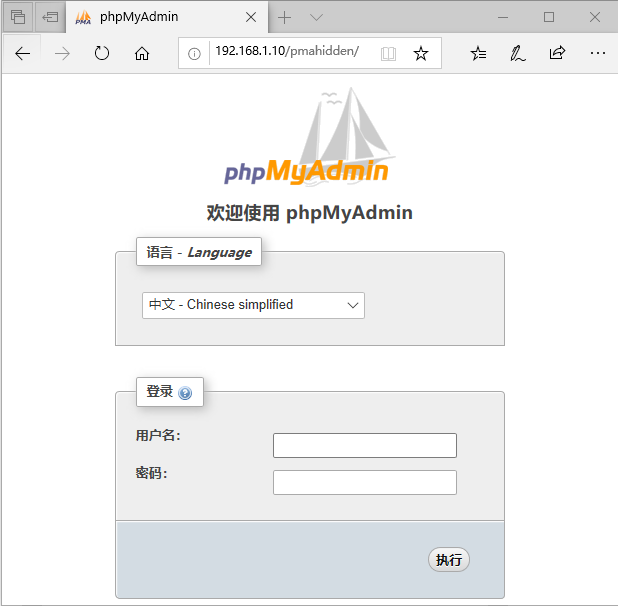
In this example, we will change it from example.com/phpmyadmin to example.com/pmahidden.
Use the vi text editor to open Apache's phpMyAdmin configuration file. (If you are not used to vi, the visual text editor gedit is recommended)
$ sudo ifconfig | grep -Eo 'inet (addr:)?([0-9]*\.){3}[0-9]*'| grep -Eo '([0-9]*\.){3}[0-9]*'| grep -v '127.0.0.1'
Change the Alias (alias) from /phpmyadmin to /pmahidden-you can also change it to whatever you want.

Save and exit vi.
The Apache service must now be reloaded for the changes to take effect.
$ sudo vi /etc/apache2/conf-available/phpmyadmin.conf
You should now be able to access phpMyAdmin via example.com/pmahidden
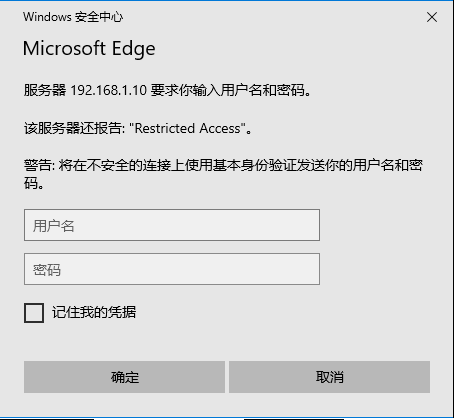
- Protect with .htpasswd
We can use .htpasswd to further protect the phpMyAdmin login page. This adds another line of defense against robots and hackers.
5.1 Allow .htaccess overwrite
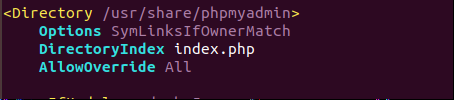
To set up .htpasswd, we must first change the phpMyadmin Apache configuration file to allow .htaccess override.
Use vi to open the configuration file phpmyadmin.conf
$ sudo vi /etc/apache2/conf-available/phpmyadmin.conf
Add AllowOverride All under DirectoryIndex index.php as shown below:
Save and exit vi
Now reload the Apache service.
$ sudo service apache2 reload
5.2 Set.htpasswd
We will use the gedit text editor to create a new .htaccess file in the phpMyAdmin installation directory.
$ sudo gedit /usr/share/phpmyadmin/.htaccess
Paste the following content into the .htaccess file.
AuthType Basic
AuthName "Restricted Access"
AuthUserFile /etc/phpmyadmin/.htpasswd
Require valid-user

Click the Save button to save, and click the Close button to exit.
Now, we can use the htpasswd tool to generate the .htpasswd file.
In this example, we created a new user named pmauser (php my admin user), although you can change it to whatever you want.
$ sudo htpasswd -c /etc/phpmyadmin/.htpasswd pmauser
You will be asked to enter a new password twice (to generate a password).
After you finish, you can now access phpMyAdmin in your browser, and you should now be prompted to enter your login details.
Reference: Installing phpMyAdmin for Apache on Ubuntu 18.04
Recommended Posts