Install RabbitMQ on CentOS 7
RabbitMQ server needs to install erlang before installation.
The latest version of RabbitMQ 3.8.0 requires Erlang 21.3 or higher version support.
Here, we need to install Erlang 21.3.8.8 version in your CentOS.
Download address and software update##
For the download address of Erlang 21.3.8.8, please refer to the link: https://packagecloud.io/rabbitmq/erlang/packages/el/7/erlang-21.3.8.8-1.el7.x86_64.rpm
For the download address of RabbitMQ 3.8.0, please refer to the link: https://www.rabbitmq.com/install-rpm.html
After logging in to your CentOS 7 server, first check whether wget is installed on your server. If wget is not installed, please run yum install wget to install it.
| yum install wget |
|---|
When wget is installed, run
| yum update |
|---|
To update your server.
Install Erlang
First you need to download Erlang, and then install it. There is a wget address on the right side of the above-mentioned address https://packagecloud.io/rabbitmq/erlang/packages/el/7/erlang-21.3.8.8-1.el7.x86_64.rpm.

You can run
| wget --content-disposition https://packagecloud.io/rabbitmq/erlang/packages/el/7/erlang-21.3.8.8-1.el7.x86_64.rpm/download.rpm |
|---|
To download.
When you download to your local computer, run the command
| yum localinstall rabbitmq-server-3.8.0-1.el7.noarch.rpm |
|---|
To install the rpm package you downloaded.
When your installation is complete, you can run the command
| erl -version |
|---|
To check the version of erl you have installed.
Here, you can see that the displayed version is lower than the Erlang emulator version, which is different from the Erlang version you downloaded.
Install RabbitMQ
Run the following command to download RabbitMQ to your server.
| wget https://github.com/rabbitmq/rabbitmq-server/releases/download/v3.8.0/rabbitmq-server-3.8.0-1.el7.noarch.rpm |
|---|
When your download is complete, you need to run the following command to import the Key.
| rpm --import https://www.rabbitmq.com/rabbitmq-release-signing-key.asc |
|---|
Use yum for local installation, run the command:
| yum localinstall rabbitmq-server-3.8.0-1.el7.noarch.rpm |
|---|
When the installation is complete, you can start the rabbitmq server with the command:
| systemctl start rabbitmq-server |
|---|
RabbitMQ firewall configuration##
RabbitMQ requires a series of ports to run. Therefore you need to configure your firewall to open the following ports.
If you are using firewalld, please execute the following commands in sequence.
Open the firewall port:
| firewall-cmd --zone=public --permanent --add-port=4369/tcp firewall-cmd --zone=public --permanent --add-port=25672/tcp firewall-cmd --zone=public --permanent --add-port=5671-5672/tcp firewall-cmd --zone=public --permanent --add-port=15672/tcp firewall-cmd --zone=public --permanent --add-port=61613-61614/tcp firewall-cmd --zone=public --permanent --add-port=1883/tcp firewall-cmd --zone=public --permanent --add-port=8883/tcp |
|---|
Reload the firewall configuration:
| firewall-cmd --reload |
|---|
In most cases, after you execute the above command, your RabbitMQ should be able to access normally.
If your server also has SELinux enabled, you also need to execute the following command to enable RabbitMQ server to receive and send network data:
| setsebool -P nis_enabled 1 |
|---|
RabbitMQ set automatic start##
After the installation is complete, we hope RabbitMQ can start automatically after booting.
Please execute the following command to make RabbitMQ start automatically when the computer is turned on:
| systemctl enable rabbitmq-server |
|---|
Use the following command to view the running status of RabbitMQ:
| systemctl status rabbitmq-server |
|---|
Depending on the server, there will be different outputs. Our output is as follows, indicating that RabbitMQ is currently running.
[ root@vps263579 yhu]# systemctl status rabbitmq-server

● rabbitmq-server.service - RabbitMQ broker
Loaded:loaded(/usr/lib/systemd/system/rabbitmq-server.service; enabled; vendor preset: disabled)
Active:active(running) since Fri 2019-10-1114:10:14 EDT; 9h ago
Main PID:14895(beam.smp)
Status:"Initialized"
CGroup:/system.slice/rabbitmq-server.service
├─14895/usr/lib64/erlang/erts-10.3.5.6/bin/beam.smp -W w -A 64-MBas ageffcbf -MHas ageffcbf -MBlmbcs 512-MHlmbcs 512-MMmcs 30-P 1048576-t 5000000-stbt db -zdbbl 128000-K true---root /usr/lib64/erlang -progn...
├─15123/usr/lib64/erlang/erts-10.3.5.6/bin/epmd -daemon
├─15259 erl_child_setup 32768
├─15280 inet_gethost 4
└─15281 inet_gethost 4
RabbitMQ enables Web management interface##
RabbitMQ web management console is not enabled by default, you need to enable it through the following command.
Install the plug-in for the Web management interface:
| rabbitmq-plugins enable rabbitmq_management |
|---|
Provide RabbitMQ users and empower users with permissions:
| chown -R rabbitmq:rabbitmq /var/lib/rabbitmq/ |
|---|
Execute the following commands separately:
| rabbitmqctl add_user admin StrongPassword rabbitmqctl set_user_tags admin administrator rabbitmqctl set_permissions -p / admin "." "." ".*" |
|---|
The explanation for the above command is that the first command creates an admin user, and the password used by this user is StrongPassword.
You can use a different user name. In the above command we executed, the password used for user login is the character StrongPassword. You can change this character to other characters, or you can modify it in the UI interface after successful login .
The following words are to empower this user.
When the above command is executed successfully, you can restart your RabbitMQ and log in through the browser. The port used by the UI interface is 15672. So the URL to visit is the address of your server + 15672.
http://Your_Server_IP:15672/
If everything is normal, you should be able to see the login interface below:
If you cannot access the login interface below, it may be your server firewall.
The easiest way is to disable the server's firewall to ensure that all processes are running normally.
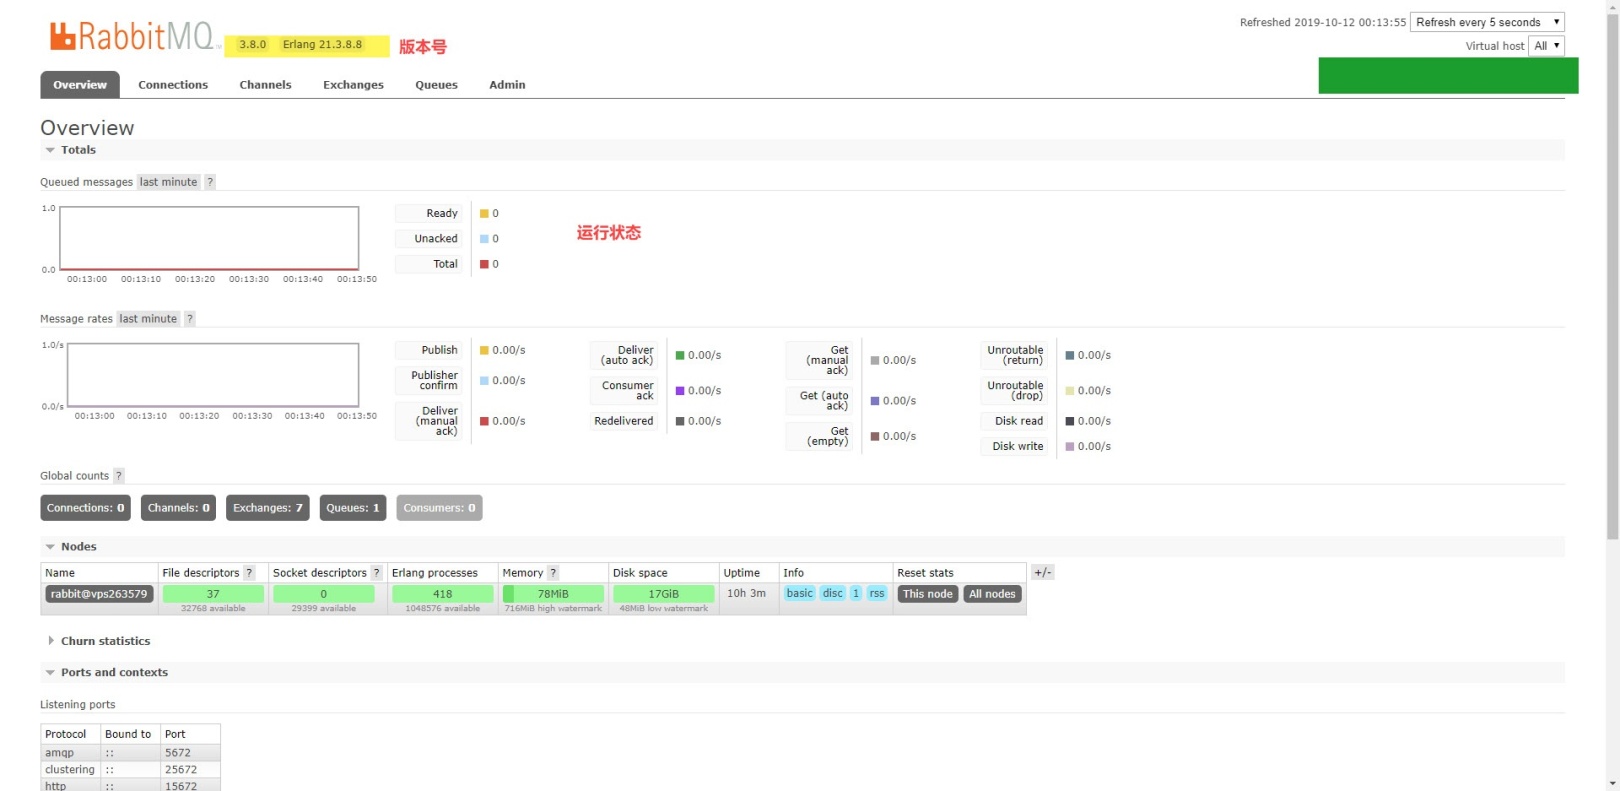
If you log in successfully, you should be able to see the following RabbitMQ running interface:
https://www.cwiki.us/display/RabbitMQZH/Install+RabbitMQ+Server+on+CentOS+7
Recommended Posts