CentOS7 install rabbitmq cluster (binary)
1. Introduction to RabbiMQ
RabbiMQ was developed with Erang, and clustering is very convenient, because Erlang is born a distributed language, but it does not support Load Balancing.
RabbiMQ mode
The RabbitMQ mode is roughly divided into the following three types:
(1) Single mode.
(2) Normal mode (the default cluster mode).
(3) Mirror mode (make the required queue into a mirror queue, which exists in multiple nodes, belongs to the HA scheme of RabbiMQ, and is more suitable for occasions that require high business reliability).
To realize the mirroring mode, you need to build a common cluster mode first, and then configure the mirroring mode on the basis of this mode to achieve high availability.
RabbiMQ features
The cluster nodes of RabbitMQ include memory nodes and disk nodes. RabbitMQ supports the persistence of messages
That is, the data is written on the disk. The most suitable solution is to have both memory nodes and disk nodes.
surroundings
Use 3 servers to build, using rabbitmq mirroring mode
| Operating system | hostname | ip address | purpose |
|---|---|---|---|
| centos7.4 | centos7_01 | 192.168.31.149 | rabbitmq001 (disk node) |
| centos7.4 | centos7_02 | 192.168.31.186 | rabbitmq002 (memory node) |
| centos7.4 | centos7_02 | 192.168.31.238 | rabbitmq003 (memory node) |
Note that the three servers here are all connected to the Internet. In addition, the RabbitMQ cluster nodes must be in the same network segment. If it is across the wide area network, the effect will be worse.
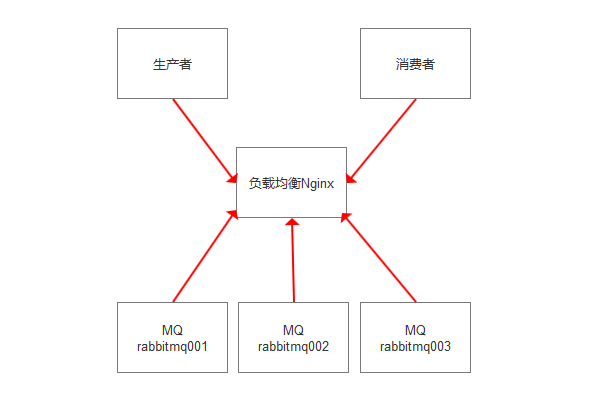
Overall structure
Modify host name
If the hostname is correct, please ignore this step
hostnamectl set-hostname centos7_01
hostnamectl set-hostname centos7_02
hostnamectl set-hostname centos7_03
Add hosts
vi /etc/hosts
The content is as follows:
192.168.31.149 centos7_01
192.168.31.186 centos7_02
192.168.31.238 centos7_03
Two, install erlang
mkdir -p /data/software
yum install -y wget epel-release
cd /data/software
wget http://download.51yuki.cn/esl-erlang_21.3.6-1_centos_7_amd64.rpm
yum -y install esl-erlang_21.3.6-1_centos_7_amd64.rpm
yum clean all
erlang check
# erl -version
Erlang(SMP,ASYNC_THREADS,HIPE)(BEAM) emulator version 10.3.4
Three, rabbitmq installation
cd /data/software
wget http://download.51yuki.cn/rabbitmq-server-generic-unix-3.7.15.tar.xz
tar xvf rabbitmq-server-generic-unix-3.7.15.tar.xz -C /data/
mv /data/rabbitmq_server-3.7.15/data/rabbitmq
echo 'export PATH=/data/rabbitmq/sbin:$PATH'>>/etc/profile
source /etc/profile
which rabbitmqctl
Fourth, configure rabbitmq
Modify the configuration file
vi /data/rabbitmq/etc/rabbitmq/rabbitmq-env.conf
The content is as follows:
RABBITMQ_NODENAME=rabbitmq001@centos7_01
RABBITMQ_NODE_IP_ADDRESS=192.168.31.149
RABBITMQ_NODE_PORT=5672
RABBITMQ_MNESIA_BASE=/data/rabbitmq/data
RABBITMQ_LOG_BASE=/data/rabbitmq/logs
Description:
| Attribute | description | default |
|---|---|---|
| RABBITMQ_NODENAME | rabbitmq node name, note that the node name is unique in the cluster | linux default node name is rabbit@$hostname |
| RABBITMQ_NODE_IP_ADDRESS | Bind network interface | The default is an empty string to bind all network interfaces of the machine |
| RABBITMQ_NODE_PORT | Port | The default is 5672 |
| RABBITMQ_MNESIA_BASE | The path where mnesia is located | $RABBITMQ_HOME/var/lib/rabbitmq/mnesia |
| RABBITMQ_LOG_BASE | The path where the log is located | $RABBITMQ_HOME/var/log/rabbitmq |
For more attributes, please refer to the official website link:
http://www.rabbitmq.com/man/rabbitmq-env.conf.5.html
Edit configuration file
mkdir -p /data/rabbitmq/data
mkdir -p /data/rabbitmq/logs
vi /data/rabbitmq/etc/rabbitmq/rabbitmq.config
The content is as follows:
[{ rabbit,[{tcp_listeners,[5672]},{dump_log_write_threshold,[1000]},{vm_memory_high_watermark,0.5},{disk_free_limit,"200MB"},{hipe_compile,true}]}].
Note: []. There is a dot after
Description:
| Key | Documentation |
|---|---|
| tcp_listeners | List of ports used to listen to AMQP connections (no SSL). It can contain integers (ie "listen all interfaces") or tuples such as {"127.0.0.1", 5672} to listen to one or more interfaces. Default: [5672] |
| dump_log_write_threshold | Change mnesia's dump log write threshold Default: [100] |
| vm_memory_high_watermark | Memory threshold triggered by process control. Look at the memory-based flow control documentation. Default: 0.4 |
| disk_free_limit | RabbitMQ storage data partition available disk space limit. When the free space value is lower than the threshold, the process control will be triggered. This value can be set relative to the total size of RAM (eg. {mem_relative, 1.0}). This value can also be set to an integer (in bytes) or Use numeric units (eg. "50MB"). By default, the available disk space must exceed 50MB. Refer to Disk Alarms documentation. Default: 50000000 |
| hipe_compile | Set this option to true, it will use HiPE pre-compiled part of RabbitMQ, Erlang just-in-time compiler. This can increase server throughput, but it will increase server startup time. |
For more reference, please refer to the link:
https://blog.csdn.net/Super_RD/article/details/70327712
Modify permissions
useradd -u 1020-s /sbin/nologin rabbitmq
chown -R rabbitmq:rabbitmq -R /data/rabbitmq
For the other 2 servers, install rabbitmq and erlang as above
Five, cluster based on mirror queue
Log in to the first host and start the rabbitmq service
Note: Must switch to normal user
su -s /bin/bash - rabbitmq
nohup /data/rabbitmq/sbin/rabbitmq-server start &
View output information
tail -f nohup.out
The output is as follows:

HiPE compiling:|---------------------------------------------------------||#########################################################|
Compiled 57 modules in 302s
  ##  ##
 ## ##  RabbitMQ 3.7.15.Copyright(C)2007-2019 Pivotal Software, Inc.
 ########## Licensed under the MPL.  See https://www.rabbitmq.com/  ######  ##
 ########## Logs:/data/rabbitmq/logs/centos7_01.log                    /data/rabbitmq/logs/centos7_01_upgrade.log
    Starting broker...
 completed with0 plugins.
Note: Completed with appears, indicating successful startup
Check whether the cookie file exists
Note: This file must exist
ls .erlang.cookie
Check the port, whether it exists
ss -tunlp|grep 5672
Copy cookie
Copy the .erlang.cookie file in the home directory of the first server rabbitmq to the home directory of the other 2 servers rabbitmq
scp -P 22/home/rabbitmq/.erlang.cookie [email protected]:/home/rabbitmq/
scp -P 22/home/rabbitmq/.erlang.cookie [email protected]:/home/rabbitmq/
Log in to the other 2 servers, modify the owner and group
chown -R rabbitmq.rabbitmq /home/rabbitmq/.erlang.cookie
chmod 600/home/rabbitmq/.erlang.cookie
Start another 2 rabbitmq servers
su -s /bin/bash - rabbitmq
nohup /data/rabbitmq/sbin/rabbitmq-server start &
Wait a few minutes and check the output of nohup.out to make sure it starts normally.
View port
# ss -tunlp|grep 5672
tcp    LISTEN     0128*:25672*:*                   users:(("beam.smp",pid=11461,fd=66))
Install plugin
3 Install it
rabbitmq-plugins enable rabbitmq_management
Create user and authorization
Log in to the first server to execute
rabbitmqctl add_user mqadmin "Nwvh3#vu@kqLP&FdHt"
rabbitmqctl set_permissions -p / mqadmin ...
rabbitmqctl set_user_tags mqadmin administrator
Join the cluster
Log in to the first server to view the cluster status
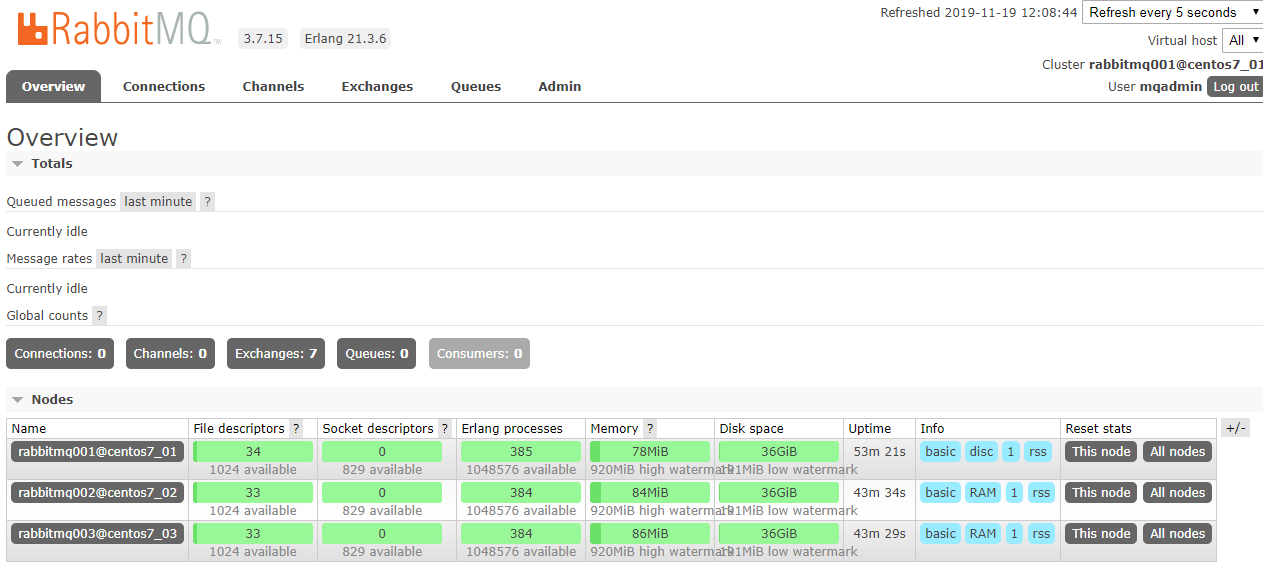
# rabbitmqctl cluster_status
Cluster status of node centos7_01@centos7_01 ...[{nodes,[{disc,[centos7_01@centos7_01]}]},{running_nodes,[centos7_01@centos7_01]},{cluster_name,<<"centos7_01@centos7_01">>},{partitions,[]},{alarms,[{centos7_01@centos7_01,[]}]}]
Log in to rabbitmq002 and rabbitmq003 to join the cluster
The app must be closed first
rabbitmqctl stop_app
Join again
rabbitmqctl join_cluster --ram rabbitmq001@centos7_01
Finally start the app
rabbitmqctl start_app
View cluster status
Log in to any node to query
rabbitmqctl cluster_status
The output is as follows:
Cluster status of node rabbitmq001@centos7_01 ...[{nodes,[{disc,[rabbitmq001@centos7_01]},{ram,[rabbitmq003@centos7_03,rabbitmq002@centos7_02]}]},{running_nodes,[rabbitmq002@centos7_02,rabbitmq003@centos7_03,
     rabbitmq001@centos7_01]},{cluster_name,<<"rabbitmq001@centos7_01">>},{partitions,[]},{alarms,[{rabbitmq002@centos7_02,[]},{rabbitmq003@centos7_03,[]},{rabbitmq001@centos7_01,[]}]}]
Note: Make sure that nodes, running_nodes, alarms have 3 node information
Six, front-end nginx reverse proxy
yum install -y nginx
vi /etc/nginx/nginx.conf
Add a line
include /etc/nginx/conf.d/vhosts/*.conf;
Create a directory
mkdir /etc/nginx/conf.d/vhosts/
mkdir -p /data/log/nginx/
Edit configuration file
vi /etc/nginx/conf.d/vhosts/rabbitmq.xx.com.conf
The content is as follows:
upstream rabbitmq {
 server 192.168.31.149:15672  max_fails=2 fail_timeout=1;
 server 192.168.31.186:15672  max_fails=2 fail_timeout=1;
 server 192.168.31.238:15672  max_fails=2 fail_timeout=1;}
server {
 listen 80;
 server_name rabbitmq.xx.com;
 charset utf-8;
 access_log /data/log/nginx/rabbitmq.xx.com.access.log main;
 error_log /data/log/nginx/rabbitmq.xx.com.error.log;
 location /{
 root html;
 index index.html index.htm;
 proxy_pass http://rabbitmq;
  proxy_set_header           Host $host;
  proxy_set_header           X-Real-IP $remote_addr;
  proxy_set_header           X-Forwarded-For $proxy_add_x_forwarded_for;
  proxy_connect_timeout 300s;
  proxy_send_timeout 300s;
  proxy_read_timeout 300s;}
 error_page 404/404.html;
  location =/40x.html {}
 error_page 500502503504/50x.html;
 location =/50x.html {
 root html;}}
Start nginx
nginx -t
nginx
Test access
http://rabbitmq.xx.com
Username: mqadmin
Password: Nwvh3#vu@kqLP&FdHt

The effect is as follows:
Reference link for this article:
https://www.cnblogs.com/shihaiming/p/11014257.html
Recommended Posts