How to set up SSH keys on CentOS 8

Secure Shell (SSH) is an encrypted network protocol designed to make a secure connection between a client and a server.
The two most popular SSH authorization methods are password-based authentication and public key-based authentication. Using SSH keys is generally more secure and convenient than traditional password authentication.
This article describes how to generate SSH keys on CentOS 8. We will show you how to set up an SSH key and connect to a remote server without a password.
1. Create an SSH key on CentOS##
You probably already have an SSH key pair on your CentOS client. If you are generating a new key pair, the old key pair will be overwritten.
Run the following ls command to check if the key file exists:
ls -l ~/.ssh/id_*.pub
If the command line output is similar to: No such file or directory, or no matches found, it means that the user does not have an SSH key pair, and you can proceed to the next step to generate an SSH key pair.
Otherwise, if you have an SSH key pair, you can use them directly, or back up the old key and generate a new key pair.
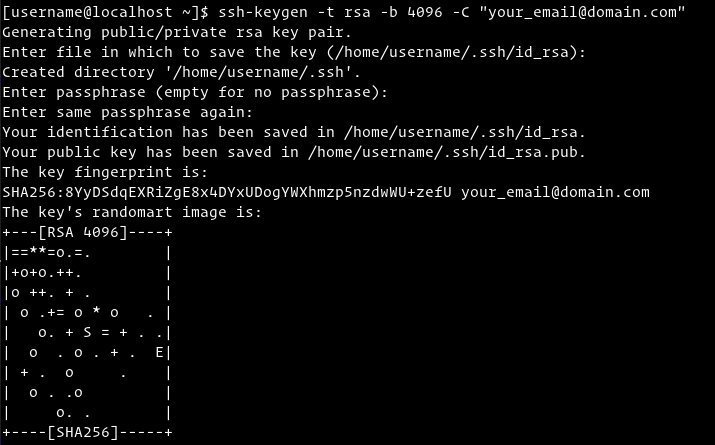
Using your email address as a comment to generate a 4096-bit SSH key pair, enter the following command:
ssh-keygen -t rsa -b 4096-C "[email protected]"
You will be prompted to specify the file name:
Enter file in which to save the key(/home/yourusername/.ssh/id_rsa):
Enter Enter to accept the default file location and file name.
Next, you will be asked to enter a secure password. Regardless of whether you need to set this security password, it is entirely up to you. A secure password will be more secure. If you don't want a secure password, enter:
Enter passphrase(empty for no passphrase):
The entire interaction process looks like this:
To verify that your new SSH key is generated, enter:
ls ~/.ssh/id_*
Output:
/home/yourusername/.ssh/id_rsa /home/yourusername/.ssh/id_rsa.pub
2. Copy the public key to the server##
Now that the SSH key has been generated, the next step is to copy the public key to the server you want to manage.
The easiest and most recommended way to copy the public key to a remote server is to use the ssh-copy-id tool. Type in your local machine terminal:
ssh-copy-id remote_username@server_ip_address
This command will ask you to enter the remote_username password:
remote_username@server_ip_address's password:
Once the user is authorized, the public key file (~/.ssh/id_rsa.pub) will be attached to the remote user ~/.ssh/authorized_keys file, and the connection will be closed.
Number ofkey(s) added:1

Now try logging into the machine,with:"ssh 'username@server_ip_address'"
and check to make sure that only the key(s) you wanted were added.
If ssh-copy-id is not available on your local computer, use the following command to copy the public key:
cat ~/.ssh/id_rsa.pub | ssh remote_username@server_ip_address "mkdir -p ~/.ssh && chmod 700 ~/.ssh && cat >> ~/.ssh/authorized_keys && chmod 600 ~/.ssh/authorized_keys"
Three, use SSH key to log in to your server##
After completing the above steps, you should be able to log in to the remote server directly without entering a password.
To verify it, try to log in to your server via SSH:
ssh remote_username@server_ip_address
If you do not set a password for the private key, you will be able to log in to the server soon. Otherwise, you will be asked to enter a password.
Fourth, disable password verification##
To make the remote server more secure, you can disable SSH password authentication.
Before continuing, make sure you can log in to your server as a sudo user without a password.
Follow the steps below to disable SSH password authentication:
- Log in to your remote server:
ssh sudo_user@server_ip_address
- Open the SSH configuration file
etc/ssh/sshd_configwith your text editor:
sudo nano /etc/ssh/sshd_config
- Search for the following command and modify it as follows:
PasswordAuthentication no
ChallengeResponseAuthentication no
UsePAM no
- Once completed, save the file and restart the SSH server, enter:
sudo systemctl restart ssh
At this time, password-based authentication is disabled.
Five, summary##
We show you how to generate a new SSH key pair and set up SSH-based authentication. You can use the same key to manage multiple remote servers. You have learned how to disable password verification and enhance the security of your server.
By default, SSH listens on port 22. Modifying this default SSH port can reduce the risk of automatic attacks. To simplify your workflow, use SSH configuration files to define all SSH connections.
Recommended Posts