How to set up password authentication with Nginx on Ubuntu 14.04
Introduction
When setting up a web server, you usually want to restrict the parts of the site that you can access. Web applications usually provide their own authentication and authorization methods, but if the Web server is insufficient or unavailable, you can use the Web server itself to restrict access.
In this guide, we will demonstrate how to password protect assets on the Nginx web server running on Ubuntu 14.04.
prerequisites
First, you need to access the Ubuntu 14.04 server environment. You will need a non-root user with sudo privileges to perform administrative tasks. Students who don’t have a server can buy it from here, but I personally recommend you to use the free Tencent Cloud Developer Lab for experimentation, and then purchase server.
If you have not already done so, enter the following command to install Nginx on your computer:
sudo apt-get update
sudo apt-get install nginx
Create a password file
First, we need to create a file to save the username and password combination. You can use the OpenSSL utility already on the server to do this. Alternatively, you can use the dedicated utility htpasswd included in the apache2-utils package (the Nginx password file uses the same format as Apache). You can choose your favorite method from the following.
Use the OpenSSL utility to create a password file
If OpenSSL is installed on your server, you can create a password file without other packages. We will create a hidden file named .htpasswd in the configuration directory /etc/nginx to store our username and password combination.
You can use this command to add user names to files. We use sammy as our username, but you can use any name you like:
sudo sh -c "echo -n 'sammy:' >> /etc/nginx/.htpasswd"
Next, enter the following to add an encrypted password entry for the username:
sudo sh -c "openssl passwd -apr1 >> /etc/nginx/.htpasswd"
You can repeat this process for other usernames. You can see how the user name and encrypted password are stored in the file by typing:
cat /etc/nginx/.htpasswd
sammy:$apr1$wI1/T0nB$jEKuTJHkTOOWkopnXqC1d1
Use Apache Utilities to create a password file
Although OpenSSL can encrypt the password for Nginx authentication, many users find it easier to use a dedicated utility. The htpasswd utility in the apache2-utils package makes good use of this function.
Type the following command to install the package apache2-utils on the server:
sudo apt-get update
sudo apt-get install apache2-utils
Now you can access the htpasswd command. We can use it to create a password file that Nginx can use to authenticate users. We will create a hidden file named .htpasswd for this purpose in the configuration directory /etc/nginx.
When we use this utility for the first time, we need to add the -c option to create the specified file. We sammy specify the username (in this example) at the end of the command to create a new entry in the file:
sudo htpasswd -c /etc/nginx/.htpasswd sammy
The system will ask you to provide and confirm the user's password.
For the parameters of any other users you want to add, omit -c:
sudo htpasswd /etc/nginx/.htpasswd another_user
If we look at the content of the file, we can see the username and encrypted password of each record:
cat /etc/nginx/.htpasswd
sammy:$apr1$lzxsIfXG$tmCvCfb49vpPFwKGVsuYz.
another_user:$apr1$p1E9MeAf$kiAhneUwr.MhAE2kKGYHK.
Configure Nginx password verification
Now we have a file whose format of our user and password is readable by Nginx. We need to configure Nginx to check this file before we can provide protected content.
First open the server block configuration file for which you want to add restrictions. For our example, we will use the default server block file installed via Ubuntu's Nginx package:
sudo nano /etc/nginx/sites-enabled/default
Internally, the comments are removed and the file should look similar to:
server {
listen 80 default_server;
listen [::]:80 default_server ipv6only=on;
root /usr/share/nginx/html;
index index.html index.htm;
server_name localhost;
location /{
try_files $uri $uri/=404;}}
To set up authentication, you need to determine the context to restrict. Among other options, Nginx allows you to set limits at the server level or within specific locations. In our example, we will use the location block to restrict the entire document root, but you can modify this list to locate only specific directories in the web space:
In this location block, use the auth_basic directive to turn on authentication and select the domain name to be shown to the user when prompted for credentials. We will use the auth_basic_user_file directive to point Nginx to the password file we created:
server {
listen 80 default_server;
listen [::]:80 default_server ipv6only=on;
root /usr/share/nginx/html;
index index.html index.htm;
server_name localhost;
location /{
try_files $uri $uri/=404;
auth_basic "Restricted Content";
auth_basic_user_file /etc/nginx/.htpasswd;}}
Save and close the file when you are done. Restart Nginx to implement the password policy:
sudo service nginx restart
The directory you specified should now be password protected.
Confirm password verification
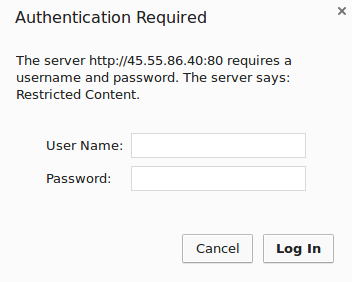
To confirm that your content is protected, try to access restricted content in a web browser. You should see a username and password prompt as shown below:
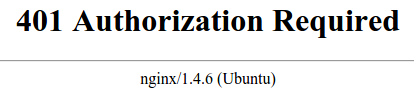
If you enter the correct credentials, you can access the content. If you enter the wrong credentials or click "Cancel", you will see the "Authorization Required" error page:
in conclusion
You should now have everything you need to set up basic authentication for your site. Remember that password protection should be combined with SSL encryption so that your credentials are not sent to the server in plain text. To learn how to create a self-signed SSL certificate for use with Nginx, please follow How to create a self-signed SSL certificate for Nginx.
For more Ubuntu tutorials, please go to [Tencent Cloud + Community] (https://cloud.tencent.com/developer?from=10680) to learn more.
Reference: "How To Set Up Password Authentication with Nginx on Ubuntu 14.04"
Recommended Posts