python opencv for image stitching
The examples in this article share the specific code of python opencv for image stitching for your reference. The specific content is as follows
Ideas and methods
Ideas
1、 Extract the feature points and feature descriptors of the two pictures to be spliced;
2、 Find the corresponding points in the two pictures and match them;
3、 If enough matching points are found, the two pictures can be spliced together. Before splicing, you may need to rotate the second picture in perspective, and use the key points found to rotate the second picture to one and the first. The angles that can be spliced with the same picture;
4、 Splicing
5、 Some processing after stitching makes the effect look better.
Implementation
1、 To extract the feature points and descriptors of the picture, you can use opencv to create a SIFT object. The SIFT object uses the DoG method to detect key points and calculates the feature vector for the area around each key point. In the implementation, the SURF method which is faster than SIFT can be used, and the Hessian algorithm can be used to detect key points. Because it is only for panorama stitching, when using SURF, you can also adjust its parameters, reduce some key points, and only obtain 64-dimensional instead of 128-dimensional vectors, etc., to speed up.
2、 After extracting the key points and feature vectors of the two pictures respectively, they can be used to match the two pictures. In splicing pictures, you can use Knn for matching, but it is faster to use FLANN fast matching library, and picture splicing requires FLANN's homography matching.
3、 After the homography is matched, the perspective transformation H matrix can be obtained. Use this inverse matrix to perform perspective transformation on the second picture, turn it to the same perspective as the first picture, and prepare for the next stitching.
4、 The size of the picture after the perspective transformation is the size of the final panorama, the right side is the picture after the perspective transformation, and the left side is black with no information. The splicing process can be relatively simple, through the numpy array selection directly add the first image to its left, covering the overlapped part, to get the spliced image, this is very fast, but the final effect is not very good, there is a segmentation mark in the middle very obvious. Use the image pyramid code in the opencv guide to process the stitched pictures, the whole picture is smoothed, and the seam in the middle is still particularly abrupt.
5、 The effect of direct spelling is not very good. You can stack the first image on the left, but do some weighting on the first image and its overlapping area. The overlapping part is closer to the left image, and the weight of the left image is higher. If the image is closer to the right, the weight of the rotating image on the right is higher, and then the two are added together to make the transition smooth, so that the effect is better and the speed is slower. If it is done with SURF, the time is mainly drawn on smoothing rather than feature point extraction and matching.
Main functions used in python_opencv
0、 Based on python 3.7 and corresponding python-opencv
1、cv2.xfeatures2d.SURF_create ([hessianThreshold[, nOctaves[, nOctaveLayers[, extended[, upright]]]]])
This function is used to generate a SURF object. In use, in order to increase the speed, hessianThreshold can be appropriately increased to reduce the number of key points to be detected. Extended=False can be used to generate only 64-dimensional descriptors instead of 128-dimensional, so upright =True, do not detect the direction of the key point.
2、cv2.SURF.detectAndCompute(image, mask[, descriptors[, useProvidedKeypoints]])
This function is used to calculate the key points and descriptors of the picture, and it is necessary to calculate both pictures.
3、flann=cv2.FlannBasedMatcher(indexParams,searchParams)** match=flann.knnMatch(descrip1,descrip2,k=2)**
The flann fast matcher has two parameters, one is indexParams and the other is searchParams. You can use the values suggested in the manual. After creating the matcher to get the matching array match, you can refer to the parameters given by Lowe to filter the matches and filter out bad matches. The return value match includes the descriptor distance distance of the two images, the descriptor index trainIdx of the training image (second image), and the descriptor index queryIdx of the queried image (first image).
4、M,mask=cv2.findHomography(srcPoints, dstPoints[, method[, ransacReprojThreshold[, mask]]])
This function implements homography matching. The returned M is a matrix, that is, the key point srcPoints can be transformed to the position of dstPoints by M transformation.
5、warpImg=cv2.warpPerspective(src,np.linalg.inv(M),dsize[,dst[,flags[,borderMode[,borderValue]]]])
Use this function to perform perspective transformation and change perspective. src is the picture to be transformed, and np.linalg.inv(M) is the inverse matrix of M in ④ to get pictures with the same direction.
6、**a=b.copy() **Achieve deep copy, the default in Python is copy by reference, a=b is the memory where a points to b.
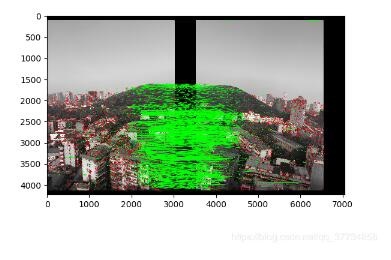
7、**draw_params = dict(matchColor = (0,255,0),singlePointColor = (255,0,0),matchesMask = matchMask,flags = 2),img3 = cv2.drawMatches(img1,kp1,img2,kp2,good,None,draw_params)
Use drawMatches to draw good key points of the match, matchMask is a better match point, connected with green lines.
Core code
import cv2
import numpy as np
from matplotlib import pyplot as plt
import time
MIN =10
starttime=time.time()
img1 = cv2.imread('1.jpg') #query
img2 = cv2.imread('2.jpg') #train

# img1gray=cv2.cvtColor(img1,cv2.COLOR_BGR2GRAY)
# img2gray=cv2.cvtColor(img2,cv2.COLOR_BGR2GRAY)
surf=cv2.xfeatures2d.SURF_create(10000,nOctaves=4,extended=False,upright=True)
# surf=cv2.xfeatures2d.SIFT_create()#Can be changed to SIFT
kp1,descrip1=surf.detectAndCompute(img1,None)
kp2,descrip2=surf.detectAndCompute(img2,None)

FLANN_INDEX_KDTREE =0
indexParams =dict(algorithm = FLANN_INDEX_KDTREE, trees =5)
searchParams =dict(checks=50)

flann=cv2.FlannBasedMatcher(indexParams,searchParams)
match=flann.knnMatch(descrip1,descrip2,k=2)

good=[]for i,(m,n)inenumerate(match):if(m.distance<0.75*n.distance):
 good.append(m)iflen(good) MIN:
 src_pts = np.float32([kp1[m.queryIdx].pt for m in good]).reshape(-1,1,2)
 ano_pts = np.float32([kp2[m.trainIdx].pt for m in good]).reshape(-1,1,2)
 M,mask=cv2.findHomography(src_pts,ano_pts,cv2.RANSAC,5.0)
 warpImg = cv2.warpPerspective(img2, np.linalg.inv(M),(img1.shape[1]+img2.shape[1], img2.shape[0]))
 direct=warpImg.copy()
 direct[0:img1.shape[0],0:img1.shape[1]]=img1
 simple=time.time()

# cv2.namedWindow("Result", cv2.WINDOW_NORMAL)
# cv2.imshow("Result",warpImg)
 rows,cols=img1.shape[:2]for col inrange(0,cols):if img1[:, col].any() and warpImg[:, col].any():#The leftmost end of the overlap
 left = col
 breakfor col inrange(cols-1,0,-1):if img1[:, col].any() and warpImg[:, col].any():#The rightmost column of overlap
 right = col
 break

 res = np.zeros([rows, cols,3], np.uint8)for row inrange(0, rows):for col inrange(0, cols):if not img1[row, col].any():#If there is no original image, fill it with rotated
 res[row, col]= warpImg[row, col]
 elif not warpImg[row, col].any():
 res[row, col]= img1[row, col]else:
 srcImgLen =float(abs(col - left))
 testImgLen =float(abs(col - right))
 alpha = srcImgLen /(srcImgLen + testImgLen)
 res[row, col]= np.clip(img1[row, col]*(1-alpha)+ warpImg[row, col]* alpha,0,255)

 warpImg[0:img1.shape[0],0:img1.shape[1]]=res
 final=time.time()
 img3=cv2.cvtColor(direct,cv2.COLOR_BGR2RGB)
 plt.imshow(img3,),plt.show()
 img4=cv2.cvtColor(warpImg,cv2.COLOR_BGR2RGB)
 plt.imshow(img4,),plt.show()print("simple stich cost %f"%(simple-starttime))print("\ntotal cost %f"%(final-starttime))
 cv2.imwrite("simplepanorma.png",direct)
 cv2.imwrite("bestpanorma.png",warpImg)else:print("not enough matches!")
operation result
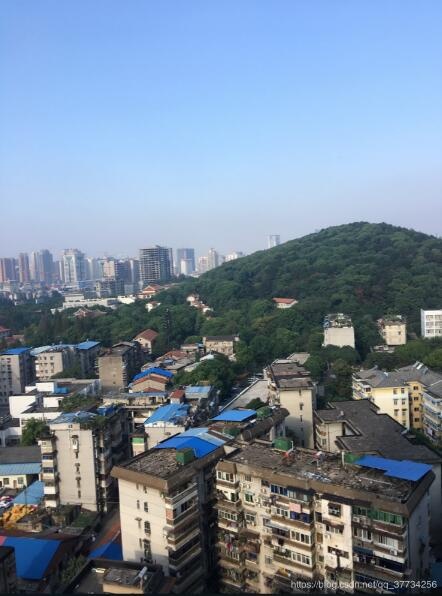
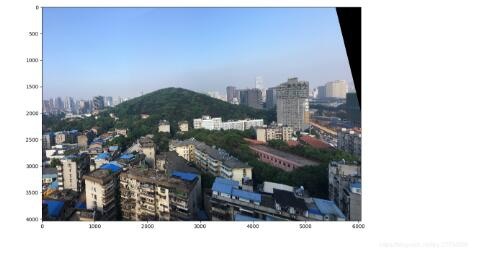
Original image 1.jpg
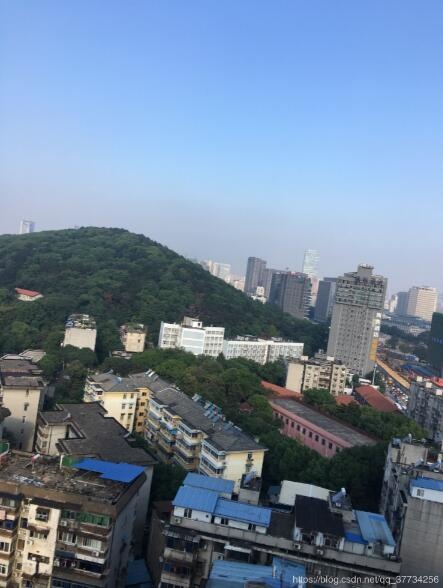
Original image 2.jpg
Feature point matching
Direct stitching and smooth contrast
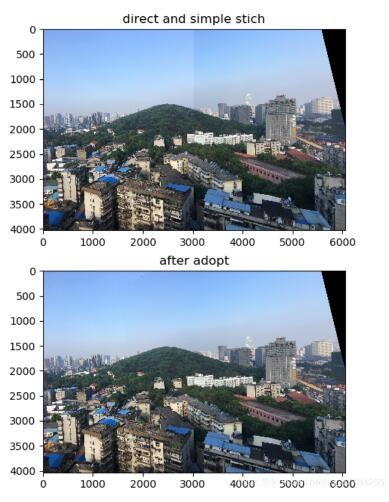
effect
This article has been included in the topic "Python Image Processing Operations", welcome to click to learn more exciting content.
The above is the whole content of this article, I hope it will be helpful to everyone's study.
Recommended Posts