Install and configure FreeIPA in Centos7
01
—
Introduction
When the unified identity management system is not deployed, the administrator needs to create and maintain an account and password for the corresponding system administrator on each host, and unified management cannot be performed. When the number of hosts increases to a certain extent, it will be difficult to carry out effective security management, and it will be difficult to control problems such as account and password leakage. A unified identity authentication system can help us solve this problem. In the Windows environment, domain accounts can be used for identity management, while in the Linux environment, FreeIPA can quickly and conveniently access the Linux system for unified identity authentication and authority management.
FreeIPA is an open source security solution for Linux that provides account management and centralized authentication, similar to Microsoft's Active Directory. FreeIPA is built on multiple open source projects, including 389 Directory Server, MIT Kerberos and SSSD.

FreeIPA can very directly add computers to your IPA domain on CentOS 7, Fedora and Ubuntu 14.04/16.04. Other operating systems can use SSSD or LDAP to authenticate to FreeIPA.
The features of FreeIPA are as follows:
- Integrate multiple services (389 Directory Server, MIT Kerberos, NTP, DNS, Dogtag certificate system, SSSD) to simplify installation and configuration
- Provides two management tools: WEB and command line for easy management
- Multi-master replication, scalable, highly available
- Rich interfaces, support CLI, Web UI, XMLRPC, JSONRPCAPI, Python SDK
The structure diagram is as follows:

**1.1.**Glossary
- MITKDC: The core of IPA certification
- 389 Directory Server: Lightweight directory access
- DogtagCertificate System: an authentication system that provides a powerful security framework to ensure the identity of users and the privacy of communications
- SSSD: SSSD is a newly added daemon process in Red Hat Enterprise Linux 6. This process can be used to access multiple authentication servers, such as LDAP, Kerberos, etc., and provide authorization. SSSD is a process between the local user and data storage. The local client first connects to the SSSD, and then the SSSD contacts the external resource provider (a remote server)
1.2 Check before installation
- Use ntp to synchronize time
- The firewall is closed, or the following ports are opened: TCP(80, 443,389,636,88, 464) UDP(88, 464,123)
- Configure the hosts file and set a fully qualified host name (such as: 192.168.1.1 freeipa1.douyu.com freeipa1)
1.3 test environment
- OS:Centos7.5
- Three machine cluster
1.4 FreeIPA Cookie Processing Security Vulnerability Edit
There is a security vulnerability in FreeIPA. The vulnerability stems from incorrect processing of cookie information. The IPA client does not check the identity of the server before sending a cookie containing authentication credentials. Allows an attacker to lure the ipa command line client to connect to a fake server, obtain sensitive session authentication credentials, and gain administrator access.
02
—
ready
Before we start the installation, we need to do a few things to ensure that the server is ready to run FreeIPA. Specifically, we will set the server hostname, update the system package, check whether the DNS record in preparation has been recorded, and ensure that the firewall allows FreeIPA traffic.
2.1. Configure static IP address
First configure a static IP address to avoid changes in the IP, resulting in the server not being found
[ root@local ~]# cat/etc/sysconfig/network-scripts/ifcfg-eth0
BOOTPROTO=static
IPADDR=192.168.192.130
NETMASK=255.255.255.0
GATEWAY=192.168.192.2
DEVICE=eth0
ONBOOT=yes
2.2. Set hostname
First, the server's hostname needs to match the FreeIPA fully qualified domain name (FQDN) to work properly. We will use cdswdemo-1.vpc.cloudera.com as the FQDN in this tutorial.
**The host name is very important. If it is the same as the one that has been used, an error will occur when you wait for the IPA configuration **
You can set the host name when creating the server, or you can set the host name from the command line after creating the server, using the hostname command:
hostnamectl set-hostname wang-1.tmp.gce.cloudera.com

2.3. Upgrade software and system kernel
Now, use yum to upgrade the software and system kernel.
yum update -y
2.4. Set up firewall
FreeIPA can choose to close the firewall or open the ports that the firewall needs to use. If the firewall is turned off, ignore the rest of this step.
Next, open the ports required by FreeIPA in the firewall.
firewall-cmd --permanent --add-port={80/tcp,443/tcp,389/tcp,636/tcp,88/tcp,464/tcp,53/tcp,88/udp,464/udp,53/udp,123/udp}

Reload the firewall for the changes to take effect.
firewall-cmd --reload

View firewall open ports:
firewall-cmd --zone=public--list-ports

2.5. Configure the hosts file
According to the hostname set earlier, add a mapping in the hosts file, for example:
172.31.115.124 wang-1.tmp.gce.cloudera.com wang-1
This one/etc/The contents of the hosts file is similar:
[ root@wang-1~]# cat /etc/hosts
127.0.0.1 localhost localhost.localdomain localhost4 localhost4.localdomain4
::1  localhost localhost.localdomain localhost6 localhost6.localdomain6
172.31.115.124 wang-1.tmp.gce.cloudera.comwang-1  # Added by Google
169.254.169.254 metadata.google.internal  # Added by Google
[ root@wang-1~]#
2.6. Configure random number generator
Next we will configure the random number generator in CentOS. This will allow FreeIPA to pre-form the encryption functions it needs for authentication.
Setting up FreeIPA requires a lot of random data to run its encryption operations. By default, the virtual machine will quickly run out of random data or entropy. To solve this problem, we will use rngd software random number generator. rngd works by taking data from hardware devices connected to other servers and providing it to the kernel's random number generator.
First, install rngd.
yum -y install rng-tools
Then enable it.
systemctl start rngd
Ensure that the service starts automatically at boot time.
systemctl enable rngd
Finally, verify that rngd is running.
systemctl status rngd
The output should include active (running) with a green font.

2.7. Install Domain Resolution device
If you need FreeIPA to configure the DNS server, proceed as follows. Otherwise, the following operations are not required.
DNS is the abbreviation of Domain Name System (Domain Name System), it is a mechanism to convert ip address into corresponding host name or host name into corresponding ip address. Among them, the resolution of the IP address through the domain name is called forward resolution, and the resolution of the domain name through the IP address is called reverse resolution.
2.7.1 Install the BIND server software and start it
yum -y install bind bind-utils bindbind-dyndb-ldap


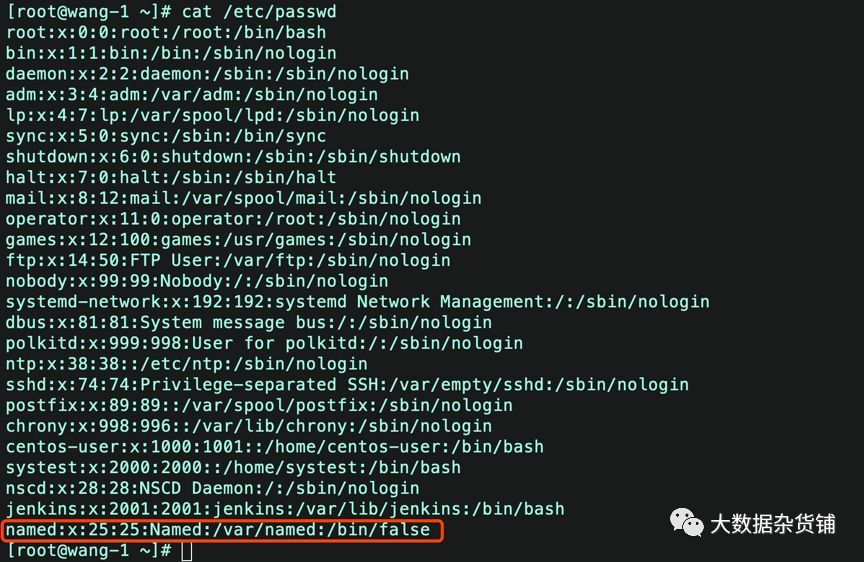
After installing BIND, the system will have one more user named.
2.7.2 Confirm the following parameter values
vi /etc/named.conf  --Change the following two parameters to yes
dnssec-enable yes;
dnssec-validation yes;

2.7.3 Start DNS service
systemctl start named.service
systemctl enable named

**2.7.4 Check whether the named process starts normally: **
systemctl status named
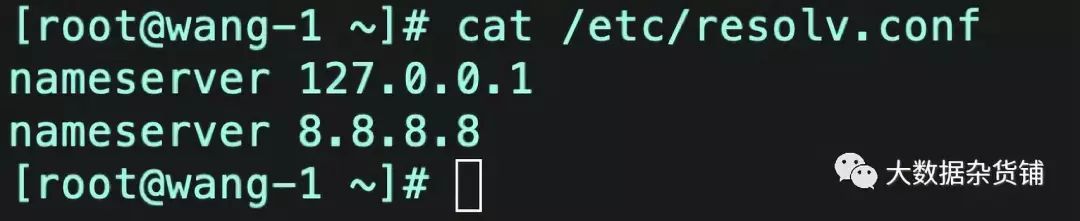
2.7.5 Set up the /etc/resolve.conf file
/etc/resolv.conf is a read-only mode, and it is not allowed to modify file permissions or modify files.
Using chmod 777 resolv.conf will report the following error:
chmod: changing permissions of `/etc/resolv.conf':Operation not permitted
Use chattr to lift this restriction
First look at the properties
sudo lsattr /etc/resolv.conf
See if there is an i attribute

Then remove the attribute i
sudo chattr -i /etc/resolv.conf
sudo lsattr /etc/resolv.conf

My cluster was originally managed by DNS, so I want to remove the DNS and set it to the default DNS.
After configuring all the dependencies and running, we can continue to install the FreeIPA server software itself.
03
—
Precautions
3.1. The node name must meet the requirements of FQDN
The FreeIPA cluster must have the password FQDN.
Reason: Freeipa has the concept of a domain (kerberos also has it), and kerberos requires all nodes to be in a domain. When we install freeipa, we will install kerberos together.
During the installation process, the installation script will automatically obtain the current machine name (which is the primary node of freeipa) and resolve the corresponding domain name.
We can get it from the prompt message of its installation script: The domain name has been determined based on the host name
In addition, our machine name must not be called similar to hadoop.sec19, which is distinguished by sec19 after the dot. This is absolutely impossible. According to freeipa, its domain name is sec19
This will result in all our machines not in the same domain.
3.2. DNS description
DNS is used for machine name resolution. If FreeIPA dual machine (ie master-slave server) is installed, DNS is needed. Reason: We need to execute a command similar to the following:
ipa-replica-prepare hadoop197.example.com--ip-address 192.168.116.197
At this time, it will go to the resolution on the DNS, and if it cannot find it, it will directly report an error. At this time, the slave node cannot be installed. If we only install a single node of freeipa, we can not use DNS.
04
—
Install FreeIPA service
4.1. Install the ipa-server package
We can continue to install ipa-server, which is FreeIPA service. If you do not need to configure dns, you can also not install the ipa-server-dns package.
yum -y install ipa-server ipa-server-dns


4.2. Configure ipa-server
Then run the FreeIPA installation command. This will run a script that prompts you to enter configuration options and install FreeIPA.
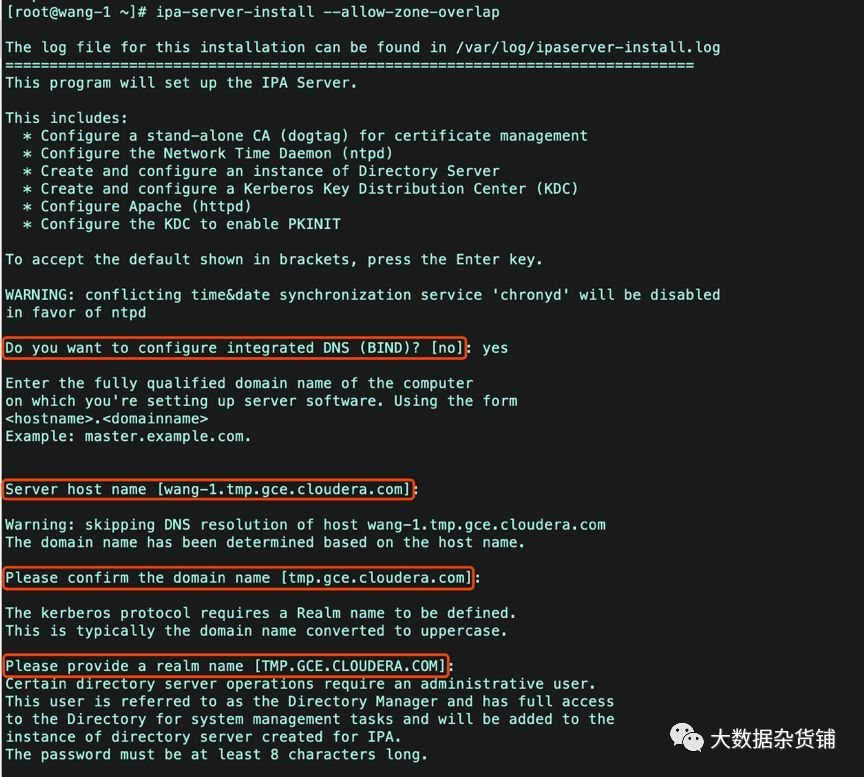
ipa-server-install --allow-zone-overlap
In addition to authentication, FreeIPA can also manage the host's DNS records. This can make it easier to configure and manage the host. In this tutorial, we will not use FreeIPA's integrated DNS, because it is basically not needed.
Do you want to configure integrated DNS(BIND)?[no]: no
Next, you need to enter the server's hostname, domain name, and Kerberos domain name. Kerberos is an authentication protocol, FreeIPA uses these protocols to verify the identity of the host. It is strongly recommended that you use the domain name as the Kerberos domain. Using a different naming scheme will cause problems with FreeIPA's Active Directory integration and may cause other problems.
**Warning: **Do not use your root domain (example.com) as your IPA domain name. This may cause DNS problems.
Server host name [ipa.example.org]: ipa.example.org
Please confirm the domain name [example.org]: ipa.example.org
Please provide a realm name [EXAMPLE.ORG]: IPA.EXAMPLE.ORG
Next, create a password for the LDAP manager. This is the LDAP required for FreeIPA function. Then there is the IPA administrator password, which will be used when logging into FreeIPA as an administrator user. It is strongly recommended to use secure randomly generated passwords, because the security of the entire system depends on them.
Confirm the configuration. After this, the installer will run.
Continue to configure the system with these values?[no]: yes
The installation process may take several minutes, depending on the speed of the server. Now that we have completed the service installation, we need to test it.
[ root@wang-1~]# ipa-server-install--allow-zone-overlap
The log file forthis installation can be found in/var/log/ipaserver-install.log
==============================================================================
This program will set up the IPA Server.
This includes:*Configure a stand-alone CA(dogtag)for certificate management
* Configure the Network Time Daemon(ntpd)* Createand configure an instance of Directory Server
* Createand configure a Kerberos Key Distribution Center(KDC)*Configure Apache(httpd)*Configure the KDC to enable PKINIT
To accept the default shown in brackets, press theEnter key.
WARNING: conflicting time&date synchronizationservice 'chronyd' will be disabled
in favor of ntpd
Do you want to configureintegrated DNS(BIND)?[no]: yes
Enter the fully qualified domain name of thecomputer
on which you're setting up server software. Usingthe form
< hostname>.<domainname>
Example: master.example.com.
Server host name[wang-1.tmp.gce.cloudera.com]:
Warning: skipping DNS resolution of hostwang-1.tmp.gce.cloudera.com
The domain name has been determined based on thehost name.
Please confirm the domainname [tmp.gce.cloudera.com]:
The kerberos protocol requires a Realm name to bedefined.
This is typically the domain name converted touppercase.
Please provide a realm name[TMP.GCE.CLOUDERA.COM]:
Certain directory server operations require anadministrative user.
This user is referred to as the Directory Managerand has full access
to the Directory for system management tasks andwill be added to the
instance of directory server created for IPA.
The password must be at least 8 characters long.
Directory Manager password:Password(confirm):
The IPA server requires an administrative user,named 'admin'.
This user is a regular system account used for IPAserver administration.
IPA admin password:Password(confirm):
Checking DNS domain tmp.gce.cloudera.com., pleasewait ...
Do you want to configure DNSforwarders?[yes]:
Following DNS servers are configured in/etc/resolv.conf:127.0.0.1,8.8.8.8
Do you want to configurethese servers as DNS forwarders?[yes]:
All DNS servers from/etc/resolv.conf were added.You can enter additional addresses now:
Enter an IP address for a DNSforwarder, or press Enter to skip:
Checking DNS forwarders, please wait ...
Do you want to search formissing reverse zones?[yes]:
Do you want to create reversezone for IP 172.31.115.124[yes]:
Please specify the reversezone name [115.31.172.in-addr.arpa.]:
Using reverse zone(s)115.31.172.in-addr.arpa.
The IPA Master Server will be configured with:
Hostname: wang-1.tmp.gce.cloudera.com
IP address(es):172.31.115.124
Domain name: tmp.gce.cloudera.com
Realm name: TMP.GCE.CLOUDERA.COM
BIND DNS server will be configured to serve IPAdomain with:
Forwarders:127.0.0.1,8.8.8.8
Forward policy: only
Reverse zone(s):115.31.172.in-addr.arpa.
Continue to configure thesystem with these values?[no]: yes
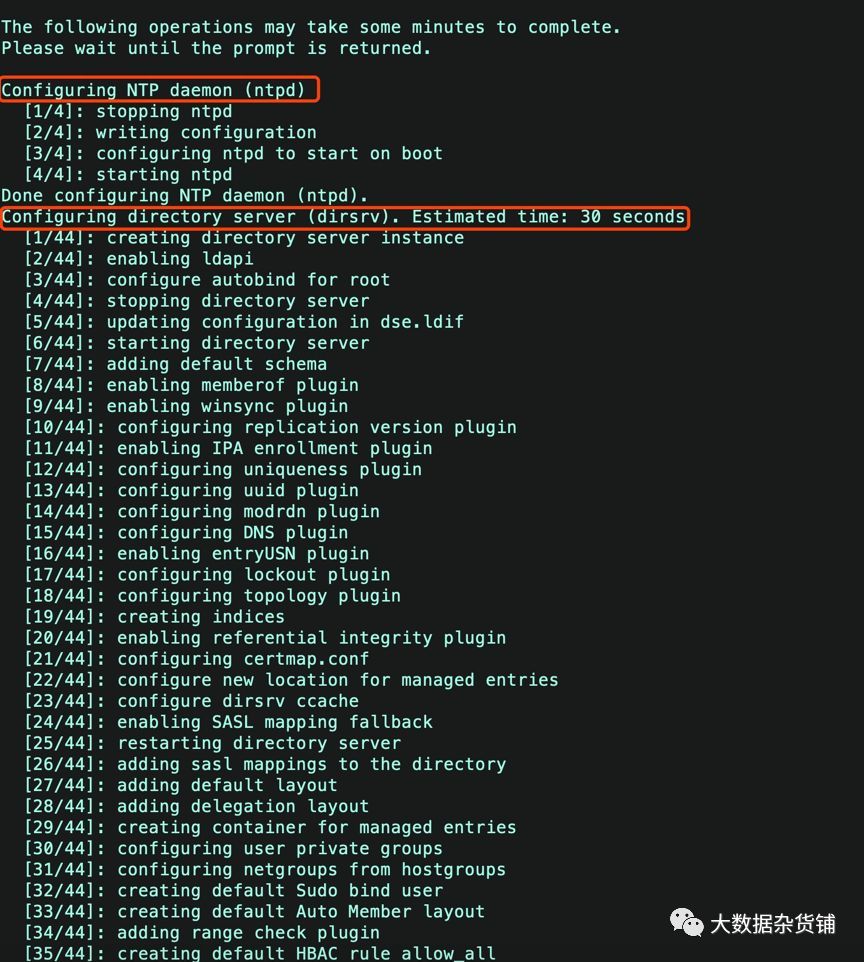
The following operations may take some minutes tocomplete.
Please wait until the prompt is returned.
Configuring NTP daemon(ntpd)[1/4]:stopping ntpd
[2 /4]:writing configuration
[3 /4]:configuring ntpd to start on boot
[4 /4]:starting ntpd
Done configuring NTP daemon(ntpd).
Configuring directory server(dirsrv). Estimatedtime:30 seconds
[1 /44]:creating directory server instance
[2 /44]:enabling ldapi
[3 /44]:configure autobind for root
[4 /44]:stopping directory server
[5 /44]:updating configuration in dse.ldif
[6 /44]:starting directory server
[7 /44]:adding default schema
[8 /44]:enabling memberof plugin
[9 /44]:enabling winsync plugin
[10 /44]:configuring replication version plugin
[11 /44]:enabling IPA enrollment plugin
[12 /44]:configuring uniqueness plugin
[13 /44]:configuring uuid plugin
[14 /44]:configuring modrdn plugin
[15 /44]:configuring DNS plugin
[16 /44]:enabling entryUSN plugin
[17 /44]:configuring lockout plugin
[18 /44]:configuring topology plugin
[19 /44]:creating indices
[20 /44]:enabling referential integrity plugin
[21 /44]:configuring certmap.conf
[22 /44]:configure newlocationfor managed entries
[23 /44]:configure dirsrv ccache
[24 /44]:enabling SASL mapping fallback
[25 /44]:restarting directory server
[26 /44]:adding sasl mappings to the directory
[27 /44]:adding default layout
[28 /44]:adding delegation layout
[29 /44]:creating container for managed entries
[30 /44]:configuring user private groups
[31 /44]:configuring netgroups from hostgroups
[32 /44]:creating default Sudo bind user
[33 /44]:creating default Auto Member layout
[34 /44]:adding range check plugin
[35 /44]:creating default HBAC rule allow_all
[36 /44]:adding entries for topology management
[37 /44]:initializing group membership
[38 /44]:adding master entry
[39 /44]:initializing domain level
[40 /44]:configuring Posix uid/gid generation
[41 /44]:adding replication acis
[42 /44]:activating sidgen plugin
[43 /44]:activating extdom plugin
[44 /44]:configuring directory to start on boot
Done configuring directory server(dirsrv).
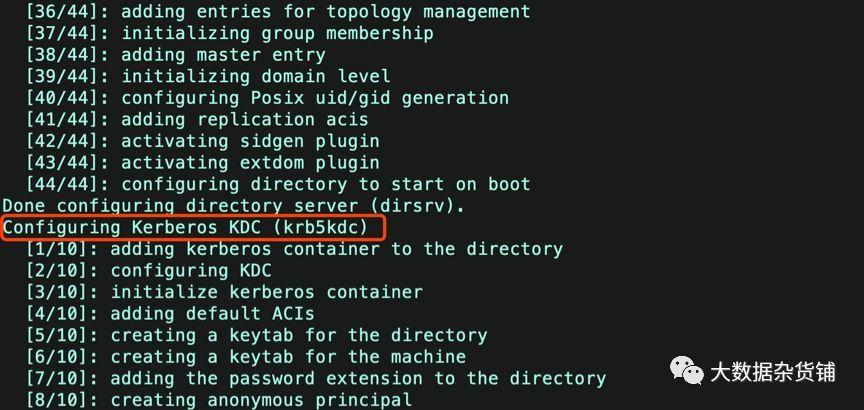
Configuring Kerberos KDC(krb5kdc)[1/10]:adding kerberos container to the directory
[2 /10]:configuring KDC
[3 /10]:initialize kerberos container
[4 /10]:adding default ACIs
[5 /10]:creating a keytab for the directory
[6 /10]:creating a keytab for the machine
[7 /10]:adding the password extension to the directory
[8 /10]:creating anonymous principal
[9 /10]:starting the KDC
[10 /10]:configuring KDC to start on boot
Done configuring Kerberos KDC(krb5kdc).
Configuring kadmin
[1 /2]:starting kadmin
[2 /2]:configuring kadmin to start on boot
Done configuring kadmin.
Configuring ipa-custodia
[1 /5]:Making sure custodia container exists
[2 /5]:Generating ipa-custodia config file
[3 /5]:Generating ipa-custodia keys
[4 /5]:starting ipa-custodia
[5 /5]:configuring ipa-custodia to start on boot
Done configuring ipa-custodia.
Configuring certificate server(pki-tomcatd).Estimated time:3 minutes
[1 /28]:configuring certificate server instance
[2 /28]:exporting Dogtag certificate store pin
[3 /28]:stopping certificate server instance to update CS.cfg
[4 /28]:backing up CS.cfg
[5 /28]:disabling nonces
[6 /28]:set up CRL publishing
[7 /28]:enable PKIX certificate path discovery and validation
[8 /28]:starting certificate server instance
[9 /28]:configure certmonger for renewals
[10 /28]:requesting RA certificate from CA
[11 /28]:setting audit signing renewal to 2 years
[12 /28]:restarting certificate server
[13 /28]: publishing the CA certificate
[14 /28]:adding RA agent as a trusted user
[15 /28]:authorizing RA to modify profiles
[16 /28]:authorizing RA to manage lightweight CAs
[17 /28]:Ensure lightweight CAs container exists
[18 /28]:configure certificate renewals
[19 /28]:configure Server-Cert certificate renewal
[20 /28]:Configure HTTP to proxy connections
[21 /28]:restarting certificate server
[22 /28]:updating IPA configuration
[23 /28]:enabling CA instance
[24 /28]:migrating certificate profiles to LDAP
[25 /28]:importing IPA certificate profiles
[26 /28]:adding default CA ACL
[27 /28]:adding 'ipa' CA entry
[28 /28]:configuring certmonger renewal for lightweight CAs
Done configuring certificate server(pki-tomcatd).
Configuring directory server(dirsrv)[1/3]:configuring TLS for DS instance
[2 /3]:adding CA certificate entry
[3 /3]:restarting directory server
Done configuring directory server(dirsrv).
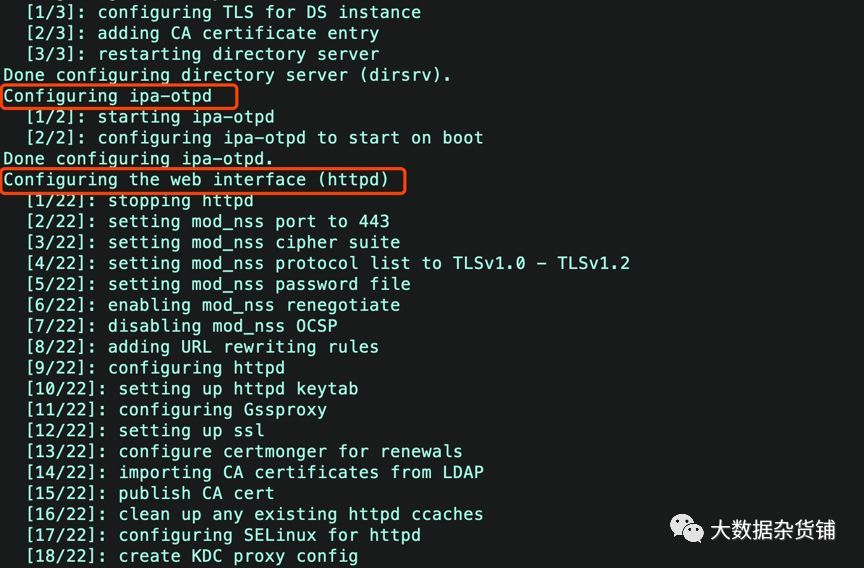
Configuring ipa-otpd
[1 /2]:starting ipa-otpd
[2 /2]:configuring ipa-otpd to start on boot
Done configuring ipa-otpd.
Configuring the web interface(httpd)[1/22]:stopping httpd
[2 /22]:setting mod_nss port to 443[3/22]:setting mod_nss cipher suite
[4 /22]:setting mod_nss protocol list to TLSv1.0- TLSv1.2[5/22]:setting mod_nss password file
[6 /22]:enabling mod_nss renegotiate
[7 /22]:disabling mod_nss OCSP
[8 /22]:adding URL rewriting rules
[9 /22]:configuring httpd
[10 /22]:setting up httpd keytab
[11 /22]:configuring Gssproxy
[12 /22]:setting up ssl
[13 /22]:configure certmonger for renewals
[14 /22]:importing CA certificates from LDAP
[15 /22]:publish CA cert
[16 /22]:clean up any existing httpd ccaches
[17 /22]:configuring SELinux for httpd
[18 /22]:create KDC proxy config
[19 /22]:enable KDC proxy
[20 /22]:starting httpd
[21 /22]:configuring httpd to start on boot
[22 /22]:enabling oddjobd
Done configuring the web interface(httpd).
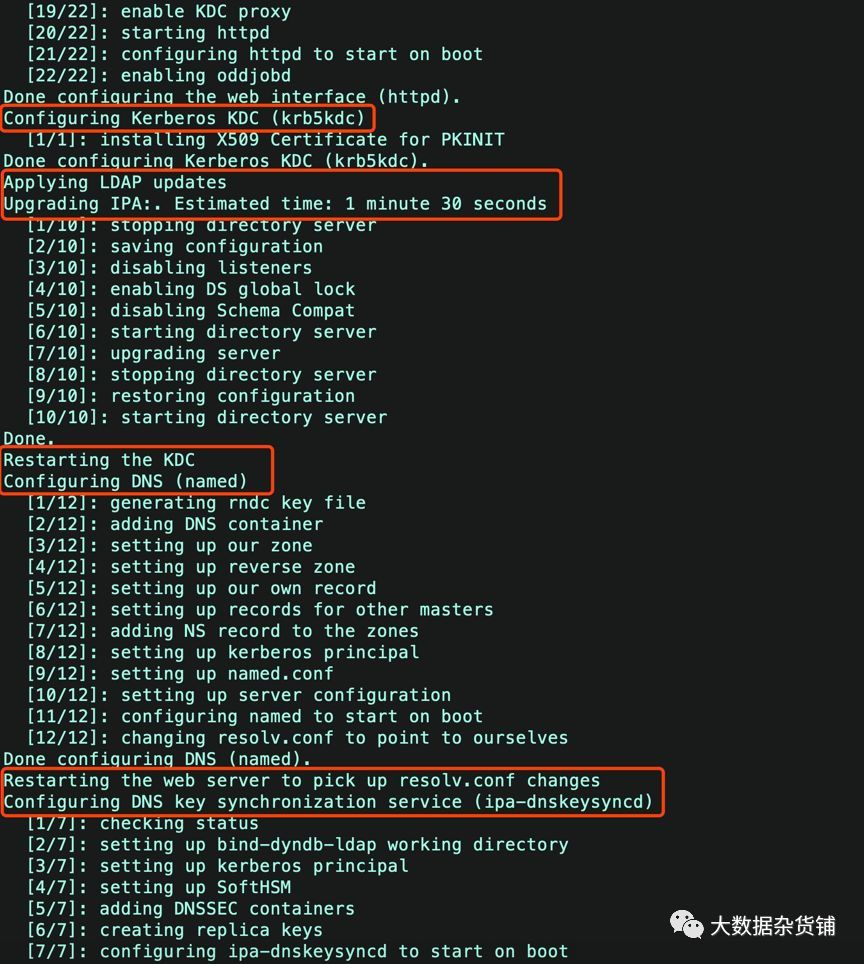
Configuring Kerberos KDC(krb5kdc)[1/1]:installing X509 Certificate for PKINIT
Done configuring Kerberos KDC(krb5kdc).
Applying LDAP updates
Upgrading IPA:. Estimated time:1 minute 30 seconds
[1 /10]:stopping directory server
[2 /10]:saving configuration
[3 /10]:disabling listeners
[4 /10]:enabling DS global lock
[5 /10]:disabling Schema Compat
[6 /10]:starting directory server
[7 /10]:upgrading server
[8 /10]:stopping directory server
[9 /10]:restoring configuration
[10 /10]:starting directory server
Done.
Restarting the KDC
Configuring DNS(named)[1/12]:generating rndc key file
[2 /12]:adding DNS container
[3 /12]:setting up our zone
[4 /12]:setting up reverse zone
[5 /12]:setting up our own record
[6 /12]:setting up records for other masters
[7 /12]:adding NS record to the zones
[8 /12]:setting up kerberos principal
[9 /12]:setting up named.conf
[10 /12]:setting up server configuration
[11 /12]:configuring named to start on boot
[12 /12]:changing resolv.conf to point to ourselves
Done configuring DNS(named).
Restarting the web server to pick up resolv.confchanges
Configuring DNS key synchronization service(ipa-dnskeysyncd)[1/7]:checking status
[2 /7]:setting up bind-dyndb-ldap working directory
[3 /7]:setting up kerberos principal
[4 /7]:setting up SoftHSM
[5 /7]:adding DNSSEC containers
[6 /7]:creating replica keys
[7 /7]:configuring ipa-dnskeysyncd to start on boot
Done configuring DNS key synchronization service(ipa-dnskeysyncd).
Restarting ipa-dnskeysyncd
Restarting named
Updating DNS system records
Configuring client side components
Using existing certificate '/etc/ipa/ca.crt'.
Client hostname: wang-1.tmp.gce.cloudera.com
Realm: TMP.GCE.CLOUDERA.COM
DNS Domain: tmp.gce.cloudera.com
IPA Server: wang-1.tmp.gce.cloudera.com
BaseDN: dc=tmp,dc=gce,dc=cloudera,dc=com
Skipping synchronizing time with NTP server.
New SSSD config will be created
Configured sudoers in/etc/nsswitch.conf
Configured /etc/sssd/sssd.conf
tryinghttps://wang-1.tmp.gce.cloudera.com/ipa/json
[ try1]: Forwarding 'schema' to json server'https://wang-1.tmp.gce.cloudera.com/ipa/json'
trying https://wang-1.tmp.gce.cloudera.com/ipa/session/json
[ try1]: Forwarding 'ping' to json server'https://wang-1.tmp.gce.cloudera.com/ipa/session/json'[try1]: Forwarding 'ca_is_enabled' to json server'https://wang-1.tmp.gce.cloudera.com/ipa/session/json'
Systemwide CA database updated.
Adding SSH public key from/etc/ssh/ssh_host_rsa_key.pub
Adding SSH public key from/etc/ssh/ssh_host_ecdsa_key.pub
Adding SSH public key from/etc/ssh/ssh_host_ed25519_key.pub
[ try1]: Forwarding 'host_mod' to json server'https://wang-1.tmp.gce.cloudera.com/ipa/session/json'
SSSD enabled
Configured /etc/openldap/ldap.conf
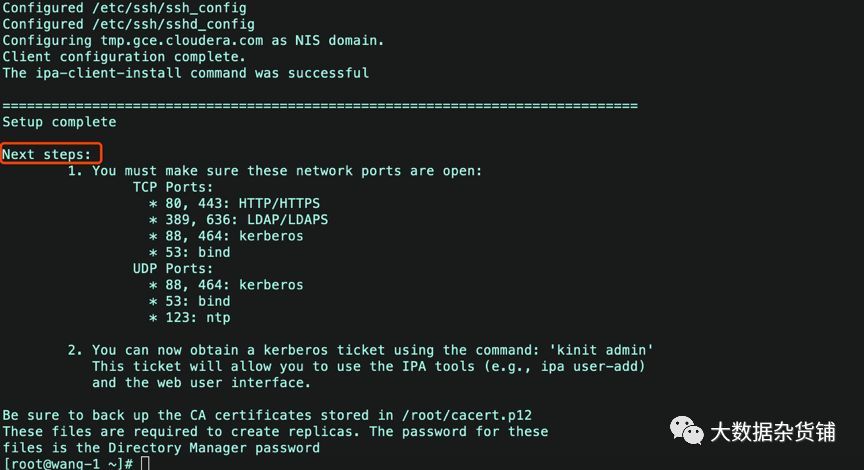
Configured /etc/ssh/ssh_config
Configured /etc/ssh/sshd_config
Configuring tmp.gce.cloudera.com as NIS domain.
Client configuration complete.
The ipa-client-install command was successful
==============================================================================
Setup complete
Next steps:1.You must make sure these network ports are open:
TCP Ports:*80,443: HTTP/HTTPS
*389,636: LDAP/LDAPS
*88,464: kerberos
*53: bind
UDP Ports:*88,464: kerberos
*53: bind
*123: ntp
2. You can now obtain a kerberos ticket using the command:'kinit admin'
This ticket will allow you to use the IPA tools(e.g., ipa user-add)
and the web user interface.
Be sure to back up the CA certificates stored in/root/cacert.p12
These files are required to create replicas. Thepassword for these
files is the Directory Manager password
[ root@wang-1~]#


4.3. Verify FreeIPA service function
First, verify that the Kerberos realm has been installed correctly by attempting to initialize the Kerberos token for the admin user.
kinit admin

If it works, you will be prompted to enter the IPA administrator password during the installation process and press ENTER.
Next, verify that the IPA server is operating normally.
ipa user-find admin
The output is as follows:
[ root@wang-1~]# ipa user-find admin
- - - - - - - - - - - - - - 1 user matched
--------------
 Userlogin: admin
 Last name:Administrator
 Homedirectory:/home/admin
 Loginshell:/bin/bash
 Principalalias: [email protected]
 UID:580800000
 GID:580800000
 Accountdisabled: False
----------------------------
Number of entries returned 1----------------------------[root@wang-1~]#
We should also be able to access the Web UI at https://xuefeng-1.vpc.cloudera.com/
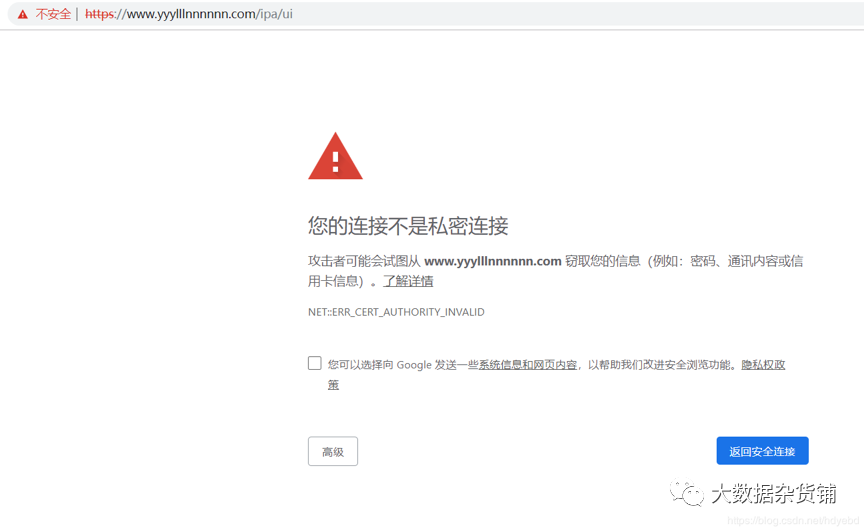
Select "Advanced"

Choose to continue to https://xuefeng-1.vpc.cloudera.com/, then choose "Cancel", "Cancel", cancel twice, you can enter the following page

Note: The TLS certificate is not trusted. We bypass the warning. In the future, you can use Tencent Cloud free SSL to obtain a valid TLS certificate. After obtaining it, you need to upload the CA certificate (usually ca.crt), certificate file (your_domain.crt) and key file (your_domain.key) to the server. After obtaining the file, install the CA using the previously set directory administrator password. You can add a space before the command to prevent it from being saved in the shell history. ipa-cacert-manage -p your_directory_manager_password -n httpcrt -tC,, install ca.crt Then install the site certificate and key. ipa-server-certinstall-w -d your_domain.key your_domain.crt You need to restart the server for these changes to take effect.
In the Web UI, log in as the admin user. Username is admin and password will be the IPA administrator password you set earlier. The top of the page will display Authenticating... and you will enter the main IPA page as shown below:

Finally, let us explore some features of FreeIPA by adding new users.
4.4. Configure IPA user
FreeIPA has a very extensive user management and strategy functions. Similar to standard Unix users, FreeIPA users can belong to groups. You can allow or deny groups or individual users to access hosts (client computers) or host groups (host groups) based on policies. FreeIPA can also manage sudo access, and can grant groups or users sudo access on a host or host group.
This tutorial will show you how to add new users to help you get started.
To add a user, click the "Identification" tab, and then click "Users". This will display a user table. Click the +Add button above the table to add a new user. Fill in the required fields (such as first name and last name) in the form that opens, and click Add to add users as-is or Add and Edit to configure advanced details.
You can also access advanced details by clicking on a user in the original table. This is what the administrator sees when viewing user details:

Ordinary users can also log in to the IPA GUI. They will be able to view their permissions and edit personal details.
When logging in to the IPA computer for the first time, the system will ask the new user to change the password. This applies to IPA GUI as well as SSH. IPA can add the ability to add SSH keys. Users can upload their public SSH keys and propagate them to IPA machines, allowing passwordless login. Then, the user can delete the SSH key at any time without worrying about it still exists on each server.
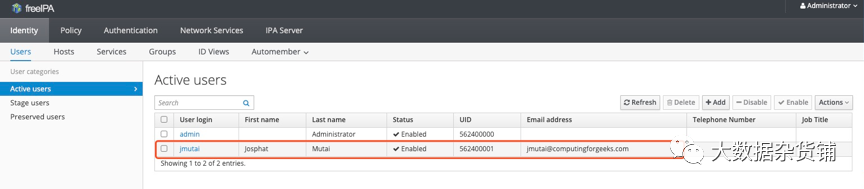
Test by adding user accounts through the list and listing accounts:
# ipa user-add jmutai --first=Josphat--last=Mutai [email protected] --shell=/bin/bash--password

After the execution is complete, you can see through the interface:
4.5. View IPA task status
Use ipactl status to view the status of IPA components
[ root@wang-2~]# ipactl status
Directory Service: RUNNING
krb5kdc Service: RUNNING
kadmin Service: RUNNING
httpd Service: RUNNING
ipa-custodia Service: RUNNING
ntpd Service: RUNNING
pki-tomcatd Service: RUNNING
ipa-otpd Service: RUNNING
ipa: INFO: The ipactl command was successful
[ root@wang-2~]#
The Ipactl command is as follows:
[ root@xuefeng-1~]# ipactl --help
Usage: ipactl start|stop|restart|status


Options:-h,--help            show this help messageand exit
 - d,--debug           Display debugginginformation
 - f,--force           Force IPA to start.Combine options --skip-version-
      check and--ignore-service-failures
 - - ignore-service-failures
      If any service startfails,do not rollback the
      services,continuewith theoperation
 - - skip-version-check  skip versioncheck
05
—
FreeIPA client installation
Install the freeIPA client on the wang-3.gce.cloudera.com node.
5.1. Install package
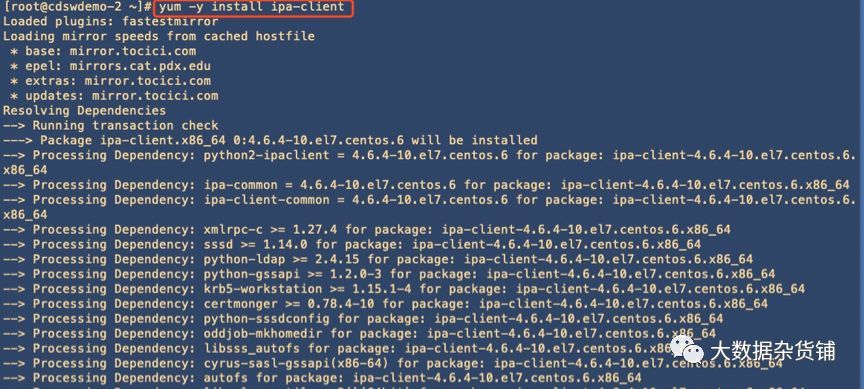
Use the following command to prepare FreeIPA client software
yum -y install ipa-client ntp
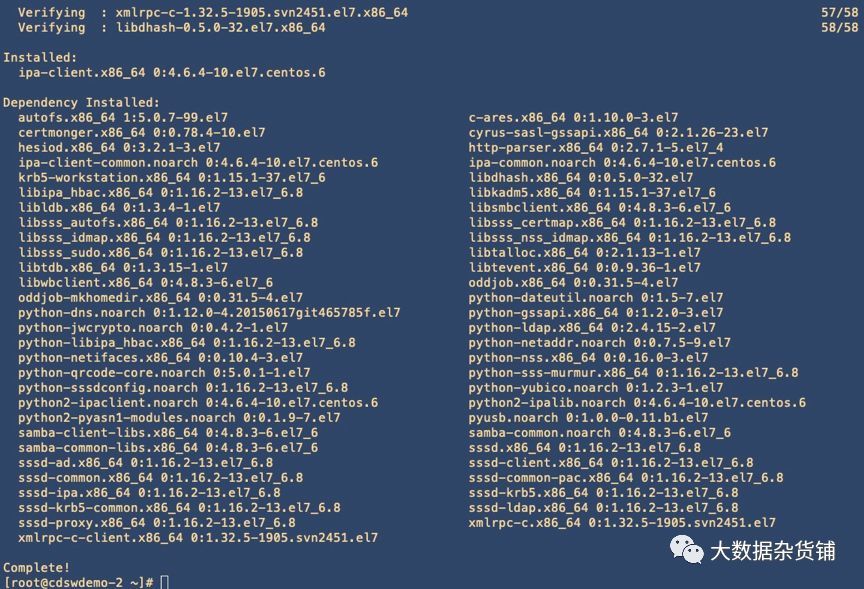
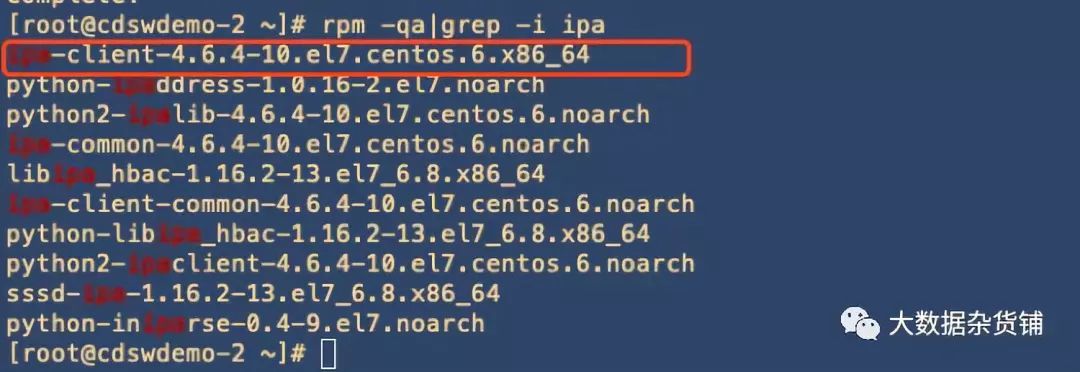
Check the ipa-client software:
rpm -qa|grep -I ipa
[ root@cdswdemo-2~]# rpm-qa|grep -i ipa

ipa-client-4.6.4-10.el7.centos.6.x86_64
python-ipaddress-1.0.16-2.el7.noarch
python2-ipalib-4.6.4-10.el7.centos.6.noarch
ipa-common-4.6.4-10.el7.centos.6.noarch
libipa_hbac-1.16.2-13.el7_6.8.x86_64
ipa-client-common-4.6.4-10.el7.centos.6.noarch
python-libipa_hbac-1.16.2-13.el7_6.8.x86_64
python2-ipaclient-4.6.4-10.el7.centos.6.noarch
sssd-ipa-1.16.2-13.el7_6.8.x86_64
python-iniparse-0.4-9.el7.noarch
[ root@cdswdemo-2~]#
5.2. Perform client installation
There are two ways to install the client, interactive and non-interactive.
5.2.1. Non-interactive installation
When installing IPAClient, be careful not to enter symbols such as spaces
[ root@ipa112 ~]# ipa-client-install--domain=example.com --realm=EXAMPLE.COM [email protected]=hadoop123 --enable-dns-updates --permit --no-ntp
Provide your IPA server name(ex:ipa.example.com): ipa110.example.com  --Enter ipaserver,Need to pay attention to the space behind, otherwise it will throw an exception
5.2.2. Interactive installation
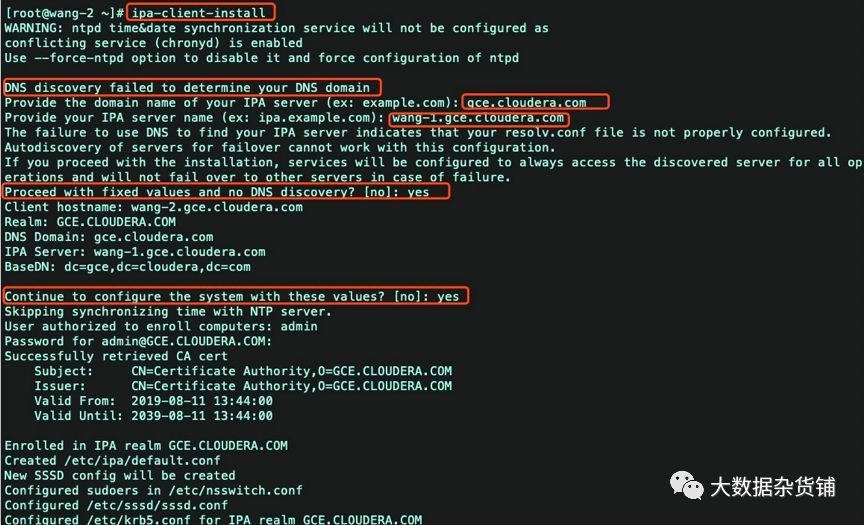
Execute the following command to perform the installation
ipa-client-install
start installation:
[ root@wang-2~]#ipa-client-install

WARNING: ntpd time&date synchronizationservice will not be configured as
conflicting service(chronyd) is enabled
Use --force-ntpd option to disable it and forceconfiguration of ntpd


DNS discovery failed to determine your DNS domain
Provide the domain name ofyour IPA server(ex: example.com): gce.cloudera.com

Provide your IPA server name(ex: ipa.example.com): wang-1.gce.cloudera.com

The failure to use DNS to find your IPA serverindicates that your resolv.conf file is not properly configured.
Autodiscovery of servers for failover cannot workwith this configuration.
If you proceed with the installation, serviceswill be configured to always access the discovered server for all operationsand will not fail over to other servers incaseof failure.
Proceed with fixed values andno DNS discovery?[no]: yes

Client hostname: wang-2.gce.cloudera.com
Realm: GCE.CLOUDERA.COM
DNS Domain: gce.cloudera.com
IPA Server: wang-1.gce.cloudera.com
BaseDN: dc=gce,dc=cloudera,dc=com


Continue to configure thesystem with these values?[no]: yes

Skipping synchronizing time with NTP server.
User authorized to enroll computers: admin
Password for [email protected]:
Successfully retrieved CA cert
 Subject:     CN=CertificateAuthority,O=GCE.CLOUDERA.COM
 Issuer:      CN=CertificateAuthority,O=GCE.CLOUDERA.COM
 ValidFrom:2019-08-1113:44:00
 ValidUntil:2039-08-1113:44:00


Enrolled in IPA realm GCE.CLOUDERA.COM
Created /etc/ipa/default.conf
New SSSD config will be created
Configured sudoers in/etc/nsswitch.conf
Configured /etc/sssd/sssd.conf
Configured /etc/krb5.conf for IPA realmGCE.CLOUDERA.COM
trying https://wang-1.gce.cloudera.com/ipa/json
[ try1]: Forwarding 'schema' to json server'https://wang-1.gce.cloudera.com/ipa/json'
trying https://wang-1.gce.cloudera.com/ipa/session/json
[ try1]: Forwarding 'ping' to json server'https://wang-1.gce.cloudera.com/ipa/session/json'[try1]: Forwarding 'ca_is_enabled' to json server'https://wang-1.gce.cloudera.com/ipa/session/json'
Systemwide CA database updated.
Adding SSH public key from/etc/ssh/ssh_host_rsa_key.pub
Adding SSH public key from/etc/ssh/ssh_host_ecdsa_key.pub
Adding SSH public key from/etc/ssh/ssh_host_ed25519_key.pub
[ try1]: Forwarding 'host_mod' to json server'https://wang-1.gce.cloudera.com/ipa/session/json'
Could not update DNS SSHFP records.
SSSD enabled
Configured /etc/openldap/ldap.conf
Configured /etc/ssh/ssh_config
Configured /etc/ssh/sshd_config
Configuring gce.cloudera.com as NIS domain.
Client configuration complete.
The ipa-client-install command was successful
[ root@wang-2~]#


06
—
FreeIPA hot standby configuration
The document suggests that 2-3 copies are recommended for each data center, but no more than 4 copies
6.1. Create a backup certificate
First execute the following command on the main server ipa server
kinit admin
ipa-replica-prepare wang-3.gce.cloudera.com
 Replicacreation using 'ipa-replica-prepare' to generate replica file
is supported only in0-level IPA domain.

The current IPA domain level is 1 and thus thereplica must
be created by promoting an existing IPA client.

To set up a replica use the following procedure:1.)set up a client on the hostusing 'ipa-client-install'2.) promote the client to replicarunning 'ipa-replica-install'*without* replica filespecified

' ipa-replica-prepare' is allowed only in domainlevel 0
The ipa-replica-prepare command failed.
The above operation reports an error: Therefore, first install ipa-client and ipa-replica on the replica server
6.2. Main server add node
Before installing ipa-client on the wang-3 replica server, perform the add server operation
ipa host-add --force --ip-address=172.31.115.236wang-3.gce.cloudera.com
[ root@wang-2~]# ipa host-add --force--ip-address=172.31.115.236 wang-3.gce.cloudera.com
------------------------------------
Added host "wang-3.gce.cloudera.com"------------------------------------
 Host name:wang-3.gce.cloudera.com
 Principalname: host/[email protected]
 Principalalias: host/[email protected]
 Password:False
 Keytab:False
 Managedby: wang-3.gce.cloudera.com

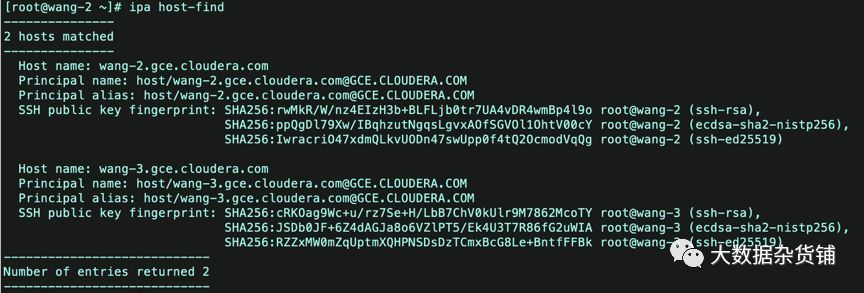
Check if the addition is successful
ipa host-find
[ root@wang-2~]# ipa host-find
- - - - - - - - - - - - - - - 2 hosts matched
---------------
 Host name:wang-2.gce.cloudera.com
 Principalname: host/[email protected]
 Principalalias: host/[email protected]
 SSH publickey fingerprint: SHA256:rwMkR/W/nz4EIzH3b+BLFLjb0tr7UA4vDR4wmBp4l9o root@wang-2(ssh-rsa),
        SHA256:ppQgDl79Xw/IBqhzutNgqsLgvxAOfSGVOl1OhtV00cY root@wang-2(ecdsa-sha2-nistp256),
        SHA256:IwracriO47xdmQLkvUODn47swUpp0f4tQ2OcmodVqQg root@wang-2(ssh-ed25519)

 Host name:wang-3.gce.cloudera.com
 Principalname: host/[email protected]
 Principalalias: host/[email protected]
----------------------------
Number of entries returned 2----------------------------

6.3. Hot standby server installation client
For installation steps, refer to Chapter 4 FreeIPA Client Installation. After the client installation is complete, check the host node:
6.4. Hot standby server installation replica
The ipa-replica-install command is in the ipa-server package. So install the ipa-server package first.
yum -y install ipa-server
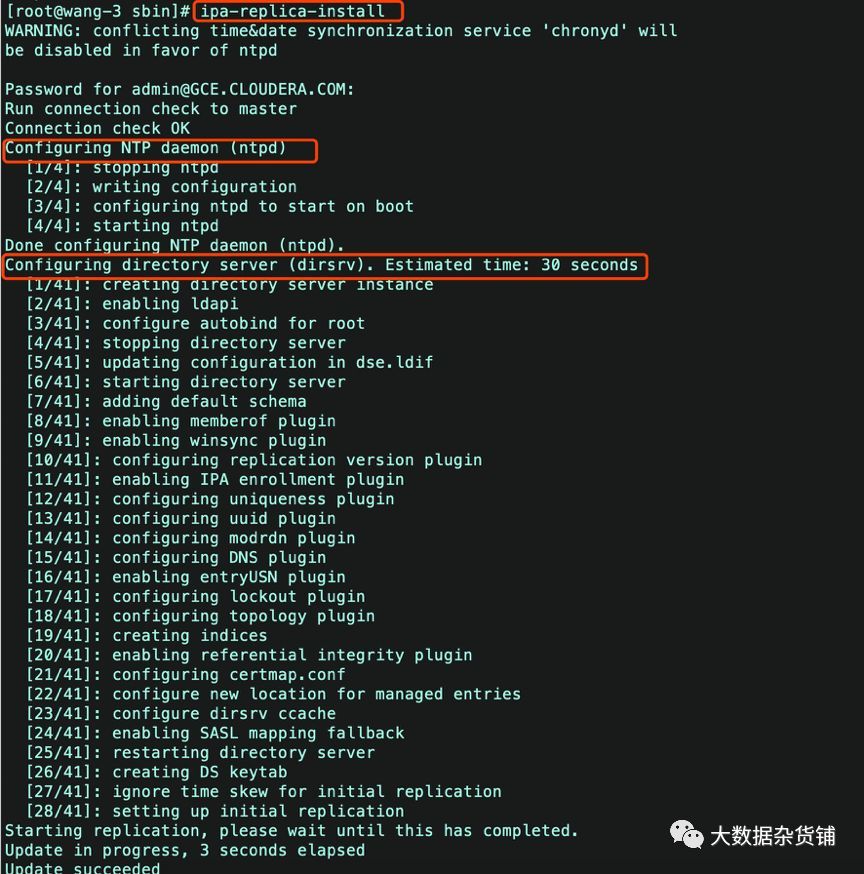
Execute the ipa-replica-install command for installation
[ root@wang-3 sbin]#ipa-replica-install
WARNING: conflicting time&date synchronizationservice 'chronyd' will
be disabled in favor of ntpd
Password [email protected]:
Run connection check to master
Connection check OK
Configuring NTP daemon(ntpd)[1/4]:stopping ntpd
[2 /4]:writing configuration
[3 /4]:configuring ntpd to start on boot
[4 /4]:starting ntpd
Done configuring NTP daemon(ntpd).
Configuring directory server(dirsrv). Estimatedtime:30 seconds
[1 /41]:creating directory server instance
[2 /41]:enabling ldapi
[3 /41]:configure autobind for root
[4 /41]:stopping directory server
[5 /41]:updating configuration in dse.ldif
[6 /41]:starting directory server
[7 /41]:adding default schema
[8 /41]:enabling memberof plugin
[9 /41]:enabling winsync plugin
[10 /41]:configuring replication version plugin
[11 /41]:enabling IPA enrollment plugin
[12 /41]:configuring uniqueness plugin
[13 /41]:configuring uuid plugin
[14 /41]:configuring modrdn plugin
[15 /41]:configuring DNS plugin
[16 /41]:enabling entryUSN plugin
[17 /41]:configuring lockout plugin
[18 /41]:configuring topology plugin
[19 /41]:creating indices
[20 /41]:enabling referential integrity plugin
[21 /41]:configuring certmap.conf
[22 /41]:configure newlocationfor managed entries
[23 /41]:configure dirsrv ccache
[24 /41]:enabling SASL mapping fallback
[25 /41]:restarting directory server
[26 /41]:creating DS keytab
[27 /41]:ignore time skew for initial replication
[28 /41]:setting up initial replication
Starting replication, please wait until this hascompleted.
Update in progress,3 seconds elapsed
Update succeeded
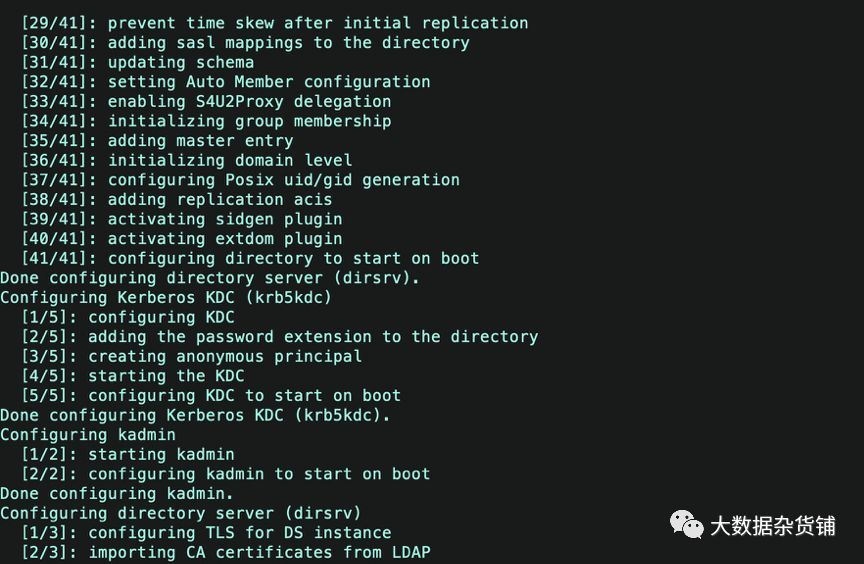
[29 /41]:prevent time skew after initial replication
[30 /41]:adding sasl mappings to the directory
[31 /41]:updating schema
[32 /41]:setting Auto Member configuration
[33 /41]:enabling S4U2Proxy delegation
[34 /41]:initializing group membership
[35 /41]:adding master entry
[36 /41]:initializing domain level
[37 /41]:configuring Posix uid/gid generation
[38 /41]:adding replication acis
[39 /41]:activating sidgen plugin
[40 /41]:activating extdom plugin
[41 /41]:configuring directory to start on boot
Done configuring directory server(dirsrv).
Configuring Kerberos KDC(krb5kdc)[1/5]:configuring KDC
[2 /5]:adding the password extension to the directory
[3 /5]: creatinganonymous principal
[4 /5]:starting the KDC
[5 /5]:configuring KDC to start on boot
Done configuring Kerberos KDC(krb5kdc).
Configuring kadmin
[1 /2]:starting kadmin
[2 /2]:configuring kadmin to start on boot
Done configuring kadmin.
Configuring directory server(dirsrv)[1/3]:configuring TLS for DS instance
[2 /3]:importing CA certificates from LDAP
[3 /3]:restarting directory server
Done configuring directory server(dirsrv).
Configuring the web interface(httpd)[1/22]:stopping httpd
[2 /22]:setting mod_nss port to 443[3/22]:setting mod_nss cipher suite
[4 /22]:setting mod_nss protocol list to TLSv1.0- TLSv1.2[5/22]:setting mod_nss password file
[6 /22]:enabling mod_nss renegotiate
[7 /22]:disabling mod_nss OCSP
[8 /22]:adding URL rewriting rules
[9 /22]:configuring httpd
[10 /22]:setting up httpd keytab
[11 /22]:configuring Gssproxy
[12 /22]:setting up ssl
[13 /22]:configure certmonger for renewals
[14 /22]:importing CA certificates from LDAP
[15 /22]:publish CA cert
[16 /22]:clean up any existing httpd ccaches
[17 /22]:configuring SELinux for httpd
[18 /22]:create KDC proxy config
[19 /22]:enable KDC proxy
[20 /22]:starting httpd
[21 /22]:configuring httpd to start on boot
[22 /22]:enabling oddjobd
Done configuring the web interface(httpd).
Configuring ipa-otpd
[1 /2]:starting ipa-otpd
[2 /2]:configuring ipa-otpd to start on boot
Done configuring ipa-otpd.
Configuring ipa-custodia
[1 /4]:Generating ipa-custodia config file
[2 /4]:Generating ipa-custodia keys
[3 /4]:starting ipa-custodia
[4 /4]:configuring ipa-custodia to start on boot
Done configuring ipa-custodia.
Configuring certificate server(pki-tomcatd)[1/2]:configure certmonger for renewals
[2 /2]:Importing RA key
Done configuring certificate server(pki-tomcatd).
Configuring Kerberos KDC(krb5kdc)[1/1]:installing X509 Certificate for PKINIT
Done configuring Kerberos KDC(krb5kdc).
Applying LDAP updates
Upgrading IPA:. Estimated time:1 minute 30seconds
[1 /10]:stopping directory server
[2 /10]:saving configuration
[3 /10]:disabling listeners
[4 /10]:enabling DS global lock
[5 /10]:disabling Schema Compat
[6 /10]:starting directory server
[7 /10]:upgrading server
[8 /10]:stopping directory server
[9 /10]:restoring configuration
[10 /10]:starting directory server
Done.
Finalize replication settings
Restarting the KDC
WARNING: The CA service is only installed on oneserver(wang-2.gce.cloudera.com).
It is strongly recommended to install it onanother server.
Run ipa-ca-install(1) on another master toaccomplish this.


After the replication is complete, execute ipa-replica-managelist to check whether the node is added to the master node, and find that there are two masters in the query column, and the hot standby server configuration is complete.
[ root@wang-3 sbin]# ipa-replica-managelist

Directory Manager password:

wang-2.gce.cloudera.com: master
wang-3.gce.cloudera.com: master
[ root@wang-3 sbin]#
6.5. Client configuration modification
Finally, you need to modify the configuration of the client: edit the /etc/krb5.conf file and add information about the hot backup service:
[ realms]
 douyu.com ={
 kdc =ipa.douyu.com:88  #Main server
 kdc =ipa2.douyu.com:88 #New hot standby configuration
 master_kdc = ipa.douyu.com:88
 master_kdc = ipa2.douyu.com:88  #Add
 admin_server = ipa.douyu.com:749
 admin_server = ipa2.douyu.com:749 #Add
 default_domain = douyu.com
 pkinit_anchors = FILE:/etc/ipa/ca.crt
}
After the modification is completed, you can test whether the hot backup works normally:
- Stop the ipa service on the ipa1 server
- Use kinit test on the client to see if the credentials can be obtained normally
07
—
FreeIPA uninstall
Execute the following command to uninstall
ipa-server-install -U --uninstall #Server uninstall
ipa-client-install -U --uninstall #Client uninstall
# Delete residual files to avoid secondary installation failure

cd /var/lib/ipa/
rm -f ca*
rm -f *.txt
rm -f sysrestore/*

cd /var/lib/dirsrv/
rm -rf scripts*
cd /var/run/dirsrv/
rm -rf slapd*
cd /etc/ipa
rm -f ca.crt
cd /var/log/dirsrv
rm -rf slapd*
rm -rf /var/lib/pki* /var/log/pki* /etc/init.d/pki*
rm -rf /usr/share/pki /usr/share/tomcat5/var/lib/tomcat5/
# Uninstall package
yum erase -y `rpmquery -a | grep freeipa``rpmquery -a | grep ^pki-` `rpmquery -a | grep tomcat6`  `rpmquery -a | grep httpd` 389-ds-base bind
08
—
FreeIPA components

The above figure is a component relationship diagram given by RedHat. From the figure, we can generally see its organizational relationship. Directory Server is its core
8.1. Directory Server
FreeIPA's directory service uses the open source 389DS. It is open source software based on the LDAP protocol. It can be said to be the foundation of the entire body system. Kerberos user data will be stored in the Directory Server database
8.1.1. File description
Directory Server is an LDAP service, and LDAP-based services also include Windows AD. For DS, the files that we may be involved in are as follows, and their locations are as lists.
| File or Directory | Location |
|---|---|
| Log file | /var/log/dirsrv/slap-{instance} |
| Configuration file | /var/dirsrv/slap-{instance} |
| Database file | /var/lib/dirsrv/slapd-{instance} |
Note 1: The instance here is set when we perform the installation and deployment. For example, in this article, its value is EXAMPLE.COM, then our log path is /var/log/dirsrv/slap-EXAMPLE.COM
Note 2: The data of DS is stored in a database named Berkeley DB
8.1.2. Multi-Master Instructions
Generally speaking, we will deploy two IPAServers, that is, two Masters, and then artificially divide them into: master node and slave node. But this is an "incorrect" description. But because FreeIPA's scripts are differentiated, so we describe it like this. In fact, for DS itself, it does not distinguish between "master and slave" Masters, it can have multiple Masters (the network-level configuration of more than two Masters has not been tested, the record here is an official description of it)
Each master is both a provider of information and a consumer. When a master updates data, it will push the corresponding changes to other masters. If there is a conflict, it will be handled by the conflict algorithm; if it still cannot be resolved, the conflict will be identified and handled by the administrator.
For each modification, a Change state Number (CSN) is set. This number can uniquely identify the modification, and this number is composed of two parts: the time stamp and the identifier of the master that can define the modification, and The conflict resolution algorithm is very simple, that is, "the one who modifies later wins."
8.1.3. Configuration modification
In using FreeIPA, we may modify the corresponding configuration as needed. FreeIPA provides two modification methods: WebUI interface modification and LDAP format file. The following is an explanation of the two modifications I encountered
8.1.3.1. Password rule modification####
The user's password policy is a very common configuration. Users can configure through the web UI. Its configuration location is shown in the figure:
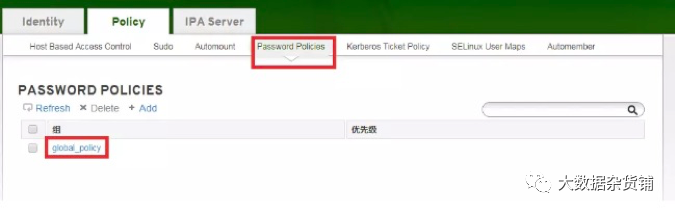
If the user has not configured a password policy, then the default password policy will be used, that is, global_policy in the figure above. Click on it and you can see the policy configuration information as shown in the figure below:
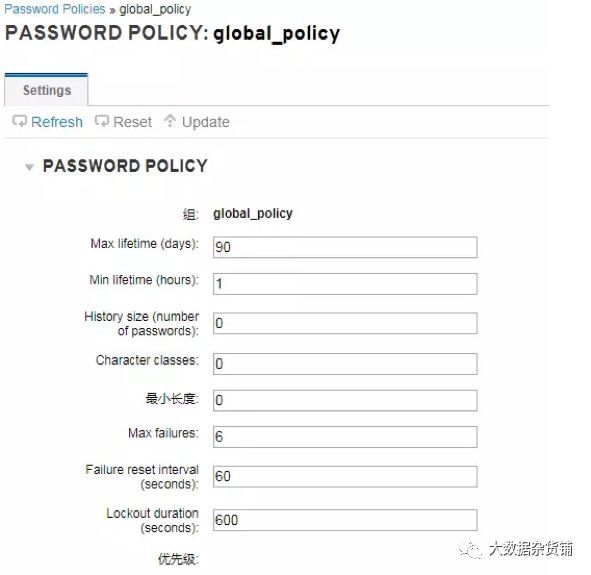
The following table shows the specific items:
| Name | Meaning |
|---|---|
| Max lifetime(days) | The maximum time of the user password, the default is 90 days |
| Min lifetime(hours) | After the user changes the user password, it must wait a period of time before it can be changed again. This timetable is the shortest modification timetable, and the default is 1 hour. The unit is also hour. It is to prevent the user from changing to the original password immediately after changing the password. Otherwise, a message will pop up: Constraint violation: Too soon to change password |
| History size(number of password) | Record the previous history passwords |
| Minimum length | The minimum length of the password. The default is 8, that is, the password length is not less than 8 digits. If you don’t need to verify the password length, you can set it to 0 |
| Max failures | The maximum number of failures. That is, the maximum number of times the user can enter the wrong password when logging in or kinit |
Note: If you enter the wrong password too many times and you need to unlock it, when you execute the kinit command, the following information will appear:
[ root@hdp136 ~]# kinit lch
kinit: Clients credentials have been revokedwhile getting initial credentials
At this time, execute the command on the KDC node (ie the IPAServer node):
[ root@hdp134 ~]# kadmin.local    <-----Execute kadmin.local
Authenticating as principaladmin/[email protected] with password.
kadmin.local: getprinc  lch  <---View user information
Principal: [email protected]
Expiration date:[never]
Last password change: Tue Feb 2711:11:02 CST2018
Password expiration date: Mon May 2811:11:02CST 2018
Maximum ticket life:1 day 00:00:00
Maximum renewable life:7 days 00:00:00
Last modified: Tue Feb 2711:11:02 CST 2018([email protected])
Last successful authentication: Tue Feb 2711:12:23 CST 2018
Last failed authentication: Tue Feb 2714:11:07CST 2018
Failed password attempts:6<--------------Print information
Indicates that the maximum number of failures has been exceeded
Number of keys:4
Key: vno 3, aes256-cts-hmac-sha1-96, Special
Key: vno 3, aes128-cts-hmac-sha1-96, Special
Key: vno 3, des3-cbc-sha1, Special
Key: vno 3, arcfour-hmac, Special
MKey: vno 1
Attributes: REQUIRES_PRE_AUTH
Policy:[none]
kadmin.local:  modprinc -unlock [email protected]   <---Enter the command to unlock
Principal "[email protected]" modified.
8.1.3.2. LDIF modification
Ldif is an LDAP data exchange format. LDIF is an ASCII format used to exchange and export data between server and client or between two servers. It is also used to modify the LDAP server database. FreeIPA configuration information is set through ldif, and then imported into the database. The following is an example of modifying the buffer size of the data exchange between the master and slave nodes. The user information created on the slave node of the ipa server cannot be synchronized to the master node, and in the log:
sasl_io_recv failed to decode packet forconnection....
At this time, the buffer size needs to be modified. 1. Create a package.ldif file, its content:
[ root@ipa110 /]# cat package.ldif
dn: cn=config
changetype: modify
replace: nsslapd-sasl-max-buffer-size
nsslapd-sasl-max-buffer-size:2097152
Execute the command, import ldif
[ root@ipa110 /]# ldapmodify -h localhost -D"cn=directory manager" -w hadoop123 -f package.ldif -ZZ
The hadoop123 behind -w is the administrator password, which is the password entered when ipa-server-install is executed. Execute on several nodes, then restart, use buffer to take effect.
8.2. SSSD
8.2.1. Operating system users
SSSD is not listed in the RedHat diagram, it does not belong to IPAServer, but belongs to IPAClient. It is mainly used for Linux system user management.
We know that when we use the useradd command to create a user, it will be recorded in the Linux /etc/passwd file. However, for users created with freeipa, their information is not stored in /etc/passwd, but in the DS database. So how does it work?
Linux has a configuration file
[ root@hdp136 ~]# cat /etc/nsswitch.conf
...
passwd:    files sss
...
The files in this configuration file refer to local Linux files, such as /etc/passwd, while sss refers to a kernel process in Linux:
[ root@hdp136 ~]# service sssd status
sssd(pid 1799) is running...
When we log in to the Linux system as a user, the process is as follows:

It should be noted that sssd itself has a cache, it will not go to the ldap server to query user information from time to time, so we don't have to worry about slow login caused by the network.
8.2.2. SSSD log configuration
If SSSD needs to modify the log level, you can modify it as follows:
[ root@hdfs142 sssd]# vi /etc/sssd/sssd.conf
[ domain/example.com]
cache_credentials = True
debug_level =9---Modify this value and restart sssd
Then restart the corresponding sssd, you can view the detailed instructions in /var/log/ssssd/ldap_child.log
09
—
other
9.1. Error reported when ipa-client-install
9.1.1.**** Connecterror
LDAP Error: Connect error: TLS error -8054:Youare attempting to import a cert with the same issuer/serial as an existingcert, but that is not the same cert.
Solution: rm -f/etc/ipa/ca.crt, re-run the installation program
9.1.2. Apache is already configured with a listener on port 443 error
[ root@test-1 OneNodeCDHCluster]#ipa-server-install

The log file forthis installation can be found in/var/log/ipaserver-install.log
==============================================================================
This program will set up the IPA Server.

This includes:*Configure a stand-alone CA(dogtag)for certificate management
 * Configure the Network Time Daemon(ntpd)* Createand configure an instance of Directory Server
 * Createand configure a Kerberos Key Distribution Center(KDC)*Configure Apache(httpd)*Configure the KDC to enable PKINIT

To accept the default shown in brackets, press theEnter key.

WARNING: conflicting time&date synchronizationservice 'chronyd' will be disabled
in favor of ntpd

Apache is already configured with a listener onport 443:*:443                  test-1.vpc.cloudera.com(/etc/httpd/conf.d/ssl.conf:56)
ipapython.admintool: ERROR    Aborting installation
ipapython.admintool: ERROR    The ipa-server-install command failed. See/var/log/ipaserver-install.log for more information
[ root@test-1 OneNodeCDHCluster]#
Solution: modify /etc/httpd/conf.d/ssl.conf to replace all 443 to 444)
vi  /etc/httpd/conf.d/ssl.conf
:1, $s/443/444/g
9.2. Log location
During the installation process, if there is an error, you can check the corresponding log according to the information:
Checking IdM Server Logs:https://access.redhat.com/documentation/en-US/Red_Hat_Enterprise_Linux/6/html/Identity_Management_Guide/server-config.html#logging
9.3. Import system users into FreeIPA
#! /bin/bash
for line in`grep"x:[5-9][0-9][0-9]:" /etc/passwd`do
 USER=`echo $line | cut -d: -f1`
 FIRST=`echo $line | cut -d: -f5 | awk {'print $1'}`
 LAST=`echo $line | cut -d: -f5 | awk {'print $2'}`if[!"$FIRST"]
 then
  FIRST=$USER
 fi
 if[!"$LAST"]
 then
  LAST=$USER
 fi
 echo$USER | ipa user-add $USER --first=$FIRST --last=$LAST --password
done
9.4. New user automatically creates home directory
Modify the client configuration file:
vi /etc/pam.d/system-auth
# add if you need( create home directoryautomatically if it's none )
session    optional      pam_mkhomedir.soskel=/etc/skel umask=077
Restart the oddjobd service and set it to start automatically
systemctl start oddjobd#Start service
systemctl enable oddjobd
10
—
in conclusion
You can configure users, groups and access policies as well as Sudo rules through the FreeIPA GUI. FreeIPA provides a relatively simple way to manage root access. For larger deployments, it is recommended to use replication to set up multiple IPA servers.
11
—
Reference documents
- https://access.redhat.com/documentation/en-US/Red_Hat_Enterprise_Linux/6/html/Identity_Management_Guide/index.html
- https://www.freeipa.org/page/Documentation
- Summary of errors reported when installing FreeIPA and applications: https://www.cnblogs.com/yinzhengjie/p/10106337.html
Recommended Posts