CentOS configuration git server in VirtualBox
Preface##
When managing my own code, I always use github. Sometimes, private projects don't want to be public, if they want to put them on GitHub, then they have to spend money. The solution to this problem is actually very simple: run a server (CentOS) with a virtual machine (VirtualBox) on your computer, and configure ssh and git server. As the saying goes: the server closest to you in history.
Configure SSH
SSH is a must-have for programmers to connect to the server at home! Therefore, after installing CentOS (minimal installation) in VirtualBox, the first job is to configure its SSH.
Install SSH
- Update system:
yum update - Install openssh-server:
yum install -y openssl openssh-server - Start the SSH service:
systemctl start sshd.service - Set boot to start ssh service:
systemctl enable sshd.service
Configure password-free login###
- Generate the key in the terminal of the client system (mine is a Mac):
ssh-keygen -t rsa -C "[email protected]"
Pay attention to enter your own mailbox
-
You will be prompted to enter the password, but you can leave it blank (at least I leave it blank, it’s too much trouble to enter the password).
-
After completion, two key files,
id_rsaandid_rsa.pub, will be generated in the.sshdirectory.
Pay attention to save these two files, even if you change the computer and redo the system, remember to back it up.
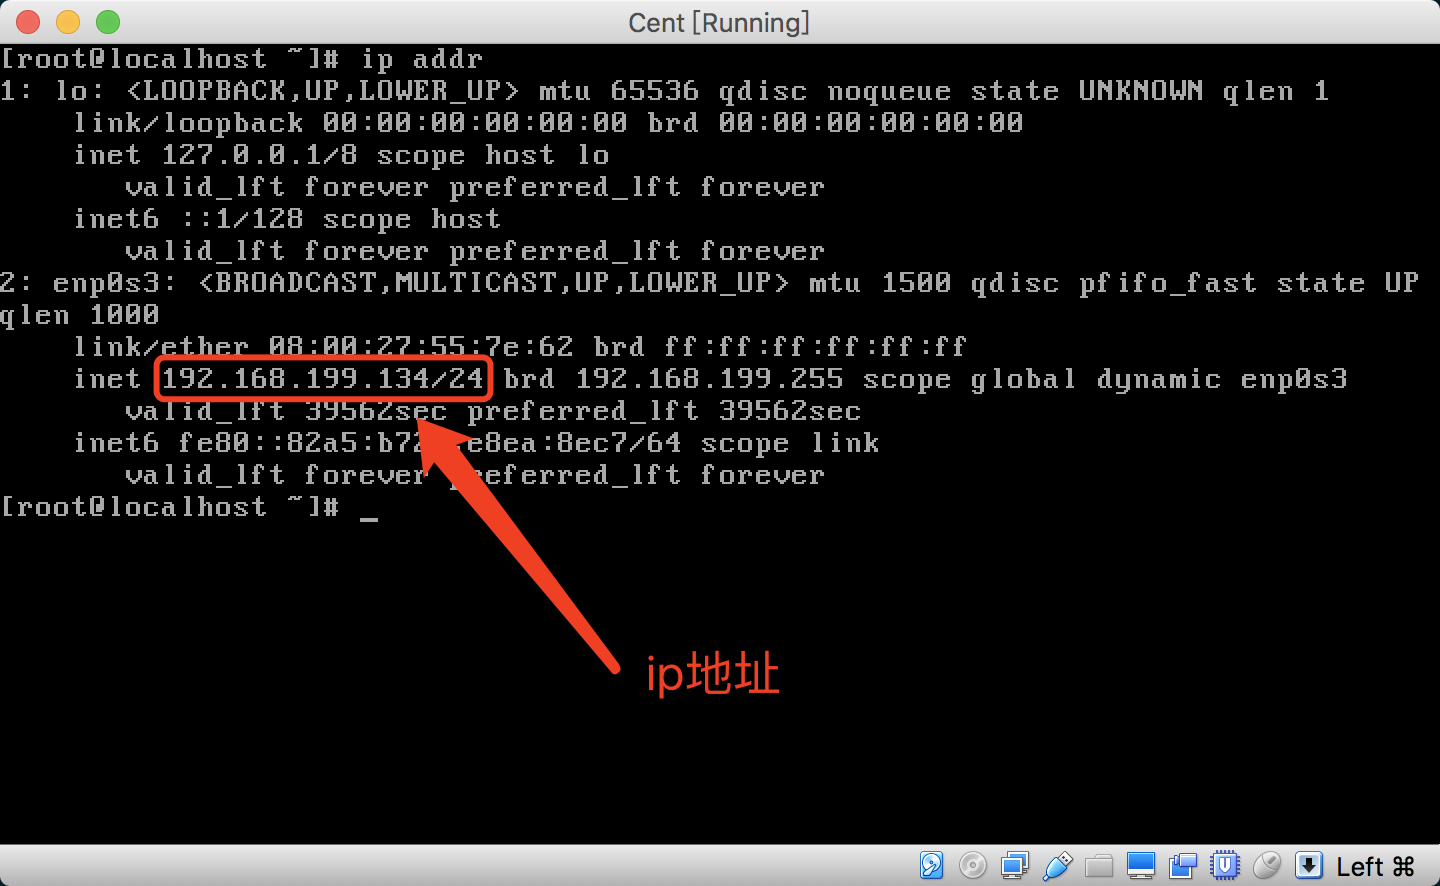
- Check the ip address of CentOS in VirtualBox:
Run CentOS, and enter after root user login:
ip addr
as the picture shows:
- Use ssh to connect to CentOS in the client:
ssh [email protected] -p 22
xxx.xxx.xxx.xxx is the ip address of CentOS, and you also need to enter the password of the root account of CentOS. The SSH login is used at this time to facilitate copying the key to authorized_keys.
- Configure in the
CentOSserver in VirtualBox:
//create.ssh folder:
mkdir .ssh
//Create authorized_keys file:
touch .ssh/authorized_keys
//Modify authorized_Permission of keys:
chmod 600.ssh/authorized_keys
- View id_rsa.pub in the client (Mac) and copy the key in it.
cat .ssh/id_rsa.pub
- Open authorized_keys in CentOS and paste the key just copied.
vi .ssh/authorized_keys
- The configuration is complete.
Client (Mac) configuration CentOS alias###
- Set up port forwarding for CentOS network in VirtualBox
Set the network type to NAT, as shown in the figure:
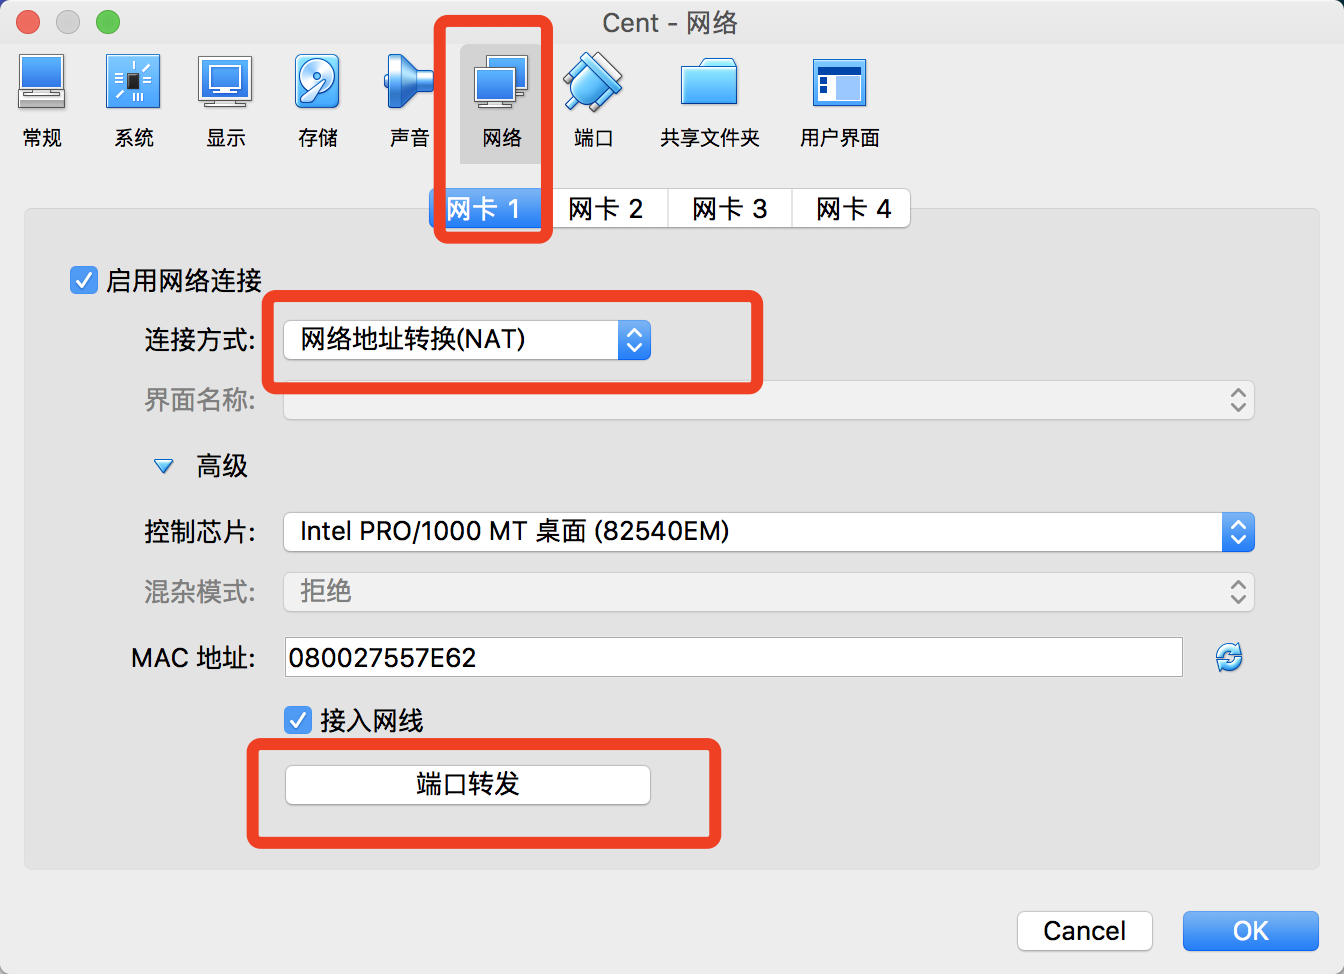
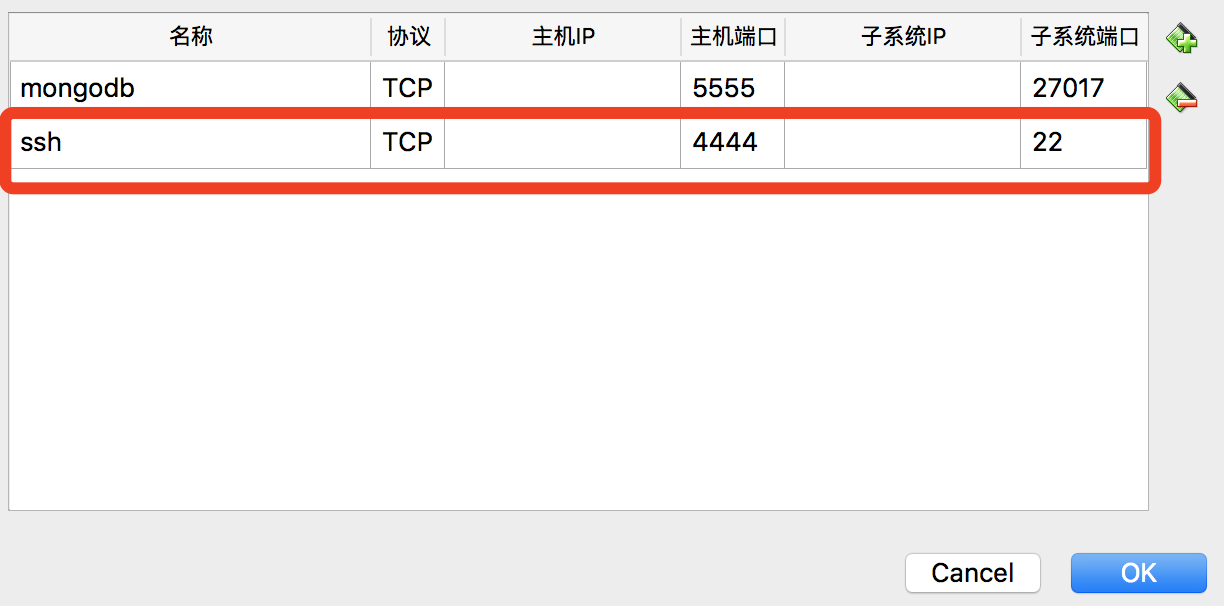
Set up port forwarding, as shown in the figure:
The above operation is to write the ip address as 127.0.0.1 when setting up alias login in the client (Mac), so as to avoid the automatic acquisition of ip changes every time CentOS is started, and it is too troublesome to modify.
- The client (Mac) configures the alias of CentOS
vi .ssh/config
Enter the following:
Host cent
	HostName 127.0.0.1
	User root
	Port 4444
cent is an alias, which can be set freely.
Very convenient to connect to CentOS
ssh cent
Configure and install git server##
All operations can be performed on the client machine (Mac) by connecting to CentOS with SSH
- CentOS install the latest git, dependent library installation
yum install curl-devel expat-devel gettext-devel openssl-devel zlib-devel
yum install gcc perl-ExtUtils-MakeMaker
- Uninstall low version Git
yum remove git
- Create a git directory and enter
cd /usr/local
mkdir git
cd git
- Download the latest version of Git 2.13.2
wget https://github.com/git/git/archive/v2.13.2.tar.gz
Up to now the latest version is 2.13.2, you can go to https://github.com/git/git/releases to copy the latest version link to download.
- Unzip to the git directory
tar -xzvf v2.13.2.tar.gz
- Install Git v2.13.2
cd git-2.13.2
make prefix=/usr/local/git all
make prefix=/usr/local/git install
The compilation process is slightly longer, wait patiently
- Add to environment variables
Open /etc/profile
vi /etc/profile
Join
export PATH="/usr/local/git/bin:$PATH"
Make the configuration effective immediately
source /etc/profile
- View git version
git --version
- Set the latest version of git as the system default to avoid errors when cloning
ln -s /usr/local/git/bin/git-upload-pack /usr/bin/git-upload-pack
ln -s /usr/local/git/bin/git-receive-pack /usr/bin/git-receive-pack
- The latest version of v2.13.2 Git is successfully installed
Create a git user group and add users##
- Add user combination user and set password
groupadd git
useradd git -g git
passwd git
Switch to git account
su -git
- Certificate login, use git without password
Create the
.sshdirectory and the.ssh/authorized_keysfile, and add the key in the id_rsa.pub of the client (Mac) to theauthorized_keysfile
Modify the permissions of directories and files
chmod 700.ssh
chmod 600.ssh/authorized_keys
Initialize Git repository##
- All my repositories are placed in the gitrepos directory, so I created this directory
cd /home/git
mkdir gitrepos
cd gitrepos
- Initialize the first test warehouse
git init --bare test.git
Local client clone warehouse##
Clone the test.git repository on CentOS on the client (Mac)
git clone git@cent:/gitrepos/test.git
centis the SSH connection alias of CentOS set in Chapter 2.3, and it can also be replaced with the corresponding ip address
Shell login is forbidden##
If you are configuring a git server on a remote VPS server, for security reasons, you can prohibit Shell login; if, like the original intention of this article, it is to build the
the closest server in history, then this step can be omitted.
Switch to the root account:
su
Edit the /etc/passwd file:
vi /etc/passwd
Change this line:
git:x:502:502::/home/git:/bin/bash
Replace with:
git:x:502:502::/home/git:/usr/local/git/bin/git-shell
Conclusion###
By using Virtualbox to build CentOS on this machine, it is convenient for developers to test; by building your own Git server on CentOS, you can manage and back up your independently developed code.
Recommended Posts