Build Hadoop in CentOS
Construction instructions: For those who are building Hadoop for the first time, please strictly follow the software environment and steps in the article. Different versions may cause problems.
Software Environment:
Virtual machine: VMware Pro14
Linux: CentOS-6.4 (download address, just download the DVD version)
JDK: OpenJDK1.8.0 (It is strongly recommended not to use Oracle’s Linux version of JDK)
Hadoop: 2.6.5 (download link)
The installation of the virtual machine and the installation of the Linux system are omitted here. You can refer to the online tutorial for installation. Generally, there is no major problem. Note that you must remember the user password you entered here, and use it below, as shown in the figure below.
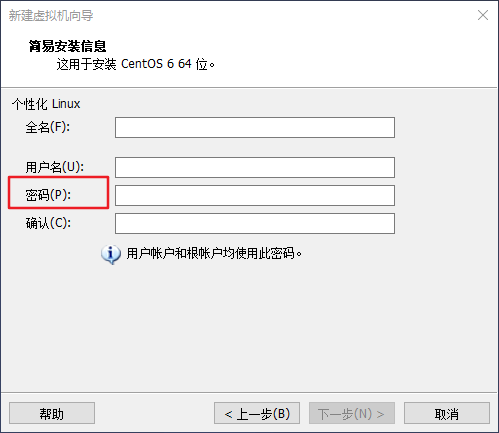
Set user password.png
User selection##
After installing the system using the virtual machine, you can see the login interface, as shown in the figure below.
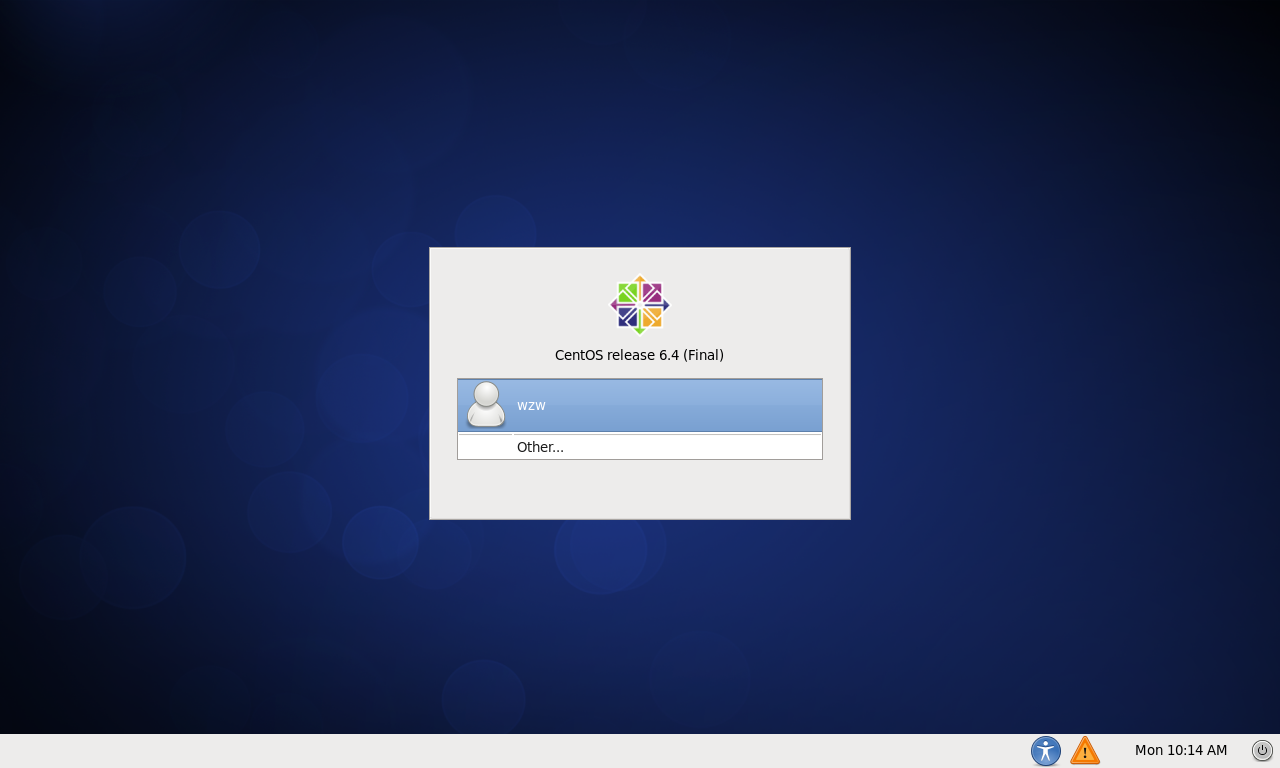
Enter system.png
Select Other, enter root in the Username input box, press Enter, and then enter the password when you created the user in the Password input box. The root user is a super user automatically created when CentOS is installed, but the password is the same as the ordinary user password created when you installed the system.
Usually when using CentOS, it is not recommended to use the root user, because this user has the highest authority of the entire system, using this user may cause serious consequences, but only if you are familiar with Linux, will you misuse it. To build Hadoop's big data platform, ordinary users are used. Many commands require sudo commands to obtain root user permissions, which is troublesome, so simply use root users directly.
Install SSH
Both cluster and single node modes need to use SSH login (similar to remote login, you can log in to a Linux host and run commands on it).
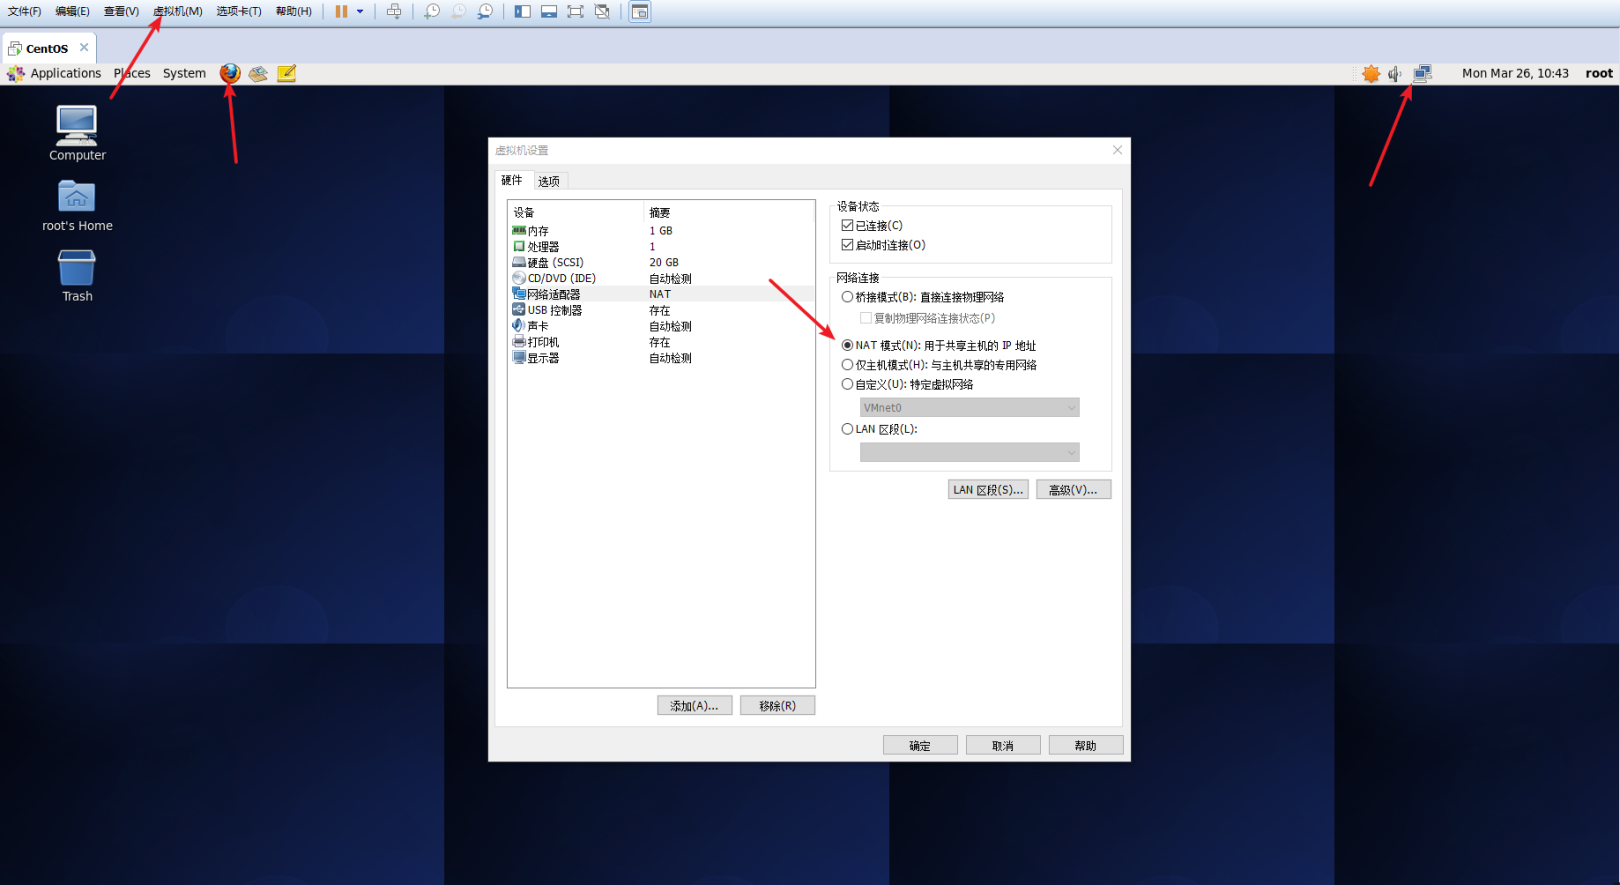
First of all, make sure your CentOS system can access the Internet normally. You can check the network icon in the upper right corner of the desktop. If a red cross is displayed, it means that you are not connected to the Internet. You can click to select an available network, or you can use the Firefox browser in the upper left corner of the desktop to enter the URL to verify whether The network connection is normal. If you still can't access the Internet, check the settings of the virtual machine, choose NAT mode, or go to Baidu to solve it.
Check network status.png
After confirming that the network connection is normal, open the CentOS terminal, click the right mouse button on the CentOS desktop, and select Open In Terminal, as shown in the figure below.
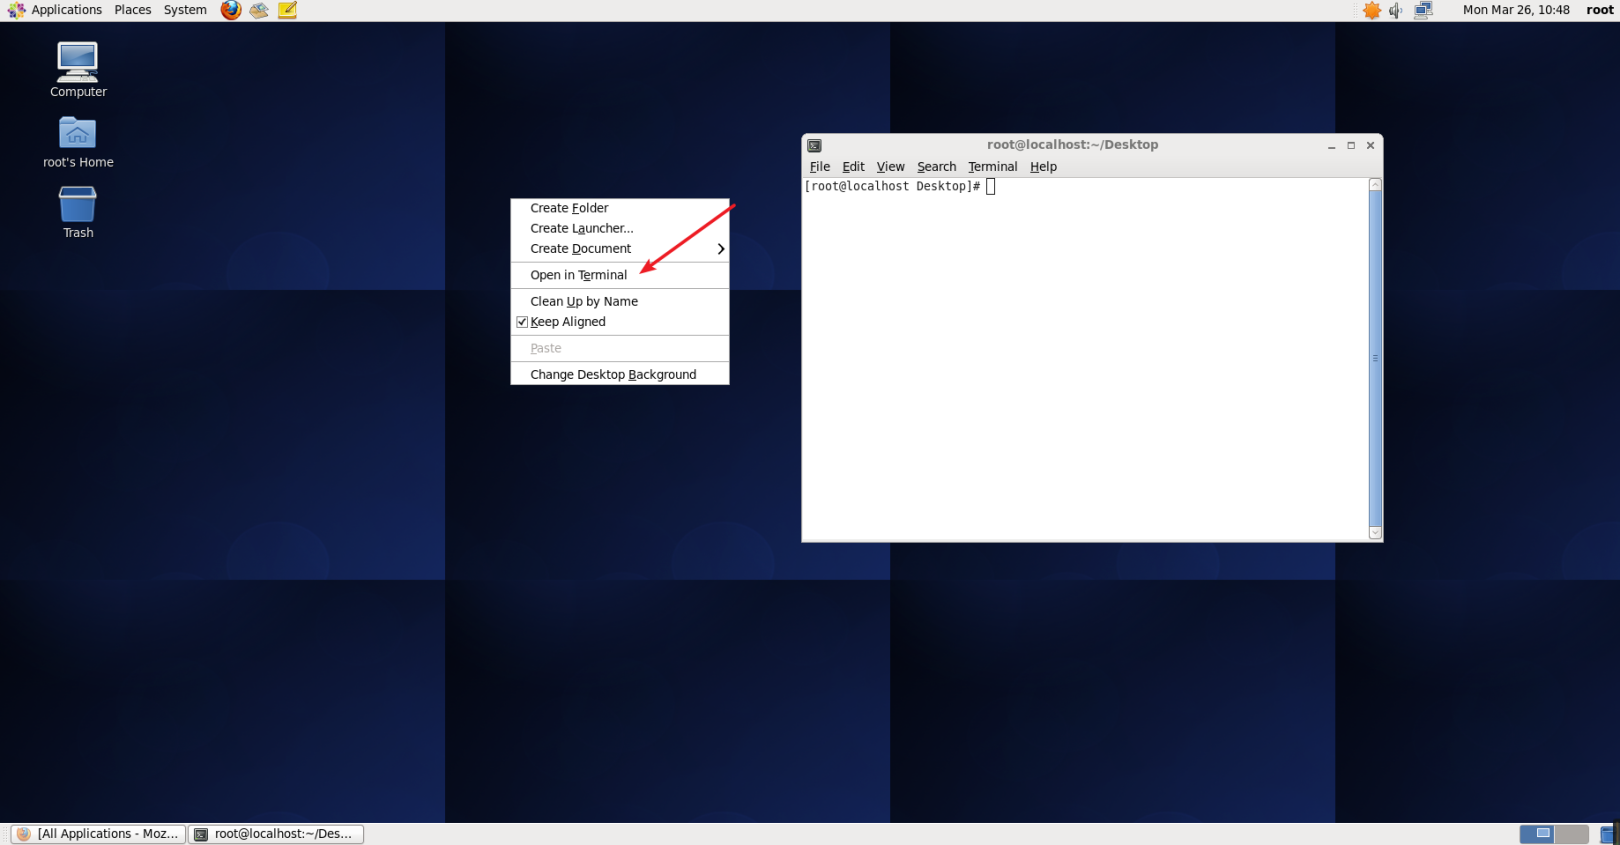
Open terminal.png
Generally, CentOS has installed SSH client and SSH server by default. You can open the terminal and execute the following commands to check:
rpm -qa | grep ssh
If the returned result is as shown in the figure below, including SSH client and SSH server, you do not need to install it again.
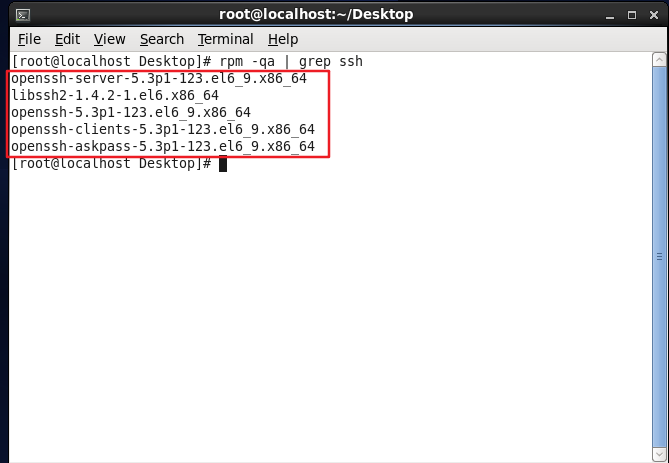
Check if SSH is installed.
If you need to install it, you can install it through the yum package manager. (You will be asked to enter [y/N] during the installation process, and then enter y)
***Note: The command is executed in a single order, instead of pasting the two commands directly. ***
Paste in the terminal can be pasted by right-clicking with the mouse and selecting Paste, or by shortcut key [Shift + Insert].
yum install openssh-clients
yum install openssh-server
After the SSH installation is complete, execute the following command to test whether SSH is available (the first time SSH login prompts yes/no information, enter yes, and then follow the prompts to enter the password of the root user, so that you can log in to the machine), as shown in the figure below .

Log in to SSH.png for the first time
However, you need to enter the password every time you log in, so we need to configure SSH to log in without a password.
First enter exit to exit the ssh just now and return to our original terminal window, then use ssh-keygen to generate the key and add the key to the authorization.
exit                           #Exit just ssh localhost
cd ~/.ssh/                     #If there is no such directory, please execute ssh localhost first
ssh-keygen -t rsa              #There will be a prompt, just press enter
cat id_rsa.pub >> authorized_keys  #Join authorization
chmod 600./authorized_keys    #Modify file permissions
At this point, use the ssh localhost command again, and you can log in directly without entering a password, as shown in the figure below.
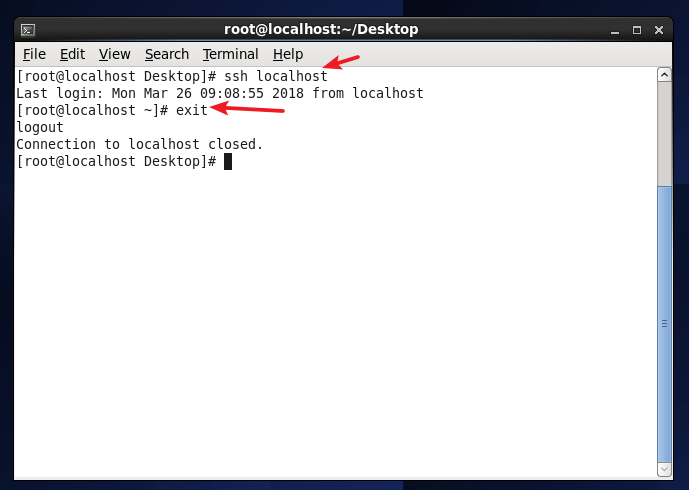
Log in to SSH.png again
Install Java environment##
Java environment can choose Oracle JDK or OpenJDK (can be regarded as the open source version of JDK). Now the default installation of Linux system is basically OpenJDK, and the version installed here is OpenJDK1.8.0.
Some CentOS 6.4 installs OpenJDK 1.7 by default. Here we can use the command to check it. Like the command under Windows, you can also check the value of the environment variable JAVA_HOME.
java -version                 #View java version
javac -version              #View the version of the compilation command Javac
echo $JAVA_HOME              #View$JAVA_The value of this environment variable HOME
If the system does not have OpenJDK installed, we can install it through the yum package manager. (During the installation process, you will enter [y/N] and enter y)
yum install java-1.8.0-openjdk java-1.8.0-openjdk-devel #Install openjdk1.8.0
Install OpenJDK through the above command. The default installation location is /usr/lib/jvm/java-1.8.0. This location is used when configuring JAVA_HOME below.
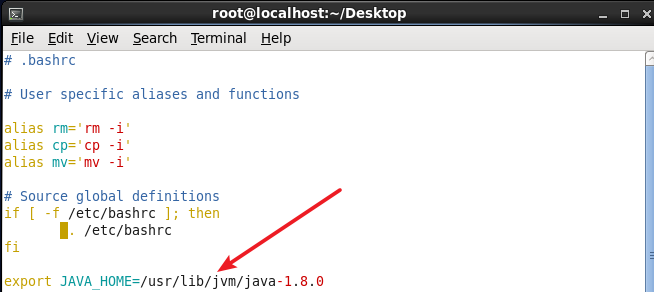
Next, you need to configure the JAVA_HOME environment variable. For convenience, set it directly in ~/.bashrc, which is equivalent to configuring the user environment variable of Windows, which only takes effect for a single user. After the user logs in, each time the shell terminal is opened, The bashrc file will be read.
To modify the file, you can directly use the vim editor to open the file, or you can use the gedit text editor similar to Windows Notepad.
Choose one of the following commands.
vim ~/.bashrc              #Open in terminal with vim editor.bashrc file
gedit ~/.bashrc              #Open with gedit text editor.bashrc file
Add the following single line at the end of the file (pointing to the installation location of the JDK), and save.
Configure JAVA_HOME environment variable.png
Then you need to make the environment variable take effect and execute the following command.
source ~/.bashrc #Make variable settings take effect
After setting, let's check whether the setting is correct, as shown in the figure below.
echo $JAVA_HOME     #Test variable value
java -version
javac -version
$JAVA_HOME/bin/java -version  #And directly execute java-same version
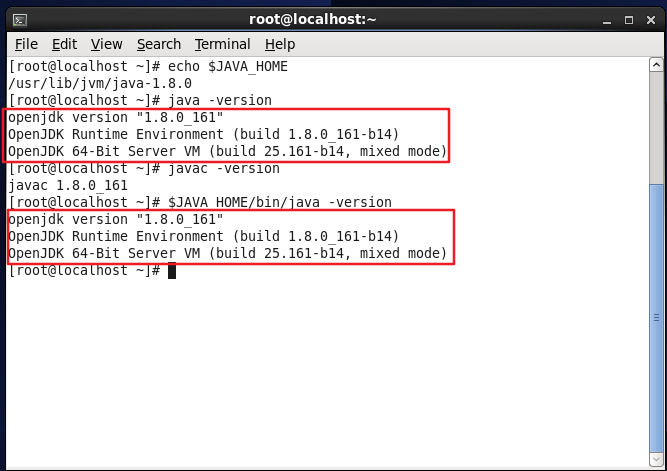
Check whether the JAVA_HOME environment variable is configured correctly.
In this way, the Java runtime environment required by Hadoop is installed.
Install Hadoop
In the previous Software Environment, the download address of hadoop 2.6.5 has been given. You can open the download directly through the Firefox browser. The default download location is under the Downloads folder in the user's Home, as shown in the figure below.
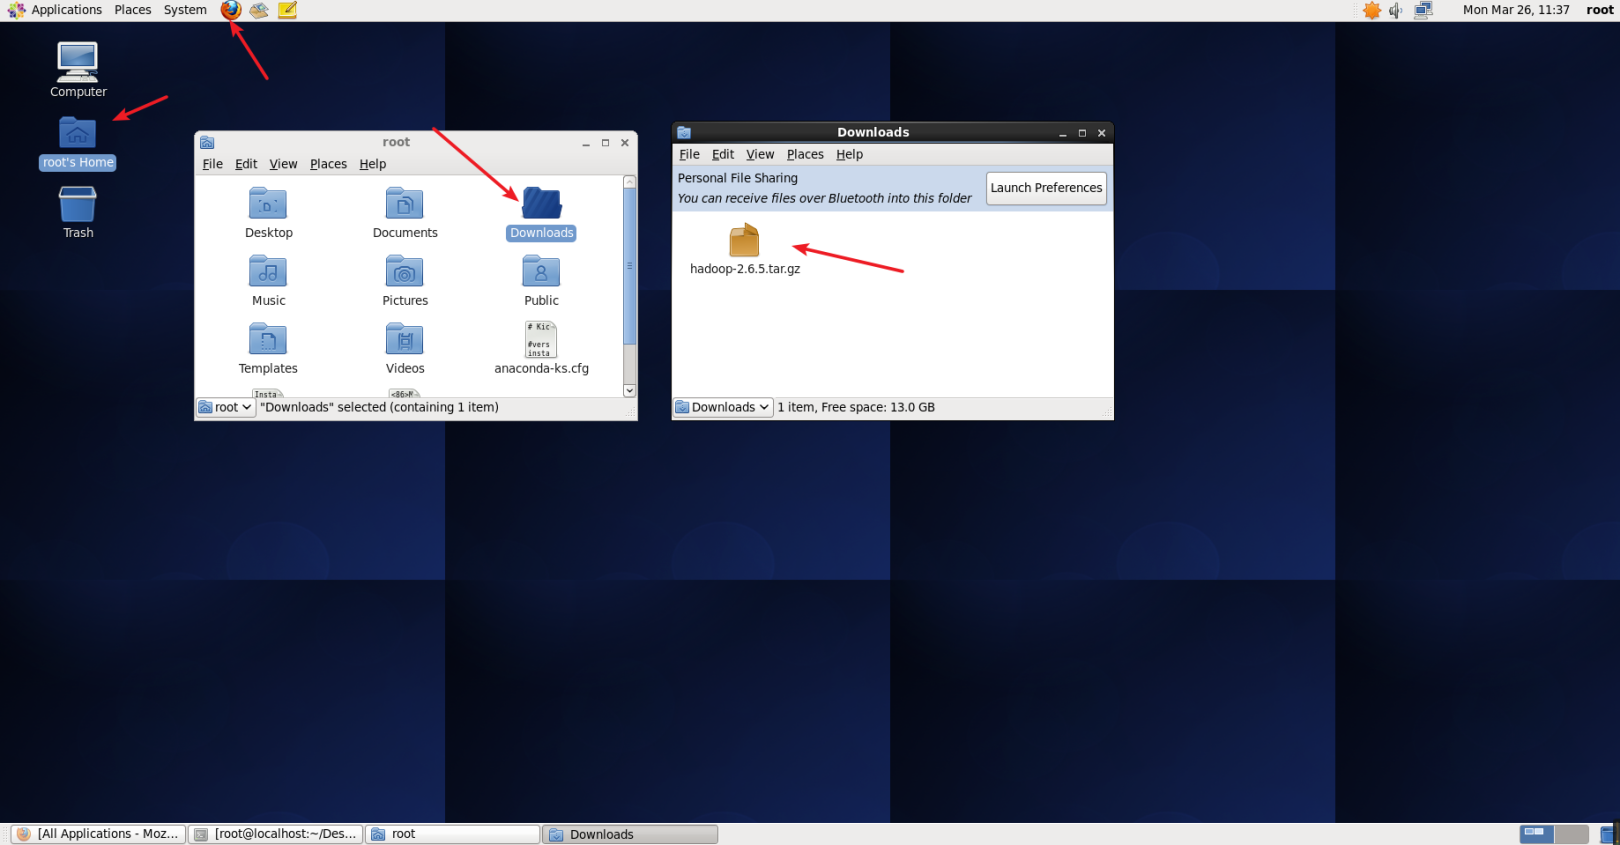
Download Hadoop.png
After the download is complete, we unzip Hadoop to /usr/local/.
tar -zxf ~/download/hadoop-2.6.5.tar.gz -C /usr/local    #Unzip to/usr/local directory
cd /usr/local/                          #Switch the current directory to/usr/local directory
mv ./hadoop-2.6.5/./hadoop            #Change the folder name to hadoop
chown -R root:root ./hadoop         #Modify file permissions, root is the current user name
Hadoop can be used after decompression. Enter the following command to check whether Hadoop is available. If it succeeds, the Hadoop version information will be displayed.
cd /usr/local/hadoop                  #Switch the current directory to/usr/local/hadoop directory
. /bin/hadoop version                  #View Hadoop version information
Or you can directly enter the hadoop version command to view it.
hadoop version #View Hadoop version information

View Hadoop version information.png
**There are three ways to install Hadoop: stand-alone mode, pseudo-distributed mode, and distributed mode. **
- Stand-alone mode: The default mode of Hadoop is non-distributed mode (local mode), and it can run without other configuration. Non-distributed or single Java process, convenient for debugging.
- Pseudo-distributed mode: Hadoop can run in a pseudo-distributed manner on a single node. The Hadoop process runs as a separate Java process. The node functions as both a NameNode and a DataNode. At the same time, it reads files in HDFS.
- Distributed mode: Use multiple nodes to form a cluster environment to run Hadoop, which requires multiple hosts, or virtual hosts.
Hadoop pseudo-distributed configuration##
Now we can use Hadoop to run some examples. Hadoop comes with many examples. You can run hadoop jar ./share/hadoop/mapreduce/hadoop-mapreduce-examples-2.6.5.jar to see all the examples.
Let's run an example of a query here. Use the input folder as the input folder, filter the words that match the regular expression dfs[az.]+, count the number of times, and output the filter results to the output folder.
cd /usr/local/hadoop      #Switch the current directory to/usr/local/hadoop directory
mkdir ./input              #Create an input folder in the current directory
cp ./etc/hadoop/*.xml ./input   #Copy the configuration file of hadoop to the newly created input folder input
. /bin/hadoop jar ./share/hadoop/mapreduce/hadoop-mapreduce-examples-*.jar grep ./input ./output 'dfs[a-z.]+'
cat ./output/*               #View output
View the result through the command cat ./output/*, and the word dfsadmin that conforms to the regularity appears once.
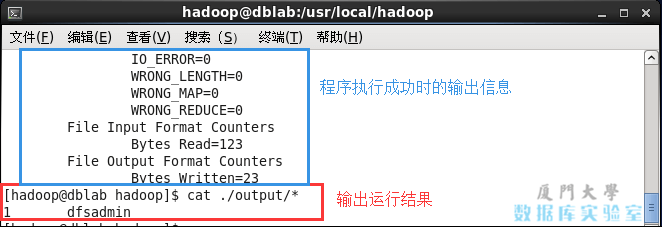
Run test Hadoop example.png
If there is an error during operation, the following prompt appears.
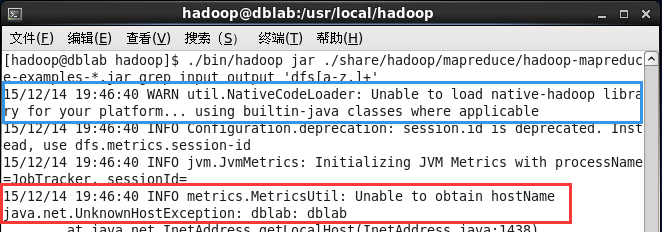
Error running Hadoop example.png
If a prompt "WARN util.NativeCodeLoader: Unable to load native-hadoop library for your platform… using builtin-java classes where applicable" appears, the WARN prompt can be ignored and does not affect the normal operation of Hadoop.
***Note: Hadoop does not overwrite the result file by default, so running the above example again will prompt an error. You need to delete the output folder first. ***
rm -rf ./output #in/usr/local/Execute under the hadoop directory
There is no problem to test our Hadoop installation. We can start to set the environment variables of Hadoop, which are also configured in the ~/.bashrc file.
gedit ~/.bashrc #Open with gedit text editor.bashrc file
Add the following content at the end of the .bashrc file. Note that the location of HADOOP_HOME is correct. If you follow the previous configuration, this part can be copied.
# Hadoop Environment Variables
export HADOOP_HOME=/usr/local/hadoop
export HADOOP_INSTALL=$HADOOP_HOME
export HADOOP_MAPRED_HOME=$HADOOP_HOME
export HADOOP_COMMON_HOME=$HADOOP_HOME
export HADOOP_HDFS_HOME=$HADOOP_HOME
export YARN_HOME=$HADOOP_HOME
export HADOOP_COMMON_LIB_NATIVE_DIR=$HADOOP_HOME/lib/native
export PATH=$PATH:$HADOOP_HOME/sbin:$HADOOP_HOME/bin
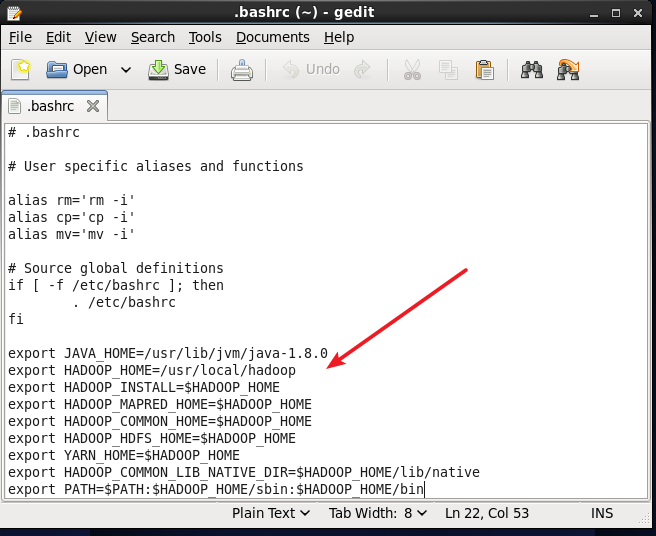
Configuration of Hadoop environment variables.png
Remember to close the gedit program after saving, otherwise the terminal will be occupied and the following commands cannot be executed. You can press [Ctrl + C] to terminate the program.
After saving, do not forget to execute the following command to make the configuration effective.
source ~/.bashrc
The configuration file of Hadoop is located under /usr/local/hadoop/etc/hadoop/. For pseudo-distribution, two configuration files core-site.xml and hdfs-site.xml need to be modified. The Hadoop configuration file is in xml format, and each configuration is implemented by declaring the name and value of the property.
Modify the configuration file core-site.xml (it is more convenient to edit through gedit, enter the command, gedit ./etc/hadoop/core-site.xml).
In<configuration></configuration> Insert the following code in the middle.
< configuration><property><name>hadoop.tmp.dir</name><value>file:/usr/local/hadoop/tmp</value><description>Abase for other temporary directories.</description></property><property><name>fs.defaultFS</name><value>hdfs://localhost:9000</value></property></configuration>
Similarly, modify the configuration file hdfs-site.xml, gedit ./etc/hadoop/hdfs-site.xml
< configuration><property><name>dfs.replication</name><value>1</value></property><property><name>dfs.namenode.name.dir</name><value>file:/usr/local/hadoop/tmp/dfs/name</value></property><property><name>dfs.datanode.data.dir</name><value>file:/usr/local/hadoop/tmp/dfs/data</value></property></configuration>
After the configuration is complete, perform the formatting of the NameNode. (This command is required for the first startup of Hadoop)
hdfs namenode -format
If it is successful, you will see the prompts "successfully formatted" and "Exitting with status 0", if it is "Exitting with status 1", it means an error.
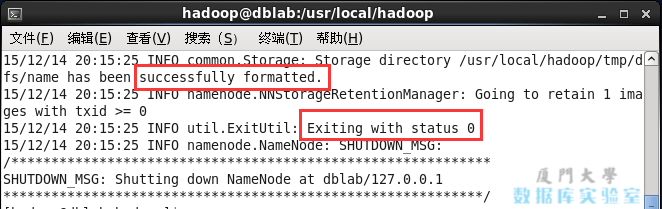
NameNode format.png
Next, start Hadoop.
start-dfs.sh #Start the NameNode and DataNode processes
If the following SSH prompt "Are you sure you want to continue connecting" appears, enter yes.

Precautions for starting Hadoop.png
After the startup is complete, you can use the command jps to judge whether the startup is successful. If the following four processes of NameNode, DataNode, SecondaryNameNode, and Jps appear, the Hadoop startup is successful.
jps #View the process to determine whether Hadoop has started successfully
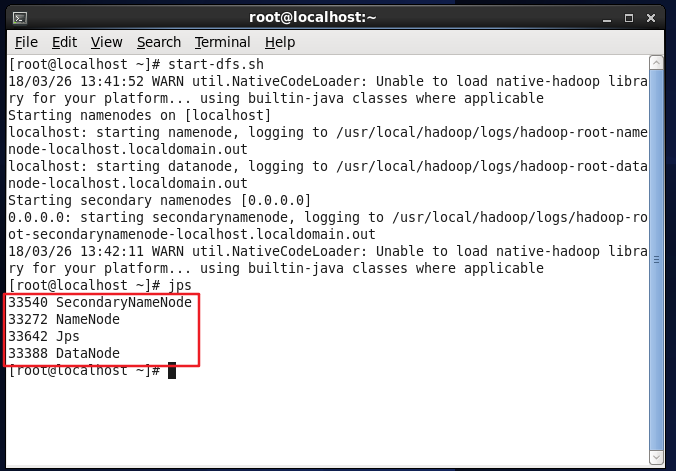
Determine whether Hadoop has started successfully.
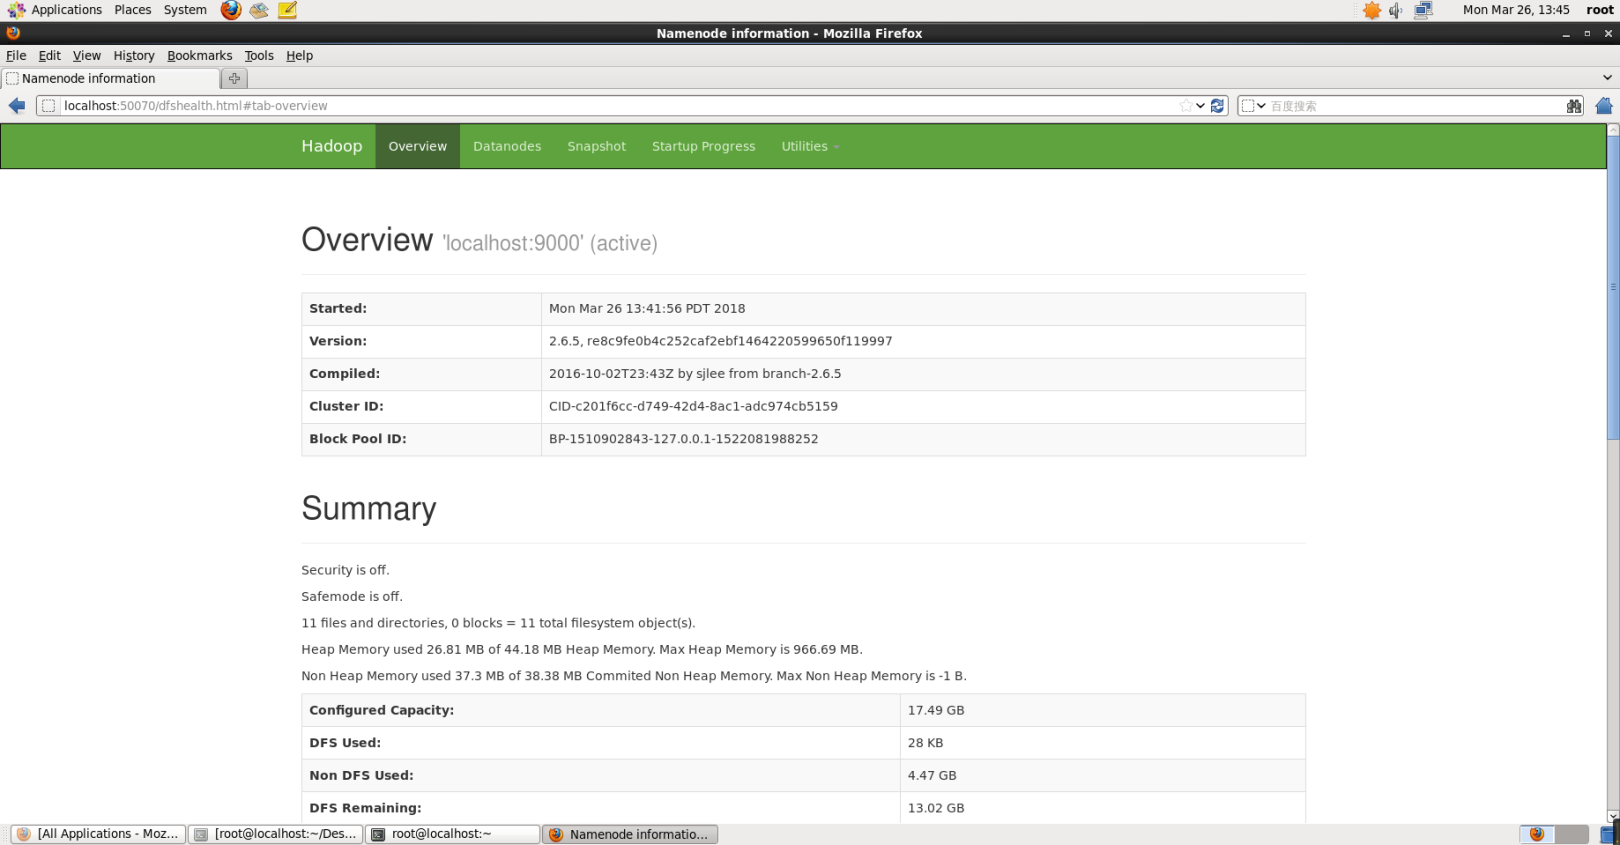
After successful startup, you can also access the web interface http://localhost:50070 to view the NameNode and Datanode information, and you can also view the files in HDFS online.
Hadoop starts the web interface normally.png
Start YARN
YARN is separated from MapReduce and is responsible for resource management and task scheduling. YARN runs on MapReduce and provides high availability and high scalability. (Pseudo-distribution does not start YARN, it will not affect program execution)
Starting Hadoop via the start-dfs.sh command above only starts the MapReduce environment. We can start YARN and let YARN be responsible for resource management and task scheduling.
First modify the configuration file mapred-site.xml, you need to rename the mapred-site.xml.template file to mapred-site.xml.
mv ./etc/hadoop/mapred-site.xml.template ./etc/hadoop/mapred-site.xml  #File rename
gedit ./etc/hadoop/mapred-site.xml                                  #Open with gedit text editor
< configuration><property><name>mapreduce.framework.name</name><value>yarn</value></property></configuration>
Then modify the configuration file yarn-site.xml.
gedit ./etc/hadoop/yarn-site.xml #Open with gedit text editor
< configuration><property><name>yarn.nodemanager.aux-services</name><value>mapreduce_shuffle</value></property></configuration>
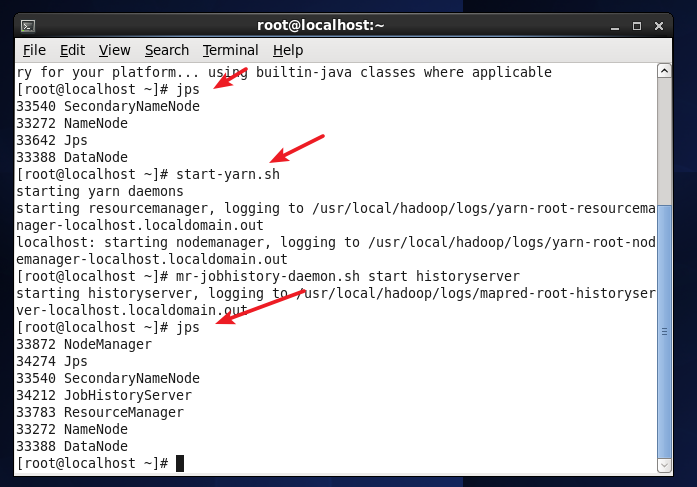
Then you can start YARN, execute the start-yarn.sh command.
Note: Before starting YARN, make sure that dfs Hadoop has been started, that is, start-dfs.sh has been executed.
start-yarn.sh                                #Start YARN
mr-jobhistory-daemon.sh start historyserver  #Enable the history server to view task running status on the Web
After opening it through jps, you can see that there are two more processes, NodeManager and ResourceManager, as shown in the figure below.
Start YARN.png
After starting YARN, the method of running the instance is still the same, except that the resource management method and task scheduling are different. The advantage of starting YARN is that you can check the running status of the task through the web interface: http://localhost:8088/cluster as shown in the figure below.
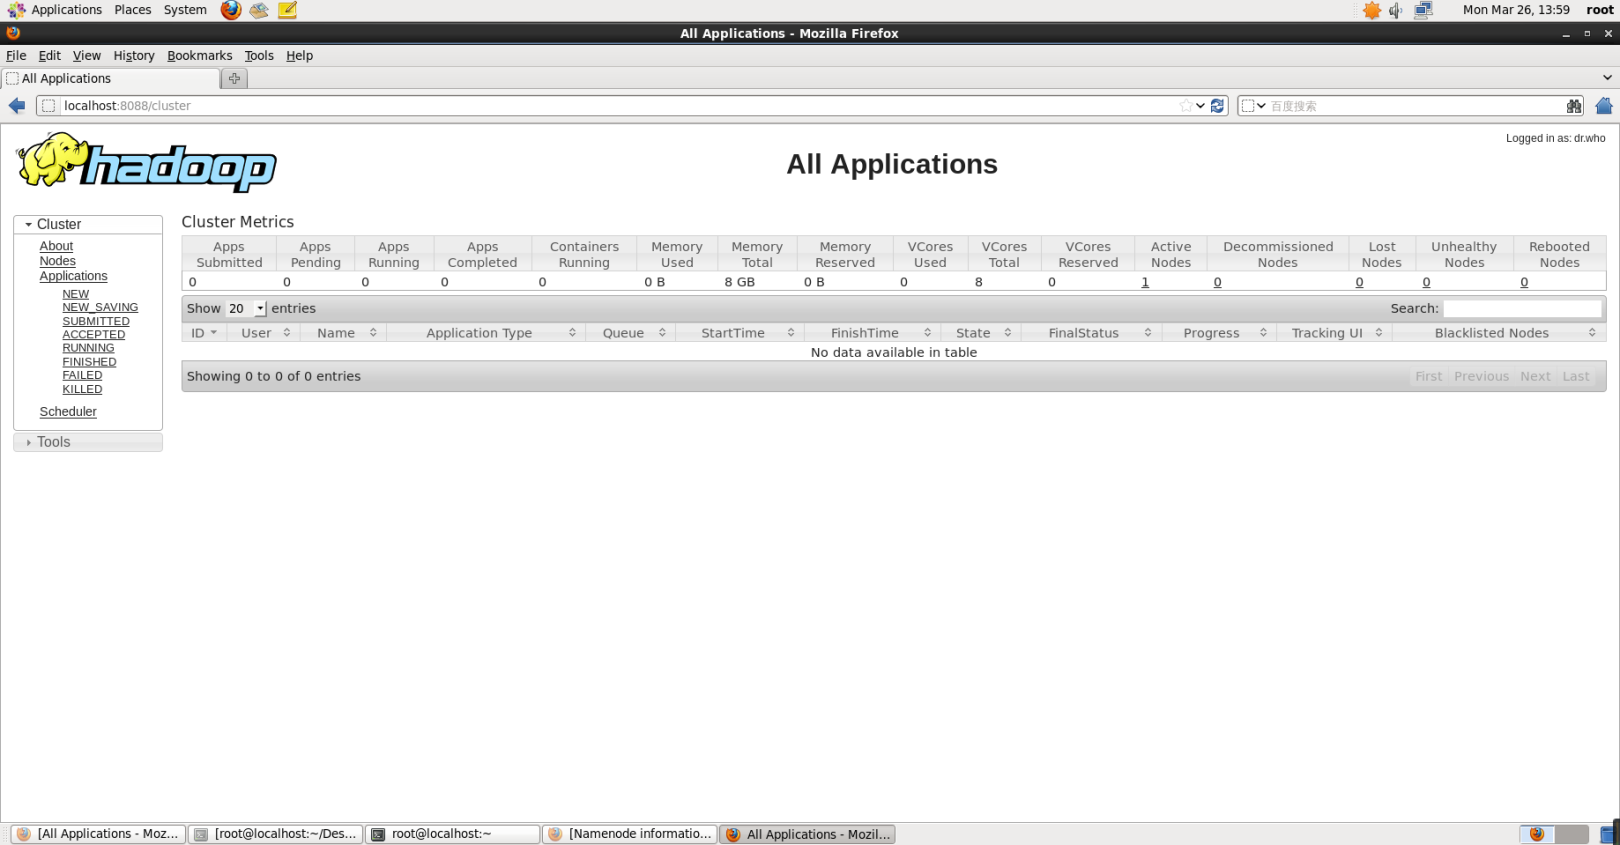
YARN web interface.png
YARN is mainly to provide better resource management and task scheduling for the cluster. If you do not want to start YARN, you must rename the configuration file mapred-site.xml to mapred-site.xml.template, and change it back when you need to use it. That's it. Otherwise, when the configuration file exists and YARN is not turned on, the running program will prompt "Retrying connect to server: 0.0.0.0/0.0.0.0:8032" error, which is why the initial file name of the configuration file is mapred- site.xml.template.
The command to turn off YARN is as follows, turn on is start, and turn off is stop.
stop-yarn.sh
mr-jobhistory-daemon.sh stop historyserver
In ordinary learning, it is sufficient to use pseudo-distribution.
Reference article:
- [ Hadoop installation tutorialpseudo distributed configurationCentOS6.4/Hadoop2.6.0](https://link.jianshu.com/?t=http%3A%2F%2Fdblab.xmu.edu.cn%2Fblog%2Finstall-hadoop -in-centos%2F)
- Big Data Processing Architecture Hadoop Learning Guide
- CentOS7 use yum command to install Java SDK (openjdk)
Recommended Posts