CentOS 7 Tomcat service installation and configuration
1. Java operating environment under Linux#
Java is an object-oriented programming language that can write cross-platform application software. It is a general term for Java programming language and Java platform (ie JavaSE, JavaEE, JavaME) launched by Sun Microsystems in May 1995. Java technology has excellent versatility, efficiency, platform portability and security, and is widely used in personal PCs, data centers, game consoles, scientific supercomputers, mobile phones and the Internet, and has the world’s largest professional developer community . In the global cloud computing and mobile Internet industry environment, Java has significant advantages and broad prospects.
JDK (Java Development Kit) is a product of Sun Microsystems for Java developers. Since the introduction of Java, JDK has become the most widely used Java SDK (software development kit). JDK is the core of the entire Java, including the Java runtime environment, Java tools and Java basic class libraries.
2. JDK supported by CentOS
In CentOS 7, you can either install the open source OpenJDK or Oracle's Java SE (JDK). Usually the open source openjdk provided by the official CentOS 7 warehouse is sufficient for Java applications, but domestic developers usually use Java SE on the Windows platform for development. In order to ensure that the environment on the production server and the developer’s computer are consistent, You can install Oracle's Java SE on Linux.
Three, Tomcat service introduction#
Tomcat server is a free and open source web application server. It is a lightweight application server. It is commonly used in small and medium-sized systems and where there are not many concurrent users. It is the first choice for developing and debugging JSP programs. Because Tomcat has advanced technology, stable performance and free of charge, it is loved by Java enthusiasts and recognized by some software developers, making it a popular Web application server.
Tomcat is not only a Java container, but also has the function of a traditional web server: processing HTML pages, but compared with Apache/Nginx, its ability to handle static HTML is not as good as Apache/Nginx, and Tomcat and Apache/Nginx can usually be integrated Together, let Apache/Nginx handle static HTML, and let Tomcat handle JSP and Java.
The full name of JSP is Java Server Pages, and the Chinese name is java server page. It is basically a simplified Servlet design. It is a dynamic web page technology standard initiated by Sun Microsystems and participated by many companies. JSP technology is somewhat similar to ASP technology. It inserts Java program segments (Scriptlet) and JSP tags (tag) into traditional web page HTML (a subset of standard general-purpose markup language) files (*.htm, .html) to form JSP file, the extension is (.jsp). *
Web applications developed with JSP are cross-platform and can run under Linux or other operating systems.
[ Official website:](http://tomcat.apache.org/)
Although Tomcat can run jsp web pages, it is usually not used as a web server, but as a middleware.
Four, Tomcat service construction and configuration#
If your system has installed the development kit, then the machine already has java
If the development kit is not installed, use the yum source command to install
English system installation:# yum -y groupinstall "Development tools"
Chinese system installation:# yum -y groupinstall "development tools"
1. Verify java version##
[ root@Tomcat ~]# java -version
openjdk version "1.8.0_161"
OpenJDK Runtime Environment(build 1.8.0_161-b14)
OpenJDK 64-Bit Server VM(build 25.161-b14, mixed mode)
2. Install Java and Tomcat
Here we do not use the java that comes with the system, we use the latest java version downloaded. Because jdk is the environment in which the java program runs, it can be used after decompression without modification.
**The first step: **Download, unzip and install jdk
[ root@Tomcat ~]# wget http://download.oracle.com/otn-pub/java/jdk/8u161-b12/2f38c3b165be4555a1fa6e98c45e0808/jdk-8u161-linux-x64.tar.gz
[ root@Tomcat ~]# tar xvf jdk-8u161-linux-x64.tar.gz -C /usr/local/
**Step 2: **Change the decompressed name for easy identification
[ root@Tomcat ~]# mv /usr/local/jdk1.8.0_161//usr/local/java/
**Step 3: **Download, unzip and install tomcat
[ root@Tomcat ~]# wget https://mirrors.tuna.tsinghua.edu.cn/apache/tomcat/tomcat-9/v9.0.5/bin/apache-tomcat-9.0.5.tar.gz
[ root@Tomcat ~]# tar xvf apache-tomcat-9.0.5.tar.gz -C /usr/local/[root@Tomcat ~]# mv /usr/local/apache-tomcat-9.0.5//usr/local/tomcat/
3. Tomcat directory structure description##
[ root@Tomcat ~]# cd /usr/local/tomcat/[root@Tomcat tomcat]# ls
 bin             --Start command directory
 conf           --Configuration file directory *Key points
 lib              --Library file directory
 logs           --Log file directory * Important
 temp         --Temporary cache file
 webapps  --Web application home directory *Key points
 work         --Working cache directory
4. Modify Tomcat environment variables##
Tomcat needs jdk to run. After the above decompression and installation, you also need to configure the jdk directory in tomcat
**There are three ways to modify tomcat environment variables: **** The first one: ** Defined in the global; if multiple JDKs are installed, the global definition will conflict, so it is not recommended
[ root@Tomcat ~]# vim /etc/profile
**The second type: **Write the environment variable file.bash_profile in the user's home directory
**The third type: ** is defined in a single tomcat startup and shutdown program, it is recommended to use this
[ root@Tomcat ~]# vim /usr/local/tomcat/bin/startup.sh                  --tomcat startup program
[ root@Tomcat ~]# vim /usr/local/tomcat/bin/shutdown.sh             --Tomcat shutdown procedure
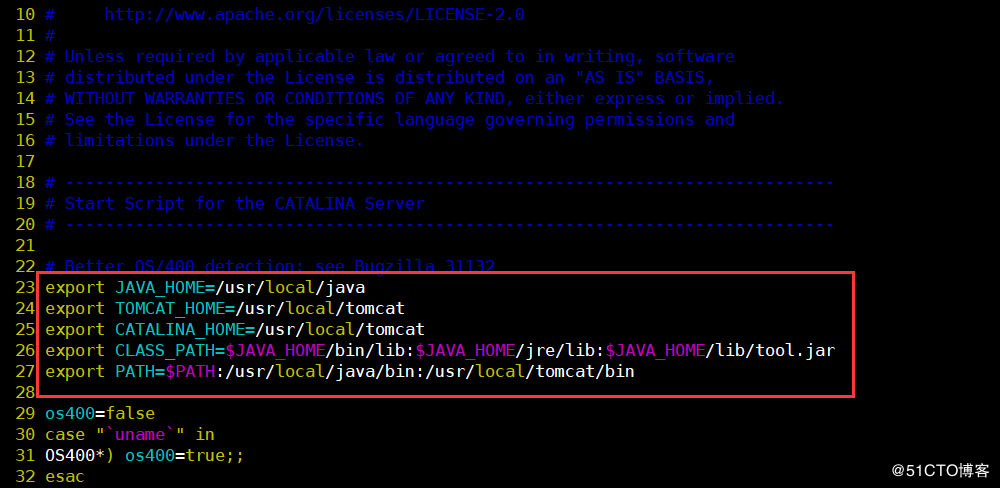
Add the following paragraph to the beginning of the startup.sh and shutdown.sh scripts:
export JAVA_HOME=/usr/local/java
export TOMCAT_HOME=/usr/local/tomcat
export CATALINA_HOME=/usr/local/tomcat
export CLASS_PATH=JAVA_HOME/bin/lib: JAVA_HOME/jre/lib:JAVA_HOME/lib/tool.jar export PATH= PATH:/usr/local/java/bin:/usr/local/tomcat/bin
The classpath is to specify the location of the class (.class) file you use in the program.
path is the full path used by the system to specify the executable file.
5. Start Tomcat
After the previous installation and configuration are completed, the following can be started, and the following section of output will be displayed when starting.
[ root@Tomcat ~]# /usr/local/tomcat/bin/startup.sh
Using CATALINA_BASE:/usr/local/tomcat
Using CATALINA_HOME:/usr/local/tomcat
Using CATALINA_TMPDIR:/usr/local/tomcat/temp
Using JRE_HOME:/usr/local/java
Using CLASSPATH:/usr/local/tomcat/bin/bootstrap.jar:/usr/local/tomcat/bin/tomcat-juli.jar
Tomcat started.
Check the port, tomcat defaults to port 8080
[ root@Tomcat ~]# lsof -i:8080
COMMAND   PID USER   FD   TYPE DEVICE SIZE/OFF NODE NAME
java    31259 root   49u  IPv6 465528      0t0  TCP *:webcache(LISTEN)
Close tomcat method
[ root@Tomcat ~]# /usr/local/tomcat/bin/shutdown.sh
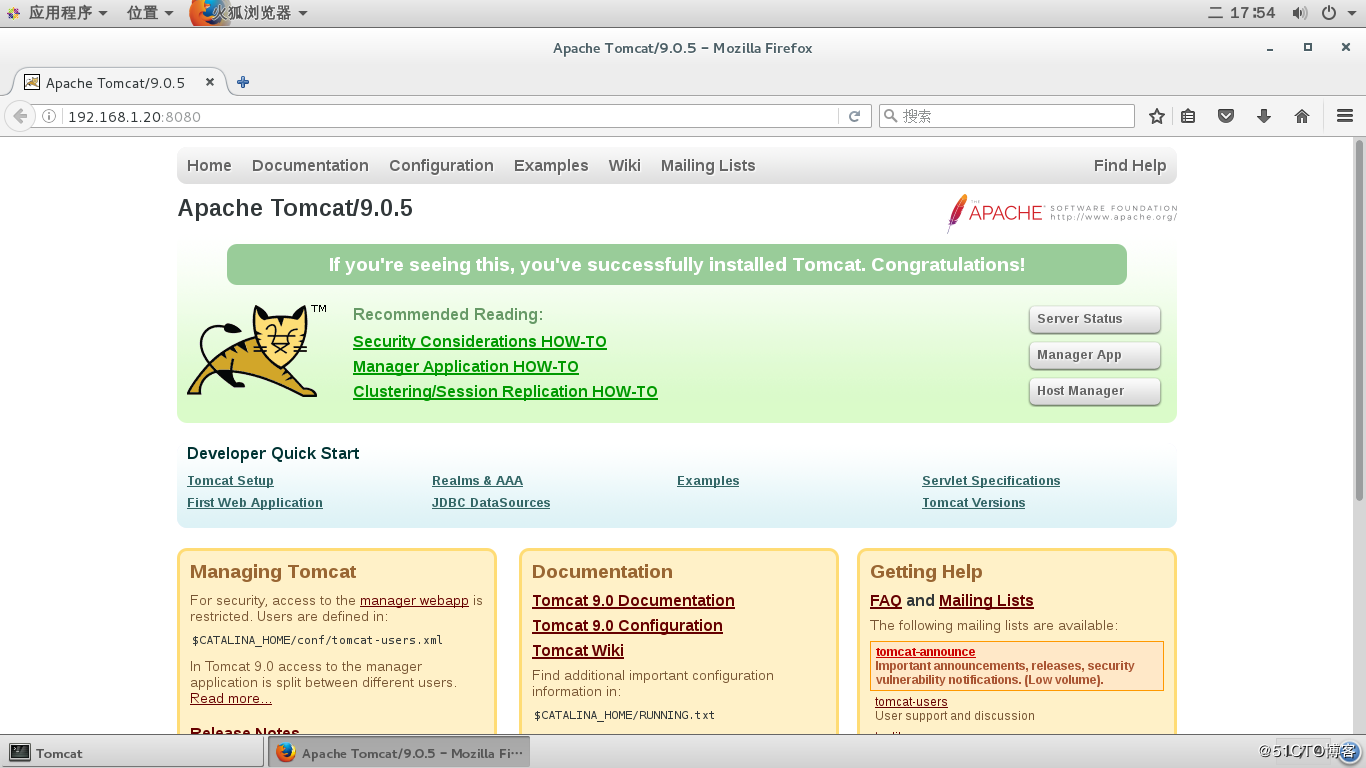
Use a browser to open the test
[ root@Tomcat ~]# firefox http://192.168.1.20:8080/
You can see the following interface
6. Modify Tomcat listening port##
[ root@Tomcat ~]# vim /usr/local/tomcat/conf/server.xml
 69< Connector port="80" protocol="HTTP/1.1"----If 8080 is changed to 80, port 80 will be monitored after restart
 70    connectionTimeout="20000"71                redirectPort="8443"/>
7. Directory deployment##
Tomcat data directory (website home directory)
/usr/local/tomcat/webapps/ROOT/
It is feasible to put the test directory at the same level as ROOT or at the next level of ROOT
[ root@Tomcat ~]# mkdir /usr/local/tomcat/webapps/test         --Directory name can be customized

[ root@Tomcat ~]# vim /usr/local/tomcat/webapps/test/index.jsp   --Customize the page content, such as the following words (do not write Chinese)
welcome to here!
8. Use a browser to open a web page for testing##
[ root@Tomcat ~]# firefox http://192.168.1.20/test/--This is the way to open the browser webpage with the port changed to 80
[ root@Tomcat ~]# firefox http://192.168.1.20:8080/test/--This is the method to open the browser webpage with port 8080

Five, build a Java application system#
1. Environment Introduction##
linux + apache + php + mysql --lamp environment This is the php environment
linux + nginx + php + mysql --lnmp environment This is the php environment
linux + tomcat + jsp + mysql --ljtm environment This is the java environment
2. Package##
jdk-8u161-linux-x64.tar.gz --java package
apache-tomcat-9.0.5.tar.gz --tomcat package
mysql-connector-java-5.1.45.tar.gz - toolkit for tomcat to connect to mysql
jsprun_6.0.0_GBK.zip --application system developed in java language (can be downloaded online)
3. Start deployment##
Step 1: Unzip the application system
Decompression application system:
[ root@Tomcat ~]# unzip jsprun_6.0.0_GBK.zip -d /usr/local/tomcat/webapps/
Change name:
[ root@Tomcat ~]# cd /usr/local/tomcat
[ root@Tomcat tomcat]# mv ./webapps/JspRun\!_6.0.0_GBK/./webapps/jsprun/
Move the application to the previous folder:
[ root@Tomcat tomcat]# cd /usr/local/tomcat/webapps/jsprun/[root@Tomcat jsprun]# mv upload/* ./
Step 2: Download and unzip the toolkit for connecting java to mysql
[ root@Tomcat ~]# wget https://dev.mysql.com/get/Downloads/Connector-J/mysql-connector-java-5.1.45.tar.gz
[ root@Tomcat ~]# tar xvf mysql-connector-java-5.1.45.tar.gz -C /usr/src/
After decompression, copy the connection tool to the application directory of tomcat
[ root@Tomcat ~]# cd /usr/src/mysql-connector-java-5.1.45/[root@Tomcat mysql-connector-java-5.1.45]# cp /usr/src/mysql-connector-java-5.1.45/mysql-connector-java-5.1.45-bin.jar  /usr/local/tomcat/webapps/jsprun/WEB-INF/
Step 3: Install mysql database (Note: Starting from CentOS 7 version, the database that comes with the system is mariadb, and the mysql database has been abandoned)
[ root@Tomcat ~]# yum -y install mariadb*[root@Tomcat ~]# id mysql
uid=27(mysql) gid=27(mysql)group=27(mysql)

If there is no mysql user, create a mysql user manually
[ root@Tomcat ~]# groupadd -g 27 mysql
[ root@Tomcat ~]# useradd -u 27 mysql -g mysql

Start the database
[ root@Tomcat ~]# systemctl restart mariadb

Log in to the database, create the account and library required by the java application
[ root@Tomcat ~]# mysql                  #Log in to the database
MariaDB> create database bbs;      #Create bbs library
MariaDB> show databases    ;          #View all libraries
MariaDB> grant all on bbs.* to 'bbs'@'localhost' identified by '123';      #Authorization

MariaDB> flush privileges;            #Refresh
MariaDB> select user,host,password from mysql.user;    #View users allowed to log in in the user table
Step 5: Modify the java application configuration to connect to the database
[ root@Tomcat ~]# vim /usr/local/tomcat/webapps/jsprun/config.properties
dbhost = localhost    #Modify database address
dbport=3306           #port
dbuser = bbs        #Connect user name
dbpw =123          #password
dbname = bbs        #Library name
pconnect =0          #Persistent connection

tablepre = jrun_
database = mysql
dbcharset =
charset = gbk
headercharset =0
tplrefresh =1      #Style template automatic refresh switch
version=5.1
Step 6: Restart tomcat to take effect
[ root@Tomcat ~]# /usr/local/tomcat/bin/shutdown.sh        --Close omcat
Using CATALINA_BASE:/usr/local/tomcat
Using CATALINA_HOME:/usr/local/tomcat
Using CATALINA_TMPDIR:/usr/local/tomcat/temp
Using JRE_HOME:/usr/local/java
Using CLASSPATH:/usr/local/tomcat/bin/bootstrap.jar:/usr/local/tomcat/bin/tomcat-juli.jar

[ root@Tomcat ~]# /usr/local/tomcat/bin/startup.sh             --Start tomcat
Using CATALINA_BASE:/usr/local/tomcat
Using CATALINA_HOME:/usr/local/tomcat
Using CATALINA_TMPDIR:/usr/local/tomcat/temp
Using JRE_HOME:/usr/local/java
Using CLASSPATH:/usr/local/tomcat/bin/bootstrap.jar:/usr/local/tomcat/bin/tomcat-juli.jar
Tomcat started.
Step 7: Use a browser to open and access installation
[ root@Tomcat ~]# firefox http://192.168.1.20:8080/jsprun/install.jsp --Pay attention to jsprun and install behind here.jsp should output it by itself(If you don’t change the port, add the port)
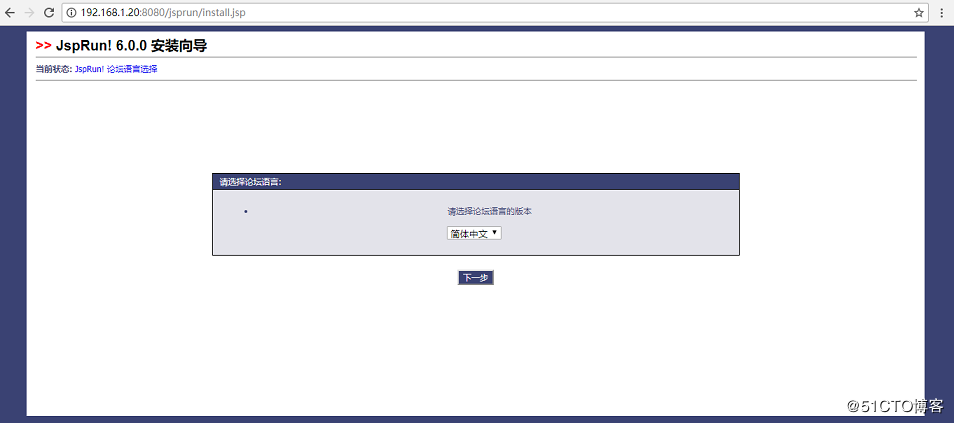
Then follow the graphical instructions to install the next step.
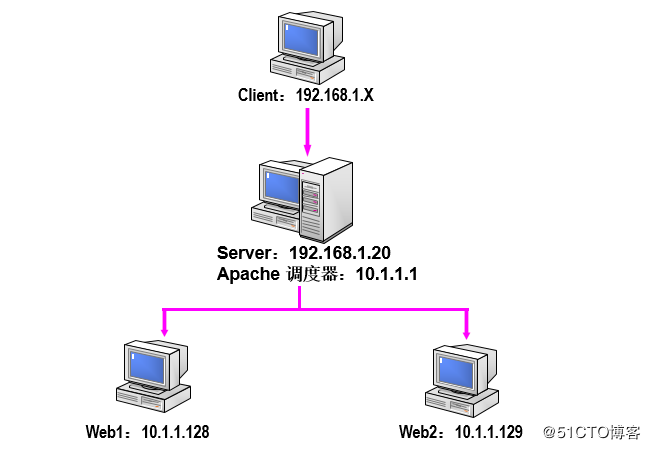
Six, module scheduling example#
1. Use Apache's ajp module call to schedule the next two Apaches
The first step: first configure apache on the scheduling machine
[ root@Apache ~]# yum -y install httpd*[root@Apache ~]# vim /etc/httpd/conf.d/proxy_ajp.conf            #note,There is no such file under centos 7, but proxy is also supported_ajp, so just create a file by yourself
ProxyPass /apache balancer://apache/     #Define the name of a load scheduler, this apache must be added/, Otherwise you can only adjust the home page of the home directory of the website, not other files in the home directory
< Proxy balancer://apache/>
BalancerMember http://10.1.1.128        #Member 128
BalancerMember http://10.1.1.129        #Member 129, if the port of 129 is 8080, then write http://10.1.1.129:8080 is fine
< /Proxy>[root@Apache ~]# systemctl restart httpd.service       --Start Apache
**Extension one: **
ProxyPass /apache balancer://apache/ # proxypass is not followed by /, but /tomcat
< Proxy balancer://apache/>
BalancerMember http://10.1.1.128
BalancerMember http://10.1.1.129:8080
< /Proxy>
This is realized when the client accesses http://192.168.1.200/apache, it will be scheduled. If it accesses http://192.168.1.200, it will still be the website on 192.168.1.200
**Extension 2: **
Achieve access to http://192.168.1.200/apache/Scheduled to 128 and 129:8080
Visit http://192.168.1.200/test/Scheduled to 130 and 131:8081
If you visit http://192.168.1.200, you will still visit 192.168.1.200
ProxyPass /apache balancer://apache/
< Proxy balancer://apache/>
BalancerMember http://10.1.1.128
BalancerMember http://10.1.1.129:8080
< /Proxy>
ProxyPass /abc balancer://test/
< Proxy balancer://test/>
BalancerMember http://10.1.1.130
BalancerMember http://10.1.1.131:8081
Step 2: Install httpd on the two back-end web servers and make a different home page for easy testing
Operation on 128:
[ root@Apache1 ~]# yum -y install httpd*[root@Apache1 ~]# echo 128>/var/www/html/index.html

Operate on 129:
[ root@Apache2 ~]# yum -y install httpd*[root@Apache2 ~]# echo 129>/var/www/html/index.html
Step 3: Visit http://192.168.1.20/apache on the Apache scheduling machine, and you can achieve scheduling
2. Use Apache's ajp module call to schedule the next two Tomcats

Step 1: First configure on the Apache scheduling machine
[ root@Apache ~]# yum -y install httpd*[root@Apache ~]# vim /etc/httpd/conf.d/proxy_ajp.conf
ProxyPass /tomcat balancer://tomcat/                 #Define a schedule, just write
< Proxy balancer://tomcat/>
BalancerMember ajp://10.1.1.128:8009/ route=tomcat1       #Define message routing, name custom BalancerMember ajp://10.1.1.129:8009/ route=tomcat2
< /Proxy>[root@Apache ~]# systemctl restart httpd.service       --Start Apache
Step 2: Add message routing to the scheduled machine Tomcat respectively
To operate on Tomcat1 on 128:
[ root@Tomcat1 ~]# vim /usr/local/tomcat/conf/server.xml
128< Engine name="Catalina"defaultHost="localhost" jvmRoute="tomcat1">
# Add jvmRoute after the sentence of 128 tomcat="tomcat1", The name and the corresponding on the dispatcher
[ root@Tomcat1 ~]# /usr/local/tomcat/bin/shutdown.sh
[ root@Tomcat1 ~]# /usr/local/tomcat/bin/startup.sh

Operate on Tomcat2 on 129:
[ root@Tomcat2 ~]# vim /usr/local/tomcat/conf/server.xml
128< Engine name="Catalina"defaultHost="localhost" jvmRoute="tomcat2">
# Add jvmRoute after the sentence of 128 tomcat="tomcat2", The name and the corresponding on the dispatcher
[ root@Tomcat2 ~]# /usr/local/tomcat/bin/shutdown.sh
[ root@Tomcat2 ~]# /usr/local/tomcat/bin/startup.sh
Step 3: Visit http://192.168.1.20/tomcat on the Apache scheduling machine, and you can achieve scheduling
(1) It supports health check. When one device is down, it will not be scheduled. When it is OK, you need to reload apache to schedule both of them again.
(2) Whether tomcat1 and tomcat2 monitor ports is 80 or 8080, it can be transferred from 8009.
(3) Make two different marks in the index.jsp homepage of the two tomcats:
To operate on Tomcat1 on 128:
[ root@Tomcat1 ~]# echo 128>>/usr/local/tomcat/webapps/ROOT/index.jsp

Operate on Tomcat2 on 129:
[ root@Tomcat2 ~]# echo 129>>/usr/local/tomcat/webapps/ROOT/index.jsp
Finally, visit http://192.168.1.20/tomcat on the Apache scheduling machine, you can achieve scheduling and see the effect.
3. mod_jk combined with Apache+Tomcat to achieve load balancing, dynamic and static separation##
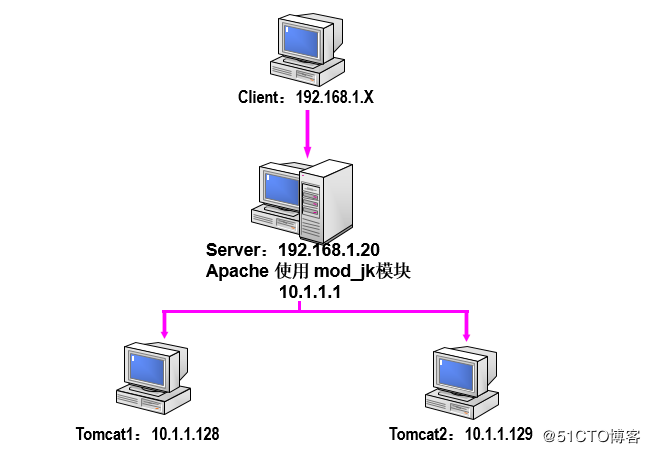
After the installation of the two Tomcat1 and Tomcat2, load balancing is implemented. Mod_jk can be used to realize the node's failure recovery function, that is, if a node has a problem, mod_jk will not participate in the load. After the node failure is restored, mod_jk will let it participate in the load , Whether this node fails is transparent to the user.
**Implementation process: **
- (1) After the user access data reaches Apache, if it is static content, Apache will respond immediately;
- (2) If Apache finds that the user is requesting dynamic content such as jsp, it will throw the request to one of the tomcats for processing.
- (3) Every time the user visits repeatedly, they are assigned to the same machine (session stickiness or session replication can be done)
The main responsibility for load balancing is done by a configuration file! That is workers.propertise. Define each Tomcat host by defining the values of worker.list, port, host, type, and lbfactor; use lbfactor to distinguish the weight of each machine. The larger the weight, the more user requests will be obtained. So, just focus on the content of this file.
Step 1: Prepare to write /etc/hosts records before experiment
[ root@Apache ~]# echo "10.1.1.1 Apache.com">>/etc/hosts
[ root@Apache ~]# echo "10.1.1.128 Tomcat1.com">>/etc/hosts
[ root@Apache ~]# echo "10.1.1.129 Tomcat2.com">>/etc/hosts
[ root@Apache ~]# scp /etc/hosts 10.1.1.128:/etc/hosts    --Remote copy/etc/hosts file to 128 machine
[ root@Apache ~]# scp /etc/hosts 10.1.1.129:/etc/hosts    --Remote copy/etc/hosts file to 129 machine
Time synchronization: see CentOS 7.3 Xinetd service installation and configuration (http://blog.51cto.com/13525470/2060765)
Close iptables, selinux
Step 2: Install Tomcat on Tomcat1 and Tomcat2
See the above section for details
**Step 3: Install Apache on the Apache scheduling machine, the following is the source code version **
If you have compiled Apache before, first use the following two commands to delete the source code and installation path
[ root@Apache ~]# rm -rf /usr/src/httpd-2.4.28/[root@Apache ~]# rm -rf /usr/local/apache2/[root@Apache ~]# tar xf httpd-2.4.28.tar.bz2 -C /usr/src    --Unzip, compile and install
[ root@Apache ~]# cd /usr/src/httpd-2.4.28/[root@Apache ~]# ./configure --prefix=/usr/local/apache2 --enable-so --enable-rewrite --enable-modules=all --enable-mods-shared=all --with-mpm=prefork
[ root@Apache ~]# make && make install
The above compilation parameters can be omitted--enable-proxy,--enable-proxy-ajp,--enable-proxy-balancer. Because we are using mod here_jk.
Step 4: Compile mod_jk module on Apache scheduling machine
[ root@Apache ~]# wget http://mirror.bit.edu.cn/apache/tomcat/tomcat-connectors/jk/tomcat-connectors-1.2.42-src.tar.gz
http://tomcat.apache.org/download-connectors.cgi    --The package above (mod_jk) download address
[ root@Apache ~]# tar xf tomcat-connectors-1.2.42-src.tar.gz -C /usr/src/[root@Apache ~]# cd /usr/src/tomcat-connectors-1.2.42-src/[root@Apache ~]# ls --There are configuration templates in conf, and mod can be compiled with Apache's apxs command in the native directory_jk module
conf  HOWTO-RELEASE.txt  LICENSE  NOTICE      support  xdocs
docs  jkstatus           native   README.txt  tools
[ root@Apache ~]# cd native/[root@Apache ~]# ./configure --with-apxs=/usr/local/apache2/bin/apxs    --Code of source version
[ root@Apache ~]# make && make install
[ root@Apache ~]# ls /usr/local/apache2/modules/mod_jk.so       --Generate mod after compilation_jk module
Step 5: Configure the main Apache configuration file to use the sub-configuration file of mod_jk
[ root@Apache ~]# vim /usr/local/apache2/conf/httpd.conf
Include conf/extra/httpd-jk.conf          #Add this sentence to the main configuration file
Step 6: Copy the configuration file template to be used
- - Copy mod_Jk configuration file template to the corresponding apache configuration directory
[ root@Apache ~]# cp /usr/src/tomcat-connectors-1.2.42-src/conf/httpd-jk.conf /usr/local/apache2/conf/extra/--Copy the configuration file template that defines the schedule
[ root@Apache ~]# cp /usr/src/tomcat-connectors-1.2.42-src/conf/workers.properties /usr/local/apache2/conf/extra/--Copy the configuration file template that defines dynamic and static separation
[ root@Apache ~]# cp /usr/src/tomcat-connectors-1.2.42-src/conf/uriworkermap.properties /usr/local/apache2/conf/extra/
Step 7: Configure these three configuration files
[ root@Apache ~]# vim /usr/local/apache2/conf/extra/httpd-jk.conf
28 JkWorkersFile conf/extra/workers.properties        #Because i copied to conf/extra, so change it to the corresponding path here
99 JkMountFile conf/extra/uriworkermap.properties                     #Open comment
115 SetEnvIf REQUEST_URI"\.(htm|html|css|gif|jpg|js)$"no-jk      #Open comment

< Location /jk-status>
JkMountjk-status
Orderdeny,allow
Deny from all
Allowfrom 127.0.0.1192.168.1.20          #Plus allow 192.168.1.20 View jk-status
< /Location><Location /jk-manager>
JkMount jk-manager
Order deny,allow
Deny from all
Allowfrom 127.0.0.1192.168.1.20         #Plus allow 192.168.1.20 View jk-manager
< /Location>[root@Apache ~]# vim /usr/local/apache2/conf/extra/workers.properties
worker.list=balancer
worker.balancer.type=lb
worker.balancer.balance_workers=node1  #The specified jvmroute to be scheduled later
worker.node1.reference=worker.template
worker.node1.host=10.1.1.128            #IP of the tomcat scheduled later
worker.node1.port=8009                       #Change to 8009
worker.node1.activation=A

worker.balancer.balance_workers=node2
worker.node2.reference=worker.template
worker.node2.host=10.1.1.129       #Another IP
worker.node2.port=8009                   #Change to 8009
worker.node2.activation=A
worker.template.type=ajp13

[ root@Apache ~]# vim /usr/local/apache2/conf/extra/uriworkermap.properties
/admin/*=balancer           #All files in these directories are handed over to the balancer for scheduling
/manager/*=balancer
/jsp-examples/*=balancer
/servlets-examples/*=balancer
/examples/*=balancer
/*.jsp=balancer             #Represents the apache home directory*.jsp gives the balancer to schedule two tomcats in the background
Step 8: Deploy website content
For a website, the same content must be deployed in the home directories of Apache and back-end Tomcat, and shared storage can be used in actual situations.
I will copy the contents of Tomcat here
It should be noted that the corresponding directory
The home directory of my compiled version of Apache is the default /usr/local/apache2/htdocs/
So I now operate on Tomcat1:
Copy all files in the following directories to the home directory of Apache
[ root@Tomcat1 ~]# scp -r /usr/local/tomcat/webapps/ROOT/* 10.1.1.1:/usr/local/apache2/htdocs/
Step 9: Configure jvmroute for two Tomcats
Operate on Tomcat1
[ root@Tomcat1 ~]# vim /usr/local/tomcat/conf/server.xml
< Engine name="Catalina"defaultHost="localhost"jvmRoute="node1">

Operation on Tomcat2:
[ root@Tomcat2 ~]# vim /usr/local/tomcat/conf/server.xml
< Engine name="Catalina"defaultHost="localhost"jvmRoute="node2">
Step 10: Start the service
Operate on Apache on 1:
[ root@Apache ~]# /usr/local/apache2/bin/apachectl restart

To operate on Tomcat1 on 128:
[ root@Tomcat1 ~]# /usr/local/tomcat/bin/shutdown.sh
[ root@Tomcat1 ~]# /usr/local/tomcat/bin/startup.sh

Operate on Tomcat2 on 129:
[ root@Tomcat2 ~]# /usr/local/tomcat/bin/shutdown.sh
[ root@Tomcat2 ~]# /usr/local/tomcat/bin/startup.sh
Step 11: Test
- Firefox on the client can directly access Apache http://192.168.1.20
I got the Tomcat homepage because I copied it.
Go to Apache and change the content in /usr/local/apache2/htdocs/index.html
Go to Tomcat1 and Tomcat2 and change the content in /usr/local/tomcat/webapps/ROOT/index.jsp to different
Visit http://192.168.1.20 again to see the modified content
Visit http://192.168.1.20/index.jsp again to visit two tomcats that will be scheduled to the background - Access http://192.168.1.20/jk-status
- Access http://192.168.1.20/jk-manager
- Install jsprun on Tomcat
Step omitted
At last
[ root@Tomcat1 ~]# scp -r /usr/local/tomcat/webapps/jsprun/ apache.com:/usr/local/apache2/htdocs/
Visit again
http://10.1.1.1/jsprun
You will see that all the files are displayed in a list, because the default home page accessed by Apache is index.html. So http://10.1.1.1/jsprun/index.jsp access, you can access OK.
Recommended Posts